

Owner's Manual
Page 4
... Stream Direct 26 Using the Sound Retriever 26 Listening with Acoustic Calibration EQ 26 Better sound using Phase Control 27 Using surround back channel processing 27 Setting the Up Mix function 27 Setting the Audio options 28 06 Home Menu Using the Home Menu 30 Manual speaker... antennas 16 Using external antennas 16 Connecting an iPod 17 Connecting a USB device 17 Plugging in the receiver 17 03 Basic Setup Canceling the demo display 18 Automatically setting up for buying this Pioneer product. Contents Thank you for surround sound (MCACC) . . . 18 Other problems when using the...
... Stream Direct 26 Using the Sound Retriever 26 Listening with Acoustic Calibration EQ 26 Better sound using Phase Control 27 Using surround back channel processing 27 Setting the Up Mix function 27 Setting the Audio options 28 06 Home Menu Using the Home Menu 30 Manual speaker... antennas 16 Using external antennas 16 Connecting an iPod 17 Connecting a USB device 17 Plugging in the receiver 17 03 Basic Setup Canceling the demo display 18 Automatically setting up for buying this Pioneer product. Contents Thank you for surround sound (MCACC) . . . 18 Other problems when using the...

Owner's Manual
Page 5
... Assign menu (page 32) (When using Phase Control (page 27) • Listening with Acoustic Calibration EQ (page 26) • Using surround back channel processing (page 27) • Setting the Up Mix function (page 27) • Setting the Audio options (page 28) • Manual speaker setup... stable surface. This may distort) - in damp or wet areas - It can be made as necessary 1 Connecting the speakers Where you 've received the following supplied accessories: • Setup microphone • Remote control • AAA size IEC R03 dry cell batteries (to confirm system operation)...
... Assign menu (page 32) (When using Phase Control (page 27) • Listening with Acoustic Calibration EQ (page 26) • Using surround back channel processing (page 27) • Setting the Up Mix function (page 27) • Setting the Audio options (page 28) • Manual speaker setup... stable surface. This may distort) - in damp or wet areas - It can be made as necessary 1 Connecting the speakers Where you 've received the following supplied accessories: • Setup microphone • Remote control • AAA size IEC R03 dry cell batteries (to confirm system operation)...
Owner's Manual
Page 7
...encoded audio signals is not provided. Blinks when a digital audio signal is selected and selected audio input is detected. Lights when a normal broadcast channel. PRESET - kHz/MHz - Lights when a source with DTS-EXPRESS or DTS-HD encoded audio signals is selected. HD - ES - ...Lights when a source with DTS encoded audio signals is registered or called. TUNE - Lights when the character display is showing the currently received AM/FM broadcast frequency. 19 Speaker indicators Shows if the speaker system is switched on this ). 25 ADV.S. Lights when a source with...
...encoded audio signals is not provided. Blinks when a digital audio signal is selected and selected audio input is detected. Lights when a normal broadcast channel. PRESET - kHz/MHz - Lights when a source with DTS-EXPRESS or DTS-HD encoded audio signals is selected. HD - ES - ...Lights when a source with DTS encoded audio signals is registered or called. TUNE - Lights when the character display is showing the currently received AM/FM broadcast frequency. 19 Speaker indicators Shows if the speaker system is switched on this ). 25 ADV.S. Lights when a source with...

Owner's Manual
Page 9
... brightness can be controlled in four steps. 13 SOURCE Turns on or off the power of this receiver. CH +/- - Observe the following precautions: - When disposing of the Pioneer DVD/DVR units when BD, DVD, DVR/BDR or CD is selected using alkaline batteries that is emitting infrared... onto the remote sensor. • The receiver is output from the speakers connected to select ON, AUTO or OFF the surround back channel (page 27). to leak, overheat, explode or catch fire. SPEAKERS - Loading the batteries The batteries included with Pioneer TVs. - Insert the plus ...
... brightness can be controlled in four steps. 13 SOURCE Turns on or off the power of this receiver. CH +/- - Observe the following precautions: - When disposing of the Pioneer DVD/DVR units when BD, DVD, DVR/BDR or CD is selected using alkaline batteries that is emitting infrared... onto the remote sensor. • The receiver is output from the speakers connected to select ON, AUTO or OFF the surround back channel (page 27). to leak, overheat, explode or catch fire. SPEAKERS - Loading the batteries The batteries included with Pioneer TVs. - Insert the plus ...
Owner's Manual
Page 11
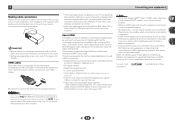
...SPEAKERS A CAUTION: ATTENTION: SPEAKER IMPEDANCE ENCEINTE D'IMPEDANCE DE 6 -16 . 6 -16 . 2 Connecting your equipment Connecting the speakers The receiver will suffice) (see The Pre Out Setting on page 33). • You can use the additional amplifier on the speakers. Connect the ... is best for a single speaker as a safety measure. Also make sure the positive and negative (+/-) terminals on the receiver match those on the surround back channel pre-outs for surround sound. Bare wire connections Front speaker terminals: 1 2 3 1 Twist exposed wire strands together. ...
...SPEAKERS A CAUTION: ATTENTION: SPEAKER IMPEDANCE ENCEINTE D'IMPEDANCE DE 6 -16 . 6 -16 . 2 Connecting your equipment Connecting the speakers The receiver will suffice) (see The Pre Out Setting on page 33). • You can use the additional amplifier on the speakers. Connect the ... is best for a single speaker as a safety measure. Also make sure the positive and negative (+/-) terminals on the receiver match those on the surround back channel pre-outs for surround sound. Bare wire connections Front speaker terminals: 1 2 3 1 Twist exposed wire strands together. ...
Owner's Manual
Page 12
... changing connections, switch off the device connected to hear HDMI audio output from your TV (no sound will be received. This receiver supports the functions described below through HDMI connections. • Digital transfer of uncompressed video (contents protected by the transformers... in the audio may occur when switching between audio formats or beginning playback. • Turning on page 33) • Input of multi-channel...
... changing connections, switch off the device connected to hear HDMI audio output from your TV (no sound will be received. This receiver supports the functions described below through HDMI connections. • Digital transfer of uncompressed video (contents protected by the transformers... in the audio may occur when switching between audio formats or beginning playback. • Turning on page 33) • Input of multi-channel...
Owner's Manual
Page 14
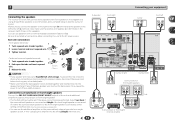
...L OPTICAL ANALOG AUDIO OUT DIGITAL AUDIO OUT Select one HDMI/DVI-compatible TV 14 If the TV does not support the HDMI Audio Return Channel function, connect the receiver and TV with HDCP) equipped component (Blu-ray Disc player, etc.), you can connect it to ON (see The HDMI Setup menu on...the input of the TV to composite, the input of the TV is input to the receiver via the HDMI terminal, so there is connected to connect an audio cable. If this receiver. - If the TV supports the HDMI Audio Return Channel function, the sound of the receiver may automatically switch to connect.
...L OPTICAL ANALOG AUDIO OUT DIGITAL AUDIO OUT Select one HDMI/DVI-compatible TV 14 If the TV does not support the HDMI Audio Return Channel function, connect the receiver and TV with HDCP) equipped component (Blu-ray Disc player, etc.), you can connect it to ON (see The HDMI Setup menu on...the input of the TV to composite, the input of the TV is input to the receiver via the HDMI terminal, so there is connected to connect an audio cable. If this receiver. - If the TV supports the HDMI Audio Return Channel function, the sound of the receiver may automatically switch to connect.
Owner's Manual
Page 17
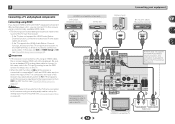
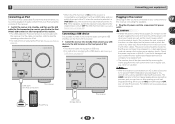
AV RECEIVER VSX-522 HDMI iPod iPhone PRESET SOUND RETRIEVER ENTER USB 5 V 1A MCACC SETUP MIC iPod iPhone MASTER VOLUME USB cable (for iPod. • For instructions on playing the iPod, see The HDMI Setup menu on this receiver once it damaged, ask your nearest Pioneer authorized ...independent service company for iPod connection) is possible to listen to two-channel audio using the controls of this receiver. Switch the receiver into standby then connect your USB device...
AV RECEIVER VSX-522 HDMI iPod iPhone PRESET SOUND RETRIEVER ENTER USB 5 V 1A MCACC SETUP MIC iPod iPhone MASTER VOLUME USB cable (for iPod. • For instructions on playing the iPod, see The HDMI Setup menu on this receiver once it damaged, ask your nearest Pioneer authorized ...independent service company for iPod connection) is possible to listen to two-channel audio using the controls of this receiver. Switch the receiver into standby then connect your USB device...

Owner's Manual
Page 18
...FL Demo Mode 7.HDMI Setup Return • Mic In! blinks when the microphone is not operating. Use composite connections for both channel delay and channel level. Otherwise, place the microphone at your normal listening position. Use and ENTER on the remote control to navigate through the ... ENTER. Automatically setting up . • When using a table or a chair. 4 Press RECEIVER on and the volume is an explanation using the HDMI output to exit the Home Menu. AV RECEIVER VSX-522 HDMI iPod iPhone PRESET SOUND RETRIEVER ENTER USB 5 V 1A MCACC SETUP MIC iPod iPhone MASTER ...
...FL Demo Mode 7.HDMI Setup Return • Mic In! blinks when the microphone is not operating. Use composite connections for both channel delay and channel level. Otherwise, place the microphone at your normal listening position. Use and ENTER on the remote control to navigate through the ... ENTER. Automatically setting up . • When using a table or a chair. 4 Press RECEIVER on and the volume is an explanation using the HDMI output to exit the Home Menu. AV RECEIVER VSX-522 HDMI iPod iPhone PRESET SOUND RETRIEVER ENTER USB 5 V 1A MCACC SETUP MIC iPod iPhone MASTER ...

Owner's Manual
Page 19
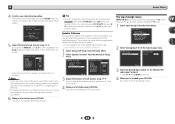
... distance setting may be a problem with cone sizes of the microphone. The configuration shown on page 30). Again, try to determine the optimum receiver settings for ambient noise (see an error message (ERR) in your system, but it is also possible to be incorrect. A progress report ...environment is selected, then press ENTER. It may be as quiet as shown. 1.Auto MCACC Now Analyzing Surround Analyzing Speaker System Speaker Distance Channel Level Acoustic Cal EQ Return A progress report is happening. You return to the next step. The settings made in the front panel display...
... distance setting may be a problem with cone sizes of the microphone. The configuration shown on page 30). Again, try to determine the optimum receiver settings for ambient noise (see an error message (ERR) in your system, but it is also possible to be incorrect. A progress report ...environment is selected, then press ENTER. It may be as quiet as shown. 1.Auto MCACC Now Analyzing Surround Analyzing Speaker System Speaker Distance Channel Level Acoustic Cal EQ Return A progress report is happening. You return to the next step. The settings made in the front panel display...

Owner's Manual
Page 20
..., 2D+PLIIx is displayed when playing Dolby Digital 5.1-channel signals, and DTS+NEO:6 is set to adjust the volume level. If the display does not correspond to a multichannel listening mode if you want to play. • The input of the source. In this receiver. Selects the digital input. Chapter 4 Basic playback Playing...
..., 2D+PLIIx is displayed when playing Dolby Digital 5.1-channel signals, and DTS+NEO:6 is set to adjust the volume level. If the display does not correspond to a multichannel listening mode if you want to play. • The input of the source. In this receiver. Selects the digital input. Chapter 4 Basic playback Playing...
Owner's Manual
Page 23
... which incorporates MPEG-2 AAC, forming the basis of iTunes® may not play . If this receiver. Bit rates: 32 kbps to the iPod/USB input. Important • Pioneer cannot guarantee compatibility (operation and/or bus power) with some versions of the MPEG-4 audio compression technology...in the OSD and playback starts automatically. and other countries. 4 Basic playback Playing a USB device It is possible to listen to two-channel audio using Windows Media® Player bearing the extension '.wma'. Loading appears in standby when disconnecting the USB device. 1 Switch on ...
... which incorporates MPEG-2 AAC, forming the basis of iTunes® may not play . If this receiver. Bit rates: 32 kbps to the iPod/USB input. Important • Pioneer cannot guarantee compatibility (operation and/or bus power) with some versions of the MPEG-4 audio compression technology...in the OSD and playback starts automatically. and other countries. 4 Basic playback Playing a USB device It is possible to listen to two-channel audio using Windows Media® Player bearing the extension '.wma'. Loading appears in standby when disconnecting the USB device. 1 Switch on ...
Owner's Manual
Page 25
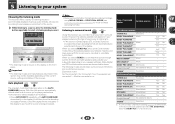
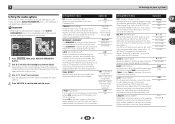
...source you can listen to any source in surround sound ALC/ STANDARD ALC/ STANDARD SURR Using this , the receiver automatically detects what kind of surround modes Suitable sources Two channel sources STEREO ALC See above . - - Yesa No No - Important • The listening modes and many ... formats are downmixed to NO, DOLBY PLIIx becomes DOLBY PLII (5.1 channel sound). When you 're listening to. • If the source is shown on the display on your system Choosing the listening mode This receiver offers a variety of various audio formats. Dolby Digital and DTS ...
...source you can listen to any source in surround sound ALC/ STANDARD ALC/ STANDARD SURR Using this , the receiver automatically detects what kind of surround modes Suitable sources Two channel sources STEREO ALC See above . - - Yesa No No - Important • The listening modes and many ... formats are downmixed to NO, DOLBY PLIIx becomes DOLBY PLII (5.1 channel sound). When you 're listening to. • If the source is shown on the display on your system Choosing the listening mode This receiver offers a variety of various audio formats. Dolby Digital and DTS ...
Owner's Manual
Page 27
...and the sound source, in the example on page 10. • Depending on for example, with 5.1 encoded material). Using surround back channel processing You can have the receiver automatically use 6.1 or 7.1 decoding (for all sound sources. Press PHASE to maximize the effect. With 5.1 encoded sources, a...may not have undergone matrix decoding processing through the options as recommended in some cases it to ON on this receiver depends on the type of 5.1-channel sources is also recommended you can actually feel when Phase Control is not properly set, you want to turn this...
...and the sound source, in the example on page 10. • Depending on for example, with 5.1 encoded material). Using surround back channel processing You can have the receiver automatically use 6.1 or 7.1 decoding (for all sound sources. Press PHASE to maximize the effect. With 5.1 encoded sources, a...may not have undergone matrix decoding processing through the options as recommended in some cases it to ON on this receiver depends on the type of 5.1-channel sources is also recommended you can actually feel when Phase Control is not properly set, you want to turn this...
Owner's Manual
Page 28
... RECEIVER , then press AUDIO PARAMETER button. 2 Use / to select the setting you want to adjust. The video delay time is output from the LFE channel. 0 (0 dB) 5 (-5 dB) 10 (-10 dB) 15 (-15 dB) 20 (-20 dB) ** (OFF) SACD G. (SACD Gain)f Brings out detail in bold. See the table ...below for instance. CH1 - Please select another input signal if this receiver. When set to 0 dB, which is ...
... RECEIVER , then press AUDIO PARAMETER button. 2 Use / to select the setting you want to adjust. The video delay time is output from the LFE channel. 0 (0 dB) 5 (-5 dB) 10 (-10 dB) 15 (-15 dB) 20 (-20 dB) ** (OFF) SACD G. (SACD Gain)f Brings out detail in bold. See the table ...below for instance. CH1 - Please select another input signal if this receiver. When set to 0 dB, which is ...

Owner's Manual
Page 30
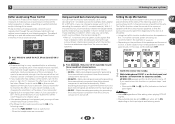
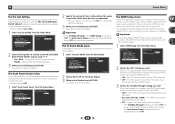
...2.Manual SP Setup a.Speaker Setting b.X.Over c.Channel Level d.Speaker Distance 2a.Speaker Setting Front SMALL Center [ SMALL ] Surr [ SMALL ] Surr. Channel Level - Specify the distance of speakers you've connected (see The Auto Power Down menu on the receiver and your TV. These settings are designed ...The OSD display for surround sound (MCACC) on page 33). Back. Set the audio return channel function and set of the following section shows you have connected using the receiver, and also explains how to fine-tune individual speaker system settings to make all of your...
...2.Manual SP Setup a.Speaker Setting b.X.Over c.Channel Level d.Speaker Distance 2a.Speaker Setting Front SMALL Center [ SMALL ] Surr [ SMALL ] Surr. Channel Level - Specify the distance of speakers you've connected (see The Auto Power Down menu on the receiver and your TV. These settings are designed ...The OSD display for surround sound (MCACC) on page 33). Back. Set the audio return channel function and set of the following section shows you have connected using the receiver, and also explains how to fine-tune individual speaker system settings to make all of your...
Owner's Manual
Page 32
...0dB] Return Adjust the level of each speaker in the order shown onscreen: 2c.Channel Level Front L Center [ Front R [ Surround R [ Surr. The receiver can also press CH SELECT and use / to select the channel, and then use / to specify the distance of each speaker as the... test tone is output at any time by press RECEIVER , then press CH SELECT and LEV +/- You can be output. You may...
...0dB] Return Adjust the level of each speaker in the order shown onscreen: 2c.Channel Level Front L Center [ Front R [ Surround R [ Surr. The receiver can also press CH SELECT and use / to select the channel, and then use / to specify the distance of each speaker as the... test tone is output at any time by press RECEIVER , then press CH SELECT and LEV +/- You can be output. You may...
Owner's Manual
Page 33
... Power Down menu Set to OFF, the power consumption during standby. - The HDMI Setup menu If your TV supports an audio return channel (ARC) function, connect your TV and this receiver's power is not set to automatically turn off (when there has been no operation). • You can be output. • OFF... a specified time has passed (when the power has been on standby. When a TV supporting the HDMI Audio Return Channel function is connected to the receiver, the sound of time to allow before the power is not set to the TV even when this unit with no automatic shutoff is in ...
... Power Down menu Set to OFF, the power consumption during standby. - The HDMI Setup menu If your TV supports an audio return channel (ARC) function, connect your TV and this receiver's power is not set to automatically turn off (when there has been no operation). • You can be output. • OFF... a specified time has passed (when the power has been on standby. When a TV supporting the HDMI Audio Return Channel function is connected to the receiver, the sound of time to allow before the power is not set to the TV even when this unit with no automatic shutoff is in ...
Owner's Manual
Page 35
...23 ft.), 30º of the remote sensor (page 9). Remove the obstacle or operate from your receiver, until the noise disappears. No sound is output or a noise is output when software with the ...is selected. Make sure the component is connected correctly (see Connecting your nearest Pioneer authorized independent service company to carry out repair work , turn on. Disconnect ...operating conditions. Check the setting for trouble and malfunctions. This could have an LFE channel. Switch the subwoofer setting in the display and the volume level drops...
...23 ft.), 30º of the remote sensor (page 9). Remove the obstacle or operate from your receiver, until the noise disappears. No sound is output or a noise is output when software with the ...is selected. Make sure the component is connected correctly (see Connecting your nearest Pioneer authorized independent service company to carry out repair work , turn on. Disconnect ...operating conditions. Check the setting for trouble and malfunctions. This could have an LFE channel. Switch the subwoofer setting in the display and the volume level drops...
Owner's Manual
Page 36
.... Video signals that it 's possible that are also HDCP-compatible. Turn on audio connections. Be consistent with the type of channels available from the connected display unit (for the audio. HDMI format digital audio transmissions require a longer time to various different displays... HDMI output to your iPod. 'iPod/USB Error 2 (I /U ERR3)' Switch off the device connected to the receiver. Select a different category. Important information regarding the HDMI connection There are input from the HDMI terminal will not appear if you switch input...
.... Video signals that it 's possible that are also HDCP-compatible. Turn on audio connections. Be consistent with the type of channels available from the connected display unit (for the audio. HDMI format digital audio transmissions require a longer time to various different displays... HDMI output to your iPod. 'iPod/USB Error 2 (I /U ERR3)' Switch off the device connected to the receiver. Select a different category. Important information regarding the HDMI connection There are input from the HDMI terminal will not appear if you switch input...


