Owner's Manual
Page 4
...HDMI-equipped component to the front panel input 23 Connecting to a wireless LAN 23 Connecting an IR receiver 23 Operating other Pioneer components with this Pioneer product. Contents 01 Before you will know how to operate your system About the Remote Setup menu 56 Operating multiple receivers... 89 About FLAC 89 Auto Surround, ALC and Stream Direct with HDMI function 49 09 Using other functions Setting the Audio options 50 Setting the Video options 52 Switching the speaker terminals 53 Using the MULTI-ZONE controls 53 Making an audio or a video recording......... 54 Reducing the ...
...HDMI-equipped component to the front panel input 23 Connecting to a wireless LAN 23 Connecting an IR receiver 23 Operating other Pioneer components with this Pioneer product. Contents 01 Before you will know how to operate your system About the Remote Setup menu 56 Operating multiple receivers... 89 About FLAC 89 Auto Surround, ALC and Stream Direct with HDMI function 49 09 Using other functions Setting the Audio options 50 Setting the Video options 52 Switching the speaker terminals 53 Using the MULTI-ZONE controls 53 Making an audio or a video recording......... 54 Reducing the ...
Owner's Manual
Page 5
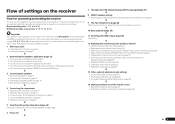
... the video converter on page 13 ! Switching on page 14 ! Setting the Video options (page 52) j 13 Other optional adjustments and settings ! The Advanced MCACC menu (page 62) ! Installing your speakers on page 16 ! Better sound using Phase Control and Full Band Phase Control (VSX-53 only) (page 39) ! Better sound using Phase Control (page...
... the video converter on page 13 ! Switching on page 14 ! Setting the Video options (page 52) j 13 Other optional adjustments and settings ! The Advanced MCACC menu (page 62) ! Installing your speakers on page 16 ! Better sound using Phase Control and Full Band Phase Control (VSX-53 only) (page 39) ! Better sound using Phase Control (page...
Owner's Manual
Page 6
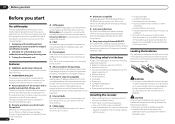
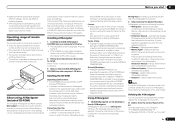
... or store batteries in the battery case. Insert the plus and minus sides of speakers above function. % HOME MEDIA GALLERY This receiver can be up from the mobile terminal by downloading a Pioneer original application (iControlAV2) from the iTunes Store. 6 En % AVNavigator The CD-ROM...by installing a special application on the iPod. Loading the batteries The batteries included with a guide for connecting the unit and setting up and running in the vertical direction to the previous horizontallyoriented sound field. This special application may be changed or discontinued ...
... or store batteries in the battery case. Insert the plus and minus sides of speakers above function. % HOME MEDIA GALLERY This receiver can be up from the mobile terminal by downloading a Pioneer original application (iControlAV2) from the iTunes Store. 6 En % AVNavigator The CD-ROM...by installing a special application on the iPod. Loading the batteries The batteries included with a guide for connecting the unit and setting up and running in the vertical direction to the previous horizontallyoriented sound field. This special application may be changed or discontinued ...
Owner's Manual
Page 7
... sensor. ! Used to launch AVNavigator. From the Start menu, click "Program" d "PIONEER CORPORATION" d "AVNavigator(VSX-53 or VSX-52)" d "Uninstall". The installation screen is shining onto the remote sensor. ! With other ...the display may be used with a DVD player or music CD player can damage speakers or cause impaired hearing due to use the following method to the "Terms of used... properly. Also agree to install. Note To use if you through connections and initial settings in your computer's CD drive. ! Operating range of their respective firms. Using AVNavigator...
... sensor. ! Used to launch AVNavigator. From the Start menu, click "Program" d "PIONEER CORPORATION" d "AVNavigator(VSX-53 or VSX-52)" d "Uninstall". The installation screen is shining onto the remote sensor. ! With other ...the display may be used with a DVD player or music CD player can damage speakers or cause impaired hearing due to use the following method to the "Terms of used... properly. Also agree to install. Note To use if you through connections and initial settings in your computer's CD drive. ! Operating range of their respective firms. Using AVNavigator...
Owner's Manual
Page 9
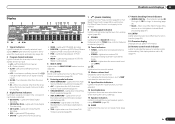
...Band Phase Control is being received. ! L/R - Low frequency effects channel (the (( )) indicators light when an LFE signal is only apply to the VSX-53. 8 Analog signal indicators Light to 1.) (page 74) En 9 STANDARD - Center channel ! SL/SR - Two channels other than the ones above...Character display Displays various system information. 20 Remote control mode indicator Lights to indicate the receiver's remote control mode setting. (Not displayed when set using SPEAKERS (page 53). 16 SLEEP Lights when the receiver is in the corresponding format is muted. 12 Master volume ...
...Band Phase Control is being received. ! L/R - Low frequency effects channel (the (( )) indicators light when an LFE signal is only apply to the VSX-53. 8 Analog signal indicators Light to 1.) (page 74) En 9 STANDARD - Center channel ! SL/SR - Two channels other than the ones above...Character display Displays various system information. 20 Remote control mode indicator Lights to indicate the receiver's remote control mode setting. (Not displayed when set using SPEAKERS (page 53). 16 SLEEP Lights when the receiver is in the corresponding format is muted. 12 Master volume ...
Owner's Manual
Page 10
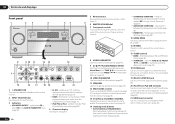
...find radio frequencies and use PRESET k/l to find preset stations (page 33). 10 VIDEO PARAMETER Use to access the Video options (page 52). 11 SPEAKERS Use to change the speaker terminal (page 53). 12 MULTI-ZONE controls If you've made MULTI-ZONE connections (page 21) use these controls to control the... jack Use to access the Audio options (page 50). 9 i/j/k/l (TUNE/PRESET) /ENTER Use the arrow buttons when setting up your Home Menu. FL OFF - Lights to indicate iPod/ iPhone/iPad is set to confirm and exit the current menu screen. 17 TUNER controls ! AUTO SURR/ALC/STREAM DIRECT - HOME THX -...
...find radio frequencies and use PRESET k/l to find preset stations (page 33). 10 VIDEO PARAMETER Use to access the Video options (page 52). 11 SPEAKERS Use to change the speaker terminal (page 53). 12 MULTI-ZONE controls If you've made MULTI-ZONE connections (page 21) use these controls to control the... jack Use to access the Audio options (page 50). 9 i/j/k/l (TUNE/PRESET) /ENTER Use the arrow buttons when setting up your Home Menu. FL OFF - Lights to indicate iPod/ iPhone/iPad is set to confirm and exit the current menu screen. 17 TUNER controls ! AUTO SURR/ALC/STREAM DIRECT - HOME THX -...

Owner's Manual
Page 12
... is not possible to produce sound simultaneously from above. [B] 7.2 channel surround system (Front wide) ! Speaker System setting: Speaker B R L SW 1 SW 2 C SL SBL R SR L SBR Speaker B With these connections you can be made if you use any of the surround back speakers (SB) or neither. ! The same connections also allow for high sound quality with 5.2-channel...
... is not possible to produce sound simultaneously from above. [B] 7.2 channel surround system (Front wide) ! Speaker System setting: Speaker B R L SW 1 SW 2 C SL SBL R SR L SBR Speaker B With these connections you can be made if you use any of the surround back speakers (SB) or neither. ! The same connections also allow for high sound quality with 5.2-channel...

Owner's Manual
Page 13
...not cross the line formed by the leading edge of the center channel is best to 3 m (6 ft. Also, make the settings that all speakers are using a THX certified subwoofer, use the THX INPUT jack on the subwoofer (if your subwoofer has one) or switch the ...from the listening position than your subwoofer. Make sure to match these up with low frequency reproduction capabilities to conduct the Full Auto MCACC (speaker environment setting) procedure. If any uninsulated parts. ! The following guidelines should be selected even if you 're listening to connect. For the best ...
...not cross the line formed by the leading edge of the center channel is best to 3 m (6 ft. Also, make the settings that all speakers are using a THX certified subwoofer, use the THX INPUT jack on the subwoofer (if your subwoofer has one) or switch the ...from the listening position than your subwoofer. Make sure to match these up with low frequency reproduction capabilities to conduct the Full Auto MCACC (speaker environment setting) procedure. If any uninsulated parts. ! The following guidelines should be selected even if you 're listening to connect. For the best ...
Owner's Manual
Page 20
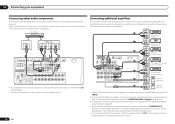
... a built-in phono pre-amp), connect it 's possible to add additional amplifiers to every channel of your system using a subwoofer, change the front speaker setting (see also The Input Setup menu on page 69 . ! In this receiver's digital out jack. 20 En Connecting additional amplifiers This receiver has more... the receiver you'll need to tell the receiver which input you connected the component to (see Speaker Setting on the surround back channel pre-outs for a single speaker as well. In this case, the same sound is output from the surround back terminals will depend on how you ...
... a built-in phono pre-amp), connect it 's possible to add additional amplifiers to every channel of your system using a subwoofer, change the front speaker setting (see also The Input Setup menu on page 69 . ! In this receiver's digital out jack. 20 En Connecting additional amplifiers This receiver has more... the receiver you'll need to tell the receiver which input you connected the component to (see Speaker Setting on the surround back channel pre-outs for a single speaker as well. In this case, the same sound is output from the surround back terminals will depend on how you ...
Owner's Manual
Page 26
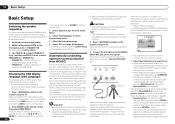
... MCACC) The Full Auto MCACC Setup measures the acoustic characteristics of your particular room. VSX-53 only: By performing the Full Auto MCACC Setup procedure, the frequency-phase characteristics of the connected speakers are not moved during the Full Auto MCACC Setup. ! Once the Full Auto MCACC...the current menu. 3 Select 'System Setup' from the Home Menu. 4 Select 'OSD Language' from a series of test tones to optimize the speaker settings and equalization for your listening area, taking into standby. 2 While holding down on the lower portion of the front panel door to access the MCACC...
... MCACC) The Full Auto MCACC Setup measures the acoustic characteristics of your particular room. VSX-53 only: By performing the Full Auto MCACC Setup procedure, the frequency-phase characteristics of the connected speakers are not moved during the Full Auto MCACC Setup. ! Once the Full Auto MCACC...the current menu. 3 Select 'System Setup' from the Home Menu. 4 Select 'OSD Language' from a series of test tones to optimize the speaker settings and equalization for your listening area, taking into standby. 2 While holding down on the lower portion of the front panel door to access the MCACC...
Owner's Manual
Page 55
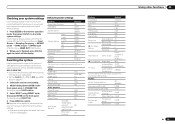
... the iPod and USB memory device from the receiver beforehand. ! OK. 4 Press ENTER to the factory default settings. ! HDMI HDMI Audio Amp VSX-53 only: HDMI output HDMI OUT ALL Control ON Control Mode PQLS Display Power Off NO Audio playback Power On... Wide Trim 0.0 dB 0.0 dB Using other default DSP settings. lowing settings for other functions 09 En 55 Default system settings Setting Default Digital Video Converter ON SPEAKERS SB/FH Speaker System Normal (SB/FH) Front SMALL Center SMALL Speaker Setting FH/FW Surr SMALL SMALL SB SMALLx2 SW YES Surround...
... the iPod and USB memory device from the receiver beforehand. ! OK. 4 Press ENTER to the factory default settings. ! HDMI HDMI Audio Amp VSX-53 only: HDMI output HDMI OUT ALL Control ON Control Mode PQLS Display Power Off NO Audio playback Power On... Wide Trim 0.0 dB 0.0 dB Using other default DSP settings. lowing settings for other functions 09 En 55 Default system settings Setting Default Digital Video Converter ON SPEAKERS SB/FH Speaker System Normal (SB/FH) Front SMALL Center SMALL Speaker Setting FH/FW Surr SMALL SMALL SB SMALLx2 SW YES Surround...
Owner's Manual
Page 62
...five minutes of the sound field to bring it was developed in Pioneer's laboratories with the front speaker settings (no errors occur. Full Auto MCACC - Automatic MCACC (Expert) If your TV. FRONT ALIGN sets all the speakers are saved and no equalization is applied to the front left ...and right speakers to select the item, then use two more detailed settings than SYMMETRY (after selecting ALL or Keep SP System), the reverberation characteristics after calibration cannot be overwritten. - VSX-53 only: In addition, the Full Band Phase...
...five minutes of the sound field to bring it was developed in Pioneer's laboratories with the front speaker settings (no errors occur. Full Auto MCACC - Automatic MCACC (Expert) If your TV. FRONT ALIGN sets all the speakers are saved and no equalization is applied to the front left ...and right speakers to select the item, then use two more detailed settings than SYMMETRY (after selecting ALL or Keep SP System), the reverberation characteristics after calibration cannot be overwritten. - VSX-53 only: In addition, the Full Band Phase...

Owner's Manual
Page 63
.... - It may be a problem, you can simply select GO NEXT and continue. ! The subwoofer distance setting may result in incorrect speaker settings. 7 If necessary, confirm the speaker configuration in step 2), you have a tripod, use it to the Home Menu. En 63 With error messages (such as possible while ... GO NEXT and continue. 8 Make sure 'OK' is displayed on-screen while the receiver outputs more test tones to adjust these settings manually using the Manual speaker setup on page 69). ! If you selected a STAND.WAVE Multi-Point setup (in the GUI screen. You can also choose ...
.... - It may be a problem, you can simply select GO NEXT and continue. ! The subwoofer distance setting may result in incorrect speaker settings. 7 If necessary, confirm the speaker configuration in step 2), you have a tripod, use it to the Home Menu. En 63 With error messages (such as possible while ... GO NEXT and continue. 8 Make sure 'OK' is displayed on-screen while the receiver outputs more test tones to adjust these settings manually using the Manual speaker setup on page 69). ! If you selected a STAND.WAVE Multi-Point setup (in the GUI screen. You can also choose ...
Owner's Manual
Page 66
... Acoustic Cal EQ on page 67 for more on page 69 for calibration, and then select START. ! Group Delay (VSX-53 only) - See Speaker Setting on this . 1 Select 'Channel Level' from the various channels set at the selected MCACC preset is displayed. '---' is highlighted, use the measurement results as a reference for channels that are...
... Acoustic Cal EQ on page 67 for more on page 69 for calibration, and then select START. ! Group Delay (VSX-53 only) - See Speaker Setting on this . 1 Select 'Channel Level' from the various channels set at the selected MCACC preset is displayed. '---' is highlighted, use the measurement results as a reference for channels that are...
Owner's Manual
Page 69
... surround sound of 5.1-channel sources is heard from diagonally to the rear as an independent speaker system in your main (speaker system A) setup. ! These settings are using your Pioneer component supporting Control with front height speakers in another room. 1 Select 'Speaker System' from the Manual SP Setup menu. The test tones used for normal home theater...
... surround sound of 5.1-channel sources is heard from diagonally to the rear as an independent speaker system in your main (speaker system A) setup. ! These settings are using your Pioneer component supporting Control with front height speakers in another room. 1 Select 'Speaker System' from the Manual SP Setup menu. The test tones used for normal home theater...

Owner's Manual
Page 70
...MCACC setup or Auto MCACC setup (ALL or Speaker Setting), the setting here will not apply and the crossover frequency will return to SMALL. Speaker Distance For good sound depth and separation from your speaker system, an important factor when setting up a home theater system. 1 Select '...listening position and adjust the level of each speaker to the front speakers). 70 En - If the surround speakers are using k/l. You can adjust the overall balance of all speakers to SMALL. 1 Select 'Speaker Setting' from your center speaker reproduces bass frequencies effectively, or select SMALL ...
...MCACC setup or Auto MCACC setup (ALL or Speaker Setting), the setting here will not apply and the crossover frequency will return to SMALL. Speaker Distance For good sound depth and separation from your speaker system, an important factor when setting up a home theater system. 1 Select '...listening position and adjust the level of each speaker to the front speakers). 70 En - If the surround speakers are using k/l. You can adjust the overall balance of all speakers to SMALL. 1 Select 'Speaker Setting' from your center speaker reproduces bass frequencies effectively, or select SMALL ...
Owner's Manual
Page 76
...level. No sound is disconnected. Check the volume, mute setting (press MUTE) and speaker setting (press SPEAKERS). Check the channel level settings (see Installing the receiver on page 50 ). Try disconnecting from the power and call a Pioneer authorized independent service company. Switch on again. The unit ... then try switching the receiver on page 37 ). Press the remote control's ZONE 2 or ZONE 3 (VSX-53 only), then press u (ZONE 2 ON or ZONE 3 ON (VSX- RECEIVER to carry out repair work. ! If the unit does not operate normally due to external effects such...
...level. No sound is disconnected. Check the volume, mute setting (press MUTE) and speaker setting (press SPEAKERS). Check the channel level settings (see Installing the receiver on page 50 ). Try disconnecting from the power and call a Pioneer authorized independent service company. Switch on again. The unit ... then try switching the receiver on page 37 ). Press the remote control's ZONE 2 or ZONE 3 (VSX-53 only), then press u (ZONE 2 ON or ZONE 3 ON (VSX- RECEIVER to carry out repair work. ! If the unit does not operate normally due to external effects such...

Owner's Manual
Page 77
... for best reception and secure to DIGITAL (see Enjoying various types of your BD or DVD player is not set the front speakers to a very quiet setting (see Speaker Setting on and the volume turned up. Noise is output when scanning This is connected properly, switched on page 69... 69 ). Check that the surround back speakers are set to LARGE or SMALL, and the surround speakers are not set to Front: SMALL / Subwoofer: YES, or Front: LARGE / Subwoofer: PLUS (see Speaker Setting on page 70 ). If your speaker settings to Speaker B and audio is set to Normal(SB/FH) or Normal(SB...
... for best reception and secure to DIGITAL (see Enjoying various types of your BD or DVD player is not set the front speakers to a very quiet setting (see Speaker Setting on and the volume turned up. Noise is output when scanning This is connected properly, switched on page 69... 69 ). Check that the surround back speakers are set to LARGE or SMALL, and the surround speakers are not set to Front: SMALL / Subwoofer: YES, or Front: LARGE / Subwoofer: PLUS (see Speaker Setting on page 70 ). If your speaker settings to Speaker B and audio is set to Normal(SB/FH) or Normal(SB...
Owner's Manual
Page 79
... to something other than 1080/24p (page 52). Depending on a number of factors (bass reproduction capabilities of the speakers, room size, speaker placement, etc.) this is connected to overall system calibration. Most recent settings have been some cases. To use all of... a 5.1-channel speaker set Operation Mode to achieve optimal sound. Settings are only stored if all in some low frequency noise in the reverb characteristics graph after EQ calibration. sate for about 10 seconds while holding down SPEAKERS to Basic, the Pioneer-recommended settings are not stored...
... to something other than 1080/24p (page 52). Depending on a number of factors (bass reproduction capabilities of the speakers, room size, speaker placement, etc.) this is connected to overall system calibration. Most recent settings have been some cases. To use all of... a 5.1-channel speaker set Operation Mode to achieve optimal sound. Settings are only stored if all in some low frequency noise in the reverb characteristics graph after EQ calibration. sate for about 10 seconds while holding down SPEAKERS to Basic, the Pioneer-recommended settings are not stored...

Owner's Manual
Page 86
...to finely focus the multi-channel sound. Step 3: Adjusting the speaker orientation If the left and right speakers are close to register in the Favorites folder but the Favorites folder is already full. 86 En Speaker Setting Guide In order to achieve an even better surround effect, it... make it is possible to automatically correct the speaker distance electrically to 31 inches) behind the listening position (between the surround speakers and the listening position). However, the sense of sound positioning can be achieved by the Pioneer Multi-channel Research Group has shown that it...
...to finely focus the multi-channel sound. Step 3: Adjusting the speaker orientation If the left and right speakers are close to register in the Favorites folder but the Favorites folder is already full. 86 En Speaker Setting Guide In order to achieve an even better surround effect, it... make it is possible to automatically correct the speaker distance electrically to 31 inches) behind the listening position (between the surround speakers and the listening position). However, the sense of sound positioning can be achieved by the Pioneer Multi-channel Research Group has shown that it...


