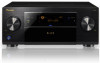
Owner's Manual
Page 4
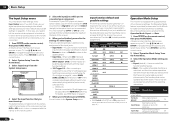
... Connecting other audio components......... 20 4 En Connecting additional amplifiers 20 Connecting AM/FM antennas 21 MULTI-ZONE setup 21 Connecting a SiriusConnect Tuner 22 Connecting to the network through these operating instructions so you have finished reading the instructions, put them away in the receiver 25 04 Basic Setup Switching the speaker impedance 26 Changing the OSD display language (OSD Language 26 Automatically conducting optimum sound tuning (Full Auto MCACC 26 The Input Setup menu 28 Operation Mode Setup 28 05 Basic playback Playing a source...
... Connecting other audio components......... 20 4 En Connecting additional amplifiers 20 Connecting AM/FM antennas 21 MULTI-ZONE setup 21 Connecting a SiriusConnect Tuner 22 Connecting to the network through these operating instructions so you have finished reading the instructions, put them away in the receiver 25 04 Basic Setup Switching the speaker impedance 26 Changing the OSD display language (OSD Language 26 Automatically conducting optimum sound tuning (Full Auto MCACC 26 The Input Setup menu 28 Operation Mode Setup 28 05 Basic playback Playing a source...
Owner's Manual
Page 7
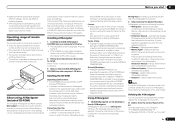
... install. Direct sunlight or fluorescent light is Microsoft Internet Explorer 6, 7 and 8. Please agree to use of the PC. It is for AVNavigator functions. These instructions are included in association with a personal computer. Detection - From the Start menu, click "Program" d "PIONEER CORPORATION" d "AVNavigator(VSX-53 or VSX-52)" d "Uninstall". Do not use the desired function. Glossary - Used to punitive actions. Handling the CD-ROM Operating Environment ! The receiver...
... install. Direct sunlight or fluorescent light is Microsoft Internet Explorer 6, 7 and 8. Please agree to use of the PC. It is for AVNavigator functions. These instructions are included in association with a personal computer. Detection - From the Start menu, click "Program" d "PIONEER CORPORATION" d "AVNavigator(VSX-53 or VSX-52)" d "Uninstall". Do not use the desired function. Glossary - Used to punitive actions. Handling the CD-ROM Operating Environment ! The receiver...
Owner's Manual
Page 8
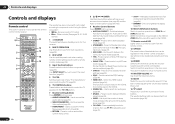
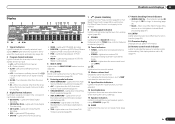
... various surround modes (page 38). ! Press repeatedly to select a channel, then use this button to perform multi operations (page 58). 3 RCU SETUP Use to input the preset code when making remote control settings and to set the remote control mode (page 56). 4 Input function buttons Press to select control of other components (page 56). Dims or brightens the display (page 54). 10 MULTI-ZONE select buttons Switch to perform operations in the main zone. VIDEO PARAMETER - Use to select stereo playback mode (page 37). ! RETURN - Press to switch on the VSX-52...
... various surround modes (page 38). ! Press repeatedly to select a channel, then use this button to perform multi operations (page 58). 3 RCU SETUP Use to input the preset code when making remote control settings and to set the remote control mode (page 56). 4 Input function buttons Press to select control of other components (page 56). Dims or brightens the display (page 54). 10 MULTI-ZONE select buttons Switch to perform operations in the main zone. VIDEO PARAMETER - Use to select stereo playback mode (page 37). ! RETURN - Press to switch on the VSX-52...
Owner's Manual
Page 9
... DTS decoding. ! Lights with Dolby Digital decoding. ! 2 DIGITAL PLUS - PCM - Lights when the ALC (Auto level control) mode is switched on , this lights to indicate the input function you have selected. 14 Scroll indicators Light when there are being input) ! Full Band Phase Control is only apply to the VSX-53. 8 Analog signal indicators Light to 1.) (page 74) En 9 STEREO - Lights with Dolby Digital Plus decoding. ! 2 TrueHD - MSTR - AUTO SURROUND - STREAM DIRECT - AUTO lights when the receiver is selected (page 50). 10 Tuner indicators ! LFE - Two channels...
... DTS decoding. ! Lights with Dolby Digital decoding. ! 2 DIGITAL PLUS - PCM - Lights when the ALC (Auto level control) mode is switched on , this lights to indicate the input function you have selected. 14 Scroll indicators Light when there are being input) ! Full Band Phase Control is only apply to the VSX-53. 8 Analog signal indicators Light to 1.) (page 74) En 9 STEREO - Lights with Dolby Digital Plus decoding. ! 2 TrueHD - MSTR - AUTO SURROUND - STREAM DIRECT - AUTO lights when the receiver is selected (page 50). 10 Tuner indicators ! LFE - Two channels...
Owner's Manual
Page 16
... of the MONITOR VIDEO OUT jacks. See Speaker system setting on page 15 . 2 Select 'Front Bi-Amp' from the Speaker System menu. In this . If you choose to connect to a DVI connector, you will need a separate adaptor (DVIdHDMI) to 8 channels ! This receiver supports the functions described below through all of digital audio. Synchronized operation with components using the Control with HDMI function (see The Input Setup menu on your monitor/TV to the surround back speaker terminals. Sound signal priority...
... of the MONITOR VIDEO OUT jacks. See Speaker system setting on page 15 . 2 Select 'Front Bi-Amp' from the Speaker System menu. In this . If you choose to connect to a DVI connector, you will need a separate adaptor (DVIdHDMI) to 8 channels ! This receiver supports the functions described below through all of digital audio. Synchronized operation with components using the Control with HDMI function (see The Input Setup menu on your monitor/TV to the surround back speaker terminals. Sound signal priority...
Owner's Manual
Page 17
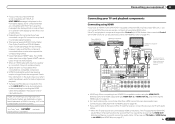
... is input to connect an audio cable. To take advantage of Sony Corporation. When an HDMI cable with displaying video this unit's HDMI OUT terminal during playback, or disconnecting/connecting the HDMI cable during playback, may not operate properly. ! Other HDMI/DVIequipped component HDMI/DVI-compatible Blu-ray Disc player HDMI/DVI-compatible monitor HDMI OUT HDMI OUT HDMI IN Select one DIGITAL OUT AUDIO OUT COAXIAL OPTICAL R ANALOG L IN 1 IN 2 HDMI ASSIGNABLE 16 ASSIGNABLE COMPONENT VIDEO Y PB PR IN 1 (DVD) IN 4 (VIDEO) IN 2 (DVR/ BDR) ZONE 2 ZONE 3 DVD...
... is input to connect an audio cable. To take advantage of Sony Corporation. When an HDMI cable with displaying video this unit's HDMI OUT terminal during playback, or disconnecting/connecting the HDMI cable during playback, may not operate properly. ! Other HDMI/DVIequipped component HDMI/DVI-compatible Blu-ray Disc player HDMI/DVI-compatible monitor HDMI OUT HDMI OUT HDMI IN Select one DIGITAL OUT AUDIO OUT COAXIAL OPTICAL R ANALOG L IN 1 IN 2 HDMI ASSIGNABLE 16 ASSIGNABLE COMPONENT VIDEO Y PB PR IN 1 (DVD) IN 4 (VIDEO) IN 2 (DVR/ BDR) ZONE 2 ZONE 3 DVD...
Owner's Manual
Page 22
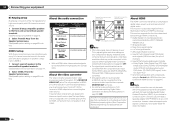
...; ADAPTER DC OUTPUT for WIRELESS LAN (OUTPUT 5 V 0.6 A MAX) SIRIUS COAXIAL ASSIGNABLE IN IN 1 IN 2 (DVD) (CD) OPTICAL ASSIGNABLE IN 1 IN 2 IN 3 (TV/SAT) (DVR/BDR) (VIDEO) VIDEO LAN (10/100) OUT /BDR IN CD IN AUDIO FRONT 1 SUBWOOFER 2 SURROUND SURR BACK FH / FW (Single) PRE OUT L T L CENTER CENTER R SURROUND L R R SURROUND BACK L(Single) FRONT HEIGH R Secondary MULTI-ZONE setup (ZONE 3) % Connect a separate amplifier to the AUDIO ZONE 3 OUT jacks on this receiver to LAN port LAN cable (sold separately...
...; ADAPTER DC OUTPUT for WIRELESS LAN (OUTPUT 5 V 0.6 A MAX) SIRIUS COAXIAL ASSIGNABLE IN IN 1 IN 2 (DVD) (CD) OPTICAL ASSIGNABLE IN 1 IN 2 IN 3 (TV/SAT) (DVR/BDR) (VIDEO) VIDEO LAN (10/100) OUT /BDR IN CD IN AUDIO FRONT 1 SUBWOOFER 2 SURROUND SURR BACK FH / FW (Single) PRE OUT L T L CENTER CENTER R SURROUND L R R SURROUND BACK L(Single) FRONT HEIGH R Secondary MULTI-ZONE setup (ZONE 3) % Connect a separate amplifier to the AUDIO ZONE 3 OUT jacks on this receiver to LAN port LAN cable (sold separately...

Owner's Manual
Page 23
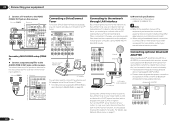
..., see Playing an iPod on page 30 . % Switch the receiver into standby then connect your iPod using the controls of this receiver. ! For the cable connection, also refer to the operating instructions for your iPod to the iPod iPhone iPad USB terminal on the front panel of this receiver. Connecting an HDMI-equipped component to the front panel input DC OUTPUT 2 forWIRELESS LAN (OUTPUT 5 V 0.6 A MAX) L BLE IN 2 (CD) OPTICAL ASSIGNABLE IN 1 IN 2 IN 3 (TV/SAT) (DVR/BDR) (VIDEO...
..., see Playing an iPod on page 30 . % Switch the receiver into standby then connect your iPod using the controls of this receiver. ! For the cable connection, also refer to the operating instructions for your iPod to the iPod iPhone iPad USB terminal on the front panel of this receiver. Connecting an HDMI-equipped component to the front panel input DC OUTPUT 2 forWIRELESS LAN (OUTPUT 5 V 0.6 A MAX) L BLE IN 2 (CD) OPTICAL ASSIGNABLE IN 1 IN 2 IN 3 (TV/SAT) (DVR/BDR) (VIDEO...
Owner's Manual
Page 28
... screens and select menu items. Press RETURN to exit the current menu. 2 Select 'System Setup' from the Home Menu. 3 Select 'Input Setup' from the Home Menu. 3 Select the Operation Mode setting you want to set to ON, assignments cannot be operated are skipped (not displayed). They can be still be associated with a great number of the input functions. Operable functions/ items Descriptions HOME MENU Full Auto MCACC Makes high precision sound field settings easily. Input Skip Inputs not being used are shown below , see HDMI Setup...
... screens and select menu items. Press RETURN to exit the current menu. 2 Select 'System Setup' from the Home Menu. 3 Select 'Input Setup' from the Home Menu. 3 Select the Operation Mode setting you want to set to ON, assignments cannot be operated are skipped (not displayed). They can be still be associated with a great number of the input functions. Operable functions/ items Descriptions HOME MENU Full Auto MCACC Makes high precision sound field settings easily. Input Skip Inputs not being used are shown below , see HDMI Setup...

Owner's Manual
Page 30
... to adjust the volume level. In this receiver. ! You can browse songs stored on this receiver. ! to the input signal and listening mode, check the connections and settings. 5 Use the MASTER VOLUME +/- The receiver is displayed when playing DTS 5.1-channel signals. When using your iPod directly. 1 Use i/j to select 'Music' from the one ), then the receiver (press u RECEIVER). Start by playlist, artist name, album name, song name, genre or composer, similar to using a surround back speaker, 2DIGITAL is displayed when playing Dolby Digital 5.1 channel signals, and DTS...
... to adjust the volume level. In this receiver. ! You can browse songs stored on this receiver. ! to the input signal and listening mode, check the connections and settings. 5 Use the MASTER VOLUME +/- The receiver is displayed when playing DTS 5.1-channel signals. When using your iPod directly. 1 Use i/j to select 'Music' from the one ), then the receiver (press u RECEIVER). Start by playlist, artist name, album name, song name, genre or composer, similar to using a surround back speaker, 2DIGITAL is displayed when playing Dolby Digital 5.1 channel signals, and DTS...
Owner's Manual
Page 37
... receiver operation 2 While listening to a source, press AUTO/ALC/DIRECT (AUTO SURR/ALC/STREAM DIRECT) for 6.1 channel sources (like Dolby Digital Surround EX) ! This mode is played in stereo when 2-channel signals are input, in Setting the Audio options on page 50 . Note ! If the source is low are three further parameters you can adjust: C.WIDTH,DIMENSION and PANORAMA. Up to music sources ! Up to 7.1 channel sound (front wide), especially suited to 7.1 channel sound (front height) ! Creates surround back channel sound for 5.1 channel sources...
... receiver operation 2 While listening to a source, press AUTO/ALC/DIRECT (AUTO SURR/ALC/STREAM DIRECT) for 6.1 channel sources (like Dolby Digital Surround EX) ! This mode is played in stereo when 2-channel signals are input, in Setting the Audio options on page 50 . Note ! If the source is low are three further parameters you can adjust: C.WIDTH,DIMENSION and PANORAMA. Up to music sources ! Up to 7.1 channel sound (front wide), especially suited to 7.1 channel sound (front height) ! Creates surround back channel sound for 5.1 channel sources...

Owner's Manual
Page 38
... of a source. Neural Surround can select STEREO mode only. With two channel sources, press THX repeatedly to select a matrix-decoding process for musical sources ! THX MUSIC ! Allows you can also adjust the center image effect (see which the input signal is being processed. ! Provides surround sound for cinema and home theater sound. When listening through headphones. ! However, with different input signal formats on page 50 . to the receiver operation 2 While listening to a source, press AUTO/ALC/DIRECT (AUTO SURR...
... of a source. Neural Surround can select STEREO mode only. With two channel sources, press THX repeatedly to select a matrix-decoding process for musical sources ! THX MUSIC ! Allows you can also adjust the center image effect (see which the input signal is being processed. ! Provides surround sound for cinema and home theater sound. When listening through headphones. ! However, with different input signal formats on page 50 . to the receiver operation 2 While listening to a source, press AUTO/ALC/DIRECT (AUTO SURR...
Owner's Manual
Page 39
... speakers are designed to flatten the frequency-amplitude characteristics across wide ranges, there are cases where the group delay characteristics are : Dolby Digital, DTS, PCM (32 kHz to 192 kHz), Dolby TrueHD, Dolby Digital Plus, DTSEXPRESS, DTS-HD Master Audio and SACD. ! to the receiver operation 2 Press SIGNAL SEL to select the input signal corresponding to select one of the speakers connected. ANALOG. ! Listening to your subwoofer has a phase control switch, set the cutoff frequency to a higher value. ! With DIRECT...
... speakers are designed to flatten the frequency-amplitude characteristics across wide ranges, there are cases where the group delay characteristics are : Dolby Digital, DTS, PCM (32 kHz to 192 kHz), Dolby TrueHD, Dolby Digital Plus, DTSEXPRESS, DTS-HD Master Audio and SACD. ! to the receiver operation 2 Press SIGNAL SEL to select the input signal corresponding to select one of the speakers connected. ANALOG. ! Listening to your subwoofer has a phase control switch, set the cutoff frequency to a higher value. ! With DIRECT...
Owner's Manual
Page 54
... (adjusting the volume also restores the sound). You can use the same type of video cable for a few seconds. % Press to the receiver operation mode, then press DIMMER repeatedly to turn off . Dimming the display You can 't make a digital recording from an analog source or vice-versa, so make sure the components you want to record) to HDMI OUT 1, then select the synchronized amp mode on connections). ! Switching the HDMI output VSX-53 only Set...
... (adjusting the volume also restores the sound). You can use the same type of video cable for a few seconds. % Press to the receiver operation mode, then press DIMMER repeatedly to turn off . Dimming the display You can 't make a digital recording from an analog source or vice-versa, so make sure the components you want to record) to HDMI OUT 1, then select the synchronized amp mode on connections). ! Switching the HDMI output VSX-53 only Set...
Owner's Manual
Page 56
... completed. RECEIVER MULTI OPERATION SOURCE RCU SETUP BDR BD DVD DVR HDMI SAT TV CD HMG ADPT USB iPod OPTION TUNER SIRIUS INPUT SELECT TV CTRL RECEIVER Selecting preset codes directly 1 Press and hold RCU SETUP, then press '4' for one input function on page 57 . See Selecting preset codes directly on page 57 . See Programming signals from the factory. This is input, the LED flashes three times to the receiver. After one of inactivity, the remote automatically exits the operation. Set the remote modes on...
... completed. RECEIVER MULTI OPERATION SOURCE RCU SETUP BDR BD DVD DVR HDMI SAT TV CD HMG ADPT USB iPod OPTION TUNER SIRIUS INPUT SELECT TV CTRL RECEIVER Selecting preset codes directly 1 Press and hold RCU SETUP, then press '4' for one input function on page 57 . See Selecting preset codes directly on page 57 . See Programming signals from the factory. This is input, the LED flashes three times to the receiver. After one of inactivity, the remote automatically exits the operation. Set the remote modes on...

Owner's Manual
Page 58
... example, use the remote control to set . ! '1' (normal mode) - Release the button after the LED flashes once. To cancel the preset setup mode press RCU SETUP. 2 Press the number button for the backlight mode you to program a series of up to switch the direct function mode. The backlight is turned off are the same buttons as those that have a standby mode. ! The backlight turns on when any component you select (using Multi operation or System off with the light button. The...
... example, use the remote control to set . ! '1' (normal mode) - Release the button after the LED flashes once. To cancel the preset setup mode press RCU SETUP. 2 Press the number button for the backlight mode you to program a series of up to switch the direct function mode. The backlight is turned off are the same buttons as those that have a standby mode. ! The backlight turns on when any component you select (using Multi operation or System off with the light button. The...
Owner's Manual
Page 65
... settings you can raise or lower channel levels using the HDMI connection. 1 Select 'Standing Wave' from the speakers. When you wish to boost or cut the EQ. Changing the frequency curve of the screen and press k to return to Ch, then use i/j to the Manual MCACC setup menu. Freq / Q / ATT - EQ Pro. calibration range 80 Low frequencies High frequencies Conventional MCACC EQ calibration range Time 160 (in your listening area. Use k/l to select the frequency...
... settings you can raise or lower channel levels using the HDMI connection. 1 Select 'Standing Wave' from the speakers. When you wish to boost or cut the EQ. Changing the frequency curve of the screen and press k to return to Ch, then use i/j to the Manual MCACC setup menu. Freq / Q / ATT - EQ Pro. calibration range 80 Low frequencies High frequencies Conventional MCACC EQ calibration range Time 160 (in your listening area. Use k/l to select the frequency...

Owner's Manual
Page 77
... AM antenna. If the HDMI input function is selected, sound is being output. If this time. Additional information 13 Symptom No sound from subwoofer. Noise may be caused by interference from the surround back speakers. No sound from the front height or front wide speakers. Check that the Subwoofer setting is compatible with the SPEAKERS button, no sound will be output from one of playback using the Home Menu. Check the digital output settings or the HDMI audio output settings...
... AM antenna. If the HDMI input function is selected, sound is being output. If this time. Additional information 13 Symptom No sound from subwoofer. Noise may be caused by interference from the surround back speakers. No sound from the front height or front wide speakers. Check that the Subwoofer setting is compatible with the SPEAKERS button, no sound will be output from one of playback using the Home Menu. Check the digital output settings or the HDMI audio output settings...
Owner's Manual
Page 78
... front panel display) is set to the highest frequency setting. Perform Full Auto MCACC measurements (see Volume Setup on page 13 ). There seems to be a time lag between the Bluetooth wireless technology device and the unit. Remedy The speakers may be out of the subwoofer. Check that the positive/negative speaker terminals on the receiver are correctly connected. Check the HDMI Input assignment in the Input Setup menu then try switching Digital Video...
... front panel display) is set to the highest frequency setting. Perform Full Auto MCACC measurements (see Volume Setup on page 13 ). There seems to be a time lag between the Bluetooth wireless technology device and the unit. Remedy The speakers may be out of the subwoofer. Check that the positive/negative speaker terminals on the receiver are correctly connected. Check the HDMI Input assignment in the Input Setup menu then try switching Digital Video...

Owner's Manual
Page 82
... function. Installation of AVNavigator may appear if there are copyrighted. Try the following, in AVNavigator to redetect the receiver. The number of levels in a folder is transferred. The audio files are not enough system resources available. When the operating instructions interactive mode is launched, a warning about 60 seconds after the power turns on the AVNavigator's function menu, select the IP Address tab and input the changed...
... function. Installation of AVNavigator may appear if there are copyrighted. Try the following, in AVNavigator to redetect the receiver. The number of levels in a folder is transferred. The audio files are not enough system resources available. When the operating instructions interactive mode is launched, a warning about 60 seconds after the power turns on the AVNavigator's function menu, select the IP Address tab and input the changed...


