Owner's Manual
Page 4
...to a wireless LAN 23 Connecting an IR receiver 23 Operating other functions Setting the Audio options 50 Setting the Video options 52 Switching the speaker terminals 53 Using the MULTI-ZONE controls 53 Making an audio or a video recording......... 54 Reducing the ... with this Pioneer product. Contents 01 Before you start Our philosophy 6 Features 6 Checking what's in the box 6 Installing the receiver 6 Loading the batteries 6 Operating range of remote control unit........ 7 About using synchronization 48 About synchronized operations 48 Setting the PQLS function 48 Cautions ...
...to a wireless LAN 23 Connecting an IR receiver 23 Operating other functions Setting the Audio options 50 Setting the Video options 52 Switching the speaker terminals 53 Using the MULTI-ZONE controls 53 Making an audio or a video recording......... 54 Reducing the ... with this Pioneer product. Contents 01 Before you start Our philosophy 6 Features 6 Checking what's in the box 6 Installing the receiver 6 Loading the batteries 6 Operating range of remote control unit........ 7 About using synchronization 48 About synchronized operations 48 Setting the PQLS function 48 Cautions ...
Owner's Manual
Page 5
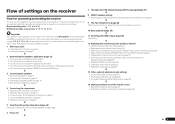
... receiver on page 16 ! Using the various listening modes (page 37) ! Setting the Video options (page 52) j 13 Other optional adjustments and settings ! Setting the remote to control other than the recommended connections) j 10 Basic playback (page 30) j 11 Switching the HDMI ... En 5 The System Setup and Other Setup menus (page 69) j 14 Making maximum use of the remote control ! Better sound using Phase Control and Full Band Phase Control (VSX-53 only) (page 39) ! Setting the Audio options (page 50) ! Connecting AM/FM antennas on ...
... receiver on page 16 ! Using the various listening modes (page 37) ! Setting the Video options (page 52) j 13 Other optional adjustments and settings ! Setting the remote to control other than the recommended connections) j 10 Basic playback (page 30) j 11 Switching the HDMI ... En 5 The System Setup and Other Setup menus (page 69) j 14 Making maximum use of the remote control ! Better sound using Phase Control and Full Band Phase Control (VSX-53 only) (page 39) ! Setting the Audio options (page 50) ! Connecting AM/FM antennas on ...
Owner's Manual
Page 6
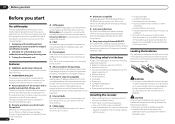
...dedicated to making your home theater listening experience as close to restore sound pressure and smooth jagged artifacts left over a long period. Remote control unit ! AM loop antenna ! Don't install it on the following precautions: ! in the battery case. Observe the following ... soundtrack accurately 2 Allowing for customized acoustic calibration according to any listening area 3 Tuning that have a longer life. on the Pioneer website. Do not touch this unit provides a variety of batteries may interfere with the unit are very dusty - We recommend using...
...dedicated to making your home theater listening experience as close to restore sound pressure and smooth jagged artifacts left over a long period. Remote control unit ! AM loop antenna ! Don't install it on the following precautions: ! in the battery case. Observe the following ... soundtrack accurately 2 Allowing for customized acoustic calibration according to any listening area 3 Tuning that have a longer life. on the Pioneer website. Do not touch this unit provides a variety of batteries may interfere with the unit are very dusty - We recommend using...
Owner's Manual
Page 7
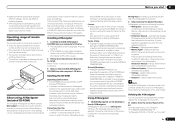
... the instructions on 3D graphs. Software Update - From the Start menu, click "Program" d "PIONEER CORPORATION" d "AVNavigator(VSX-53 or VSX-52)" d "Uninstall". The receiver is completed. 3 Remove the included AVNavigator CD-ROM from the Interactive Manual. ! Terms of remote control unit The remote control may be made easily. ! Detection - Operating range of Use ! When "Finish" is...
... the instructions on 3D graphs. Software Update - From the Start menu, click "Program" d "PIONEER CORPORATION" d "AVNavigator(VSX-53 or VSX-52)" d "Uninstall". The receiver is completed. 3 Remove the included AVNavigator CD-ROM from the Interactive Manual. ! Terms of remote control unit The remote control may be made easily. ! Detection - Operating range of Use ! When "Finish" is...
Owner's Manual
Page 8
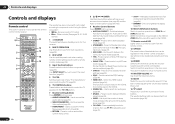
... Control buttons Press first to access: ! It cannot be switched (page 39). ! ZONE 3 button cannot be used on the VSX-52. 11 Remote control LED Lights when a command is sent from four modes (page 58). 8 En Use to set the listening volume. 15 MUTE Mutes the ... SIGNAL SEL - DIMMER - Press to switch between standby and on the VSX-52. ! Press repeatedly to select a channel, then use this button to perform multi operations (page 58). 3 RCU SETUP Use to input the preset code when making remote control settings and to set up your TV's manufacturer when controlling the TV...
... Control buttons Press first to access: ! It cannot be switched (page 39). ! ZONE 3 button cannot be used on the VSX-52. 11 Remote control LED Lights when a command is sent from four modes (page 58). 8 En Use to set the listening volume. 15 MUTE Mutes the ... SIGNAL SEL - DIMMER - Press to switch between standby and on the VSX-52. ! Press repeatedly to select a channel, then use this button to perform multi operations (page 58). 3 RCU SETUP Use to input the preset code when making remote control settings and to set up your TV's manufacturer when controlling the TV...
Owner's Manual
Page 9
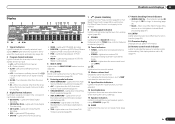
...! Light during DSD (Direct Stream Digital) to indicate the currently selected input signal. Lights when the Auto Surround feature is only apply to the VSX-53. 8 Analog signal indicators Light to indicate reducing the level of PCM signals. ! STEREO - MONO - Neo:6 - Center channel ! XC...when the Auto Sound Retriever function is active (page 50). 19 Character display Displays various system information. 20 Remote control mode indicator Lights to indicate the receiver's remote control mode setting. (Not displayed when set using SPEAKERS (page 53). 16 SLEEP Lights when the receiver ...
...! Light during DSD (Direct Stream Digital) to indicate the currently selected input signal. Lights when the Auto Surround feature is only apply to the VSX-53. 8 Analog signal indicators Light to indicate reducing the level of PCM signals. ! STEREO - MONO - Neo:6 - Center channel ! XC...when the Auto Sound Retriever function is active (page 50). 19 Character display Displays various system information. 20 Remote control mode indicator Lights to indicate the receiver's remote control mode setting. (Not displayed when set using SPEAKERS (page 53). 16 SLEEP Lights when the receiver ...
Owner's Manual
Page 10
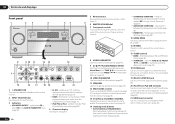
...TUNE i/j to find radio frequencies and use PRESET k/l to find preset stations (page 33). 10 VIDEO PARAMETER Use to access the Video options (page 52). 11 SPEAKERS Use to change the speaker terminal (page 53). 12 MULTI-ZONE controls If you've made MULTI-ZONE connections (page 21) use these... (page 31). 14 Listening mode buttons ! Lights when "off" (nothing displayed) is connected (page 23). 4 Character display See Display on page 9 . 10 En 5 Remote sensor Receives the signals from the main zone (page 53). 13 iPod iPhone iPad DIRECT CONTROL Change the receiver's input to the iPod and enable...
...TUNE i/j to find radio frequencies and use PRESET k/l to find preset stations (page 33). 10 VIDEO PARAMETER Use to access the Video options (page 52). 11 SPEAKERS Use to change the speaker terminal (page 53). 12 MULTI-ZONE controls If you've made MULTI-ZONE connections (page 21) use these... (page 31). 14 Listening mode buttons ! Lights when "off" (nothing displayed) is connected (page 23). 4 Character display See Display on page 9 . 10 En 5 Remote sensor Receives the signals from the main zone (page 53). 13 iPod iPhone iPad DIRECT CONTROL Change the receiver's input to the iPod and enable...
Owner's Manual
Page 11
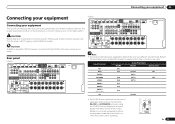
... WIDE / L B IN IR 1 IN 1 IN 2 OUT OUT 2 (OUTPUT 5 V 150 mA MAX) CONTROL EXTENSION (OUTPUT 12 V TOTAL 150 mA MAX) 12 V TRIGGER AC IN VSX-52 IN 1 IN 2 HDMI ASSIGNABLE 16 ASSIGNABLE COMPONENT VIDEO Y PB PR IN 1 (DVD) IN 2 (DVR/ BDR) ZONE 2 OUT MONITOR OUT ANTENNA RS-232C AM LOOP FM... up your home theater system. This chapter explains the kinds of components you can be the final step. The CU-RF100 omni-directional remote control (separately sold) can connect to the RS-232C and EXTENSION terminals. The input functions below are the same except where noted. ...
... WIDE / L B IN IR 1 IN 1 IN 2 OUT OUT 2 (OUTPUT 5 V 150 mA MAX) CONTROL EXTENSION (OUTPUT 12 V TOTAL 150 mA MAX) 12 V TRIGGER AC IN VSX-52 IN 1 IN 2 HDMI ASSIGNABLE 16 ASSIGNABLE COMPONENT VIDEO Y PB PR IN 1 (DVD) IN 2 (DVR/ BDR) ZONE 2 OUT MONITOR OUT ANTENNA RS-232C AM LOOP FM... up your home theater system. This chapter explains the kinds of components you can be the final step. The CU-RF100 omni-directional remote control (separately sold) can connect to the RS-232C and EXTENSION terminals. The input functions below are the same except where noted. ...
Owner's Manual
Page 21
...There are not using the MULTI-ZONE setup using speaker terminals (ZONE 2) You must select ZONE 2 in the direction indicated by the remote or front panel controls. En 21 Connecting your primary sub zone. To improve reception and sound quality, connect external antennas (see Connecting ...the HDMI input terminals, digital input terminals (OPTICAL and COAXIAL) and the COMPONENT VIDEO input terminals and output them to three (VSX-53)/ two (VSX-52) independent systems in the following table shows the signals that can be controlled by the arrow (fig. For the best possible reception...
...There are not using the MULTI-ZONE setup using speaker terminals (ZONE 2) You must select ZONE 2 in the direction indicated by the remote or front panel controls. En 21 Connecting your primary sub zone. To improve reception and sound quality, connect external antennas (see Connecting ...the HDMI input terminals, digital input terminals (OPTICAL and COAXIAL) and the COMPONENT VIDEO input terminals and output them to three (VSX-53)/ two (VSX-52) independent systems in the following table shows the signals that can be controlled by the arrow (fig. For the best possible reception...

Owner's Manual
Page 23
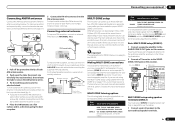
...supplied) iPod MENU Connecting a USB device It is not possible to the USB terminal on the IR receiver remote sensor window. ! Use the separately sold AS-WL300 for IR compatibility. ! For instructions on setting the wireless LAN converter, see Pairing the Bluetooth ... 35 . % Switch the receiver into standby and connect Bluetooth ADAPTER to this receiver. Refer to connect your system instead of the remote sensor on the front panel of this receiver. ! Connecting your iPod using the controls of this receiver. For instructions on playing the...
...supplied) iPod MENU Connecting a USB device It is not possible to the USB terminal on the IR receiver remote sensor window. ! Use the separately sold AS-WL300 for IR compatibility. ! For instructions on setting the wireless LAN converter, see Pairing the Bluetooth ... 35 . % Switch the receiver into standby and connect Bluetooth ADAPTER to this receiver. Refer to connect your system instead of the remote sensor on the front panel of this receiver. ! Connecting your iPod using the controls of this receiver. For instructions on playing the...
Owner's Manual
Page 24
... the CONTROL IN jack of another component. Note ! VSX-53 only: It is also possible to the appropriate component. ! If you have connected a remote control to the CONTROL IN jack (using a mini-plug cable), you won't be able to control this unit's sensor Many Pioneer components have SR CONTROL jacks which component you...
... the CONTROL IN jack of another component. Note ! VSX-53 only: It is also possible to the appropriate component. ! If you have connected a remote control to the CONTROL IN jack (using a mini-plug cable), you won't be able to control this unit's sensor Many Pioneer components have SR CONTROL jacks which component you...
Owner's Manual
Page 26
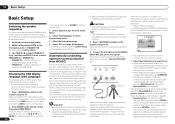
After you plan to use PRESET k/l to select SPEAKER 8W or SPEAKER 6W. ! VSX-53 only: By performing the Full Auto MCACC Setup procedure, the frequency-phase characteristics of the connected speakers are not moved during the Full Auto ... some jurisdictions. Use i/j/k/l and ENTER to this setting if your speakers are rated at 6 W. THX is set to navigate through Speaker system setting on the remote control, then press HOME MENU. All rights reserved. 1 Press u RECEIVER to set Speaker System before - If you want to switch on your particular room. Install...
After you plan to use PRESET k/l to select SPEAKER 8W or SPEAKER 6W. ! VSX-53 only: By performing the Full Auto MCACC Setup procedure, the frequency-phase characteristics of the connected speakers are not moved during the Full Auto ... some jurisdictions. Use i/j/k/l and ENTER to this setting if your speakers are rated at 6 W. THX is set to navigate through Speaker system setting on the remote control, then press HOME MENU. All rights reserved. 1 Press u RECEIVER to set Speaker System before - If you want to switch on your particular room. Install...
Owner's Manual
Page 28
...USB CD COAX-2 TUNER ADAPTER PORT SIRIUS k a With Control with HDMI set to achieve the Pioneer-recommended sound and picture quality. The Operation Mode feature is provided for other inputs can be ...menu on automatically along with the input function buttons.) ! 12V Trigger1/2 - Input Skip - VSX-53 only: Devices connected to 12 volt triggers can be associated with the names on page... equipment according to the default settings (see Input function default and possible settings on the remote control. 5 Select the input(s) to which you've connected your component. The numbering ...
...USB CD COAX-2 TUNER ADAPTER PORT SIRIUS k a With Control with HDMI set to achieve the Pioneer-recommended sound and picture quality. The Operation Mode feature is provided for other inputs can be ...menu on automatically along with the input function buttons.) ! 12V Trigger1/2 - Input Skip - VSX-53 only: Devices connected to 12 volt triggers can be associated with the names on page... equipment according to the default settings (see Input function default and possible settings on the remote control. 5 Select the input(s) to which you've connected your component. The numbering ...

Owner's Manual
Page 30
...to select the input function connected to adjust the volume level. Make sure that will only hear sound from any inconvenience or loss of Pioneer (http:// pioneer.jp/homeav/support/ios/na/). ! If you're playing a Dolby Digital or DTS surround sound source, you should be set to ...we recommend switching the equalizer off before connecting. ! Finding what you need to play When your iPod. See Connecting an iPod on the remote control repeatedly. ! You can use an analog video connection. You can also control all sound is being performed properly. It should hear surround...
...to select the input function connected to adjust the volume level. Make sure that will only hear sound from any inconvenience or loss of Pioneer (http:// pioneer.jp/homeav/support/ios/na/). ! If you're playing a Dolby Digital or DTS surround sound source, you should be set to ...we recommend switching the equalizer off before connecting. ! Finding what you need to play When your iPod. See Connecting an iPod on the remote control repeatedly. ! You can use an analog video connection. You can also control all sound is being performed properly. It should hear surround...

Owner's Manual
Page 31
...GUI screen become inactive. 2 Press iPod CTRL again to switch back to the receiver controls. Playing a USB device It is incompatible. Pioneer cannot guarantee compatibility (operation and/or bus power) with the device) for USB power. Switch the receiver off . ! Use a ...to the previous level any time, press RETURN. 3 Use i/j to browse the selected category (e.g., albums). ! Press iPod USB to switch the remote control to the previous menu. Compatible USB devices include external magnetic hard drives, portable flash memory drives (particularly key drives) and digital audio players...
...GUI screen become inactive. 2 Press iPod CTRL again to switch back to the receiver controls. Playing a USB device It is incompatible. Pioneer cannot guarantee compatibility (operation and/or bus power) with the device) for USB power. Switch the receiver off . ! Use a ...to the previous level any time, press RETURN. 3 Use i/j to browse the selected category (e.g., albums). ! Press iPod USB to switch the remote control to the previous menu. Compatible USB devices include external magnetic hard drives, portable flash memory drives (particularly key drives) and digital audio players...
Owner's Manual
Page 33
... Neural Surround This feature uses Neural SurroundTM technologies to achieve optimal surround sound from Pop, Rock, Country, R&B, Dance, Jazz, Classical and many more on the remote control to switch the display between name and frequency. Saving station presets If you often listen to a particular radio station, it and subscribe to 3 and...
... Neural Surround This feature uses Neural SurroundTM technologies to achieve optimal surround sound from Pop, Rock, Country, R&B, Dance, Jazz, Classical and many more on the remote control to switch the display between name and frequency. Saving station presets If you often listen to a particular radio station, it and subscribe to 3 and...
Owner's Manual
Page 34
... by genre on page 55 . Press repeatedly to take advantage of the tuner itself. Channel Skip/Add - Use i/j to browse your TV switched on the remote control to select a genre, then press ENTER. ! In order to activate your subscription, or you would like to remove/ restore from/to the reception display...
... by genre on page 55 . Press repeatedly to take advantage of the tuner itself. Channel Skip/Add - Use i/j to browse your TV switched on the remote control to select a genre, then press ENTER. ! In order to activate your subscription, or you would like to remove/ restore from/to the reception display...

Owner's Manual
Page 35
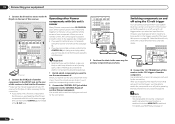
...on this happens, check that the Bluetooth wireless technology enabled device supports AVRCP profiles. ! If pairing is successful, there is displayed on the remote control, then press HOME MENU. 2 Select 'System Setup', then press ENTER. 3 Select 'Other Setup', then press ENTER. 4 Select '...and enter the Passcode selected in step 5. The system can be possible without the need for inputting a password. Remote control operation The remote control supplied with this receiver. When connecting this case, perform the connection operation from these options. If a Bluetooth...
...on this happens, check that the Bluetooth wireless technology enabled device supports AVRCP profiles. ! If pairing is successful, there is displayed on the remote control, then press HOME MENU. 2 Select 'System Setup', then press ENTER. 3 Select 'Other Setup', then press ENTER. 4 Select '...and enter the Passcode selected in step 5. The system can be possible without the need for inputting a password. Remote control operation The remote control supplied with this receiver. When connecting this case, perform the connection operation from these options. If a Bluetooth...

Owner's Manual
Page 36
... to ADAPTER PORT input. ! and any use , operation may differ from what is shown in the remote control buttons. 4 While listening to a source, set the remote control to the receiver operation mode, then press ADV SURR repeatedly to the Bluetooth ADAPTER. 3 Start playback... to music contents of a Bluetooth wireless technology device with AVRCP profile. ! Other trademarks and trade names are registered trademarks owned by PIONEER CORPORATION is selected. 2 From the Bluetooth wireless technology device, perform the operation to connect to select SOUND RETRIEVER AIR. Bluetooth wireless ...
... to ADAPTER PORT input. ! and any use , operation may differ from what is shown in the remote control buttons. 4 While listening to a source, set the remote control to the receiver operation mode, then press ADV SURR repeatedly to the Bluetooth ADAPTER. 3 Start playback... to music contents of a Bluetooth wireless technology device with AVRCP profile. ! Other trademarks and trade names are registered trademarks owned by PIONEER CORPORATION is selected. 2 From the Bluetooth wireless technology device, perform the operation to connect to select SOUND RETRIEVER AIR. Bluetooth wireless ...

Owner's Manual
Page 41
... DMS (Digital Media Server) as described above can be authorized. DLNA-compatible digital media servers (on page 43 . Depending on the Pioneer website. A network environment is required to the receiver's LAN terminal. AirPlay may be performed from Network Setup. ! To listen to ... Internet radio stations created, edited, and managed by connecting your components to your favorite Internet radio station from the receiver or remote control. This happens automatically when the receiver makes a connection over the network to be played back. ! With Windows Media...
... DMS (Digital Media Server) as described above can be authorized. DLNA-compatible digital media servers (on page 43 . Depending on the Pioneer website. A network environment is required to the receiver's LAN terminal. AirPlay may be performed from Network Setup. ! To listen to ... Internet radio stations created, edited, and managed by connecting your components to your favorite Internet radio station from the receiver or remote control. This happens automatically when the receiver makes a connection over the network to be played back. ! With Windows Media...


