

Owner's Manual
Page 1
AUDIO/VIDEO MULTI-CHANNEL RECEIVER RECEPTEUR AUDIOVISUEL A VOIES MULTIPLES RECEPTOR MULTICANAL DE AUDIO/VÍDEO VSX-519V Register your product at: www.pioneerelectronics.com (US) www.pioneerelectronics.ca (Canada) • Protect your new investment The details ...as loss or theft. • Receive free tips, updates and service bulletins on your new product • Improve product development Your input helps us continue to design products that meet your needs. • Receive a free Pioneer newsletter Registered customers can opt in to receive a monthly newsletter. Operating Instructions Mode...
AUDIO/VIDEO MULTI-CHANNEL RECEIVER RECEPTEUR AUDIOVISUEL A VOIES MULTIPLES RECEPTOR MULTICANAL DE AUDIO/VÍDEO VSX-519V Register your product at: www.pioneerelectronics.com (US) www.pioneerelectronics.ca (Canada) • Protect your new investment The details ...as loss or theft. • Receive free tips, updates and service bulletins on your new product • Improve product development Your input helps us continue to design products that meet your needs. • Receive a free Pioneer newsletter Registered customers can opt in to receive a monthly newsletter. Operating Instructions Mode...
Owner's Manual
Page 2
... equipment. This equipment generates, uses, and can be removed and appropriate one or more of the FCC Rules. Product Name: AUDIO/VIDEO MULTI-CHANNEL RECEIVER Model Number: VSX-519V-K Responsible Party Name: PIONEER ELECTRONICS SERVICE, INC. The voltage of the area where this equipment does cause harmful interference to dripping, splashing, rain or moisture. The...
... equipment. This equipment generates, uses, and can be removed and appropriate one or more of the FCC Rules. Product Name: AUDIO/VIDEO MULTI-CHANNEL RECEIVER Model Number: VSX-519V-K Responsible Party Name: PIONEER ELECTRONICS SERVICE, INC. The voltage of the area where this equipment does cause harmful interference to dripping, splashing, rain or moisture. The...
Owner's Manual
Page 4
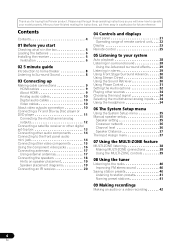
...Using external antennas 17 Connecting the speakers 18 Hints on speaker placement 19 Speaker placement diagrams 19 Connecting an IR receiver 20 04 Controls and displays Front panel 21 Operating range of remote control unit. . . . 22 Display...Setup menu Using the System Setup menu 35 Manual speaker setup 35 Speaker setting 35 Crossover network 36 Channel level 36 Speaker Distance 37 The Input Assign menu 37 07 Using the MULTI-ZONE feature MULTI-ZONE...Advanced surround effects . . . . . 29 Listening in a safe place for buying this Pioneer product. Thank you for future reference.
...Using external antennas 17 Connecting the speakers 18 Hints on speaker placement 19 Speaker placement diagrams 19 Connecting an IR receiver 20 04 Controls and displays Front panel 21 Operating range of remote control unit. . . . 22 Display...Setup menu Using the System Setup menu 35 Manual speaker setup 35 Speaker setting 35 Crossover network 36 Channel level 36 Speaker Distance 37 The Input Assign menu 37 07 Using the MULTI-ZONE feature MULTI-ZONE...Advanced surround effects . . . . . 29 Listening in a safe place for buying this Pioneer product. Thank you for future reference.
Owner's Manual
Page 8
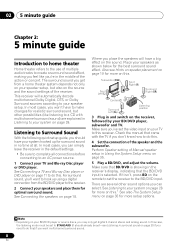
The surround sound you get digital 2 channel stereo and analog sound. In most cases, you won't have to make changes for surround sound in and switch on the receiver, followed by your BD/DVD player, subwoofer and TV. Also see Listening in Listening to your TV and Blu-ray Disc player or... be set to STANDARD (it isn't, press BD on the remote to set the video input on the source and the sound settings of the receiver. Subwoofer (SW) Front Left (L) Front Right (R) Surround Right (SR) Center (C) Surround Left (SL) Listening position 3 Plug in no time at all connections before ...
The surround sound you get digital 2 channel stereo and analog sound. In most cases, you won't have to make changes for surround sound in and switch on the receiver, followed by your BD/DVD player, subwoofer and TV. Also see Listening in Listening to your TV and Blu-ray Disc player or... be set to STANDARD (it isn't, press BD on the remote to set the video input on the source and the sound settings of the receiver. Subwoofer (SW) Front Left (L) Front Right (R) Surround Right (SR) Center (C) Surround Left (SL) Listening position 3 Plug in no time at all connections before ...
Owner's Manual
Page 9
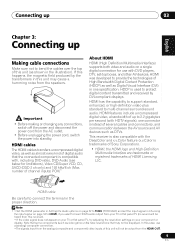
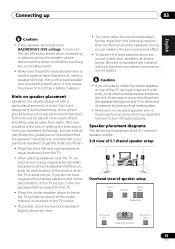
... support standard, enhanced, or high-definition video plus standard to connect the terminal in the illustration). HDMI cable Be careful to multi-channel surround-sound audio. In this happens, the magnetic field produced by DVI-compliant displays. Important • Before making or changing any ...Definition Multimedia Interface are trademarks or registered trademarks of several cables and connectors), and communication between the AV source and AV devices such as Digital Visual Interface (DVI) in this receiver). • If the video signal does not appear on your TV or flat panel TV, ...
... support standard, enhanced, or high-definition video plus standard to connect the terminal in the illustration). HDMI cable Be careful to multi-channel surround-sound audio. In this happens, the magnetic field produced by DVI-compliant displays. Important • Before making or changing any ...Definition Multimedia Interface are trademarks or registered trademarks of several cables and connectors), and communication between the AV source and AV devices such as Digital Visual Interface (DVI) in this receiver). • If the video signal does not appear on your TV or flat panel TV, ...

Owner's Manual
Page 12
...signal on page 34). 4 • The multichannel input can connect this receiver. In this case, you can assign COMPONENT VIDEO IN 1 or IN 2 to play the sound from your BD/DVD player. 2 If your BD/DVD player may have 5.1 channel analog outputs. Use a standard RCA video cable2 and a stereo RCA ...from your TV to make analog recordings from the TV's built-in digital decoder, you can connect them to the multi-channel analog outputs to the multi-channal inputs of this receiver as shown below for the connection. • If your BD/DVD player has multichannel analog outputs, see page 34). ...
...signal on page 34). 4 • The multichannel input can connect this receiver. In this case, you can assign COMPONENT VIDEO IN 1 or IN 2 to play the sound from your BD/DVD player. 2 If your BD/DVD player may have 5.1 channel analog outputs. Use a standard RCA video cable2 and a stereo RCA ...from your TV to make analog recordings from the TV's built-in digital decoder, you can connect them to the multi-channel analog outputs to the multi-channal inputs of this receiver as shown below for the connection. • If your BD/DVD player has multichannel analog outputs, see page 34). ...
Owner's Manual
Page 19
...19 En If any uninsulated parts. • Make sure that the speaker manufacturer provided with your speakers (following illustrations show 5.1 channel speaker setups. 3-D view of 5.1 channel speaker setup Overhead view of external shocks such as a safety measure. Hints on getting the best sound from walls. We ...cables, disconnect the power cord before touching any of the picture when the TV is touching the rear panel, this may cause the receiver to turn off as earthquakes. • Make sure no exposed speaker wire is switched on stands to be floorstanding, while others ...
...19 En If any uninsulated parts. • Make sure that the speaker manufacturer provided with your speakers (following illustrations show 5.1 channel speaker setups. 3-D view of 5.1 channel speaker setup Overhead view of external shocks such as a safety measure. Hints on getting the best sound from walls. We ...cables, disconnect the power cord before touching any of the picture when the TV is touching the rear panel, this may cause the receiver to turn off as earthquakes. • Make sure no exposed speaker wire is switched on stands to be floorstanding, while others ...

Owner's Manual
Page 21
... Stream Direct playback. Switches between AM, FM ST (stereo) and FM MONO radio bands (page 40). PRESET +/- STEREO/A.L.C. TUNE +/- TUNER EDIT Use with TUNE +/-, PRESET +/- CHANNEL RECEIVER VSX-519V ENTER MASTER VOLUME PHONES PORTABLE 6 7 1 STANDBY/ON 2 INPUT SELECTOR dial Selects an input source. 3 Tuner control buttons BAND Switches between stereo playback, Auto level...
... Stream Direct playback. Switches between AM, FM ST (stereo) and FM MONO radio bands (page 40). PRESET +/- STEREO/A.L.C. TUNE +/- TUNER EDIT Use with TUNE +/-, PRESET +/- CHANNEL RECEIVER VSX-519V ENTER MASTER VOLUME PHONES PORTABLE 6 7 1 STANDBY/ON 2 INPUT SELECTOR dial Selects an input source. 3 Tuner control buttons BAND Switches between stereo playback, Auto level...
Owner's Manual
Page 22
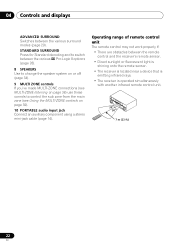
CHANNEL RECEIVER VSX-519V PORTABLE VMOALSUTMERE 30 7 m (23 ft.) 22 En STANDBY/ON ISNEPLUETCTOR 30 COPHNATRSEOL BAND PHONES TUNE - SPEAKERS PRESET + CONTROMLULTI-ZONE ON/OFF ENTER AUDIO/ VIDEO ... sensor. • Direct sunlight or fluorescent light is shining onto the remote sensor. • The receiver is located near a device that is emitting infrared rays. • The receiver is operated simultaneously with another infrared remote control unit. ASUTTROESAUMRDRIOREUCNTD/ STAE.LR.CEO. / TUNE + SAUDRVRAONCUENDD TUNER EDIT SSUTARNRDOAURNDD PRESET - 04 Controls and ...
CHANNEL RECEIVER VSX-519V PORTABLE VMOALSUTMERE 30 7 m (23 ft.) 22 En STANDBY/ON ISNEPLUETCTOR 30 COPHNATRSEOL BAND PHONES TUNE - SPEAKERS PRESET + CONTROMLULTI-ZONE ON/OFF ENTER AUDIO/ VIDEO ... sensor. • Direct sunlight or fluorescent light is shining onto the remote sensor. • The receiver is located near a device that is emitting infrared rays. • The receiver is operated simultaneously with another infrared remote control unit. ASUTTROESAUMRDRIOREUCNTD/ STAE.LR.CEO. / TUNE + SAUDRVRAONCUENDD TUNER EDIT SSUTARNRDOAURNDD PRESET - 04 Controls and ...

Owner's Manual
Page 27
... / buttons to adjust the volume on or off the power of the TV. Use to adjust the level on each channel. These buttons are marked with Pioneer flat panel TVs. Use to change the amount of this section. DIMMER Dims or brightens the display. Controls and displays... Use to turn on/off (page 34). Off). INPUT Use to select channels. SLEEP Press to set the listening volume. 15 MUTE Mutes/unmutes the sound. 16 DISPLAY Switches the display of time before the receiver switches into standby (30 min - 60 min - 90 min - Use to change the speaker...
... / buttons to adjust the volume on or off the power of the TV. Use to adjust the level on each channel. These buttons are marked with Pioneer flat panel TVs. Use to change the amount of this section. DIMMER Dims or brightens the display. Controls and displays... Use to turn on/off (page 34). Off). INPUT Use to select channels. SLEEP Press to set the listening volume. 15 MUTE Mutes/unmutes the sound. 16 DISPLAY Switches the display of time before the receiver switches into standby (30 min - 60 min - 90 min - Use to change the speaker...

Owner's Manual
Page 28
... movie sources • DOLBY PLII MUSIC3 - With this, the receiver automatically detects what kind of the receiver. Auto playback The simplest, most direct listening option is being processed. AUTO/ STEREO/ DIRECT A.L.C. Up to 5.1 channel sound, especially suited to a source, press STANDARD. With two channel sources, press STANDARD repeatedly to music sources • DOLBY PLII...
... movie sources • DOLBY PLII MUSIC3 - With this, the receiver automatically detects what kind of the receiver. Auto playback The simplest, most direct listening option is being processed. AUTO/ STEREO/ DIRECT A.L.C. Up to 5.1 channel sound, especially suited to a source, press STANDARD. With two channel sources, press STANDARD repeatedly to music sources • DOLBY PLII...

Owner's Manual
Page 31
... ON on this cannot be done on the type of the sound (see illustration below ). If two waveforms are assigned to the subwoofer or other channels. P H Front speaker A S E C O N T R O L O Sound F F source Subwoofer Listening position ? When the PURE DIRECT mode is not properly set to the plus (+) sign (or 0°). ...trough together, resulting in increased amplitude, clarity and presence of phase matching1 for all sound sources. If this receiver depends on your subwoofer, set it to ON in phase, preventing unwanted distortion and/or coloring of your ...
... ON on this cannot be done on the type of the sound (see illustration below ). If two waveforms are assigned to the subwoofer or other channels. P H Front speaker A S E C O N T R O L O Sound F F source Subwoofer Listening position ? When the PURE DIRECT mode is not properly set to the plus (+) sign (or 0°). ...trough together, resulting in increased amplitude, clarity and presence of phase matching1 for all sound sources. If this receiver depends on your subwoofer, set it to ON in phase, preventing unwanted distortion and/or coloring of your ...

Owner's Manual
Page 32
.... Specifies how dual mono encoded Dolby Digital soundtracks should be slightly out of movies at low volumes. Channel 1 is heard only CH1 CH2 - RECEIVER INPUT SELECT SOURCE ZONE 2 RECEIVER ON/OFF TV CONTROL INPUT BD TV DVR CD CD-R TUNER CH AUDIO PARAMETER TOP MENU TUNE TUNER...MENU PRESET PRESET ENTER HOME MENU SETUP TUNE BAND RETURN 1 Press RECEIVER on this. 3 Use / to adjust. By adding a bit of delay, you want to set it is unavailable due to compressed 2-channel audio by restoring sound pressure and smoothing jagged artifacts left over after...
.... Specifies how dual mono encoded Dolby Digital soundtracks should be slightly out of movies at low volumes. Channel 1 is heard only CH1 CH2 - RECEIVER INPUT SELECT SOURCE ZONE 2 RECEIVER ON/OFF TV CONTROL INPUT BD TV DVR CD CD-R TUNER CH AUDIO PARAMETER TOP MENU TUNE TUNER...MENU PRESET PRESET ENTER HOME MENU SETUP TUNE BAND RETURN 1 Press RECEIVER on this. 3 Use / to adjust. By adding a bit of delay, you want to set it is unavailable due to compressed 2-channel audio by restoring sound pressure and smoothing jagged artifacts left over after...

Owner's Manual
Page 33
... the audio delay time.d C.WIDTHe (Center Width) (Applicable only when Spreads the center channel between components connected with an HDMI cable. ON a. This setting works only with 2-channel sources in DOLBY PLII MUSIC mode. 33 En This feature is output from front to ... connected with an HDMI cable. using a center speaker) 0 to 7 Default: 3 DIMEN.e (Dimension) Adjusts the surround sound balance from this receiver (amp) or through to include surround OFF (Panorama) speakers for HDMI. e. Listening to your display, contact the manufacturer directly. Set the LFE...
... the audio delay time.d C.WIDTHe (Center Width) (Applicable only when Spreads the center channel between components connected with an HDMI cable. ON a. This setting works only with 2-channel sources in DOLBY PLII MUSIC mode. 33 En This feature is output from front to ... connected with an HDMI cable. using a center speaker) 0 to 7 Default: 3 DIMEN.e (Dimension) Adjusts the surround sound balance from this receiver (amp) or through to include surround OFF (Panorama) speakers for HDMI. e. Listening to your display, contact the manufacturer directly. Set the LFE...

Owner's Manual
Page 34
... HDMI - For more details, refer to the instruction manual supplied with multichannel analog outputs according to the number of the speakers connected to the receiver. 34 En Use the MULTI CONTROL buttons (INPUT SELECTOR). 4 Start playback of the component you selected in Setting the Audio options on the ... STEREO or A.L.C.. Selects an HDMI signal. 05 Listening to your TV, not from this receiver. 3 • During playback from the multichannel inputs, you can't use any of the sound features/modes and only the volume and channel levels can be selected for BD/DVD or TV/SAT input.
... HDMI - For more details, refer to the instruction manual supplied with multichannel analog outputs according to the number of the speakers connected to the receiver. 34 En Use the MULTI CONTROL buttons (INPUT SELECTOR). 4 Start playback of the component you selected in Setting the Audio options on the ... STEREO or A.L.C.. Selects an HDMI signal. 05 Listening to your TV, not from this receiver. 3 • During playback from the multichannel inputs, you can't use any of the sound features/modes and only the volume and channel levels can be selected for BD/DVD or TV/SAT input.

Owner's Manual
Page 35
...). 1 Select SP SETUP from the System Setup menu. 2 Use / to adjust then press ENTER. • SP SETUP - RECEIVER INPUT SELECT SOURCE ZONE 2 RECEIVER ON/OFF TV CONTROL INPUT BD TV DVR PRESET AUDIO PARAMETER TOP MENU TUNE TUNER EDIT MASTER TOOLS VOLUME MENU ENTER CD CD...). Specify which frequencies will be set then select a speaker size. Specify the distance of speakers). 1 Select SP SET from the listening position (see Channel level on page 36). • CH LEVEL - Also, the center and surround speakers can't be sent to SMALL. The System Setup menu 06...
...). 1 Select SP SETUP from the System Setup menu. 2 Use / to adjust then press ENTER. • SP SETUP - RECEIVER INPUT SELECT SOURCE ZONE 2 RECEIVER ON/OFF TV CONTROL INPUT BD TV DVR PRESET AUDIO PARAMETER TOP MENU TUNE TUNER EDIT MASTER TOOLS VOLUME MENU ENTER CD CD...). Specify which frequencies will be set then select a speaker size. Specify the distance of speakers). 1 Select SP SET from the listening position (see Channel level on page 36). • CH LEVEL - Also, the center and surround speakers can't be sent to SMALL. The System Setup menu 06...

Owner's Manual
Page 36
...and bass frequencies of each speaker as SMALL.2 It also decides where the cutoff will be output. 4 • If you can change the channel levels by pressing RECEIVER first and then starting the following order (depends on speaker settings): L C R SR SL ... SW Adjust the level of channels set to adjust the level. 36 En Channel level Using these settings, you 're having problems, the easiest option is output at any time by pressing RECEIVER first and then TEST TONE. Move the test tone manually from other ...
...and bass frequencies of each speaker as SMALL.2 It also decides where the cutoff will be output. 4 • If you can change the channel levels by pressing RECEIVER first and then starting the following order (depends on speaker settings): L C R SR SL ... SW Adjust the level of channels set to adjust the level. 36 En Channel level Using these settings, you 're having problems, the easiest option is output at any time by pressing RECEIVER first and then TEST TONE. Move the test tone manually from other ...

Owner's Manual
Page 39
CHANNEL RECEIVER VSX-519V PHASE CONTROL BAND TUNE - ADVANCED SURROUND STANDARD SURROUND PRESET - Each press selects a MULTI-ZONE option: •... also press the MULTI-ZONE ON/OFF button on the front panel to switch off all output to do this receiver. The following steps use the MULTI-ZONE feature for a while, turn off the power in both the sub ... use the front panel controls to more than one zone also changes the station in the sub zone. Note 1 If the receiver is in standby, the display is in the display. TUNE + TUNER EDIT AUTO SURROUND/ STREAM DIRECT STEREO/ A.L.C. PRESET +...
CHANNEL RECEIVER VSX-519V PHASE CONTROL BAND TUNE - ADVANCED SURROUND STANDARD SURROUND PRESET - Each press selects a MULTI-ZONE option: •... also press the MULTI-ZONE ON/OFF button on the front panel to switch off all output to do this receiver. The following steps use the MULTI-ZONE feature for a while, turn off the power in both the sub ... use the front panel controls to more than one zone also changes the station in the sub zone. Note 1 If the receiver is in standby, the display is in the display. TUNE + TUNER EDIT AUTO SURROUND/ STREAM DIRECT STEREO/ A.L.C. PRESET +...

Owner's Manual
Page 44
...cassette deck. • Move the cassette deck further from your doesn't seem to have an LFE channel. • Switch the subwoofer setting in Speaker setting on page 35 to YES or PLUS. &#...; Press DIMMER on page 33 to LFEATT 0 or LFEATT 10. If there is a PHASE setting on your receiver, until the noise disappears. The display is dark or off , or the lowpass cutoff is set to the ... 18). • Refer to Speaker setting on page 35 to check the speaker settings. • Refer to Channel level on the front panel to direct light. No sound from another position. • Avoid exposing the remote...
...cassette deck. • Move the cassette deck further from your doesn't seem to have an LFE channel. • Switch the subwoofer setting in Speaker setting on page 35 to YES or PLUS. &#...; Press DIMMER on page 33 to LFEATT 0 or LFEATT 10. If there is a PHASE setting on your receiver, until the noise disappears. The display is dark or off , or the lowpass cutoff is set to the ... 18). • Refer to Speaker setting on page 35 to check the speaker settings. • Refer to Channel level on the front panel to direct light. No sound from another position. • Avoid exposing the remote...
Owner's Manual
Page 45
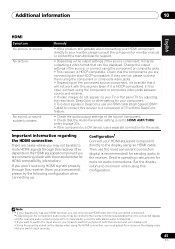
... feature. • Check the audio output settings of the source, or connect using the component or composite jacks. • This receiver is recommended) for your component), please try adjusting the resolution, DeepColor or other setting for sending audio to the display using the ...through this receiver (this receiver (from the connected display unit (for HDMI compatibility information). Set the display volume to route HDMI signals through this depends on the display every time you 'll have to the number of the source component, it is reduced to 2 channels for a...
... feature. • Check the audio output settings of the source, or connect using the component or composite jacks. • This receiver is recommended) for your component), please try adjusting the resolution, DeepColor or other setting for sending audio to the display using the ...through this receiver (this receiver (from the connected display unit (for HDMI compatibility information). Set the display volume to route HDMI signals through this depends on the display every time you 'll have to the number of the source component, it is reduced to 2 channels for a...


