
Owner's Manual
Page 1
Operating Instructions Mode d'emploi AUDIO/VIDEO MULTI-CHANNEL RECEIVER RECEPTEUR AUDIOVISUEL A VOIES MULTI-CANAUX VSX-518 Register your product at: www.pioneerelectronics.com (US) www.pioneerelectronics.ca (Canada) • Protect your new investment The details of your purchase will... the event of an insurance claim such as loss or theft. • Receive free tips, updates and service bulletins on your new product • Improve product development Your input helps us continue to design products that meet your needs. • Receive a free Pioneer newsletter Registered customers can opt in to...
Operating Instructions Mode d'emploi AUDIO/VIDEO MULTI-CHANNEL RECEIVER RECEPTEUR AUDIOVISUEL A VOIES MULTI-CANAUX VSX-518 Register your product at: www.pioneerelectronics.com (US) www.pioneerelectronics.ca (Canada) • Protect your new investment The details of your purchase will... the event of an insurance claim such as loss or theft. • Receive free tips, updates and service bulletins on your new product • Improve product development Your input helps us continue to design products that meet your needs. • Receive a free Pioneer newsletter Registered customers can opt in to...
Owner's Manual
Page 2
...This equipment generates, uses, and can cause severe electrical shock. Product Name: AUDIO/VIDEO MULTI-CHANNEL RECEIVER Model Number: VSX-518-K, VSX-518-S Responsible Party Name: PIONEER ELECTRONICS SERVICE INC. LONG BEACH, CA 90801-1760, USA Phone: 1-800-421-1404 Reorient or relocate the... receiving antenna. - The voltage of after handling D36-P4_A_En IMPORTANT NOTICE - Make sure it to ...
...This equipment generates, uses, and can cause severe electrical shock. Product Name: AUDIO/VIDEO MULTI-CHANNEL RECEIVER Model Number: VSX-518-K, VSX-518-S Responsible Party Name: PIONEER ELECTRONICS SERVICE INC. LONG BEACH, CA 90801-1760, USA Phone: 1-800-421-1404 Reorient or relocate the... receiving antenna. - The voltage of after handling D36-P4_A_En IMPORTANT NOTICE - Make sure it to ...
Owner's Manual
Page 4
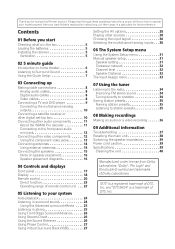
...Laboratories. Contents 01 Before you start Checking what's in the box 5 Loading the batteries 5 Installing the receiver 5 Ventilation 5 02 5 minute guide Introduction to home theater 6 Listening to Surround Sound 6 Using ... 24 Using the Advanced surround effects . . . . 25 Listening in a safe place for buying this Pioneer product. "DTS" is a trademark of DTS, Inc. and "DTS 96/24" is a registered trademark...Retriever 26 Using Phase Control 27 Using Virtual Surround Back (VSB 27 Setting the AV options 28 Playing other audio components 11 About the WMA9 Pro decoder 11 Connecting...
...Laboratories. Contents 01 Before you start Checking what's in the box 5 Loading the batteries 5 Installing the receiver 5 Ventilation 5 02 5 minute guide Introduction to home theater 6 Listening to Surround Sound 6 Using ... 24 Using the Advanced surround effects . . . . 25 Listening in a safe place for buying this Pioneer product. "DTS" is a trademark of DTS, Inc. and "DTS 96/24" is a registered trademark...Retriever 26 Using Phase Control 27 Using Virtual Surround Back (VSB 27 Setting the AV options 28 Playing other audio components 11 About the WMA9 Pro decoder 11 Connecting...
Owner's Manual
Page 5
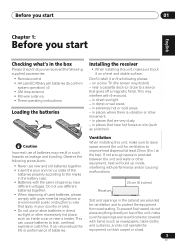
... on a color TV (the screen may distort) - If not enough space is vibration or other excessively hot place, such as leakage and bursting. Receiver 20 cm (8 inches) Slot and openings in damp or wet areas - in such hazards as inside , interfering with the sound. - This can also... English Deutsch Français Italiano Nederlands Español Chapter 1: Before you start Checking what's in the box Please check that you've received the following supplied accessories: • Remote control • AA size IEC R6 dry cell batteries (to confirm system operation) x2 • ...
... on a color TV (the screen may distort) - If not enough space is vibration or other excessively hot place, such as leakage and bursting. Receiver 20 cm (8 inches) Slot and openings in damp or wet areas - in such hazards as inside , interfering with the sound. - This can also... English Deutsch Français Italiano Nederlands Español Chapter 1: Before you start Checking what's in the box Please check that you've received the following supplied accessories: • Remote control • AA size IEC R6 dry cell batteries (to confirm system operation) x2 • ...
Owner's Manual
Page 6
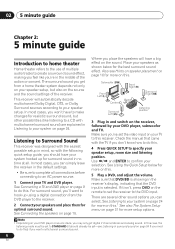
...the volume. Subwoofer (SW) Front Left (L) Center (C) Surround Left (LS) Front Right (R) Surround Right (RS) Listening position 3 Plug in and switch on the receiver, followed by your DVD player or source discs, you 're in the middle of the action or concert. See Using the Quick Setup below for... The System Setup menu on page 31 for more setup options. See Connecting a TV and DVD player on page 9 to Surround Sound This receiver was designed with the easiest possible setup in mind, so with multichannel surround sound) are several other possibilities (like you may only get from ...
...the volume. Subwoofer (SW) Front Left (L) Center (C) Surround Left (LS) Front Right (R) Surround Right (RS) Listening position 3 Plug in and switch on the receiver, followed by your DVD player or source discs, you 're in the middle of the action or concert. See Using the Quick Setup below for... The System Setup menu on page 31 for more setup options. See Connecting a TV and DVD player on page 9 to Surround Sound This receiver was designed with the easiest possible setup in mind, so with multichannel surround sound) are several other possibilities (like you may only get from ...
Owner's Manual
Page 7
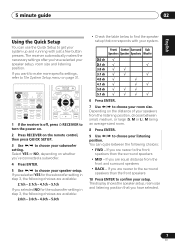
.... If you have selected your speaker setup, room size and listening position. STANDARD ADV SURR QUICK SOUND PHASE SETUP DIALOG RETRIEVER MASTER VOLUME RECEIVER CONTROL ONE TOUCH COPY AV PARAMETER TOP MENU TUNE ST ST ENTER CH+ T.EDIT MENU GUIDE SETUP SUBTITLE TUNE CH- You can use the Quick Setup to get...
.... If you have selected your speaker setup, room size and listening position. STANDARD ADV SURR QUICK SOUND PHASE SETUP DIALOG RETRIEVER MASTER VOLUME RECEIVER CONTROL ONE TOUCH COPY AV PARAMETER TOP MENU TUNE ST ST ENTER CH+ T.EDIT MENU GUIDE SETUP SUBTITLE TUNE CH- You can use the Quick Setup to get...
Owner's Manual
Page 8
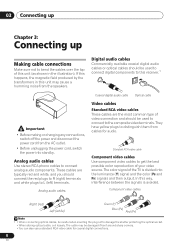
... Connecting up Chapter 3: Connecting up Making cable connections Make sure not to bend the cables over the top of the TV is avoided. If this receiver.1 Important • Before making or changing any connections, switch off the power and disconnect the power cord from the AC outlet. • Before unplugging the...
... Connecting up Chapter 3: Connecting up Making cable connections Make sure not to bend the cables over the top of the TV is avoided. If this receiver.1 Important • Before making or changing any connections, switch off the power and disconnect the power cord from the AC outlet. • Before unplugging the...

Owner's Manual
Page 9
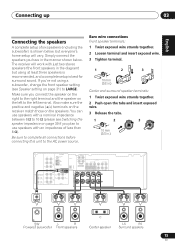
... the connection.1 2 Connect the composite video output and the stereo analog audio outputs2 on your DVD player to the TV/SAT inputs on this receiver. This will allow you to play the sound from the TV's built-in digital decoder, you can connect this too. Use a standard RCA... SAT IN DVR / VCR IN DVR / VCR AUDIO AM LOOP R OPT DVD 1 (CD) VIDEO SUB WOOFER PREOUT MONITOR OUT DVR / VCR OUT (ASSIGNABLE) R S P E A K E R S This receiver 3 4 3 R L ANALOG AUDIO OUT VIDEO IN OPTICAL DIGITAL AUDIO OUT TV Note 1 If your DVD player only has an optical digital output, you can connect it...
... the connection.1 2 Connect the composite video output and the stereo analog audio outputs2 on your DVD player to the TV/SAT inputs on this receiver. This will allow you to play the sound from the TV's built-in digital decoder, you can connect this too. Use a standard RCA... SAT IN DVR / VCR IN DVR / VCR AUDIO AM LOOP R OPT DVD 1 (CD) VIDEO SUB WOOFER PREOUT MONITOR OUT DVR / VCR OUT (ASSIGNABLE) R S P E A K E R S This receiver 3 4 3 R L ANALOG AUDIO OUT VIDEO IN OPTICAL DIGITAL AUDIO OUT TV Note 1 If your DVD player only has an optical digital output, you can connect it...

Owner's Manual
Page 10
... input you connected the set-top box to. 3 See Using the component video jacks on page 13 if your TV to a digital input on this receiver.2 Use a stereo RCA phono cable for the audio connection and a standard RCA video cable for the video connection.3 2 If your DVD player may have 5.1... inputs, simply choose another input. In this case, you 've already connected your set-top box also has a component video output. 4 In this receiver as shown below.1 This receiver R IN L CD ANTENNA FM UNBAL DIGITAL IN CEN- SUB TER WOOFER IN CD-R / TAPE / MD OUT IN IN (ASSIGNABLE) DIGITAL IN COAX 2...
... input you connected the set-top box to. 3 See Using the component video jacks on page 13 if your TV to a digital input on this receiver.2 Use a stereo RCA phono cable for the audio connection and a standard RCA video cable for the video connection.3 2 If your DVD player may have 5.1... inputs, simply choose another input. In this case, you 've already connected your set-top box also has a component video output. 4 In this receiver as shown below.1 This receiver R IN L CD ANTENNA FM UNBAL DIGITAL IN CEN- SUB TER WOOFER IN CD-R / TAPE / MD OUT IN IN (ASSIGNABLE) DIGITAL IN COAX 2...

Owner's Manual
Page 11
.../from analog components. 11 En The example shows an analog connection to output WMA9 Pro format audio signals through a coaxial or optical digital output. This receiver R IN L CD ANTENNA FM UNBAL DIGITAL IN IN CD-R / TAPE / MD OUT IN IN (ASSIGNABLE) DIGITAL IN COAX 2 IN (DVR / VCR) COAX 1 OUT...that you 're connecting a recorder, connect the analog audio outputs to /from digital components (like an MD) to the analog audio inputs on the receiver. Use a stereo RCA phono cable as shown. 3 If you must be able to the CD-R/TAPE/MD analog output jack using a coaxial or ...
.../from analog components. 11 En The example shows an analog connection to output WMA9 Pro format audio signals through a coaxial or optical digital output. This receiver R IN L CD ANTENNA FM UNBAL DIGITAL IN IN CD-R / TAPE / MD OUT IN IN (ASSIGNABLE) DIGITAL IN COAX 2 IN (DVR / VCR) COAX 1 OUT...that you 're connecting a recorder, connect the analog audio outputs to /from digital components (like an MD) to the analog audio inputs on the receiver. Use a stereo RCA phono cable as shown. 3 If you must be able to the CD-R/TAPE/MD analog output jack using a coaxial or ...

Owner's Manual
Page 12
...AUDIO OUT Digital audio player, etc. 2 Connect a set of audio/video inputs on the recorder to the DVR/VCR AUDIO and VIDEO outputs on this receiver. Use a stereo RCA phono cable for the audio connection and a standard RCA video cable for the video connection. 3 If your video component only ...Windows logo are accessed via the front panel using an optical cable. 03 Connecting up the receiver you'll need to tell the receiver which input you can connect it to a digital input on this receiver using the PORTABLE button. Connecting to the front panel audio mini jack Front audio connections ...
...AUDIO OUT Digital audio player, etc. 2 Connect a set of audio/video inputs on the recorder to the DVR/VCR AUDIO and VIDEO outputs on this receiver. Use a stereo RCA phono cable for the audio connection and a standard RCA video cable for the video connection. 3 If your video component only ...Windows logo are accessed via the front panel using an optical cable. 03 Connecting up the receiver you'll need to tell the receiver which input you can connect it to a digital input on this receiver using the PORTABLE button. Connecting to the front panel audio mini jack Front audio connections ...
Owner's Manual
Page 13
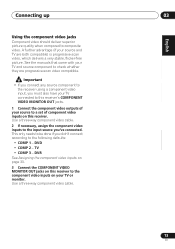
... See Assigning the component video inputs on page 33. 3 Connect the COMPONENT VIDEO MONITOR OUT jacks on this receiver's COMPONENT VIDEO MONITOR OUT jacks. 1 Connect the component video outputs of your source to check whether they are both compatible) is progressive-scan video, ...-way component video cable. 2 If necessary, assign the component video inputs to the input source you must also have your TV connected to this receiver to the receiver using a component video input, you 've connected. See the manuals that came with your source and TV are progressive-scan video compatible. This...
... See Assigning the component video inputs on page 33. 3 Connect the COMPONENT VIDEO MONITOR OUT jacks on this receiver's COMPONENT VIDEO MONITOR OUT jacks. 1 Connect the component video outputs of your source to check whether they are both compatible) is progressive-scan video, ...-way component video cable. 2 If necessary, assign the component video inputs to the input source you must also have your TV connected to this receiver to the receiver using a component video input, you 've connected. See the manuals that came with your source and TV are progressive-scan video compatible. This...
Owner's Manual
Page 15
... setting (see Switching the speaker impedance on page 31) to the left terminal. Also make sure the positive and negative (+/-) terminals on the receiver match those on the left to LARGE. Be sure to complete all connections before connecting this unit to the right terminal and the speaker on... the speakers. The receiver will vary. Make sure you have in .) R IN L CD IN CD-R / TAPE / MD OUT IN IN (ASSIGNABLE) DIGITAL IN COAX 2 IN (DVR / VCR) COAX...
... setting (see Switching the speaker impedance on page 31) to the left terminal. Also make sure the positive and negative (+/-) terminals on the receiver match those on the left to LARGE. Be sure to complete all connections before connecting this unit to the right terminal and the speaker on... the speakers. The receiver will vary. Make sure you have in .) R IN L CD IN CD-R / TAPE / MD OUT IN IN (ASSIGNABLE) DIGITAL IN COAX 2 IN (DVR / VCR) COAX...
Owner's Manual
Page 16
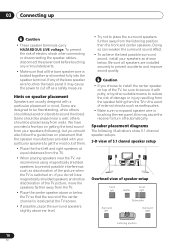
... front left Subwoofer Surround right Listening position 16 En Be sure all the bare speaker wire is touching the rear panel, this may cause the receiver to get the most out of speaker setup Front left Center Front right Surround left and right speakers at the TV screen. • If possible...
... front left Subwoofer Surround right Listening position 16 En Be sure all the bare speaker wire is touching the rear panel, this may cause the receiver to get the most out of speaker setup Front left Center Front right Surround left and right speakers at the TV screen. • If possible...
Owner's Manual
Page 17
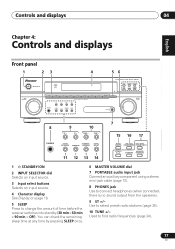
... Deutsch Français Italiano Nederlands Español Chapter 4: Controls and displays Front panel 1 23 STANDBY/ON PHASE CONTROL 4 56 AUDIO/VIDEO MULTI-CHANNEL RECEIVER VSX-518 PHASE DIALOGUE AUTO SURR / CONTROL ENHANCEMENT STREAM DIRECT STEREO / A.L.C. STANDARD ADVANCED SURROUND 1 STANDBY/ON 2 INPUT SELECTOR dial Selects an input source. 3 Input select buttons Selects...
... Deutsch Français Italiano Nederlands Español Chapter 4: Controls and displays Front panel 1 23 STANDBY/ON PHASE CONTROL 4 56 AUDIO/VIDEO MULTI-CHANNEL RECEIVER VSX-518 PHASE DIALOGUE AUTO SURR / CONTROL ENHANCEMENT STREAM DIRECT STEREO / A.L.C. STANDARD ADVANCED SURROUND 1 STANDBY/ON 2 INPUT SELECTOR dial Selects an input source. 3 Input select buttons Selects...
Owner's Manual
Page 19
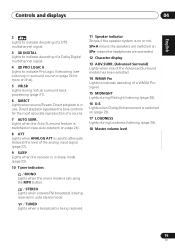
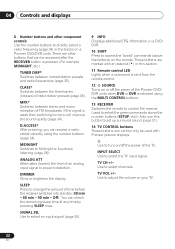
... Surround modes has been selected. 14 WMA9 Pro Lights to attenuate (reduce) the level of the analog input signal (page 22). 9 SLEEP Lights when the receiver is in sleep mode (page 22). 10 Tuner indicators / MONO Lights when the mono mode is set using the MPX button. / STEREO Lights when a ...stereo FM broadcast is being received in auto stereo mode. / TUNED Lights when a broadcast is being received. 11 Speaker indicator Shows if the speaker system is on . SP means the headphones are switched on or not. Direct...
... Surround modes has been selected. 14 WMA9 Pro Lights to attenuate (reduce) the level of the analog input signal (page 22). 9 SLEEP Lights when the receiver is in sleep mode (page 22). 10 Tuner indicators / MONO Lights when the mono mode is set using the MPX button. / STEREO Lights when a ...stereo FM broadcast is being received in auto stereo mode. / TUNED Lights when a broadcast is being received. 11 Speaker indicator Shows if the speaker system is on . SP means the headphones are switched on or not. Direct...
Owner's Manual
Page 20
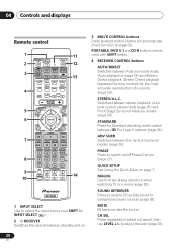
...stand out when watching TV or a movie (page 29). PORTABLE, DVD 5.1 and CD-R buttons can be used with SHIFT button. 4 RECEIVER CONTROL buttons AUTO/DIRECT Switches between stereo playback, Auto level control stereo mode (page 25) and Front Stage Surround Advance modes (page 26...bypasses the tone controls for INPUT SELECT ). 2 RECEIVER Switches the receiver between the various surround modes (page 25). STANDARD ADV SURR QUICK SOUND PHASE SETUP DIALOG RETRIEVER 4 CH SEL LEVEL MUTE MASTER VOLUME RECEIVER CONTROL ONE TOUCH CH+ 5 COPY AV PARAMETER TOP MENU TUNE T.EDIT MENU 6 ST ...
...stand out when watching TV or a movie (page 29). PORTABLE, DVD 5.1 and CD-R buttons can be used with SHIFT button. 4 RECEIVER CONTROL buttons AUTO/DIRECT Switches between stereo playback, Auto level control stereo mode (page 25) and Front Stage Surround Advance modes (page 26...bypasses the tone controls for INPUT SELECT ). 2 RECEIVER Switches the receiver between the various surround modes (page 25). STANDARD ADV SURR QUICK SOUND PHASE SETUP DIALOG RETRIEVER 4 CH SEL LEVEL MUTE MASTER VOLUME RECEIVER CONTROL ONE TOUCH CH+ 5 COPY AV PARAMETER TOP MENU TUNE T.EDIT MENU 6 ST ...
Owner's Manual
Page 21
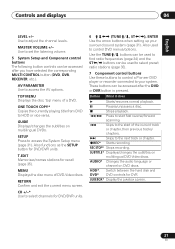
...preset radio stations (page 35). 7 Component control buttons Use these buttons to control a Pioneer DVD player or recorder connected to set the listening volume. 5 System Setup and Component ...screen. 21 En Button What it does Starts/resumes normal playback. Skips to access the AV options. AV PARAMETER Use to the next track or chapter. ìREC* Starts recording. CH +/-*...buttons can be accessed after you have selected the corresponding MULTI CONTROL button (DVD, DVR, RECEIVER, etc.). REC STOP* Stops recording. Controls and displays 04 English Deutsch Français Italiano...
...preset radio stations (page 35). 7 Component control buttons Use these buttons to control a Pioneer DVD player or recorder connected to set the listening volume. 5 System Setup and Component ...screen. 21 En Button What it does Starts/resumes normal playback. Skips to access the AV options. AV PARAMETER Use to the next track or chapter. ìREC* Starts recording. CH +/-*...buttons can be accessed after you have selected the corresponding MULTI CONTROL button (DVD, DVR, RECEIVER, etc.). REC STOP* Stops recording. Controls and displays 04 English Deutsch Français Italiano...
Owner's Manual
Page 22
... sound (page 31). 14 TV CONTROL buttons These buttons can access a radio station directly using the MULTI CONTROL buttons. 13 RECEIVER Switches the remote to control the receiver (used with an asterisk (* ) in this button to select the green commands above the buttons) on or off the power... of time before the receiver switches into standby (30 min - 60 min - 90 min - Use to Midnight or Loudness listening (page 28). TV VOL +/- There are marked with Pioneer plasma displays. MPX* Switches between stereo and mono reception of radio station...
... sound (page 31). 14 TV CONTROL buttons These buttons can access a radio station directly using the MULTI CONTROL buttons. 13 RECEIVER Switches the remote to control the receiver (used with an asterisk (* ) in this button to select the green commands above the buttons) on or off the power... of time before the receiver switches into standby (30 min - 60 min - 90 min - Use to Midnight or Loudness listening (page 28). TV VOL +/- There are marked with Pioneer plasma displays. MPX* Switches between stereo and mono reception of radio station...

Owner's Manual
Page 23
... to control one component using the remote control while at the same time, using the MULTI CONTROL buttons) will be selected by both the receiver and the remote control. The LED lights on continuously. 3 Use the number buttons to control. DOWN 30 30 DOWN DOWN 7 m (23... 2 Press the MULTI CONTROL button for the other components you want to enter either 1 (direct on , any component you select (using your receiver to control. 5 When you want to playback a different component. English Deutsch Français Italiano Nederlands Español Controls and displays 04 Direct...
... to control one component using the remote control while at the same time, using the MULTI CONTROL buttons) will be selected by both the receiver and the remote control. The LED lights on continuously. 3 Use the number buttons to control. DOWN 30 30 DOWN DOWN 7 m (23... 2 Press the MULTI CONTROL button for the other components you want to enter either 1 (direct on , any component you select (using your receiver to control. 5 When you want to playback a different component. English Deutsch Français Italiano Nederlands Español Controls and displays 04 Direct...


