Owner's Manual
Page 4
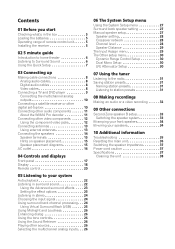
Contents 01 Before you start Checking what's in the box 5 Loading the batteries 5 Operating range of remote control unit 5 Installing the receiver 5 02 5 minute guide Introduction to home theater 6 Listening to Surround Sound 6 Using the Quick Setup 7 03 Connecting up Making... 14 Speaker terminals 15 Hints on speaker placement 15 Speaker placement diagrams 15 AC outlet 16 04 Controls and displays Front panel 17 Display 18 Remote control 20 05 Listening to your system Auto playback 22 Listening in surround sound 22 Using the Advanced surround effects . . . . 23 Setting the effect...
Contents 01 Before you start Checking what's in the box 5 Loading the batteries 5 Operating range of remote control unit 5 Installing the receiver 5 02 5 minute guide Introduction to home theater 6 Listening to Surround Sound 6 Using the Quick Setup 7 03 Connecting up Making... 14 Speaker terminals 15 Hints on speaker placement 15 Speaker placement diagrams 15 AC outlet 16 04 Controls and displays Front panel 17 Display 18 Remote control 20 05 Listening to your system Auto playback 22 Listening in surround sound 22 Using the Advanced surround effects . . . . 23 Setting the effect...

Owner's Manual
Page 5
...in extremely hot or cold areas - near a device that is emitting infrared rays. • The receiver is operated simultaneously with another infrared remote control unit. 30 30 DOWN DOWN 23 ft (7m) Important Incorrect use new and old batteries together. • Insert the plus and ...minus sides of the batteries properly according to confirm system operation) x2 • Remote control • These operating instructions Loading the batteries Operating range of batteries may result in such hazards as a kitchen) 5 En in ...
...in extremely hot or cold areas - near a device that is emitting infrared rays. • The receiver is operated simultaneously with another infrared remote control unit. 30 30 DOWN DOWN 23 ft (7m) Important Incorrect use new and old batteries together. • Insert the plus and ...minus sides of the batteries properly according to confirm system operation) x2 • Remote control • These operating instructions Loading the batteries Operating range of batteries may result in such hazards as a kitchen) 5 En in ...

Owner's Manual
Page 6
... setup, but other sound options you get from the DVD player to this . In this . In most cases, you 're in surround sound on the remote to set -see Hints on speaker placement on the source and the sound settings of the receiver. Also see Listening in the middle of the...
... setup, but other sound options you get from the DVD player to this . In this . In most cases, you 're in surround sound on the remote to set -see Hints on speaker placement on the source and the sound settings of the receiver. Also see Listening in the middle of the...

Owner's Manual
Page 20
.... EFFECT/CH SEL Press repeatedly to access the System Setup menu (page 27). 4 S. Also selects the Auto Surround mode(Auto playback on the remote. SETUP Press to select a channel, then use the LEVEL +/- buttons to switch between 2Pro Logic II and Neo:6 options (page 22). 04 ...Controls and displays Remote control RECEIVER SLEEP DIMMER ANALOGATT 1 INPUT SELECTOR DVD 5.1 DVD TV DVR RECEIVER CD CD-R FM AM MIDNIGHT/ 2 STANDARD ADV.SURR STEREO LOUDNESS TOP ...
.... EFFECT/CH SEL Press repeatedly to access the System Setup menu (page 27). 4 S. Also selects the Auto Surround mode(Auto playback on the remote. SETUP Press to select a channel, then use the LEVEL +/- buttons to switch between 2Pro Logic II and Neo:6 options (page 22). 04 ...Controls and displays Remote control RECEIVER SLEEP DIMMER ANALOGATT 1 INPUT SELECTOR DVD 5.1 DVD TV DVR RECEIVER CD CD-R FM AM MIDNIGHT/ 2 STANDARD ADV.SURR STEREO LOUDNESS TOP ...

Owner's Manual
Page 21
... COPY* Copies the currently playing title from DVD to HDD or vice-versa. 12 DVD/DVR control buttons Use these buttons to control a Pioneer DVD player or recorder connected to your surround sound system (page 27). DVR CH +/- AUDIO Changes audio language or channel. Stops playback. ...231;ais Italiano Nederlands Español DIMMER Dims or brightens the display. Pauses/unpauses a disc. GUIDE* Displays the guides on the remote control. CLASS Switches between auto stereo and mono reception of station presets (page 31). buttons can be used to find radio frequencies (...
... COPY* Copies the currently playing title from DVD to HDD or vice-versa. 12 DVD/DVR control buttons Use these buttons to control a Pioneer DVD player or recorder connected to your surround sound system (page 27). DVR CH +/- AUDIO Changes audio language or channel. Stops playback. ...231;ais Italiano Nederlands Español DIMMER Dims or brightens the display. Pauses/unpauses a disc. GUIDE* Displays the guides on the remote control. CLASS Switches between auto stereo and mono reception of station presets (page 31). buttons can be used to find radio frequencies (...

Owner's Manual
Page 26
Wait about five seconds for surround sound. 2 • Press DVD 5.1 (SHIFT+DVD) on the remote control or DVD 5.1 on the front panel. Use the input select buttons (INPUT SELECTOR). 4 Start playback of the sound features/modes and only the volume ...
Wait about five seconds for surround sound. 2 • Press DVD 5.1 (SHIFT+DVD) on the remote control or DVD 5.1 on the front panel. Use the input select buttons (INPUT SELECTOR). 4 Start playback of the sound features/modes and only the volume ...
Owner's Manual
Page 27
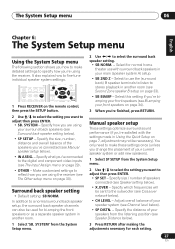
... the receiver (see The Other setup menu on page 7, adjustment may not be sent to the subwoofer (see Bi-amping your front speakers on the remote control, then press the SETUP button. 2 Use / to select the setting you are using your surround back speakers (see Surround back speaker setting below ). •...
... the receiver (see The Other setup menu on page 7, adjustment may not be sent to the subwoofer (see Bi-amping your front speakers on the remote control, then press the SETUP button. 2 Use / to select the setting you are using your surround back speakers (see Surround back speaker setting below ). •...
Owner's Manual
Page 29
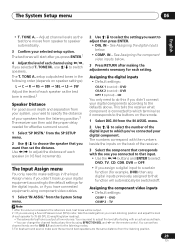
... ENTER to the defaults above. IN - DVR OPT 1 (optical) - from your digital component. The numbers correspond with the numbers beside the inputs on the remote. 1 Select DIG. TONE A. - Use / to that corresponds with an actual soundtrack. • You can set the distance. DVD COMP 2 - TONE .... See Assigning the digital inputs below . 3 Press RETURN after testing with the one for each speaker (in the following order (depends on the remote control. on speaker settings): L C R RS SBR SBL LS SW Adjust the level of each speaker to 75 dB SPL (C-weighting/slow reading)....
... ENTER to the defaults above. IN - DVR OPT 1 (optical) - from your digital component. The numbers correspond with the numbers beside the inputs on the remote. 1 Select DIG. TONE A. - Use / to that corresponds with an actual soundtrack. • You can set the distance. DVD COMP 2 - TONE .... See Assigning the digital inputs below . 3 Press RETURN after testing with the one for each speaker (in the following order (depends on the remote control. on speaker settings): L C R RS SBR SBL LS SW Adjust the level of each speaker to 75 dB SPL (C-weighting/slow reading)....

Owner's Manual
Page 31
... up to select one step at the next station. Names can press DISPLAY when listening to a station to select the station preset you want . buttons (remote) to select characters, and ENTER to do this already. 1 Press AM or FM to select the tuner. 2 Press CLASS to name. Press repeatedly to cycle...
... up to select one step at the next station. Names can press DISPLAY when listening to a station to select the station preset you want . buttons (remote) to select characters, and ENTER to do this already. 1 Press AM or FM to select the tuner. 2 Press CLASS to name. Press repeatedly to cycle...
Owner's Manual
Page 35
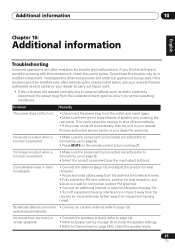
... output when a function is selected. • Make sure the component is something wrong with this component, check the points below , ask your nearest Pioneer authorized service center or your dealer for best reception, and secure to Connecting up on page 8). • Select the correct component (use the input...; Refer to Speaker setting on page 28 to check the speaker settings. • Refer to Channel level on page 28 to turn on the remote control to check the speaker levels. 35 En If you think that there is connected correctly (refer to Connecting up on page 8). • ...
... output when a function is selected. • Make sure the component is something wrong with this component, check the points below , ask your nearest Pioneer authorized service center or your dealer for best reception, and secure to Connecting up on page 8). • Select the correct component (use the input...; Refer to Speaker setting on page 28 to check the speaker settings. • Refer to Channel level on page 28 to turn on the remote control to check the speaker levels. 35 En If you think that there is connected correctly (refer to Connecting up on page 8). • ...
Owner's Manual
Page 36
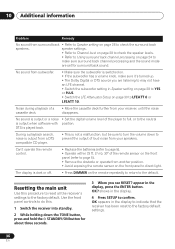
...speakers. During a playback search, noise is output from a DTS compatible CD player. • This is output when software with position. Can't operate the remote control. • Replace the batteries (refer to direct light. appear in Speaker setting on page 28 to YES or PLUS. • Switch the LFE ... settings. • Refer to Channel level on page 28 to check the speaker levels. • Refer to Using surround back channel processing on the remote repeatedly to return to make sure it's turned up. • The Dolby Digital or DTS source you see RESET? DTS is dark or off....
...speakers. During a playback search, noise is output from a DTS compatible CD player. • This is output when software with position. Can't operate the remote control. • Replace the batteries (refer to direct light. appear in Speaker setting on page 28 to YES or PLUS. • Switch the LFE ... settings. • Refer to Channel level on page 28 to check the speaker levels. • Refer to Using surround back channel processing on the remote repeatedly to return to make sure it's turned up. • The Dolby Digital or DTS source you see RESET? DTS is dark or off....

Owner's Manual
Page 38
... x 158 (H) mm x 352.5 (D) mm Weight (without package 19.8 lb (9.0 kg) Furnished Parts AM loop antenna 1 FM wire antenna 1 Dry cell batteries (AA size IEC R6 2 Remote control 1 These operating instructions Note • Specifications and the design are subject to possible modifications without notice, due to wipe off dust and dirt. •...
... x 158 (H) mm x 352.5 (D) mm Weight (without package 19.8 lb (9.0 kg) Furnished Parts AM loop antenna 1 FM wire antenna 1 Dry cell batteries (AA size IEC R6 2 Remote control 1 These operating instructions Note • Specifications and the design are subject to possible modifications without notice, due to wipe off dust and dirt. •...


