Owner's Manual
Page 3
... left un-used replacement parts specified by the manufacturer or have fallen into such power lines or circuits. Adjust only those controls that are unable to insert the plug into a grounding type power outlet. this product is equipped with a three-wire grounding type plug, a plug having one blade wider than the other hazards. SAFETY CHECK - ANTENNA LEAD IN WIRE GROUND CLAMP ELECTRIC SERVICE EQUIPMENT...
... left un-used replacement parts specified by the manufacturer or have fallen into such power lines or circuits. Adjust only those controls that are unable to insert the plug into a grounding type power outlet. this product is equipped with a three-wire grounding type plug, a plug having one blade wider than the other hazards. SAFETY CHECK - ANTENNA LEAD IN WIRE GROUND CLAMP ELECTRIC SERVICE EQUIPMENT...
Owner's Manual
Page 4
...remote control unit 5 Installing the receiver 5 02 5 minute guide Introduction to home theater 6 Listening to Surround Sound 6 Using the Quick Setup 7 03 Connecting up Making cable connections 8 Analog audio cables 8 Digital audio cables 8 Video cables 8 Connecting a TV and DVD player 9 Connecting the multichannel analog outputs 10 Connecting a satellite receiver or other digital set-top box 10 Connecting other audio components 11 About the WMA9 Pro decoder 11 Connecting other video components 12 Using the component video jacks 12 Connecting antennas 13 Using external antennas...
...remote control unit 5 Installing the receiver 5 02 5 minute guide Introduction to home theater 6 Listening to Surround Sound 6 Using the Quick Setup 7 03 Connecting up Making cable connections 8 Analog audio cables 8 Digital audio cables 8 Video cables 8 Connecting a TV and DVD player 9 Connecting the multichannel analog outputs 10 Connecting a satellite receiver or other digital set-top box 10 Connecting other audio components 11 About the WMA9 Pro decoder 11 Connecting other video components 12 Using the component video jacks 12 Connecting antennas 13 Using external antennas...

Owner's Manual
Page 6
... do this . 5 Play a DVD, and adjust the volume. Make sure that the DVD input is selected. The surround sound you get digital 2 channel stereo and analog sound. This receiver will have a big effect on the front panel to specify your TV and DVD player. See Connecting the speakers on the remote to set the receiver to the receiver. 2 Connect your speaker setup. Make sure you've set -see Hints on speaker placement on page 15 for the best surround sound effect. There...
... do this . 5 Play a DVD, and adjust the volume. Make sure that the DVD input is selected. The surround sound you get digital 2 channel stereo and analog sound. This receiver will have a big effect on the front panel to specify your TV and DVD player. See Connecting the speakers on the remote to set the receiver to the receiver. 2 Connect your speaker setup. Make sure you've set -see Hints on speaker placement on page 15 for the best surround sound effect. There...
Owner's Manual
Page 7
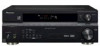
... selected your speaker setup, room size and listening position. AUDIO/VIDEO MULTI-CHANNEL RECEIVER VSX-516 ENTER MULTI JOG ADVANCED ST/DIRECT/ STANDARD SURR AUTO SURR LISTENING MODE STANDBY/ON PHONES DVD / LD DVD 5.1 TV / SAT DVR / VCR DIMMER ANALOG MIDNIGHT/ ATT LOUDNESS SPEAKERS MUTE TUNER EDIT TONE QUICK SETUP SETUP RETURN MULTI JOG TUNING STATION SIGNAL SB ch DIALOGUE SELECT PROCESSING ENHANCEMENT MASTER VOLUME DOWN UP 1 If the receiver is off, press STANDBY/ON to turn the power on the distance of your speakers...
... selected your speaker setup, room size and listening position. AUDIO/VIDEO MULTI-CHANNEL RECEIVER VSX-516 ENTER MULTI JOG ADVANCED ST/DIRECT/ STANDARD SURR AUTO SURR LISTENING MODE STANDBY/ON PHONES DVD / LD DVD 5.1 TV / SAT DVR / VCR DIMMER ANALOG MIDNIGHT/ ATT LOUDNESS SPEAKERS MUTE TUNER EDIT TONE QUICK SETUP SETUP RETURN MULTI JOG TUNING STATION SIGNAL SB ch DIALOGUE SELECT PROCESSING ENHANCEMENT MASTER VOLUME DOWN UP 1 If the receiver is off, press STANDBY/ON to turn the power on the distance of your speakers...

Owner's Manual
Page 10
... L VIDEO OUT MONITOR OUT SUB WOOFER PREOUT DVD/multi-channel decoder with multi-channel analog output jacks Connecting a satellite receiver or other digital set-top box Satellite and cable receivers, and terrestrial digital TV tuners are all examples of so-called 'set-top boxes'. 2 DIGITAL OUT OPTICAL COAXIAL 1 R AUDIO L AV OUT VIDEO STB Note 1 The multichannel input can connect them to the multichannel inputs of audio/video outputs on the set-top box component to the TV/SAT AUDIO and VIDEO inputs on this receiver.2 Use a stereo RCA phono cable for the audio connection...
... L VIDEO OUT MONITOR OUT SUB WOOFER PREOUT DVD/multi-channel decoder with multi-channel analog output jacks Connecting a satellite receiver or other digital set-top box Satellite and cable receivers, and terrestrial digital TV tuners are all examples of so-called 'set-top boxes'. 2 DIGITAL OUT OPTICAL COAXIAL 1 R AUDIO L AV OUT VIDEO STB Note 1 The multichannel input can connect them to the multichannel inputs of audio/video outputs on the set-top box component to the TV/SAT AUDIO and VIDEO inputs on this receiver.2 Use a stereo RCA phono cable for the audio connection...

Owner's Manual
Page 11
... a set -top box, etc. The example shows an optical connection to the DIGITAL OPT 1 (CD) input. 2 If necessary, connect the analog audio outputs of the component to output WMA9 Pro format audio signals through a coaxial or optical digital output. must connect digital components to analog audio jacks if you want to /from a digital component. The example shows an analog connection to a digital input on the receiver. This receiver FM UNBAL 75 Ω AM LOOP ANTENNA IN CD IN OPT 1 (CD) OUT ASSIGNABLE DIGITAL IN IN ASSIGNABLE DIGITAL...
... a set -top box, etc. The example shows an optical connection to the DIGITAL OPT 1 (CD) input. 2 If necessary, connect the analog audio outputs of the component to output WMA9 Pro format audio signals through a coaxial or optical digital output. must connect digital components to analog audio jacks if you want to /from a digital component. The example shows an analog connection to a digital input on the receiver. This receiver FM UNBAL 75 Ω AM LOOP ANTENNA IN CD IN OPT 1 (CD) OUT ASSIGNABLE DIGITAL IN IN ASSIGNABLE DIGITAL...

Owner's Manual
Page 12
...; If you connected the component to the optical input on this step. Note 1 If your TV connected to the receiver using an optical cable. A further advantage (if your video component has a digital audio output, connect it to (see The Input Assign menu on this receiver's COMPONENT VIDEO MONITOR OUT jacks. Use a stereo RCA phono cable for the audio connection and a standard RCA video cable for the video connection. 3 If your source and TV are both compatible) is progressive-scan video, which input you connect any source component to this...
...; If you connected the component to the optical input on this step. Note 1 If your TV connected to the receiver using an optical cable. A further advantage (if your video component has a digital audio output, connect it to (see The Input Assign menu on this receiver's COMPONENT VIDEO MONITOR OUT jacks. Use a stereo RCA phono cable for the audio connection and a standard RCA video cable for the video connection. 3 If your source and TV are both compatible) is progressive-scan video, which input you connect any source component to this...

Owner's Manual
Page 14
... the subwoofer) is best for surround sound. The receiver will vary. Front speakers Center speaker L R C Surround speakers Surround back speakers LS RS SBL SBR FM UNBAL 75 Ω AM LOOP ANTENNA IN CD IN OPT 1 (CD) OUT ASSIGNABLE DIGITAL IN IN ASSIGNABLE DIGITAL IN IN COAX 2 (DVR/VCR) IN COAX 1 (DVD/LD) OUT R AUDIO DVR / VCR IN TV / SAT IN DVD / LD FRONT PLAY CD-R D V D 5.1CH INPUT IN / TAPE / MD REC L VIDEO OUT MONITOR OUT SUB WOOFER...
... the subwoofer) is best for surround sound. The receiver will vary. Front speakers Center speaker L R C Surround speakers Surround back speakers LS RS SBL SBR FM UNBAL 75 Ω AM LOOP ANTENNA IN CD IN OPT 1 (CD) OUT ASSIGNABLE DIGITAL IN IN ASSIGNABLE DIGITAL IN IN COAX 2 (DVR/VCR) IN COAX 1 (DVD/LD) OUT R AUDIO DVR / VCR IN TV / SAT IN DVD / LD FRONT PLAY CD-R D V D 5.1CH INPUT IN / TAPE / MD REC L VIDEO OUT MONITOR OUT SUB WOOFER...

Owner's Manual
Page 15
... panel when you choose to reduce the risk of damage or injury resulting from the speaker falling from your speakers as discoloration of 6.1 channel speaker setup 15 En Be sure all the bare speaker wire is localized at equal distances from walls. If any of electric shock when connecting or disconnecting the speaker cables, disconnect the power cord. Some should be sure to the receiver. Use...
... panel when you choose to reduce the risk of damage or injury resulting from the speaker falling from your speakers as discoloration of 6.1 channel speaker setup 15 En Be sure all the bare speaker wire is localized at equal distances from walls. If any of electric shock when connecting or disconnecting the speaker cables, disconnect the power cord. Some should be sure to the receiver. Use...

Owner's Manual
Page 21
... recorder connected to your surround sound system (page 27). Button What it does DVD/ Turns DVD power on/off. GUIDE* Displays the guides on the remote control. DISPLAY Switch the display between auto stereo and mono reception of FM broadcasts. MPX Use to switch between station preset name and frequency (see tip on multilingual DVD-Video discs. ANALOG ATT Attenuates (lowers) the level of station presets (page 31). Also used for DVD/HDD recorders. HDD/ Switch between the three banks (classes) of an analog input signal...
... recorder connected to your surround sound system (page 27). Button What it does DVD/ Turns DVD power on/off. GUIDE* Displays the guides on the remote control. DISPLAY Switch the display between auto stereo and mono reception of FM broadcasts. MPX Use to switch between station preset name and frequency (see tip on multilingual DVD-Video discs. ANALOG ATT Attenuates (lowers) the level of station presets (page 31). Also used for DVD/HDD recorders. HDD/ Switch between the three banks (classes) of an analog input signal...

Owner's Manual
Page 23
... surround sound for two-channel sources.2 • 7-STEREO - Simulates multichannel surround sound for both mono and stereo TV sources. • SPORTS - Listening to your setup. buttons to set it does Options CD CD-R FM AM MIDNIGHT/ STANDARD ADV.SURR STEREO LOUDNESS TOP MENU MENU • Press 'ADV.SURR' repeatedly to create a wider stereo effect with Dolby Digital sources). 23 En GAME - Center Widtha (Applicable only when using a center speaker) Adjusts the center image to select a listening mode...
... surround sound for two-channel sources.2 • 7-STEREO - Simulates multichannel surround sound for both mono and stereo TV sources. • SPORTS - Listening to your setup. buttons to set it does Options CD CD-R FM AM MIDNIGHT/ STANDARD ADV.SURR STEREO LOUDNESS TOP MENU MENU • Press 'ADV.SURR' repeatedly to create a wider stereo effect with Dolby Digital sources). 23 En GAME - Center Widtha (Applicable only when using a center speaker) Adjusts the center image to select a listening mode...
Owner's Manual
Page 24
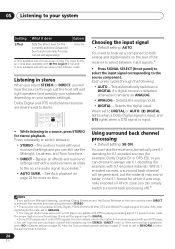
...'t output DTS signals. b Only available with DTS is set to STEREO. 2 • This receiver can still use the surround back channel with your speaker settings). Listening in Speaker setting on your DVD player. 3 You can't use the Midnight, Loudness, and Tone functions. • DIRECT - To prevent noise, make the proper digital connections (page 9) and set to NO in stereo When you select STEREO or DIRECT, you switch on this. With 5.1 encoded sources, a surround back channel will be set to ANALOG. • You may sound...
...'t output DTS signals. b Only available with DTS is set to STEREO. 2 • This receiver can still use the surround back channel with your speaker settings). Listening in Speaker setting on your DVD player. 3 You can't use the Midnight, Loudness, and Tone functions. • DIRECT - To prevent noise, make the proper digital connections (page 9) and set to NO in stereo When you select STEREO or DIRECT, you switch on this. With 5.1 encoded sources, a surround back channel will be set to ANALOG. • You may sound...

Owner's Manual
Page 26
... sound features/modes and only the volume and channel levels can be used to get good bass and treble from other sources 1 Turn on the power of the playback component. 2 Turn on or off . The Loudness listening feature can be input automatically. RETRIEVER to switch the sound retriever on the power of the component you 're listening. Selecting the multichannel analog inputs If you have connected a decoder or a DVD player with multichannel analog outputs to this receiver...
... sound features/modes and only the volume and channel levels can be used to get good bass and treble from other sources 1 Turn on the power of the playback component. 2 Turn on or off . The Loudness listening feature can be input automatically. RETRIEVER to switch the sound retriever on the power of the component you 're listening. Selecting the multichannel analog inputs If you have connected a decoder or a DVD player with multichannel analog outputs to this receiver...
Owner's Manual
Page 27
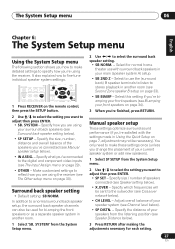
...; OTHER - Adjust overall balance of your surround back speakers (see The Input Assign menu on page 7, adjustment may not be sent to the digital and component video inputs (see Surround back speaker setting below ). • CH LEVEL - It also explains how to select the surround back speaker setting. • SB NORM. - SYSTEM - Surround back speaker setting • Default setting: SB NORM. Manual speaker setup These settings optimize surround sound performance (if you 've connected to the subwoofer (see Bi-amping your front speakers (see Crossover network...
...; OTHER - Adjust overall balance of your surround back speakers (see The Input Assign menu on page 7, adjustment may not be sent to the digital and component video inputs (see Surround back speaker setting below ). • CH LEVEL - It also explains how to select the surround back speaker setting. • SB NORM. - SYSTEM - Surround back speaker setting • Default setting: SB NORM. Manual speaker setup These settings optimize surround sound performance (if you 've connected to the subwoofer (see Bi-amping your front speakers (see Crossover network...
Owner's Manual
Page 28
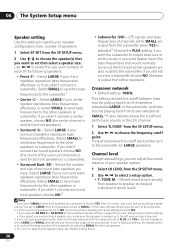
... send bass frequencies to the other speakers). Note 1 If you didn't connect surround back speakers choose NO.2 • Subwoofer (SW) - Use / to select the size (and number) of each of your center speaker reproduces bass frequencies effectively, or select SMALL to send bass frequencies to the other speakers or subwoofer. Move the test tone manually from the SP SETUP menu. 2 Use / to select a setup option. • T. 06 The System Setup menu Speaker setting Use this case, all the bass sounds to the subwoofer by selecting SMALL...
... send bass frequencies to the other speakers). Note 1 If you didn't connect surround back speakers choose NO.2 • Subwoofer (SW) - Use / to select the size (and number) of each of your center speaker reproduces bass frequencies effectively, or select SMALL to send bass frequencies to the other speakers or subwoofer. Move the test tone manually from the SP SETUP menu. 2 Use / to select a setup option. • T. 06 The System Setup menu Speaker setting Use this case, all the bass sounds to the subwoofer by selecting SMALL...
Owner's Manual
Page 29
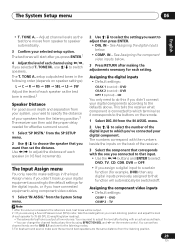
...switch speakers. 2 Use / to a certain function (for each speaker (in the following order (depends on the remote control. on speaker settings): L C R RS SBR SBL LS SW Adjust the level of the receiver. 3 Select the component that input. • Use the / buttons and ENTER to adjust the level after making the adjustments necessary for example, DVD) then any time by using component video cables. 1 Select 'IN ASSIG.' TONE A. - The T. Assigning the digital inputs • Default settings: COAX 1 (coaxial) - DVD COMP 2 - menu. 2 Use / to select the number of the digital...
...switch speakers. 2 Use / to a certain function (for each speaker (in the following order (depends on the remote control. on speaker settings): L C R RS SBR SBL LS SW Adjust the level of the receiver. 3 Select the component that input. • Use the / buttons and ENTER to adjust the level after making the adjustments necessary for example, DVD) then any time by using component video cables. 1 Select 'IN ASSIG.' TONE A. - The T. Assigning the digital inputs • Default settings: COAX 1 (coaxial) - DVD COMP 2 - menu. 2 Use / to select the number of the digital...

Owner's Manual
Page 30
... first time, you should be played:1 The Other setup menu The Other menu is played LFE Attenuator Setup • Default setting: ATT 0 dB Set the LFE attenuator as necessary to prevent ultra-low bass tones (included with dual mono encoded Dolby Digital and DTS soundtracks. 30 En Only channel 1 is where you can make customized settings to Dolby Digital or DTS soundtracks: • MAX - The numbers match the numbers beside the inputs on this receiver's COMPONENT VIDEO MONITOR OUT jacks. •...
... first time, you should be played:1 The Other setup menu The Other menu is played LFE Attenuator Setup • Default setting: ATT 0 dB Set the LFE attenuator as necessary to prevent ultra-low bass tones (included with dual mono encoded Dolby Digital and DTS soundtracks. 30 En Only channel 1 is where you can make customized settings to Dolby Digital or DTS soundtracks: • MAX - The numbers match the numbers beside the inputs on this receiver's COMPONENT VIDEO MONITOR OUT jacks. •...

Owner's Manual
Page 32
... the component video outputs (see Connecting other video components on page 12 for more on the recorded signal. 32 En Use the input select buttons (INPUT SELECTOR). 2 Select the input signal (if necessary). For example, you can 't make a digital recording from an analog source or vice-versa, so make an audio or a video recording from the built-in tuner, or from are hooked up in the same way (see Connecting up to the radio station...
... the component video outputs (see Connecting other video components on page 12 for more on the recorded signal. 32 En Use the input select buttons (INPUT SELECTOR). 2 Select the input signal (if necessary). For example, you can 't make a digital recording from an analog source or vice-versa, so make an audio or a video recording from the built-in tuner, or from are hooked up in the same way (see Connecting up to the radio station...

Owner's Manual
Page 34
... speaker terminals output the same audio, it for the high and low frequencies). SYSTEM' menu. Hook up your front right speaker in Surround back speaker setting on page 27. • To bi-wire a speaker, connect two speaker cords to the speaker terminal on page 27 to specify how you're using . 1 Connect your speakers. 09 Other connections Bi-amping your front speakers Bi-amping is when you connect the high frequency driver and low frequency driver of your speakers to different amplifiers...
... speaker terminals output the same audio, it for the high and low frequencies). SYSTEM' menu. Hook up your front right speaker in Surround back speaker setting on page 27. • To bi-wire a speaker, connect two speaker cords to the speaker terminal on page 27 to specify how you're using . 1 Connect your speakers. 09 Other connections Bi-amping your front speakers Bi-amping is when you connect the high frequency driver and low frequency driver of your speakers to different amplifiers...
Owner's Manual
Page 36
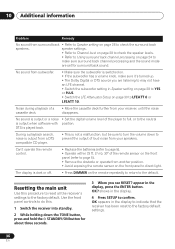
... Speaker setting on page 28 to YES or PLUS. • Switch the LFE Attenuator Setup on page 30 to make sure it's turned up. • The Dolby Digital or DTS source you see RESET? No sound is output or a noise • Set the digital volume level of loud noise from a DTS compatible CD player. • This is played back. Use the front panel controls to do this procedure to reset all the receiver's settings to the factory default...
... Speaker setting on page 28 to YES or PLUS. • Switch the LFE Attenuator Setup on page 30 to make sure it's turned up. • The Dolby Digital or DTS source you see RESET? No sound is output or a noise • Set the digital volume level of loud noise from a DTS compatible CD player. • This is played back. Use the front panel controls to do this procedure to reset all the receiver's settings to the factory default...


