Owner's Manual
Page 3
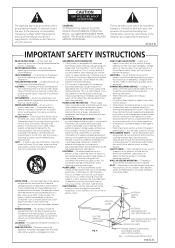
... equilateral triangle is intended to alert the user to replace your obsolete outlet. NO USER-SERVICEABLE PARTS INSIDE. REFER SERVICING TO QUALIFIED SERVICE PERSONNEL. All the safety and operating instructions should be sure the antenna or cable system is operated. RETAIN INSTRUCTIONS - The safety and operating instructions should be moved with care. All operating and use this product from touching such power lines or circuits as radiators, heat...
... equilateral triangle is intended to alert the user to replace your obsolete outlet. NO USER-SERVICEABLE PARTS INSIDE. REFER SERVICING TO QUALIFIED SERVICE PERSONNEL. All the safety and operating instructions should be sure the antenna or cable system is operated. RETAIN INSTRUCTIONS - The safety and operating instructions should be moved with care. All operating and use this product from touching such power lines or circuits as radiators, heat...
Owner's Manual
Page 4
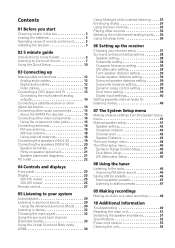
... range of remote control unit 5 Installing the receiver 5 02 5 minute guide Introduction to home theater 6 Listening to Surround Sound 7 Using the Quick Setup 10 03 Connecting up Making cable connections 12 Analog audio cables 12 Digital audio cables 12 Video cables 12 Connecting a DVD player and TV 13 Connecting the multichannel analog outputs 14 Connecting a satellite receiver or other digital set-top box 14 Connecting other audio components 15 About the WMA9 Pro decoder 15 Connecting other video components 16 Using the component video jacks 16 Connecting antennas 18 FM wire...
... range of remote control unit 5 Installing the receiver 5 02 5 minute guide Introduction to home theater 6 Listening to Surround Sound 7 Using the Quick Setup 10 03 Connecting up Making cable connections 12 Analog audio cables 12 Digital audio cables 12 Video cables 12 Connecting a DVD player and TV 13 Connecting the multichannel analog outputs 14 Connecting a satellite receiver or other digital set-top box 14 Connecting other audio components 15 About the WMA9 Pro decoder 15 Connecting other video components 16 Using the component video jacks 16 Connecting antennas 18 FM wire...
Owner's Manual
Page 7
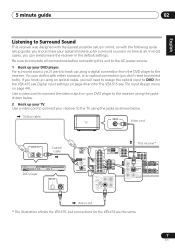
... surround sound in the default settings. SUB TER WOOFER R L SURROUND DVD 5.1CH INPUT COMPONENT VIDEO ASSIGNABLE (DVD / LD) IN ¥ Y PB PR Y PB PR S P E A K IN E R S MONITOR OUT VIDEO R FRONT L CENTER (T V / SAT)IN ø R SURROUND BACK L OUT SINGLE SEE INSTRUCTION MONITOR MANUAL OUT SUB WOOFER PREOUT R SURROUND L Video cord * The illustration shows the VSX-515, but connections for the VSX-515 see The Input Assign menu on page 44). You can simply leave the receiver in no time at all connections before connecting this with the following quick setup guide...
... surround sound in the default settings. SUB TER WOOFER R L SURROUND DVD 5.1CH INPUT COMPONENT VIDEO ASSIGNABLE (DVD / LD) IN ¥ Y PB PR Y PB PR S P E A K IN E R S MONITOR OUT VIDEO R FRONT L CENTER (T V / SAT)IN ø R SURROUND BACK L OUT SINGLE SEE INSTRUCTION MONITOR MANUAL OUT SUB WOOFER PREOUT R SURROUND L Video cord * The illustration shows the VSX-515, but connections for the VSX-515 see The Input Assign menu on page 44). You can simply leave the receiver in no time at all connections before connecting this with the following quick setup guide...

Owner's Manual
Page 8
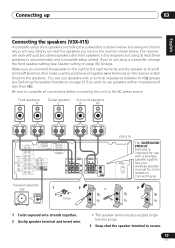
... INPUT CD-R IN / TAPE / MD PLAY VIDEO OUT MONITOR OUT SUB WOOFER PREOUT CENTER SUB WOOFER R L SURROUND DVD 5.1CH INPUT FRONT SPEAKER RL CENTER SPEAKER SURROUND SPEAKERS RL L R SURROUND PREOUT Powered subwoofer SW INPUT AC OUTLET VSX-415 Note 1 • If you are using only one surround back speaker, connect the positive wire to the right channel (+) terminal, and the negative wire to large. • VSX-515 only - 02 5 minute guide 3 Connect your speakers. If you 're not using at least three speakers is recommended, and a complete setup...
... INPUT CD-R IN / TAPE / MD PLAY VIDEO OUT MONITOR OUT SUB WOOFER PREOUT CENTER SUB WOOFER R L SURROUND DVD 5.1CH INPUT FRONT SPEAKER RL CENTER SPEAKER SURROUND SPEAKERS RL L R SURROUND PREOUT Powered subwoofer SW INPUT AC OUTLET VSX-415 Note 1 • If you are using only one surround back speaker, connect the positive wire to the right channel (+) terminal, and the negative wire to large. • VSX-515 only - 02 5 minute guide 3 Connect your speakers. If you 're not using at least three speakers is recommended, and a complete setup...
Owner's Manual
Page 9
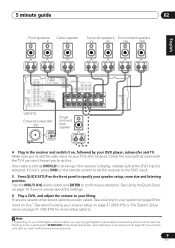
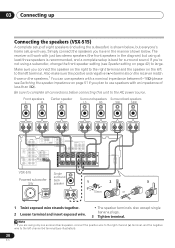
.../ SA T IN DVD /LD FRONT D V D 5.1CH REC INPUT CD-R IN / TAPE / MD PLAY VIDEO OUT MONITOR OUT SUB WOOFER PREOUT CEN- SUB TER WOOFER R L SURROUND DVD 5.1CH INPUT COMPONENT VIDEO ASSIGNABLE (DVD / LD) IN ¥ Y PB PR Y PB PR MONITOR OUT (T V / SAT)IN ø S R FRONT L CENTER R SURROUND BACK L R SURROUND L P E A SINGLE K SEE INSTRUCTION MANUAL E R S VSX-515 Powered subwoofer SW INPUT Single surround back speaker AC OUTLET 4 Plug in surround sound on page 29 if you may only get digital 2 channel stereo and analog sound. See Using the Quick Setup on , followed...
.../ SA T IN DVD /LD FRONT D V D 5.1CH REC INPUT CD-R IN / TAPE / MD PLAY VIDEO OUT MONITOR OUT SUB WOOFER PREOUT CEN- SUB TER WOOFER R L SURROUND DVD 5.1CH INPUT COMPONENT VIDEO ASSIGNABLE (DVD / LD) IN ¥ Y PB PR Y PB PR MONITOR OUT (T V / SAT)IN ø S R FRONT L CENTER R SURROUND BACK L R SURROUND L P E A SINGLE K SEE INSTRUCTION MANUAL E R S VSX-515 Powered subwoofer SW INPUT Single surround back speaker AC OUTLET 4 Plug in surround sound on page 29 if you may only get digital 2 channel stereo and analog sound. See Using the Quick Setup on , followed...
Owner's Manual
Page 10
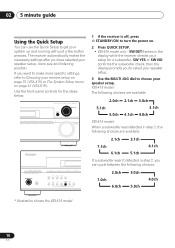
... VSX-515 model: When a subwoofer was detected in step 2, the following choices: 7.0ch 2.0ch 6.0ch 3.0ch 5.0ch 4.0ch * Illustration shows the VSX-515 model 10 En AUDIO/VIDEO MULTI-CHANNEL RECEIVER VSX-515 MULTI JOG ENTER CD CD-R/TAPE/MD FM AM MASTER VOLUME DOWN UP ADVANCED ST/DIRECT SIGNAL STANDARD SURR /AUTO SURR SELECT LISTENING MODE STANDBY/ON PHONES DVD/LD DVD 5.1 TV/SAT INPUT FL DIMMER ATT SPEAKER EXTENDED IMPEDANCE MODE MUTE DVR/VCR CLASS TUNING /STATION TUNER EDIT TONE QUICK SETUP SYSTEM SETUP...
... VSX-515 model: When a subwoofer was detected in step 2, the following choices: 7.0ch 2.0ch 6.0ch 3.0ch 5.0ch 4.0ch * Illustration shows the VSX-515 model 10 En AUDIO/VIDEO MULTI-CHANNEL RECEIVER VSX-515 MULTI JOG ENTER CD CD-R/TAPE/MD FM AM MASTER VOLUME DOWN UP ADVANCED ST/DIRECT SIGNAL STANDARD SURR /AUTO SURR SELECT LISTENING MODE STANDBY/ON PHONES DVD/LD DVD 5.1 TV/SAT INPUT FL DIMMER ATT SPEAKER EXTENDED IMPEDANCE MODE MUTE DVR/VCR CLASS TUNING /STATION TUNER EDIT TONE QUICK SETUP SYSTEM SETUP...
Owner's Manual
Page 14
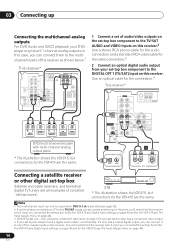
Use an optical cable for the connection.4 This receiver* R AUDIO L IN CD FM UNBAL 75 Ω AM LOOP ANTENNA OUT OPT IN 1 (TV/SAT) IN ASSIGNABLE DIGITAL IN IN COAX 2 (CD) OUT COAX 1 (DVD /LD) IN DVR/ VCR IN TV / SA T IN DVD /LD FRONT D V D 5.1CH REC INPUT CD-R IN / TAPE / MD PLAY VIDEO OUT MONITOR OUT SUB WOOFER PREOUT DVD/multi-channel decoder with multi-channel analog output jacks * The illustration shows the VSX-515, but connections for the...
Use an optical cable for the connection.4 This receiver* R AUDIO L IN CD FM UNBAL 75 Ω AM LOOP ANTENNA OUT OPT IN 1 (TV/SAT) IN ASSIGNABLE DIGITAL IN IN COAX 2 (CD) OUT COAX 1 (DVD /LD) IN DVR/ VCR IN TV / SA T IN DVD /LD FRONT D V D 5.1CH REC INPUT CD-R IN / TAPE / MD PLAY VIDEO OUT MONITOR OUT SUB WOOFER PREOUT DVD/multi-channel decoder with multi-channel analog output jacks * The illustration shows the VSX-515, but connections for the...

Owner's Manual
Page 15
... spare audio inputs on -board Windows Media® Audio 9 Professional (WMA9 Pro) decoder, so it is possible to playback WMA9 Pro-encoded audio using a coaxial or optical digital connection when connected to the CD-R/TAPE/MD analog output jack using a coaxial digital audio cable. 2 If necessary, connect the analog audio outputs of the component to a set of component you want to record to/from digital components (like an MD) to/from a digital component. This receiver* R AUDIO L IN CD FM UNBAL 75 Ω AM LOOP ANTENNA...
... spare audio inputs on -board Windows Media® Audio 9 Professional (WMA9 Pro) decoder, so it is possible to playback WMA9 Pro-encoded audio using a coaxial or optical digital connection when connected to the CD-R/TAPE/MD analog output jack using a coaxial digital audio cable. 2 If necessary, connect the analog audio outputs of the component to a set of component you want to record to/from digital components (like an MD) to/from a digital component. This receiver* R AUDIO L IN CD FM UNBAL 75 Ω AM LOOP ANTENNA...
Owner's Manual
Page 16
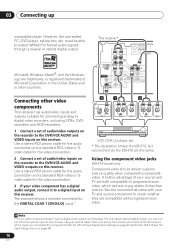
...has audio/video inputs and outputs suitable for connecting analog or digital video recorders, including VCRs, DVDrecorders and HDD recorders. 1 Connect a set of audio/video outputs on the recorder to the optical input on the recorder to the DIGITAL COAX 1 (DVD/LD) input.1 3 1 2 OPTICAL COAXIAL DIGITAL OUT R OUT L PLAY AUDIO OUT VIDEO OUT R IN L REC AUDIO IN VIDEO IN VCR, DVR, LD player, etc. * The illustration shows the VSX-515, but connections for the video connection. 2 Connect a set of audio/video inputs on this receiver using an optical cable. Use a stereo RCA phono cable...
...has audio/video inputs and outputs suitable for connecting analog or digital video recorders, including VCRs, DVDrecorders and HDD recorders. 1 Connect a set of audio/video outputs on the recorder to the optical input on the recorder to the DIGITAL COAX 1 (DVD/LD) input.1 3 1 2 OPTICAL COAXIAL DIGITAL OUT R OUT L PLAY AUDIO OUT VIDEO OUT R IN L REC AUDIO IN VIDEO IN VCR, DVR, LD player, etc. * The illustration shows the VSX-515, but connections for the video connection. 2 Connect a set of audio/video inputs on this receiver using an optical cable. Use a stereo RCA phono cable...
Owner's Manual
Page 19
... speakers L R Center speaker Surround speakers C LS RS R AUDIO L IN CD FM UNBAL 75 Ω AM LOOP ANTENNA OUT DIGITAL IN IN OPT 1 (TV / SA T ) IN ASSIGNABLE COAX 2 (CD) IN COAX 1 (DVD OUT /LD) IN DVR/ VCR IN TV / SA T IN DVD /LD FRONT D V D 5.1CH REC INPUT CD-R IN / TAPE / MD PLAY VIDEO OUT MONITOR OUT SUB WOOFER PREOUT CENTER SUB WOOFER R L SURROUND DVD 5.1CH INPUT FRONT SPEAKER RL CENTER SPEAKER SURROUND SPEAKERS RL L R SURROUND PREOUT Powered subwoofer SW INPUT 1 2 10mm or ª · VSX...
... speakers L R Center speaker Surround speakers C LS RS R AUDIO L IN CD FM UNBAL 75 Ω AM LOOP ANTENNA OUT DIGITAL IN IN OPT 1 (TV / SA T ) IN ASSIGNABLE COAX 2 (CD) IN COAX 1 (DVD OUT /LD) IN DVR/ VCR IN TV / SA T IN DVD /LD FRONT D V D 5.1CH REC INPUT CD-R IN / TAPE / MD PLAY VIDEO OUT MONITOR OUT SUB WOOFER PREOUT CENTER SUB WOOFER R L SURROUND DVD 5.1CH INPUT FRONT SPEAKER RL CENTER SPEAKER SURROUND SPEAKERS RL L R SURROUND PREOUT Powered subwoofer SW INPUT 1 2 10mm or ª · VSX...
Owner's Manual
Page 20
... the receiver match those on the speakers.1 You can use speakers with a nominal impedance between 6-16Ω (please see Switching the speaker impedance on page 42) to the AC power source. Be sure to complete all connections before connecting this unit to large. If you have in the diagram) but everyone's home setup will work with an impedance of eight speakers (including the subwoofer) is best for surround sound. SUB TER WOOFER R L SURROUND DVD 5.1CH INPUT COMPONENT VIDEO ASSIGNABLE (DVD / LD...
... the receiver match those on the speakers.1 You can use speakers with a nominal impedance between 6-16Ω (please see Switching the speaker impedance on page 42) to the AC power source. Be sure to complete all connections before connecting this unit to large. If you have in the diagram) but everyone's home setup will work with an impedance of eight speakers (including the subwoofer) is best for surround sound. SUB TER WOOFER R L SURROUND DVD 5.1CH INPUT COMPONENT VIDEO ASSIGNABLE (DVD / LD...
Owner's Manual
Page 24
... current menu screen. 21 VSB MODE VSX-415 model only Selects the Virtual Surround Back (VSB) mode (page 34). 24 En 04 Controls and displays ADVANCED SURROUND Use to switch between direct and stereo playback. RETURN Press to access the System Setup menu (page 41). STEREO/DIRECT (AUTO SURR) Switches between the various surround modes (page 30). Direct playback bypasses the tone controls and channel levels for recall (page 46). 18 TONE Press this button to access the bass and treble controls, which...
... current menu screen. 21 VSB MODE VSX-415 model only Selects the Virtual Surround Back (VSB) mode (page 34). 24 En 04 Controls and displays ADVANCED SURROUND Use to switch between direct and stereo playback. RETURN Press to access the System Setup menu (page 41). STEREO/DIRECT (AUTO SURR) Switches between the various surround modes (page 30). Direct playback bypasses the tone controls and channel levels for recall (page 46). 18 TONE Press this button to access the bass and treble controls, which...

Owner's Manual
Page 26
... use. SP A means the speakers are connected. 12 Character display 13 Neo:6 (VSX-515 model only) When the (STANDARD) Neo:6 mode of the receiver is on, this lights to indicate decoding of a Dolby Digital multichannel signal. 4 2 PRO LOGIC II x When the (STANDARD) Pro Logic II mode of the analog input signal. 9 SLEEP Lights when the receiver is in sleep mode (page 36). 10 Tuner indicators / MONO Lights when the mono mode is set using the MPX button. / STEREO Lights when a stereo...
... use. SP A means the speakers are connected. 12 Character display 13 Neo:6 (VSX-515 model only) When the (STANDARD) Neo:6 mode of the receiver is on, this lights to indicate decoding of a Dolby Digital multichannel signal. 4 2 PRO LOGIC II x When the (STANDARD) Pro Logic II mode of the analog input signal. 9 SLEEP Lights when the receiver is in sleep mode (page 36). 10 Tuner indicators / MONO Lights when the mono mode is set using the MPX button. / STEREO Lights when a stereo...

Owner's Manual
Page 28
...control a Pioneer DVD player connected to your surround sound system (VSX-415 - TEST TONE Sounds the test tone when setting up your system. LEVEL +/- SIGNAL SELECT Use to select an input source. 8 MENU Displays the disc menu of an analog input signal to prevent distortion. 7 INPUT SELECTOR buttons Press to select an input signal (page 32). VSX-415 model only: CH SELECT Selects a speaker when setting up the surround sound for DVD menus. 10 RECEIVER Use to switch to start of station presets (page 46). Button What it does DVD Turns DVD power on multilingual DVD-Video discs...
...control a Pioneer DVD player connected to your surround sound system (VSX-415 - TEST TONE Sounds the test tone when setting up your system. LEVEL +/- SIGNAL SELECT Use to select an input source. 8 MENU Displays the disc menu of an analog input signal to prevent distortion. 7 INPUT SELECTOR buttons Press to select an input signal (page 32). VSX-415 model only: CH SELECT Selects a speaker when setting up the surround sound for DVD menus. 10 RECEIVER Use to switch to start of station presets (page 46). Button What it does DVD Turns DVD power on multilingual DVD-Video discs...
Owner's Manual
Page 31
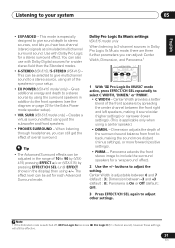
...-channel (stereo) signals as simulated multichannel surround sound. Dolby Pro Logic IIx Music settings VSX-515 model only When listening to 2-channel sources in addition to adjust other settings. or 'PNRM'. • C WIDTH - buttons to include the surround speakers for a stereo surround effect. Dimension between 0 and 7 (default : 3); Panorama extends the front stereo image to adjust the setting. Note 1 If the Extended mode is switched off, 2 Pro Logic IIx becomes 2 Pro Logic II (5.1 channel sound), however these settings will still be adjusted in the range...
...-channel (stereo) signals as simulated multichannel surround sound. Dolby Pro Logic IIx Music settings VSX-515 model only When listening to 2-channel sources in addition to adjust other settings. or 'PNRM'. • C WIDTH - buttons to include the surround speakers for a stereo surround effect. Dimension between 0 and 7 (default : 3); Panorama extends the front stereo image to adjust the setting. Note 1 If the Extended mode is switched off, 2 Pro Logic IIx becomes 2 Pro Logic II (5.1 channel sound), however these settings will still be adjusted in the range...
Owner's Manual
Page 32
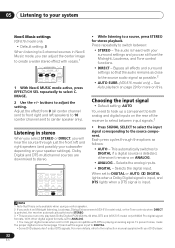
... you select STEREO or DIRECT, you can only play back Dolby Digital, PCM (32kHz-96 kHz), DTS and (VSX-515 model only) WMA9 Pro digital signal formats. With other digital signal formats, set to DIGITAL or AUTO, 2 DIGITAL lights when a Dolby Digital signal is input, and DTS lights when a DTS signal is playing an analog signal. For more on Midnight listening, Loudness, Dialog Enhancement (VSX-515 model only), or the Tone controls when DIRECT is heard with vocals.1 RECEIVER CONTROL VOLUME EFFECT/CH SEL LEVEL MUTE SIGNAL TUNER DIALOG E SELECT EDIT CLASS TUNER 1 With Neo:6 MUSIC mode...
... you select STEREO or DIRECT, you can only play back Dolby Digital, PCM (32kHz-96 kHz), DTS and (VSX-515 model only) WMA9 Pro digital signal formats. With other digital signal formats, set to DIGITAL or AUTO, 2 DIGITAL lights when a Dolby Digital signal is input, and DTS lights when a DTS signal is playing an analog signal. For more on Midnight listening, Loudness, Dialog Enhancement (VSX-515 model only), or the Tone controls when DIRECT is heard with vocals.1 RECEIVER CONTROL VOLUME EFFECT/CH SEL LEVEL MUTE SIGNAL TUNER DIALOG E SELECT EDIT CLASS TUNER 1 With Neo:6 MUSIC mode...

Owner's Manual
Page 37
... settings in turn, following pages for the LFE channel (page 38). • Front speaker distance setting - Specify the distance from your listening position to your surround speakers (page 39). • Subwoofer distance setting - Specify the components to be assigned to the following digital inputs (page 40): • Coaxial digital input 1 setting • Coaxial digital input 2 setting • Optical digital input 1 setting 3 Use / (cursor up operations. The setting is entered automatically. 4 Repeat step 2 and 3 to adjust other setup options. 5 When you have connected...
... settings in turn, following pages for the LFE channel (page 38). • Front speaker distance setting - Specify the distance from your listening position to your surround speakers (page 39). • Subwoofer distance setting - Specify the components to be assigned to the following digital inputs (page 40): • Coaxial digital input 1 setting • Coaxial digital input 2 setting • Optical digital input 1 setting 3 Use / (cursor up operations. The setting is entered automatically. 4 Repeat step 2 and 3 to adjust other setup options. 5 When you have connected...
Owner's Manual
Page 38
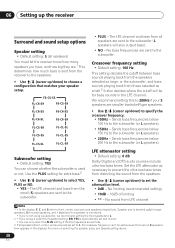
...; Default setting: 0 dB Dolby Digital and DTS audio sources include ultra-low bass tones. Set the LFE attenuator as L for large speakers, S for small speakers, and ∗ (asterisk) if no S speakers (∗∗∗ appears in the LFE channel. No limiting (recommended setting) • 10dB - 10dB of limiting • ** - Crossover frequency setting • Default setting: 100 Hz This setting decides the cutoff between bass sounds playing back from the speakers selected as large, or the subwoofer, and bass sounds playing back from the receiver...
...; Default setting: 0 dB Dolby Digital and DTS audio sources include ultra-low bass tones. Set the LFE attenuator as L for large speakers, S for small speakers, and ∗ (asterisk) if no S speakers (∗∗∗ appears in the LFE channel. No limiting (recommended setting) • 10dB - 10dB of limiting • ** - Crossover frequency setting • Default setting: 100 Hz This setting decides the cutoff between bass sounds playing back from the speakers selected as large, or the subwoofer, and bass sounds playing back from the receiver...
Owner's Manual
Page 43
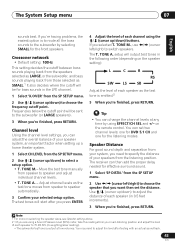
Adjust channel levels as the test tone is output at any time by selecting SMALL for bass sounds in the LFE channel. 1 Select 'X.OVER' from the SP SETUP menu. 2 Use / (cursor left /right) to choose the frequency cutoff point. TONE A. Tip • You can adjust the overall balance of your speaker system, an important factor when setting up a home theater system. 1 Select CH LEVEL from speaker to adjust the distance of each speaker (in the following order (depending on the...
Adjust channel levels as the test tone is output at any time by selecting SMALL for bass sounds in the LFE channel. 1 Select 'X.OVER' from the SP SETUP menu. 2 Use / (cursor left /right) to choose the frequency cutoff point. TONE A. Tip • You can adjust the overall balance of your speaker system, an important factor when setting up a home theater system. 1 Select CH LEVEL from speaker to adjust the distance of each speaker (in the following order (depending on the...

Owner's Manual
Page 44
... the buttons on page 16. 1 Select COMP. Assigning the component video inputs • Default settings: COMP 1 - IN - CD OPT 1 (optical) - menu. 2 Select the number of the digital input to which you have connected equipment using a component video input, you should also have connected the audio from the IN ASSIG. For more on the rear of a different component). The Input Assign menu You only need to that function will automatically be switched off. 4 When you have hooked up /down ) buttons and...
... the buttons on page 16. 1 Select COMP. Assigning the component video inputs • Default settings: COMP 1 - IN - CD OPT 1 (optical) - menu. 2 Select the number of the digital input to which you have connected equipment using a component video input, you should also have connected the audio from the IN ASSIG. For more on the rear of a different component). The Input Assign menu You only need to that function will automatically be switched off. 4 When you have hooked up /down ) buttons and...


