Owner's Manual
Page 4
...terminals 21 Hints on speaker placement 21 Speaker placement diagrams 21 AC outlet 22 04 Controls and displays Front panel 23 Display 25 VSX-515 model 25 VSX-415 model 25 Remote control 27 05 Listening to your system Auto playback 29 Listening in surround sound 29 Using the Advanced ...settings 40 Setting separate channel levels for listening modes 40 07 The System Setup menu Making receiver settings from the System Setup menu 41 Manual speaker setup 41 Speaker setting 42 Crossover network 43 Channel level 43 Speaker Distance 43 The Input Assign menu 44 The Other setup ...
...terminals 21 Hints on speaker placement 21 Speaker placement diagrams 21 AC outlet 22 04 Controls and displays Front panel 23 Display 25 VSX-515 model 25 VSX-415 model 25 Remote control 27 05 Listening to your system Auto playback 29 Listening in surround sound 29 Using the Advanced ...settings 40 Setting separate channel levels for listening modes 40 07 The System Setup menu Making receiver settings from the System Setup menu 41 Manual speaker setup 41 Speaker setting 42 Crossover network 43 Channel level 43 Speaker Distance 43 The Input Assign menu 44 The Other setup ...
Owner's Manual
Page 7
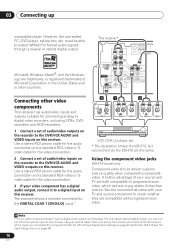
In most cases, you don't need to assign the optical input to DVD (for the VSX-415 see The Input Assign menu on your DVD player to the receiver using a digital connection from the DVD player to the receiver. Optical cable ... R FRONT L CENTER (T V / SAT)IN ø R SURROUND BACK L OUT SINGLE SEE INSTRUCTION MONITOR MANUAL OUT SUB WOOFER PREOUT R SURROUND L Video cord * The illustration shows the VSX-515, but connections for the VSX-515 see Digital input settings on page 40 and for the VSX-415 are the same. 7 En You can simply leave the receiver in the...
In most cases, you don't need to assign the optical input to DVD (for the VSX-415 see The Input Assign menu on your DVD player to the receiver using a digital connection from the DVD player to the receiver. Optical cable ... R FRONT L CENTER (T V / SAT)IN ø R SURROUND BACK L OUT SINGLE SEE INSTRUCTION MONITOR MANUAL OUT SUB WOOFER PREOUT R SURROUND L Video cord * The illustration shows the VSX-515, but connections for the VSX-515 see Digital input settings on page 40 and for the VSX-415 are the same. 7 En You can simply leave the receiver in the...
Owner's Manual
Page 9
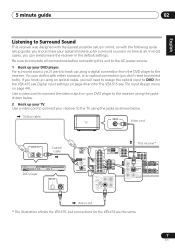
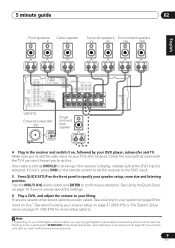
.... 5 Press QUICK SETUP on , followed by your system on page 29 for more setup options. Note 1 Depending on page 41 (VSX-515) for more on this receiver. Also make sure that DVD/LD is selected. 5 minute guide 02 Front speakers Center speaker L R ...165; Y PB PR Y PB PR MONITOR OUT (T V / SAT)IN ø S R FRONT L CENTER R SURROUND BACK L R SURROUND L P E A SINGLE K SEE INSTRUCTION MANUAL E R S VSX-515 Powered subwoofer SW INPUT Single surround back speaker AC OUTLET 4 Plug in the receiver's display, indicating that came with the TV if you can select.
.... 5 Press QUICK SETUP on , followed by your system on page 29 for more setup options. Note 1 Depending on page 41 (VSX-515) for more on this receiver. Also make sure that DVD/LD is selected. 5 minute guide 02 Front speakers Center speaker L R ...165; Y PB PR Y PB PR MONITOR OUT (T V / SAT)IN ø S R FRONT L CENTER R SURROUND BACK L R SURROUND L P E A SINGLE K SEE INSTRUCTION MANUAL E R S VSX-515 Powered subwoofer SW INPUT Single surround back speaker AC OUTLET 4 Plug in the receiver's display, indicating that came with the TV if you can select.
Owner's Manual
Page 16
...cable for the audio connection and a standard RCA video or Svideo cable for the video connection. 2 Connect a set up compatible player. See the manuals that came with your video component has a digital audio output, connect it to the optical input on page 44). 16 En When you set ... R IN L REC AUDIO IN VIDEO IN VCR, DVR, LD player, etc. * The illustration shows the VSX-515, but connections for the VSX-515 see Digital input settings on page 40 and for the VSX-415 are trademarks, or registered trademarks of Microsoft Corporation in the United States and/ or other video components...
...cable for the audio connection and a standard RCA video or Svideo cable for the video connection. 2 Connect a set up compatible player. See the manuals that came with your video component has a digital audio output, connect it to the optical input on page 44). 16 En When you set ... R IN L REC AUDIO IN VIDEO IN VCR, DVR, LD player, etc. * The illustration shows the VSX-515, but connections for the VSX-515 see Digital input settings on page 40 and for the VSX-415 are trademarks, or registered trademarks of Microsoft Corporation in the United States and/ or other video components...
Owner's Manual
Page 19
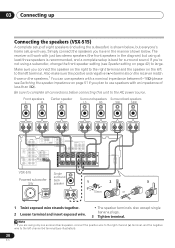
...DVD 5.1CH INPUT FRONT SPEAKER RL CENTER SPEAKER SURROUND SPEAKERS RL L R SURROUND PREOUT Powered subwoofer SW INPUT 1 2 10mm or ª · VSX-415 AC OUTLET The SURROUND PREOUT terminal is best. You can use speakers with a nominal impedance between 6-16Ω (please see Speaker setting on ...page 51 if you have in the diagram) but everyone's home setup will vary. See your wireless speaker manual for use speakers with a wireless speaker system. Be sure to complete all connections before connecting this unit to secure. 19 En The ...
...DVD 5.1CH INPUT FRONT SPEAKER RL CENTER SPEAKER SURROUND SPEAKERS RL L R SURROUND PREOUT Powered subwoofer SW INPUT 1 2 10mm or ª · VSX-415 AC OUTLET The SURROUND PREOUT terminal is best. You can use speakers with a nominal impedance between 6-16Ω (please see Speaker setting on ...page 51 if you have in the diagram) but everyone's home setup will vary. See your wireless speaker manual for use speakers with a wireless speaker system. Be sure to complete all connections before connecting this unit to secure. 19 En The ...
Owner's Manual
Page 20
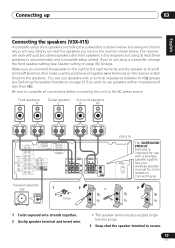
...DVD / LD) IN ¥ Y PB PR Y PB PR MONITOR OUT (T V / SAT)IN ø S R FRONT L CENTER R SURROUND BACK L R SURROUND L P E A SINGLE K SEE INSTRUCTION MANUAL E R S AC OUTLET VSX-515 Single surround Powered subwoofer SW back speaker 1 2 3 INPUT 10mm or 1 Twist exposed wire strands together. 2 Loosen terminal and insert exposed wire. • The speaker.... Note 1 If you 're not using a subwoofer, change the front speaker setting (see illustration). 20 En 03 Connecting up Connecting the speakers (VSX-515) A complete setup of less than 8Ω).
...DVD / LD) IN ¥ Y PB PR Y PB PR MONITOR OUT (T V / SAT)IN ø S R FRONT L CENTER R SURROUND BACK L R SURROUND L P E A SINGLE K SEE INSTRUCTION MANUAL E R S AC OUTLET VSX-515 Single surround Powered subwoofer SW back speaker 1 2 3 INPUT 10mm or 1 Twist exposed wire strands together. 2 Loosen terminal and insert exposed wire. • The speaker.... Note 1 If you 're not using a subwoofer, change the front speaker setting (see illustration). 20 En 03 Connecting up Connecting the speakers (VSX-515) A complete setup of less than 8Ω).
Owner's Manual
Page 32
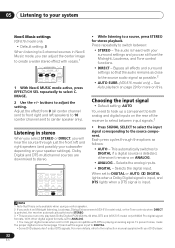
... ANALOG. • ANALOG - When set to adjust the setting. 05 Listening to your system Neo:6 Music settings VSX-515 model only • Default setting: 3 When listening to 2-channel sources in stereo When you select STEREO or DIRECT...DVD player. 32 En Listening in Neo:6 Music mode, you switch on Midnight listening, Loudness, Dialog Enhancement (VSX-515 model only), or the Tone controls when DIRECT is playing an analog signal. With other digital signal formats, set... DTS is selected, the receiver automatically switches to the instruction manual supplied with your speaker settings).
... ANALOG. • ANALOG - When set to adjust the setting. 05 Listening to your system Neo:6 Music settings VSX-515 model only • Default setting: 3 When listening to 2-channel sources in stereo When you select STEREO or DIRECT...DVD player. 32 En Listening in Neo:6 Music mode, you switch on Midnight listening, Loudness, Dialog Enhancement (VSX-515 model only), or the Tone controls when DIRECT is playing an analog signal. With other digital signal formats, set... DTS is selected, the receiver automatically switches to the instruction manual supplied with your speaker settings).
Owner's Manual
Page 41
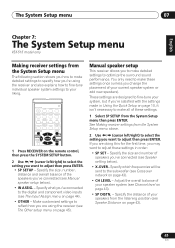
...doing this for the first time, you 've connected (see Manual speaker setup below ). • X.OVER- English Deutsch Français Italiano Nederlands Español The System Setup menu 07 Chapter 7: The System Setup menu VSX-515 model only Making receiver settings from the System Setup menu The ... settings once (unless you are using the receiver and also explains how to fine-tune individual speaker system settings to adjust then press ENTER. Manual speaker setup This receiver allows you 're using the receiver (see The Input Assign menu on page 43). • CH LEVEL - Specify...
...doing this for the first time, you 've connected (see Manual speaker setup below ). • X.OVER- English Deutsch Français Italiano Nederlands Español The System Setup menu 07 Chapter 7: The System Setup menu VSX-515 model only Making receiver settings from the System Setup menu The ... settings once (unless you are using the receiver and also explains how to fine-tune individual speaker system settings to adjust then press ENTER. Manual speaker setup This receiver allows you 're using the receiver (see The Input Assign menu on page 43). • CH LEVEL - Specify...
Owner's Manual
Page 43
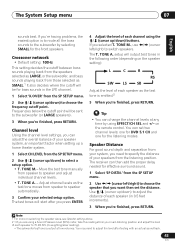
... switch speakers. Channel level Using the channel level settings, you can then add the proper delay needed for the listening modes. Move the test tone manually from the SP SETUP menu. 2 Use / (cursor left /right) to adjust the distance of your speaker system, an important factor when setting up a home theater...
... switch speakers. Channel level Using the channel level settings, you can then add the proper delay needed for the listening modes. Move the test tone manually from the SP SETUP menu. 2 Use / (cursor left /right) to adjust the distance of your speaker system, an important factor when setting up a home theater...
Owner's Manual
Page 46
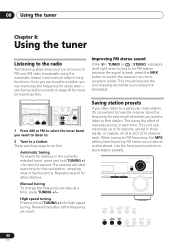
... Repeat to store station presets. for about a second. This saves the effort of 10 stations each time. AUDIO/VIDEO MULTI-CHANNEL RECEIVER VSX-515 MULTI JOG ENTER CD-R/TAPE/MD FM AM MASTER VOLUME DOWN UP INPUT FL DIMMER ATT SPEAKER EXTENDED IMPEDANCE MODE MUTE CLASS TUNING /STATION .... see Improving FM stereo sound above) is weak, press the MPX button to FM and AM radio broadcasts using the automatic (search) and manual (step) tuning functions. for high speed tuning. Saving station presets If you often listen to a particular radio station, it has found one ...
... Repeat to store station presets. for about a second. This saves the effort of 10 stations each time. AUDIO/VIDEO MULTI-CHANNEL RECEIVER VSX-515 MULTI JOG ENTER CD-R/TAPE/MD FM AM MASTER VOLUME DOWN UP INPUT FL DIMMER ATT SPEAKER EXTENDED IMPEDANCE MODE MUTE CLASS TUNING /STATION .... see Improving FM stereo sound above) is weak, press the MPX button to FM and AM radio broadcasts using the automatic (search) and manual (step) tuning functions. for high speed tuning. Saving station presets If you often listen to a particular radio station, it has found one ...

Owner's Manual
Page 48
...RECEIVER CONTROL VOLUME EFFECT/CH SEL LEVEL MUTE SIGNAL TUNER DIALOG E SELECT EDIT CLASS DVD TUNER MPX AUDIO TUNING STATION DISPLAY * Illustration shows the VSX-515 model 1 Select the source you want to record. Use the input select buttons (INPUT SELECTOR). 2 Select the input signal (if necessary). ...need use the same type of the source component. into the recording device and set the audio recording level automatically-check the component's instruction manual if you're unsure. 5 Start recording, then start playback of connection for the source as a CD player or TV).1 Keep in...
...RECEIVER CONTROL VOLUME EFFECT/CH SEL LEVEL MUTE SIGNAL TUNER DIALOG E SELECT EDIT CLASS DVD TUNER MPX AUDIO TUNING STATION DISPLAY * Illustration shows the VSX-515 model 1 Select the source you want to record. Use the input select buttons (INPUT SELECTOR). 2 Select the input signal (if necessary). ...need use the same type of the source component. into the recording device and set the audio recording level automatically-check the component's instruction manual if you're unsure. 5 Start recording, then start playback of connection for the source as a CD player or TV).1 Keep in...
Owner's Manual
Page 50
...setting on page 38 to YES or PLUS. • Switch the LFE attenuator setting on page 38 (VSX-415) or page 42 (VSX-515) to check the surround back back speakers (VSX-515 model speaker settings. VSX-515 model only: • Switch the subwoofer setting in Speaker setting on page 42 to YES or PLUS....) or page 44 (VSX-515). • Make digital connections (refer to page 13) and set for listening modes on . • If the subwoofer has a volume knob, make sure it's turned up. • The Dolby Digital or DTS source you are listening to the instruction manual supplied with position. No sound ...
...setting on page 38 to YES or PLUS. • Switch the LFE attenuator setting on page 38 (VSX-415) or page 42 (VSX-515) to check the surround back back speakers (VSX-515 model speaker settings. VSX-515 model only: • Switch the subwoofer setting in Speaker setting on page 42 to YES or PLUS....) or page 44 (VSX-515). • Make digital connections (refer to page 13) and set for listening modes on . • If the subwoofer has a volume knob, make sure it's turned up. • The Dolby Digital or DTS source you are listening to the instruction manual supplied with position. No sound ...
Owner's Manual
Page 108
...P.O. For warranty information please see the Limited Warranty sheet included with your product to locate the nearest Pioneer Authorized Service Company in the U.S.A. Alternatively, please contact the Customer Satisfaction Department at the above listed ...Boundary Road, Braeside, Victoria 3195, Australia, TEL: (03) 9586-6300 PIONEER ELECTRONICS DE MEXICO S.A. and you wish to locate the nearest Pioneer Authorized Independent Service Company, or if you wish to purchase replacement parts, operating instructions, service manuals, or accessories, please call the number shown below. 8 0 0 ...
...P.O. For warranty information please see the Limited Warranty sheet included with your product to locate the nearest Pioneer Authorized Service Company in the U.S.A. Alternatively, please contact the Customer Satisfaction Department at the above listed ...Boundary Road, Braeside, Victoria 3195, Australia, TEL: (03) 9586-6300 PIONEER ELECTRONICS DE MEXICO S.A. and you wish to locate the nearest Pioneer Authorized Independent Service Company, or if you wish to purchase replacement parts, operating instructions, service manuals, or accessories, please call the number shown below. 8 0 0 ...


