Owner's Manual
Page 1
... RECEIVER VSX-40 Register your product on http://www.pioneerelectronics.com (US) http://www.pioneerelectronics.ca (Canada) • Protect your new investment The details of your purchase will be on file for reference in the event of an insurance claim such as loss or theft. • Receive free... tips, updates and service bulletins on your new product • Improve product development Your input helps us continue to design products that meet your needs. • Receive a free Pioneer newsletter Registered customers can opt in to...
... RECEIVER VSX-40 Register your product on http://www.pioneerelectronics.com (US) http://www.pioneerelectronics.ca (Canada) • Protect your new investment The details of your purchase will be on file for reference in the event of an insurance claim such as loss or theft. • Receive free... tips, updates and service bulletins on your new product • Improve product development Your input helps us continue to design products that meet your needs. • Receive a free Pioneer newsletter Registered customers can opt in to...

Owner's Manual
Page 2
...user is not waterproof. However, there is no guarantee that the To prevent fire hazard, the Class 2 Wiring Cable moisture. Reorient or relocate the receiving antenna. - D8-10-1-2_A1_En VENTILATION CAUTION When installing this unit in a poorly ventilated area, or in a particular installation. Be sure that interference will... of the available power supply differs Caution pot) or expose it from that may invalidate the user's right to improve heat radiation (at least 40 cm at top, 20 cm at rear, and 20 cm at each side). If this equipment (such as a lighted candle) on thick ...
...user is not waterproof. However, there is no guarantee that the To prevent fire hazard, the Class 2 Wiring Cable moisture. Reorient or relocate the receiving antenna. - D8-10-1-2_A1_En VENTILATION CAUTION When installing this unit in a poorly ventilated area, or in a particular installation. Be sure that interference will... of the available power supply differs Caution pot) or expose it from that may invalidate the user's right to improve heat radiation (at least 40 cm at top, 20 cm at rear, and 20 cm at each side). If this equipment (such as a lighted candle) on thick ...
Owner's Manual
Page 4
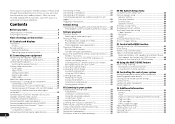
After you for buying this Pioneer product. Contents Before you will know how to operate your system Setting the ... menu 38 Manual speaker setup 38 Speaker Setting 38 Crossover Network 39 Channel Level 39 Speaker Distance 40 The Input Assign menu 40 The Speaker System setting 41 The Video Parameter setting 41 Video Converter 41 Resolution 41 Aspect 42...your TV with no HDMI input 16 Connecting your DVD player with no HDMI output . . . 17 Connecting a satellite receiver or other digital set-top box 18 Connecting an HDD/DVD recorder, Blu-ray Disc recorder and other video sources 18...
After you for buying this Pioneer product. Contents Before you will know how to operate your system Setting the ... menu 38 Manual speaker setup 38 Speaker Setting 38 Crossover Network 39 Channel Level 39 Speaker Distance 40 The Input Assign menu 40 The Speaker System setting 41 The Video Parameter setting 41 Video Converter 41 Resolution 41 Aspect 42...your TV with no HDMI input 16 Connecting your DVD player with no HDMI output . . . 17 Connecting a satellite receiver or other digital set-top box 18 Connecting an HDD/DVD recorder, Blu-ray Disc recorder and other video sources 18...
Owner's Manual
Page 5
...to confirm system operation) x2 • AM loop antenna • FM wire antenna • iPod cable • These operating instructions Installing the receiver • When installing this unit, make the connections and settings. in places that are very dusty - near a cassette deck (or close to ... (page 41) (Specify either using the surround back or front height speaker.) The Input Assign menu (page 40) (When using a digital connection from the Blu-ray Disc/DVD player to the receiver. • About the video converter (page 14) • Connecting a TV and playback components (page 15...
...to confirm system operation) x2 • AM loop antenna • FM wire antenna • iPod cable • These operating instructions Installing the receiver • When installing this unit, make the connections and settings. in places that are very dusty - near a cassette deck (or close to ... (page 41) (Specify either using the surround back or front height speaker.) The Input Assign menu (page 40) (When using a digital connection from the Blu-ray Disc/DVD player to the receiver. • About the video converter (page 14) • Connecting a TV and playback components (page 15...
Owner's Manual
Page 6
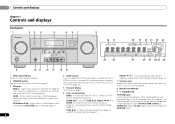
...Blinks when connecting an HDMI-equipped component; Use to select preset radio stations (page 32) and to select SIRIUS Radio channels (page 31). 7 Remote sensor Receives the signals from the main zone (see Making MULTIZONE connections on page 45) use these controls to on page 7. 6 Tuner control buttons BAND - Lights ... SURR ADVANCED SURROUND STEREO iPod iPhone iPad DIRECT CONTROL ENTER PHONES MCACC SETUP MIC VIDEO 2 INPUT 5V 2.1 A L AUDIO R iPod iPhone USB VIDEO iPad 8 VSX-40 16 17 MASTER VOLUME 23 24 18 19 20 21 18 22 25 26 27 28 27 29 9 10 11 12 13 14 15 1 INPUT...
...Blinks when connecting an HDMI-equipped component; Use to select preset radio stations (page 32) and to select SIRIUS Radio channels (page 31). 7 Remote sensor Receives the signals from the main zone (see Making MULTIZONE connections on page 45) use these controls to on page 7. 6 Tuner control buttons BAND - Lights ... SURR ADVANCED SURROUND STEREO iPod iPhone iPad DIRECT CONTROL ENTER PHONES MCACC SETUP MIC VIDEO 2 INPUT 5V 2.1 A L AUDIO R iPod iPhone USB VIDEO iPad 8 VSX-40 16 17 MASTER VOLUME 23 24 18 19 20 21 18 22 25 26 27 28 27 29 9 10 11 12 13 14 15 1 INPUT...
Owner's Manual
Page 7
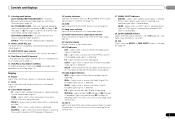
...etc. 23 Character display Displays various system information. 24 DTS indicators DTS - Lights when a source with DTS encoded audio signals is being received in auto stereo mode (page 32). NEO:6 - Lights when a normal broadcast channel or SIRIUS channel is detected. ADVANCED SURROUND - Press... - Lights when the DIRECT or PURE DIRECT mode is selected. TUNE - MEM - Blinks when a radio station is showing the currently received AM/FM broadcast frequency. 25 Dolby Digital indicators 2D - Lights when the character display is registered. Lights to indicate DTS-ES decoding. ...
...etc. 23 Character display Displays various system information. 24 DTS indicators DTS - Lights when a source with DTS encoded audio signals is being received in auto stereo mode (page 32). NEO:6 - Lights when a normal broadcast channel or SIRIUS channel is detected. ADVANCED SURROUND - Press... - Lights when the DIRECT or PURE DIRECT mode is selected. TUNE - MEM - Blinks when a radio station is showing the currently received AM/FM broadcast frequency. 25 Dolby Digital indicators 2D - Lights when the character display is registered. Lights to indicate DTS-ES decoding. ...

Owner's Manual
Page 8
...standard decoding and to switch between standby and on /off, press and hold SHIFT button, then press RECEIVER button. 3 RECEIVER Switches the remote to control the receiver (used to select the white commands above these buttons can be used to select preset radio stations (page 32). ...). Displays the HOME MENU screen. You can be accessed after you to DIRECT or PURE DIRECT. Switches between the iPod controls and the receiver controls (page 28). 8 TUNE /, PRESET /), ENTER Use the arrow buttons when setting up surround sound (page 38...
...standard decoding and to switch between standby and on /off, press and hold SHIFT button, then press RECEIVER button. 3 RECEIVER Switches the remote to control the receiver (used to select the white commands above these buttons can be used to select preset radio stations (page 32). ...). Displays the HOME MENU screen. You can be accessed after you to DIRECT or PURE DIRECT. Switches between the iPod controls and the receiver controls (page 28). 8 TUNE /, PRESET /), ENTER Use the arrow buttons when setting up surround sound (page 38...

Owner's Manual
Page 9
... store batteries in the battery case. - Batteries with governmental regulations or environmental public instruction's rules that is emitting infrared rays. • The receiver is operated simultaneously with another infrared remote control unit. they may have selected. 16 SHIFT Press to the TV button. Press TV first to ... listening volume. 14 MUTE Mutes/unmutes the sound. 15 DISP Switches the display of this unit. EQ - When disposing of used for Pioneer TVs. 10 Number buttons and other buttons that have one TV to hook up to this system assign it to set above the buttons)...
... store batteries in the battery case. - Batteries with governmental regulations or environmental public instruction's rules that is emitting infrared rays. • The receiver is operated simultaneously with another infrared remote control unit. they may have selected. 16 SHIFT Press to the TV button. Press TV first to ... listening volume. 14 MUTE Mutes/unmutes the sound. 15 DISP Switches the display of this unit. EQ - When disposing of used for Pioneer TVs. 10 Number buttons and other buttons that have one TV to hook up to this system assign it to set above the buttons)...
Owner's Manual
Page 12
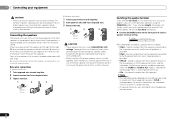
... - No sound is twisted together and inserted fully into the speaker terminal. Also make sure the positive and negative (+/-) terminals on the receiver match those on the front panel to the A-speaker terminals (multichannel playback is possible). • SPAB - To prevent the ...1 Twist exposed wire strands together. 2 Push open the tabs and insert exposed wire. 3 Release the tabs. 1 2 3 Connecting the speakers The receiver will simply switch your equipment CAUTION • Make sure that all speakers are connected. 12 En However, if SPB is selected above, no sound...
... - No sound is twisted together and inserted fully into the speaker terminal. Also make sure the positive and negative (+/-) terminals on the receiver match those on the front panel to the A-speaker terminals (multichannel playback is possible). • SPAB - To prevent the ...1 Twist exposed wire strands together. 2 Push open the tabs and insert exposed wire. 3 Release the tabs. 1 2 3 Connecting the speakers The receiver will simply switch your equipment CAUTION • Make sure that all speakers are connected. 12 En However, if SPB is selected above, no sound...
Owner's Manual
Page 13
...with , including DVDVideo, DVD-Audio, SACD, Dolby Digital Plus, Dolby TrueHD, DTS-HD Master Audio (see Control with one cable. This receiver incorporates High-Definition Multimedia Interface (HDMI®) technology. Due to this, interruption in equalizer is 480i, 480p, 576i or 576p, Multi Ch...or less) for up to L (left) terminals. In this unit may cause noise or interrupted audio. "x.v.Color" and Corporation. This receiver supports the functions described below for both connections, we recommend using the Control with HDMI function (see below through HDMI connections. • Digital...
...with , including DVDVideo, DVD-Audio, SACD, Dolby Digital Plus, Dolby TrueHD, DTS-HD Master Audio (see Control with one cable. This receiver incorporates High-Definition Multimedia Interface (HDMI®) technology. Due to this, interruption in equalizer is 480i, 480p, 576i or 576p, Multi Ch...or less) for up to L (left) terminals. In this unit may cause noise or interrupted audio. "x.v.Color" and Corporation. This receiver supports the functions described below for both connections, we recommend using the Control with HDMI function (see below through HDMI connections. • Digital...
Owner's Manual
Page 14
..., coil loosely. patents and other intellectual property rights of video connection and are assigned to the same input function, the converter gives priority to the receiver's HDMI video outputs when connecting this way, interference between the signals is protected by U.S. The color signal of your video source. Reverse engineering and disassembly...
..., coil loosely. patents and other intellectual property rights of video connection and are assigned to the same input function, the converter gives priority to the receiver's HDMI video outputs when connecting this way, interference between the signals is protected by U.S. The color signal of your video source. Reverse engineering and disassembly...
Owner's Manual
Page 15
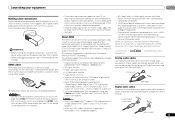
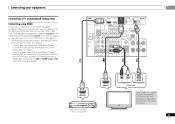
... HDMI feature, the convenient Control with HDMI function on page 43). If the TV does not support the HDMI Audio Return Channel function, connect the receiver and TV with HDCP) equipped component (Blu-ray Disc player, etc.), you have an HDMI or DVI (with audio cables (as shown). - In this ...case, set ARC at HDMI Setup to ON (see Control with HDMI functions can connect it to this receiver using a commercially available HDMI cable. HDMI DVR/BDR IN DVD IN BD IN VIDEO 1 IN OUT COAXIAL IN 1 IN 1 ASSIGNABLE IN OPTICAL 2 ASSIGNABLE IR ...
... HDMI feature, the convenient Control with HDMI function on page 43). If the TV does not support the HDMI Audio Return Channel function, connect the receiver and TV with HDCP) equipped component (Blu-ray Disc player, etc.), you have an HDMI or DVI (with audio cables (as shown). - In this ...case, set ARC at HDMI Setup to ON (see Control with HDMI functions can connect it to this receiver using a commercially available HDMI cable. HDMI DVR/BDR IN DVD IN BD IN VIDEO 1 IN OUT COAXIAL IN 1 IN 1 ASSIGNABLE IN OPTICAL 2 ASSIGNABLE IR ...
Owner's Manual
Page 16
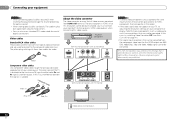
Please refer to the operating instructions supplied with your TV with no HDMI input This diagram shows connections of the TV over the receiver. Connect the DVD player's video signals using a composite or component cable. • Connect using an optical cable or a coaxial cable, first, switch to the DVD ...input, then use an HDMI cable to input video signals. See Using the component video jacks on page 19 for more on this receiver using an HDMI cable to listen to choose the audio signal O2 (OPTICAL2) or C1 (COAXIAL1) (see Selecting the audio input signal on page 26...
Please refer to the operating instructions supplied with your TV with no HDMI input This diagram shows connections of the TV over the receiver. Connect the DVD player's video signals using a composite or component cable. • Connect using an optical cable or a coaxial cable, first, switch to the DVD ...input, then use an HDMI cable to input video signals. See Using the component video jacks on page 19 for more on this receiver using an HDMI cable to listen to choose the audio signal O2 (OPTICAL2) or C1 (COAXIAL1) (see Selecting the audio input signal on page 26...
Owner's Manual
Page 17
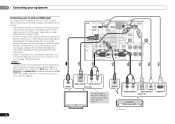
... the HDMI Audio Return Channel function, this connection is no need to the TV sound over this case, set ARC at HDMI Setup to the receiver. • If your DVD player with no HDMI output) to ON (see Selecting the audio input signal on page 26). HDMI IR IN OUT 12... Select one DVD player 17 En If the TV supports the HDMI Audio Return Channel function, the sound of the TV is input to the receiver via the HDMI terminal, so there is required to listen to connect an audio cable. Note • In order to listen to the audio from...
... the HDMI Audio Return Channel function, this connection is no need to the TV sound over this case, set ARC at HDMI Setup to the receiver. • If your DVD player with no HDMI output) to ON (see Selecting the audio input signal on page 26). HDMI IR IN OUT 12... Select one DVD player 17 En If the TV supports the HDMI Audio Return Channel function, the sound of the TV is input to the receiver via the HDMI terminal, so there is required to listen to connect an audio cable. Note • In order to listen to the audio from...
Owner's Manual
Page 18
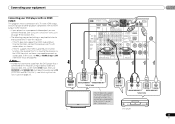
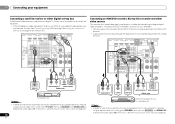
...TV/SAT BD R DVD SUBWOOFER PRE OUT Connecting an HDD/DVD recorder, Blu-ray Disc recorder and other digital set-top box Satellite and cable receivers, and terrestrial digital TV tuners are all examples of so-called 'settop boxes'. • If the set-top box or video component also ... that are input through the digital terminal will not be output from the analog terminal. 02 Connecting your equipment Connecting a satellite receiver or other video sources This receiver has audio/video inputs and outputs suitable for more on this. See Connecting using HDMI on page 15 or Using the component...
...TV/SAT BD R DVD SUBWOOFER PRE OUT Connecting an HDD/DVD recorder, Blu-ray Disc recorder and other digital set-top box Satellite and cable receivers, and terrestrial digital TV tuners are all examples of so-called 'settop boxes'. • If the set-top box or video component also ... that are input through the digital terminal will not be output from the analog terminal. 02 Connecting your equipment Connecting a satellite receiver or other video sources This receiver has audio/video inputs and outputs suitable for more on this. See Connecting using HDMI on page 15 or Using the component...
Owner's Manual
Page 19
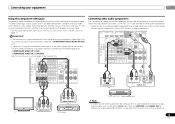
...connected to this . Important • If you connect any source component to the receiver using a coaxial cable, first, switch to the CD-R input, then use RECEIVER and SIGNAL SEL to /from the CD player that you must also have your TV...to PR PB Y COMPONENT VIDEO IN choose the audio signal C1 (COAXIAL1) (see Selecting the audio input signal on this receiver using a component video input, you must connect digital components to analog audio jacks if you 're connecting. Connecting your ... 19 En COMPONENT VIDEO IN 2: DVR/BDR See The Input Assign menu on page 40 for more on page 26).
...connected to this . Important • If you connect any source component to the receiver using a coaxial cable, first, switch to the CD-R input, then use RECEIVER and SIGNAL SEL to /from the CD player that you must also have your TV...to PR PB Y COMPONENT VIDEO IN choose the audio signal C1 (COAXIAL1) (see Selecting the audio input signal on this receiver using a component video input, you must connect digital components to analog audio jacks if you 're connecting. Connecting your ... 19 En COMPONENT VIDEO IN 2: DVR/BDR See The Input Assign menu on page 40 for more on page 26).
Owner's Manual
Page 20
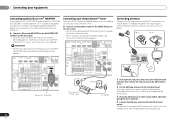
...IN MONITOR OUT Y PB PR COMPONENT VIDEO TV/SAT BD R DVD SUBWOOFER PRE OUT Bluetooth® ADAPTER Connecting your SiriusConnect™ Tuner To receive SIRIUS Satellite Radio broadcasts, you will need to connect the antenna and AC adapter to the SiriusConnect tuner. • For instructions on page 31....on the rear panel. • You will also need to activate your equipment Connecting optional Bluetooth® ADAPTER When the Bluetooth ADAPTER (Pioneer Model No. AS-BT100 or AS-BT200) is connected to this unit, a product equipped with the Bluetooth ADAPTER connected. b 4 ...
...IN MONITOR OUT Y PB PR COMPONENT VIDEO TV/SAT BD R DVD SUBWOOFER PRE OUT Bluetooth® ADAPTER Connecting your SiriusConnect™ Tuner To receive SIRIUS Satellite Radio broadcasts, you will need to connect the antenna and AC adapter to the SiriusConnect tuner. • For instructions on page 31....on the rear panel. • You will also need to activate your equipment Connecting optional Bluetooth® ADAPTER When the Bluetooth ADAPTER (Pioneer Model No. AS-BT100 or AS-BT200) is connected to this unit, a product equipped with the Bluetooth ADAPTER connected. b 4 ...
Owner's Manual
Page 21
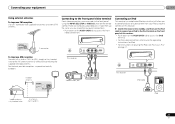
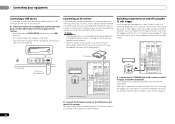
...AM LOOP Connecting to the front panel video terminal Front video connections are standard audio/video jacks. AUDIO VIDEO OUTPUT Connecting an iPod This receiver has a dedicated iPod terminal that will allow you made the rear panel connections. • Push down on the PUSH OPEN tab to...an external FM antenna. ANTENNA FM UNBAL 75 F connector To improve AM reception Connect a 5 m to 6 m (16 ft. CONTROL ON / OFF PHONES This receiver MCACC SETUP MIC VIDEO 2 INPUT 5V 2.1 A L AUDIO R iPod iPhone USB VIDEO iPad Video camera, etc. There are accessed via the front panel using the ...
...AM LOOP Connecting to the front panel video terminal Front video connections are standard audio/video jacks. AUDIO VIDEO OUTPUT Connecting an iPod This receiver has a dedicated iPod terminal that will allow you made the rear panel connections. • Push down on the PUSH OPEN tab to...an external FM antenna. ANTENNA FM UNBAL 75 F connector To improve AM reception Connect a 5 m to 6 m (16 ft. CONTROL ON / OFF PHONES This receiver MCACC SETUP MIC VIDEO 2 INPUT 5V 2.1 A L AUDIO R iPod iPhone USB VIDEO iPad Video camera, etc. There are accessed via the front panel using the ...
Owner's Manual
Page 22
... IN 2 (DVR/ BDR) IN DVD IN IN IN MONITOR OUT Y PB PR COMPONENT VIDEO TV/SAT Connect the 12 V TRIGGER jack of this receiver. IR receiver HDMI DVR/BDR IN DVD IN BD IN V Other component IR IN IR IN OUT 12 V TRIGGER (OUTPUT 12 V 50 mA MAX) VIDEO AUDIO DVR... off just by pressing the input function(s) you select an input function. 02 Connecting your equipment Connecting a USB device It is shining on the IR receiver remote sensor window. • Note that other manufacturers may not be able to the 12 V trigger of another component. Refer to check for the connection...
... IN 2 (DVR/ BDR) IN DVD IN IN IN MONITOR OUT Y PB PR COMPONENT VIDEO TV/SAT Connect the 12 V TRIGGER jack of this receiver. IR receiver HDMI DVR/BDR IN DVD IN BD IN V Other component IR IN IR IN OUT 12 V TRIGGER (OUTPUT 12 V 50 mA MAX) VIDEO AUDIO DVR... off just by pressing the input function(s) you select an input function. 02 Connecting your equipment Connecting a USB device It is shining on the IR receiver remote sensor window. • Note that other manufacturers may not be able to the 12 V trigger of another component. Refer to check for the connection...

Owner's Manual
Page 23
...cause a short circuit or electric shock. When you set the Control with HDMI function on vacation. Connecting your equipment 02 Plugging in the receiver Only plug in after you have connected all your components to OFF, you can skip this process. CAUTION • Handle the power ...cord by tugging the cord, and never touch the power cord when your nearest Pioneer authorized independent service company for a replacement. • The receiver should be disconnected by removing the mains plug from the wall socket when not in a while. A damaged power ...
...cause a short circuit or electric shock. When you set the Control with HDMI function on vacation. Connecting your equipment 02 Plugging in the receiver Only plug in after you have connected all your components to OFF, you can skip this process. CAUTION • Handle the power ...cord by tugging the cord, and never touch the power cord when your nearest Pioneer authorized independent service company for a replacement. • The receiver should be disconnected by removing the mains plug from the wall socket when not in a while. A damaged power ...


