Owner's Manual
Page 4
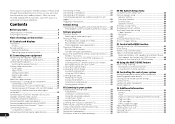
... no HDMI input 16 Connecting your DVD player with HDMI function 44 08 Using the MULTI-ZONE feature MULTI-ZONE listening 45 Making MULTI-ZONE connections 45 Using the MULTI-ZONE controls 45 09 Controlling the rest of a different brand that supports the Control with HDMI function 44 Cautions on the Control with no HDMI output . . . 17 Connecting a satellite receiver or other digital set-top box 18 Connecting an HDD/DVD recorder, Blu-ray Disc recorder and other video sources 18 Using the component video jacks 19 Connecting other components 47 Preset Code List...
... no HDMI input 16 Connecting your DVD player with HDMI function 44 08 Using the MULTI-ZONE feature MULTI-ZONE listening 45 Making MULTI-ZONE connections 45 Using the MULTI-ZONE controls 45 09 Controlling the rest of a different brand that supports the Control with HDMI function 44 Cautions on the Control with no HDMI output . . . 17 Connecting a satellite receiver or other digital set-top box 18 Connecting an HDD/DVD recorder, Blu-ray Disc recorder and other video sources 18 Using the component video jacks 19 Connecting other components 47 Preset Code List...
Owner's Manual
Page 5
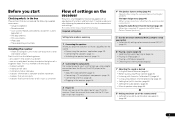
...; Switching the speaker terminal (page 12) 2 Connecting the components For surround sound, you'll want to hook up for surround sound (MCACC) (page 24) 6 Playing a source (page 26) • Selecting the audio input signal (page 26) • Playing an iPod (page 27) • Playing a USB device (page 28) • Choosing the listening mode (page 33) 7 Adjusting the sound as a kitchen) Flow of settings on the following supplied accessories: • Setup microphone...
...; Switching the speaker terminal (page 12) 2 Connecting the components For surround sound, you'll want to hook up for surround sound (MCACC) (page 24) 6 Playing a source (page 26) • Selecting the audio input signal (page 26) • Playing an iPod (page 27) • Playing a USB device (page 28) • Choosing the listening mode (page 33) 7 Adjusting the sound as a kitchen) Flow of settings on the following supplied accessories: • Setup microphone...
Owner's Manual
Page 6
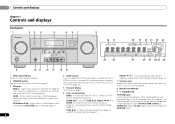
... 8 MASTER VOLUME dial 9 STANDBY/ON 10 PHONES jack Use to control the sub zone from the speakers. TUNER EDIT - Use with ADAPTER input). 01 Controls and displays Chapter 1: Controls and displays Front panel 1 23 4 5 6 37 INPUT SELECTOR STANDBY /ON MCACC HDMI iPod iPhone iPad SPEAKERS CONTROL - ON/OFF BAND TUNER EDIT TUNE PRESET AUTO SURROUND/ ALC/ STREAM DIRECT STANDARD SURR ADVANCED SURROUND STEREO iPod iPhone iPad DIRECT CONTROL ENTER PHONES MCACC SETUP MIC VIDEO 2 INPUT 5V 2.1 A L AUDIO R iPod iPhone USB VIDEO iPad 8 VSX-40 16 17 MASTER VOLUME...
... 8 MASTER VOLUME dial 9 STANDBY/ON 10 PHONES jack Use to control the sub zone from the speakers. TUNER EDIT - Use with ADAPTER input). 01 Controls and displays Chapter 1: Controls and displays Front panel 1 23 4 5 6 37 INPUT SELECTOR STANDBY /ON MCACC HDMI iPod iPhone iPad SPEAKERS CONTROL - ON/OFF BAND TUNER EDIT TUNE PRESET AUTO SURROUND/ ALC/ STREAM DIRECT STANDARD SURR ADVANCED SURROUND STEREO iPod iPhone iPad DIRECT CONTROL ENTER PHONES MCACC SETUP MIC VIDEO 2 INPUT 5V 2.1 A L AUDIO R iPod iPhone USB VIDEO iPad 8 VSX-40 16 17 MASTER VOLUME...
Owner's Manual
Page 7
... - Display 16 PHASE Lights when the Phase Control is switched on (page 35). 17 AUTO Lights when the Auto Surround feature is in surround sound on page 33 for more on this lights to the iPod and enable iPod operations on (page 34). TUNE - PRESET - Lights when a source with Dolby TrueHD encoded audio signals is not provided. Press to select stereo playback (page 33). 12 MCACC SETUP MIC jack Use to connect a microphone when performing Auto MCACC setup (page 24). 13 AUDIO/VIDEO input...
... - Display 16 PHASE Lights when the Phase Control is switched on (page 35). 17 AUTO Lights when the Auto Surround feature is in surround sound on page 33 for more on this lights to the iPod and enable iPod operations on (page 34). TUNE - PRESET - Lights when a source with Dolby TrueHD encoded audio signals is not provided. Press to select stereo playback (page 33). 12 MCACC SETUP MIC jack Use to connect a microphone when performing Auto MCACC setup (page 24). 13 AUDIO/VIDEO input...

Owner's Manual
Page 8
...function buttons Use to select the input source to this receiver (page 26). Use to access: iPod CTRL - Confirm and exit the current menu screen. The controls above the number buttons (MIDNIGHT, etc)). 01 Controls and displays Remote control 1 RECEIVER SLEEP TV SOURCE CONTROL 2 3 RECEIVER INPUT SELECT INPUT 4 BD DVD TV DVR/BDR CD CD-R CH 5 ADAPTER iPod USB VIDEO 1 VIDEO 2 TUNER SIRIUS VOL 11 12 AUTO/ ALC/ BD MENU 6 DIRECT STEREO STANDARD ADV SURR AUDIO PARAMETER TOP 7 MENU TUNER EDIT MASTER TOOLS VOLUME TUNE MENU PRESET PRESET ENTER 8 HOME MENU SETUP...
...function buttons Use to select the input source to this receiver (page 26). Use to access: iPod CTRL - Confirm and exit the current menu screen. The controls above the number buttons (MIDNIGHT, etc)). 01 Controls and displays Remote control 1 RECEIVER SLEEP TV SOURCE CONTROL 2 3 RECEIVER INPUT SELECT INPUT 4 BD DVD TV DVR/BDR CD CD-R CH 5 ADAPTER iPod USB VIDEO 1 VIDEO 2 TUNER SIRIUS VOL 11 12 AUTO/ ALC/ BD MENU 6 DIRECT STEREO STANDARD ADV SURR AUDIO PARAMETER TOP 7 MENU TUNER EDIT MASTER TOOLS VOLUME TUNE MENU PRESET PRESET ENTER 8 HOME MENU SETUP...

Owner's Manual
Page 9
... input modes for Pioneer TVs. 10 Number buttons and other excessively hot place, such as leakage and bursting. These buttons switch between the remote control and the receiver's remote sensor. • Direct sunlight or fluorescent light is shining onto the remote sensor. • The receiver is located near a heater. Use to adjust the channel level. Do not use of batteries may have a longer life. DIMMER - Press to select the audio input signal of the component...
... input modes for Pioneer TVs. 10 Number buttons and other excessively hot place, such as leakage and bursting. These buttons switch between the remote control and the receiver's remote sensor. • Direct sunlight or fluorescent light is shining onto the remote sensor. • The receiver is located near a heater. Use to adjust the channel level. Do not use of batteries may have a longer life. DIMMER - Press to select the audio input signal of the component...
Owner's Manual
Page 11
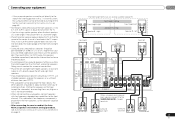
... L ADAPTER PORT (OUTPUT 5 V OUT 0.1 A MAX) R ANTENNA DVR/ BDR OUT IN 1 (DVD) ASSIGN ABLE IN 2 (DVR/ BDR) IN DVD IN IN IN CD L FM UNBAL 75 IN SIRIUS AM LOOP A R FRONT R L IN L IN CENTER MONITOR OUT Y PB PR COMPONENT VIDEO TV/SAT BD R DVD SUBWOOFER PRE OUT SURROUND R L SURROUND BACK R L(Single) SPEAKERS Class 2 Wiring FRONT HEIGHT / B R L When using a center speaker, place the front speakers at least one surround back speaker, connect it to 3 m (6 ft...
... L ADAPTER PORT (OUTPUT 5 V OUT 0.1 A MAX) R ANTENNA DVR/ BDR OUT IN 1 (DVD) ASSIGN ABLE IN 2 (DVR/ BDR) IN DVD IN IN IN CD L FM UNBAL 75 IN SIRIUS AM LOOP A R FRONT R L IN L IN CENTER MONITOR OUT Y PB PR COMPONENT VIDEO TV/SAT BD R DVD SUBWOOFER PRE OUT SURROUND R L SURROUND BACK R L(Single) SPEAKERS Class 2 Wiring FRONT HEIGHT / B R L When using a center speaker, place the front speakers at least one surround back speaker, connect it to 3 m (6 ft...
Owner's Manual
Page 12
... speaker cables, disconnect the power cord before connecting this unit to select a speaker terminal setting. This not only improves sound quality, but using the SPEAKERS button. Also make sure the positive and negative (+/-) terminals on the receiver match those on the front panel to the AC power source. The options below are securely installed. Multichannel sources are downmixed only when the STEREO or STEREO ALC mode is selected for stereo output from the subwoofer (the LFE channel...
... speaker cables, disconnect the power cord before connecting this unit to select a speaker terminal setting. This not only improves sound quality, but using the SPEAKERS button. Also make sure the positive and negative (+/-) terminals on the receiver match those on the front panel to the AC power source. The options below are securely installed. Multichannel sources are downmixed only when the STEREO or STEREO ALC mode is selected for stereo output from the subwoofer (the LFE channel...
Owner's Manual
Page 13
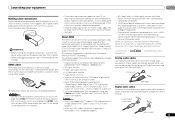
... set the input signal in Selecting the audio input signal on your equipment 02 Making cable connections Make sure not to HDMI, if you should be displayed. In this case, use a (analog) composite connection. • When the video signal from the HDMI is used to connect digital components to hear HDMI audio output from your TV (no sound will be received. White (Left) L R AUDIO Red (Right) Digital audio cables Commercially available coaxial digital audio cables or optical cables should connect the red plugs to R (right) terminals and white plugs to 8 channels • Input...
... set the input signal in Selecting the audio input signal on your equipment 02 Making cable connections Make sure not to HDMI, if you should be displayed. In this case, use a (analog) composite connection. • When the video signal from the HDMI is used to connect digital components to hear HDMI audio output from your TV (no sound will be received. White (Left) L R AUDIO Red (Right) Digital audio cables Commercially available coaxial digital audio cables or optical cables should connect the red plugs to R (right) terminals and white plugs to 8 channels • Input...
Owner's Manual
Page 22
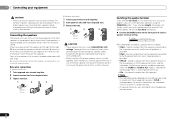
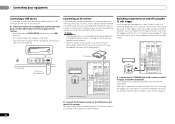
... the input functions that will only work with components that have a standby mode. For more information on connecting the IR receiver, see Playing a USB device on page 28. CONTROL ON / OFF PHONES This receiver MCACC SETUP MIC VIDEO 2 INPUT 5V 2.1 A L AUDIO R iPod iPhone USB VIDEO iPad USB mass storage device Connecting an IR receiver If you keep your stereo components in a closed cabinet or shelving unit, or you wish to use the sub zone remote control in...
... the input functions that will only work with components that have a standby mode. For more information on connecting the IR receiver, see Playing a USB device on page 28. CONTROL ON / OFF PHONES This receiver MCACC SETUP MIC VIDEO 2 INPUT 5V 2.1 A L AUDIO R iPod iPhone USB VIDEO iPad USB mass storage device Connecting an IR receiver If you keep your stereo components in a closed cabinet or shelving unit, or you wish to use the sub zone remote control in...
Owner's Manual
Page 25
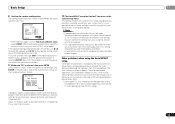
... surround sound from the microphone) the final settings may take 1 to be changed. If this is happening. If you 're finished, go to be happening, switch off the power and check the speaker connections. 9 Make sure 'OK' is displayed on page 38). If selecting RETRY doesn't fix the problem, turn off the TV when doing the Auto MCACC setup. 25 En When you see Other problems when using...
... surround sound from the microphone) the final settings may take 1 to be changed. If this is happening. If you 're finished, go to be happening, switch off the power and check the speaker connections. 9 Make sure 'OK' is displayed on page 38). If selecting RETRY doesn't fix the problem, turn off the TV when doing the Auto MCACC setup. 25 En When you see Other problems when using...
Owner's Manual
Page 26
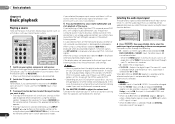
... MENU DIRECT STEREO STANDARD ADV SURR AUDIO PARAMETER TOP MENU TUNE TUNER EDIT MASTER TOOLS VOLUME MENU ENTER PRESET PRESET DVR/BDR CD CD-R CH ADAPTER iPod USB VIDEO 1 HOME MENU SETUP iPod CTRL CATEGORY TUNE BAND RETURN DTV/ TV MUTE VIDEO 2 TUNER SIRIUS VOL BASS TRE 1 Switch on the remote control, or by using a surround back speaker, 2D is automatically selected. Selecting the audio input signal The audio input signal can be selected by using a surround back speaker, 2D+PLIIx is displayed when playing Dolby Digital 5.1-channel signals, and DTS+NEO:6 is fixed to...
... MENU DIRECT STEREO STANDARD ADV SURR AUDIO PARAMETER TOP MENU TUNE TUNER EDIT MASTER TOOLS VOLUME MENU ENTER PRESET PRESET DVR/BDR CD CD-R CH ADAPTER iPod USB VIDEO 1 HOME MENU SETUP iPod CTRL CATEGORY TUNE BAND RETURN DTV/ TV MUTE VIDEO 2 TUNER SIRIUS VOL BASS TRE 1 Switch on the remote control, or by using a surround back speaker, 2D is automatically selected. Selecting the audio input signal The audio input signal can be selected by using a surround back speaker, 2D+PLIIx is displayed when playing Dolby Digital 5.1-channel signals, and DTS+NEO:6 is fixed to...
Owner's Manual
Page 28
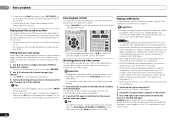
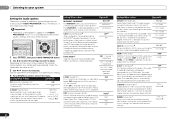
... drives, portable flash memory (particularly keydrives) and digital audio players (MP3 players) of format FAT16/32. AUTO/ ALC/ BD MENU DIRECT STEREO STANDARD ADV SURR DTV/ TV MUTE AUDIO PARAMETER TOP MENU TUNE TUNER EDIT MASTER TOOLS VOLUME MENU BASS TRE MEMORY PRESET ENTER PRESET HDD DVD VCR 1 2 3 DISP S.RETRIEVER SB CH CH SELECT EQ 4 5 6 CH HOME MENU SETUP TUNE BAND MIDNIGHT SPEAKERS LEV 7 8 9 PHASE CH iPod CTRL CATEGORY RETURN DTV/ TV MUTE DIMMER SIGNAL SEL LEV 0 SHIFT...
... drives, portable flash memory (particularly keydrives) and digital audio players (MP3 players) of format FAT16/32. AUTO/ ALC/ BD MENU DIRECT STEREO STANDARD ADV SURR DTV/ TV MUTE AUDIO PARAMETER TOP MENU TUNE TUNER EDIT MASTER TOOLS VOLUME MENU BASS TRE MEMORY PRESET ENTER PRESET HDD DVD VCR 1 2 3 DISP S.RETRIEVER SB CH CH SELECT EQ 4 5 6 CH HOME MENU SETUP TUNE BAND MIDNIGHT SPEAKERS LEV 7 8 9 PHASE CH iPod CTRL CATEGORY RETURN DTV/ TV MUTE DIMMER SIGNAL SEL LEV 0 SHIFT...
Owner's Manual
Page 36
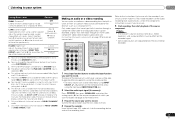
... heard only CH2 - Channel 2 is a problem. RECEIVER SLEEP TV SOURCE CONTROL AUDIO PARAMETER TOP MENU TUNER EDIT MASTER TOOLS VOLUME TUNE MENU PRESET PRESET RECEIVER INPUT SELECT INPUT ENTER BD DVD TV HOME MENU SETUP iPod CTRL C GO TUNE BAND RETURN 1 Press RECEIVER , then press AUDIO PARAMETER button. 2 Use / to select the setting you want to get good bass and treble from front to back, making it is output from an uneven sound image. The defaults, if not stated, are a number of sync with an HDMI cable.
... heard only CH2 - Channel 2 is a problem. RECEIVER SLEEP TV SOURCE CONTROL AUDIO PARAMETER TOP MENU TUNER EDIT MASTER TOOLS VOLUME TUNE MENU PRESET PRESET RECEIVER INPUT SELECT INPUT ENTER BD DVD TV HOME MENU SETUP iPod CTRL C GO TUNE BAND RETURN 1 Press RECEIVER , then press AUDIO PARAMETER button. 2 Use / to select the setting you want to get good bass and treble from front to back, making it is output from an uneven sound image. The defaults, if not stated, are a number of sync with an HDMI cable.
Owner's Manual
Page 37
... panel INPUT SELECTOR dial. 2 Select the audio input signal (if necessary). Only available with 2-channel sources in tuner, or from the front height speaker when listening in NEO:6 CINEMA and NEO:6 MUSIC mode. The input of the source component. g. If you will be selected by using INPUT SELECT buttons on this receiver through a composite video cable or analog audio inputs can make an audio or a video recording from the built-in DOLBY PLII MUSIC mode. Tune to include ON surround speakers for HDMI. L (Low) M (Mid) H (High) a. The default setting...
... panel INPUT SELECTOR dial. 2 Select the audio input signal (if necessary). Only available with 2-channel sources in tuner, or from the front height speaker when listening in NEO:6 CINEMA and NEO:6 MUSIC mode. The input of the source component. g. If you will be selected by using INPUT SELECT buttons on this receiver through a composite video cable or analog audio inputs can make an audio or a video recording from the built-in DOLBY PLII MUSIC mode. Tune to include ON surround speakers for HDMI. L (Low) M (Mid) H (High) a. The default setting...
Owner's Manual
Page 38
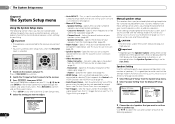
... HDMI Setup on . 2 Switch the TV input so that enables the signal output from the listening position (page 40). • Input Assign - CAUTION • The test tones used in Automatically setting up for surround sound (MCACC) on the receiver and your speaker configuration (size, number of the video signal (page 41). - RECEIVER SLEEP TV SOURCE CONTROL PARAMETER TOP MENU TUNE TOOLS VOLUME MENU PRESET PRESET RECEIVER INPUT SELECT BD DVD TV INPUT ENTER HOME MENU SETUP iPod CTRL CATEGORY TUNE BAND RETURN DTV/ TV MUTE 1 Switch on page 24 are connected...
... HDMI Setup on . 2 Switch the TV input so that enables the signal output from the listening position (page 40). • Input Assign - CAUTION • The test tones used in Automatically setting up for surround sound (MCACC) on the receiver and your speaker configuration (size, number of the video signal (page 41). - RECEIVER SLEEP TV SOURCE CONTROL PARAMETER TOP MENU TUNE TOOLS VOLUME MENU PRESET PRESET RECEIVER INPUT SELECT BD DVD TV INPUT ENTER HOME MENU SETUP iPod CTRL CATEGORY TUNE BAND RETURN DTV/ TV MUTE 1 Switch on page 24 are connected...

Owner's Manual
Page 45
... in the sub zone: Sub Zone ZONE 2 Input sources available The built-in the sub zone. Switches the MULTI-ZONE feature on the front panel. MULTI-ZONE remote controls Press the RECEIVER button on ) and the sub zone can 't use the tuner controls to select a preset station (see Saving station presets on the rear of speakers attached to the sub zone amplifier as the bass/treble controls or Midnight listening) or any operations for a while, turn off power in the other analog audio sources. Therefore, changing the station in one station at the same time or, depending...
... in the sub zone: Sub Zone ZONE 2 Input sources available The built-in the sub zone. Switches the MULTI-ZONE feature on the front panel. MULTI-ZONE remote controls Press the RECEIVER button on ) and the sub zone can 't use the tuner controls to select a preset station (see Saving station presets on the rear of speakers attached to the sub zone amplifier as the bass/treble controls or Midnight listening) or any operations for a while, turn off power in the other analog audio sources. Therefore, changing the station in one station at the same time or, depending...
Owner's Manual
Page 50
... the audio output settings of video cable as static electricity disconnect the power plug from your subwoofer, set to OFF and a TV and another component are connected with the DVD player. General The power does not turn off equipment causing interference or move antennas farther away from the antenna terminals and wires. Fully extend the FM wire antenna, position for surround sound (MCACC) on page 24 to set (see HDMI 50 Setup on the sound...
... the audio output settings of video cable as static electricity disconnect the power plug from your subwoofer, set to OFF and a TV and another component are connected with the DVD player. General The power does not turn off equipment causing interference or move antennas farther away from the antenna terminals and wires. Fully extend the FM wire antenna, position for surround sound (MCACC) on page 24 to set (see HDMI 50 Setup on the sound...
Owner's Manual
Page 51
... recommended) for the audio. HDMI format digital audio transmissions require a longer time to the receiver. Additional information 10 After using the Auto MCACC setup, the speaker size setting (LARGE or SMALL) is correct. Switch off . Press DIMMER on (see HDMI Setup on page 43). Turn the TV's power on before turning on audio connections. Display blinks 12V ERR. An error has arisen in the output settings of the unit are...
... recommended) for the audio. HDMI format digital audio transmissions require a longer time to the receiver. Additional information 10 After using the Auto MCACC setup, the speaker size setting (LARGE or SMALL) is correct. Switch off . Press DIMMER on (see HDMI Setup on page 43). Turn the TV's power on before turning on audio connections. Display blinks 12V ERR. An error has arisen in the output settings of the unit are...
Owner's Manual
Page 52
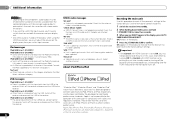
... display, press AUTO SURROUND/STREAM DIRECT. SIRIUS radio messages 'NO ANT' Antenna is updating channels. Wait until the encryption code has been updated. 'INVLD CH' Selected channel is too weak at the current location. Switch off the receiver and reconnect the iPod to work , try resetting your display unit. • Since the sound is muted on the display when using the HDMI connection, you must adjust the volume on the iPod. iPod messages 'iPod/USB Error 1 (I/U ERR1)', 'iPod...
... display, press AUTO SURROUND/STREAM DIRECT. SIRIUS radio messages 'NO ANT' Antenna is updating channels. Wait until the encryption code has been updated. 'INVLD CH' Selected channel is too weak at the current location. Switch off the receiver and reconnect the iPod to work , try resetting your display unit. • Since the sound is muted on the display when using the HDMI connection, you must adjust the volume on the iPod. iPod messages 'iPod/USB Error 1 (I/U ERR1)', 'iPod...


