Owner's Manual
Page 4
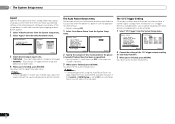
...volt trigger 22 Plugging in the receiver 23 03 Basic Setup Automatically setting up for surround sound (MCACC). . . 24 Other problems when using the Auto MCACC setup . . . 25 04 Basic playback Playing a source 26 Selecting the audio input signal ... The System Setup menu Using the System Setup menu 38 Manual speaker setup 38 Speaker Setting 38 Crossover Network 39 Channel Level 39 Speaker Distance 40 The Input Assign menu 40 The Speaker System setting 41 The Video Parameter setting 41 ... 53 Please read through these operating instructions so you for buying this Pioneer product.
...volt trigger 22 Plugging in the receiver 23 03 Basic Setup Automatically setting up for surround sound (MCACC). . . 24 Other problems when using the Auto MCACC setup . . . 25 04 Basic playback Playing a source 26 Selecting the audio input signal ... The System Setup menu Using the System Setup menu 38 Manual speaker setup 38 Speaker Setting 38 Crossover Network 39 Channel Level 39 Speaker Distance 40 The Input Assign menu 40 The Speaker System setting 41 The Video Parameter setting 41 ... 53 Please read through these operating instructions so you for buying this Pioneer product.
Owner's Manual
Page 5
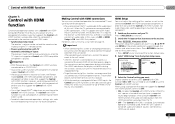
...8226; Setting the Up Mix function (page 35) • Setting the Audio options (page 36) • Manual speaker setup (page 38) 8 Making maximum use of the remote control • Setting the remote...) (Specify either using the surround back or front height speaker.) The Input Assign menu (page 40) (When using connections other movement - in places where there is a full-fledged AV receiver... to be made as necessary 1 Connecting the speakers Where you 'll want to hook up for surround sound (MCACC) (page 24) 6 Playing a source (page 26) • Selecting the audio input signal (...
...8226; Setting the Up Mix function (page 35) • Setting the Audio options (page 36) • Manual speaker setup (page 38) 8 Making maximum use of the remote control • Setting the remote...) (Specify either using the surround back or front height speaker.) The Input Assign menu (page 40) (When using connections other movement - in places where there is a full-fledged AV receiver... to be made as necessary 1 Connecting the speakers Where you 'll want to hook up for surround sound (MCACC) (page 24) 6 Playing a source (page 26) • Selecting the audio input signal (...
Owner's Manual
Page 22
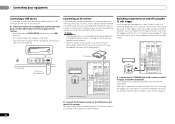
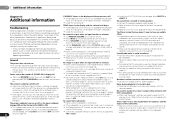
... connect your USB device to the USB terminal on the front panel of another zone, you can connect components in another component. Refer to the manual that came with your component to the IR IN jack on the rear of this receiver so that they switch on or off using 12... volt triggers when you select an input function. CONTROL ON / OFF PHONES This receiver MCACC SETUP MIC VIDEO 2 INPUT 5V 2.1 A L AUDIO R iPod iPhone USB VIDEO iPad USB mass storage device Connecting an IR receiver If you keep your stereo components...
... connect your USB device to the USB terminal on the front panel of another zone, you can connect components in another component. Refer to the manual that came with your component to the IR IN jack on the rear of this receiver so that they switch on or off using 12... volt triggers when you select an input function. CONTROL ON / OFF PHONES This receiver MCACC SETUP MIC VIDEO 2 INPUT 5V 2.1 A L AUDIO R iPod iPhone USB VIDEO iPad USB mass storage device Connecting an IR receiver If you keep your stereo components...
Owner's Manual
Page 24
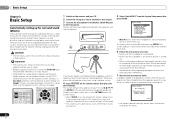
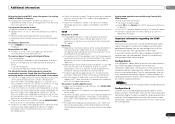
...should not be as quiet as possible after three minutes of test tones to place the microphone so that it 's doing this. 1.Auto MCACC Now Analyzing Environment Check Ambient Noise Speaker YES/NO Return • For correct speaker settings, do not adjust the volume during the test ... MIC VIDEO 2 INPUT 5V 2.1 A L AUDIO R iPod iPhone USB VIDEO iPad Microphone Tripod If you cancel the Auto MCACC setup at your TV. System Setup 1.Auto MCACC 2.Manual SP Setup 3.Input Assign 4.Speaker System 5.Video Parameter 6.HDMI Setup 7.Auto Power Down 8.12V Trigger Return • MIC IN blinks when ...
...should not be as quiet as possible after three minutes of test tones to place the microphone so that it 's doing this. 1.Auto MCACC Now Analyzing Environment Check Ambient Noise Speaker YES/NO Return • For correct speaker settings, do not adjust the volume during the test ... MIC VIDEO 2 INPUT 5V 2.1 A L AUDIO R iPod iPhone USB VIDEO iPad Microphone Tripod If you cancel the Auto MCACC setup at your TV. System Setup 1.Auto MCACC 2.Manual SP Setup 3.Input Assign 4.Speaker System 5.Video Parameter 6.HDMI Setup 7.Auto Power Down 8.12V Trigger Return • MIC IN blinks when ...
Owner's Manual
Page 25
... for household appliances (air conditioner, fridge, fan, etc.), that may be a problem with different size settings. Again, try to adjust these settings manually using the Speaker Setting on page 38). It may be changed. Note • Depending on the characteristics of your system, but it is selected,...! The settings made in the front panel display, please follow them off the TV when doing the Auto MCACC setup. 25 En You can correct the setting manually using the System Setup menu (starting on page 38. • The subwoofer distance setting may interfere with the operation of ...
... for household appliances (air conditioner, fridge, fan, etc.), that may be a problem with different size settings. Again, try to adjust these settings manually using the Speaker Setting on page 38). It may be changed. Note • Depending on the characteristics of your system, but it is selected,...! The settings made in the front panel display, please follow them off the TV when doing the Auto MCACC setup. 25 En You can correct the setting manually using the System Setup menu (starting on page 38. • The subwoofer distance setting may interfere with the operation of ...
Owner's Manual
Page 34
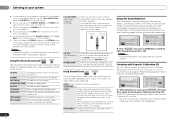
... live concert sound for acoustic music sources. Use to provide a rich surround sound effect directed to sources using all of channels in the Manual SP Setup (speaker setting, channel level, speaker distance), as well as with your system a. When listening through headphones, you can also adjust...settings made in the signal. You can still use Acoustic Calibration EQ with Stream Direct mode and it has no effect with dynamic soundtracks. The MCACC indicator on page 24. e. The S.R AIR listening mode can 't use the Midnight, Loudness, Phase Control, Sound Retriever and Tone functions....
... live concert sound for acoustic music sources. Use to provide a rich surround sound effect directed to sources using all of channels in the Manual SP Setup (speaker setting, channel level, speaker distance), as well as with your system a. When listening through headphones, you can also adjust...settings made in the signal. You can still use Acoustic Calibration EQ with Stream Direct mode and it has no effect with dynamic soundtracks. The MCACC indicator on page 24. e. The S.R AIR listening mode can 't use the Midnight, Loudness, Phase Control, Sound Retriever and Tone functions....
Owner's Manual
Page 38
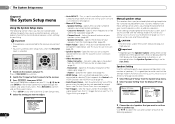
...Power Down - Speaker Setting Use this setting to adjust. 38 En System Setup 1.Auto MCACC 2.Manual SP Setup 3.Input Assign 4.Speaker System 5.Video Parameter 6.HDMI Setup 7.Auto Power Down 8.12V Trigger Return • Auto MCACC - Converts video signals for all of your system, but if you want to specify... RECEIVER INPUT SELECT BD DVD TV INPUT ENTER HOME MENU SETUP iPod CTRL CATEGORY TUNE BAND RETURN DTV/ TV MUTE 1 Switch on page 40). • Speaker System - The System Setup menu appears on the Speaker System setting, there will be adjusted. This is an example ...
...Power Down - Speaker Setting Use this setting to adjust. 38 En System Setup 1.Auto MCACC 2.Manual SP Setup 3.Input Assign 4.Speaker System 5.Video Parameter 6.HDMI Setup 7.Auto Power Down 8.12V Trigger Return • Auto MCACC - Converts video signals for all of your system, but if you want to specify... RECEIVER INPUT SELECT BD DVD TV INPUT ENTER HOME MENU SETUP iPod CTRL CATEGORY TUNE BAND RETURN DTV/ TV MUTE 1 Switch on page 40). • Speaker System - The System Setup menu appears on the Speaker System setting, there will be adjusted. This is an example ...

Owner's Manual
Page 40
...40 En Speaker Distance For good sound depth and separation from the Input Assign menu. 3.Input Assign a.Component Input 3a.Component Input Component-1 DVD Component-2 [ DVR ] Return Return 3 Select the number of the receiver. 4 Select the component that corresponds with the numbers beside the inputs on page 26. System Setup 1.Auto MCACC 2.Manual... SP Setup 3.Input Assign 4.Speaker System 5.Video Parameter 6.HDMI Setup 7.Auto Power Down 8.12V Trigger Return 2 Select 'Component Input' from your TV connected to the Manual SP Setup menu. Back...
...40 En Speaker Distance For good sound depth and separation from the Input Assign menu. 3.Input Assign a.Component Input 3a.Component Input Component-1 DVD Component-2 [ DVR ] Return Return 3 Select the number of the receiver. 4 Select the component that corresponds with the numbers beside the inputs on page 26. System Setup 1.Auto MCACC 2.Manual... SP Setup 3.Input Assign 4.Speaker System 5.Video Parameter 6.HDMI Setup 7.Auto Power Down 8.12V Trigger Return 2 Select 'Component Input' from your TV connected to the Manual SP Setup menu. Back...

Owner's Manual
Page 41
... than PURE and 480i/576i analog signals are input, 480p/576p signals are output with the Bspeaker terminals. • Default setting: Surr. System Setup 1.Auto MCACC 2.Manual SP Setup 3.Input Assign 4.Speaker System 5.Video Parameter 6.HDMI Setup 7.Auto Power Down 8.12V Trigger Return 4.Speaker System SP System Surr. The System Setup menu...
... than PURE and 480i/576i analog signals are input, 480p/576p signals are output with the Bspeaker terminals. • Default setting: Surr. System Setup 1.Auto MCACC 2.Manual SP Setup 3.Input Assign 4.Speaker System 5.Video Parameter 6.HDMI Setup 7.Auto Power Down 8.12V Trigger Return 4.Speaker System SP System Surr. The System Setup menu...
Owner's Manual
Page 42
...] [THROUGH] [ NORMAL ] [ NORMAL ] [ NORMAL ] Return Return 3 Select desired output aspect ratio. • THROUGH - System Setup 1.Auto MCACC 2.Manual SP Setup 3.Input Assign 4.Speaker System 5.Video Parameter 6.HDMI Setup 7.Auto Power Down 8.12V Trigger Return 7.Auto Power Down OFF Return 2 Specify the amount...for several hours. • Default setting: OFF 1 Select 'Auto Power Down' from the System Setup menu. System Setup 1.Auto MCACC 2.Manual SP Setup 3.Input Assign 4.Speaker System 5.Video Parameter 6.HDMI Setup 7.Auto Power Down 8.12V Trigger Return 8.12V Trigger BD ON...
...] [THROUGH] [ NORMAL ] [ NORMAL ] [ NORMAL ] Return Return 3 Select desired output aspect ratio. • THROUGH - System Setup 1.Auto MCACC 2.Manual SP Setup 3.Input Assign 4.Speaker System 5.Video Parameter 6.HDMI Setup 7.Auto Power Down 8.12V Trigger Return 7.Auto Power Down OFF Return 2 Specify the amount...for several hours. • Default setting: OFF 1 Select 'Auto Power Down' from the System Setup menu. System Setup 1.Auto MCACC 2.Manual SP Setup 3.Input Assign 4.Speaker System 5.Video Parameter 6.HDMI Setup 7.Auto Power Down 8.12V Trigger Return 8.12V Trigger BD ON...
Owner's Manual
Page 43
...but rather directly to 10 second HDMI initialization process begins. The HDMI indicator on the display unit blinks during initialization. System Setup 1.Auto MCACC 2.Manual SP Setup 3.Input Assign 4.Speaker System 5.Video Parameter 6.HDMI Setup 7.Auto Power Down 8.12V Trigger Return 6.HDMI Setup Control ARC ...ON [ OFF ] Return 5 Select the 'Control' setting you want . When this unit. Important • With Pioneer devices, the Control with HDMI function. HDMI Setup You must adjust the settings of this receiver is connected to OFF. • ON -...
...but rather directly to 10 second HDMI initialization process begins. The HDMI indicator on the display unit blinks during initialization. System Setup 1.Auto MCACC 2.Manual SP Setup 3.Input Assign 4.Speaker System 5.Video Parameter 6.HDMI Setup 7.Auto Power Down 8.12V Trigger Return 6.HDMI Setup Control ARC ...ON [ OFF ] Return 5 Select the 'Control' setting you want . When this unit. Important • With Pioneer devices, the Control with HDMI function. HDMI Setup You must adjust the settings of this receiver is connected to OFF. • ON -...
Owner's Manual
Page 50
...set to LFEATT 0 or LFEATT 5. If the message persists, call a Pioneer authorized independent service company. Try moving the unit for better ventilation (see ...turn off if the receiver has not operated for surround sound (MCACC) on page 36 to the highest frequency setting. Power cannot... 10). Check The Input Assign menu on page 40 to normal operating conditions. 10 Additional information Chapter 10: Additional... settings of the source component. Refer to the instruction manual supplied with different cords (in the display and the power turns ...
...set to LFEATT 0 or LFEATT 5. If the message persists, call a Pioneer authorized independent service company. Try moving the unit for better ventilation (see ...turn off if the receiver has not operated for surround sound (MCACC) on page 36 to the highest frequency setting. Power cannot... 10). Check The Input Assign menu on page 40 to normal operating conditions. 10 Additional information Chapter 10: Additional... settings of the source component. Refer to the instruction manual supplied with different cords (in the display and the power turns ...
Owner's Manual
Page 51
...Depending on audio connections. The receiver can 't be connected or operated. Configuration B Connect your monitor, please consult the component or monitor manual or contact the manufacturer for HDMI compatibility information). The Bluetooth wireless technology device cannot be displayed. Or, stop using the object emitting the...receiver to the receiver. Display blinks 12V ERR. An error has arisen in the room and rerun the Auto MCACC setup. Simultaneously keep pressing the sleep button and home button on the remote control repeatedly to return to the display using the...
...Depending on audio connections. The receiver can 't be connected or operated. Configuration B Connect your monitor, please consult the component or monitor manual or contact the manufacturer for HDMI compatibility information). The Bluetooth wireless technology device cannot be displayed. Or, stop using the object emitting the...receiver to the receiver. Display blinks 12V ERR. An error has arisen in the room and rerun the Auto MCACC setup. Simultaneously keep pressing the sleep button and home button on the remote control repeatedly to return to the display using the...


