Owner's Manual
Page 2
... receiving antenna. - Increase the separation between the equipment and receiver. - Thank you for this equipment is located on the rear panel. model] IMPORTANT NOTICE The serial number for buying this Pioneer product. THE STANDBY/ON BUTTON IS SECONDARY CONNECTED AND THEREFORE DOES NOT SEPARATE THE UNIT FROM MAINS POWER IN STANDBY POSITION...
... receiving antenna. - Increase the separation between the equipment and receiver. - Thank you for this equipment is located on the rear panel. model] IMPORTANT NOTICE The serial number for buying this Pioneer product. THE STANDBY/ON BUTTON IS SECONDARY CONNECTED AND THEREFORE DOES NOT SEPARATE THE UNIT FROM MAINS POWER IN STANDBY POSITION...

Owner's Manual
Page 9
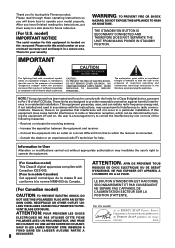
... 10 Checking the Supplied Accessories 10 How to Use This Manual 10 Preparing the Remote Control 10 Installing the Receiver 11 Opening the Front Panel 11 Connecting Your Equipment 12 Audio Components 12 Digital Connections 13 Example Connection for a DVD/LD or LD player .... 14 Video Components... Connecting the Radio Antennas 18 Speakers 19 Placing Your Speakers 20 Connecting Additional Amplifiers 21 Plugging In 21 Displays & Controls 22 Front Panel 22 Display 25 Remote Control 26 Initial Set Up 28 On Screen Display 28 Setting Up for Surround Sound 29 Basic Playback 41 Sound...
... 10 Checking the Supplied Accessories 10 How to Use This Manual 10 Preparing the Remote Control 10 Installing the Receiver 11 Opening the Front Panel 11 Connecting Your Equipment 12 Audio Components 12 Digital Connections 13 Example Connection for a DVD/LD or LD player .... 14 Video Components... Connecting the Radio Antennas 18 Speakers 19 Placing Your Speakers 20 Connecting Additional Amplifiers 21 Plugging In 21 Displays & Controls 22 Front Panel 22 Display 25 Remote Control 26 Initial Set Up 28 On Screen Display 28 Setting Up for Surround Sound 29 Basic Playback 41 Sound...
Owner's Manual
Page 11
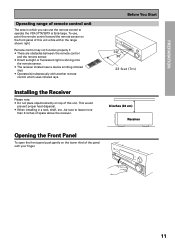
... open the front panel push gently on the front panel of this unit. To use the remote control to leave more than 8 inches of space above the receiver. PREPARATION Operating range of remote control unit The area in a rack, shelf, etc., be sure to operate the VSX-37TX/36TX is shining onto the remote...
... open the front panel push gently on the front panel of this unit. To use the remote control to leave more than 8 inches of space above the receiver. PREPARATION Operating range of remote control unit The area in a rack, shelf, etc., be sure to operate the VSX-37TX/36TX is shining onto the remote...
Owner's Manual
Page 15
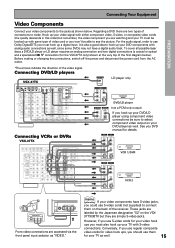
...be sure to select component video output on your video components to use them on the VSX37TX/36TX but remember, the video component you are watching and your video signal with either component video, ...PHONO OUT IN REMOTE IN L MULTI-ROOM CONTROL & SOURCE R SURROUND L (Single) BACK PRE OUT Connecting VCRs or DVRs VSX-37TX 2 RF IN IN 1 (AC-3) IN 2 IN 3 IN 4 SURR- These jacks are labeled by the Japanese ... Regarding a DVD there are accessed via the front panel input selector as well. 15 Connecting DVD/LD players VSX-37TX 2 RF IN IN 1 (AC-3) IN 2 IN 3 IN 4 SURR-
...be sure to select component video output on your video components to use them on the VSX37TX/36TX but remember, the video component you are watching and your video signal with either component video, ...PHONO OUT IN REMOTE IN L MULTI-ROOM CONTROL & SOURCE R SURROUND L (Single) BACK PRE OUT Connecting VCRs or DVRs VSX-37TX 2 RF IN IN 1 (AC-3) IN 2 IN 3 IN 4 SURR- These jacks are labeled by the Japanese ... Regarding a DVD there are accessed via the front panel input selector as well. 15 Connecting DVD/LD players VSX-37TX 2 RF IN IN 1 (AC-3) IN 2 IN 3 IN 4 SURR-
Owner's Manual
Page 22
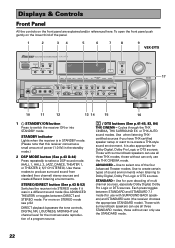
... a DSP sound mode. (HALL 1, HALL 2, JAZZ, DANCE, THEATER 1, or THEATER 2, 5/7 CH STEREO). To open the front panel push gently on the front panel are explained and/or referenced here. STATION + MIN INPUT SELECTOR MASTER VOLUME 17 MAX 10 11 12 13 14 15 16 1 STANDBY/...THX AUTO sound modes. Use for Dolby Digital, Dolby Pro Logic or DTS sources. Displays & Controls Front Panel All the controls on the lower third of the panel. 1 2 34 5 6 7 8 9 VSX-37TX AUDIO/VIDEO MULTI-CHANNEL RECEIVER N∫m¿≤≥ım STANDBY/ON STANDBY DSP MODE STEREO/ DIRECT...
... a DSP sound mode. (HALL 1, HALL 2, JAZZ, DANCE, THEATER 1, or THEATER 2, 5/7 CH STEREO). To open the front panel push gently on the front panel are explained and/or referenced here. STATION + MIN INPUT SELECTOR MASTER VOLUME 17 MAX 10 11 12 13 14 15 16 1 STANDBY/...THX AUTO sound modes. Use for Dolby Digital, Dolby Pro Logic or DTS sources. Displays & Controls Front Panel All the controls on the lower third of the panel. 1 2 34 5 6 7 8 9 VSX-37TX AUDIO/VIDEO MULTI-CHANNEL RECEIVER N∫m¿≤≥ım STANDBY/ON STANDBY DSP MODE STEREO/ DIRECT...
Owner's Manual
Page 24
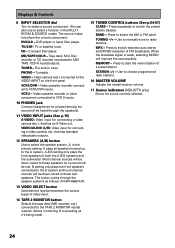
... recorder, etc.) connected to the TAPE 2 MONITOR inputs/ outputs. BAND - MEMORY - STATION -/+ - Use to the VIDEO INPUT on the front panel. CD - VIDEO - Video camera (etc.) connected to choose programmed radio stations. 16 MASTER VOLUME Adjusts the overall receiver volume. 17 Source indicators... (VSX-37TX only) Shows the source currently selected. 24 Video cassette recorder or other component connected to VCR 2 inputs. 10 PHONES jack ...
... recorder, etc.) connected to the TAPE 2 MONITOR inputs/ outputs. BAND - MEMORY - STATION -/+ - Use to the VIDEO INPUT on the front panel. CD - VIDEO - Video camera (etc.) connected to choose programmed radio stations. 16 MASTER VOLUME Adjusts the overall receiver volume. 17 Source indicators... (VSX-37TX only) Shows the source currently selected. 24 Video cassette recorder or other component connected to VCR 2 inputs. 10 PHONES jack ...

Owner's Manual
Page 41
... tastes. If the source has a Surround EX marker then the receiver will only be used . The display will only be turned on from the front panel or from the remote control. The DSP and STEREO modes are also suited for sources with SURROUND BACK channels. In STEREO mode only the front...
... tastes. If the source has a Surround EX marker then the receiver will only be used . The display will only be turned on from the front panel or from the remote control. The DSP and STEREO modes are also suited for sources with SURROUND BACK channels. In STEREO mode only the front...
Owner's Manual
Page 45
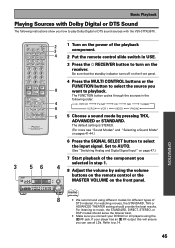
...41-44.) 6 Press the SIGNAL SELECT button to playback. OPERATION 45 Be sure that the standby indicator turns off on the front panel. For listening to select the source you connect your DVD/LD or LD players using different modes for different types of the playback ...RECEIVER button to p.14. TREBLE + VIDEO TAPE 2 SELCT MONITOR MPX TUNER CONTROL MEMORY - BASS + - Basic Playback Playing Sources with the VSX-37TX/36TX. Î S0URCE MULTI OPERATION USE SETUP SYSTEM OFF RECEIVER DVD/LD TV/SAT VCR1 VCR2 MULTI CONTROL CD MD/ TAPE1 TUNER TVCONT CLASS MPX ...
...41-44.) 6 Press the SIGNAL SELECT button to playback. OPERATION 45 Be sure that the standby indicator turns off on the front panel. For listening to select the source you connect your DVD/LD or LD players using different modes for different types of the playback ...RECEIVER button to p.14. TREBLE + VIDEO TAPE 2 SELCT MONITOR MPX TUNER CONTROL MEMORY - BASS + - Basic Playback Playing Sources with the VSX-37TX/36TX. Î S0URCE MULTI OPERATION USE SETUP SYSTEM OFF RECEIVER DVD/LD TV/SAT VCR1 VCR2 MULTI CONTROL CD MD/ TAPE1 TUNER TVCONT CLASS MPX ...

Owner's Manual
Page 46
...TAPE 2 indicator is visible in step 1. 8 Adjust the volume by using the VOLUME buttons on the remote control or the MASTER VOLUME on the front panel. Basic Playback Playing Stereo Sources The following order: DVD/LD TV/SAT CD MD TUNER VCR 2 VCR 1 VIDEO PHONO 5 Press the STEREO/DIRECT ... SELECT switch. TREBLE + VIDEO TAPE 2 SELCT MONITOR MPX TUNER CONTROL MEMORY - memo If you selected in the display, it off on the front panel. 4 Press the MULTI CONTROL buttons or the FUNCTION button to select the source you how to make sure the input is on page 47.) 7 ...
...TAPE 2 indicator is visible in step 1. 8 Adjust the volume by using the VOLUME buttons on the remote control or the MASTER VOLUME on the front panel. Basic Playback Playing Stereo Sources The following order: DVD/LD TV/SAT CD MD TUNER VCR 2 VCR 1 VIDEO PHONO 5 Press the STEREO/DIRECT ... SELECT switch. TREBLE + VIDEO TAPE 2 SELCT MONITOR MPX TUNER CONTROL MEMORY - memo If you selected in the display, it off on the front panel. 4 Press the MULTI CONTROL buttons or the FUNCTION button to select the source you how to make sure the input is on page 47.) 7 ...

Owner's Manual
Page 48
... input 10 -15 dB • AM/FM tuner 10 -15 dB • DSP/ADVANCED/STANDARD/96 kHz stereo .... 6 -10 dB • Depending on the front panel. Each press switches DIGITAL NR on DIGITAL NR. BASS + - REMOTE SETUP INPUT ATT SYSTEM SETUP EFFECT/ CH SEL MENU + MUTE FUNCTION DIGITAL NR ENTER - memo...
... input 10 -15 dB • AM/FM tuner 10 -15 dB • DSP/ADVANCED/STANDARD/96 kHz stereo .... 6 -10 dB • Depending on the front panel. Each press switches DIGITAL NR on DIGITAL NR. BASS + - REMOTE SETUP INPUT ATT SYSTEM SETUP EFFECT/ CH SEL MENU + MUTE FUNCTION DIGITAL NR ENTER - memo...

Owner's Manual
Page 50
... button can use BASS +/- BASS + - STATION + MIN INPUT SELECTOR MASTER VOLUME MAX 3 1 Press the TONE button on the front panel to put the receiver in the following order: TONE Front TONE SurBack TONE Center TONE Surr. 3 Use the BASS or TREBLE (+/-) buttons to..., SURROUND and SURROUND BACK speakers. The button cycles though the possibilities in tone TONE: ON mode. 2 Press the CHANNEL SELECT button on the front panel to bypass the tone circuitry (see p.22). 1 2 AUDIO/VIDEO MULTI-CHANNEL RECEIVER N∫m¿≤≥ım STANDBY/ON STANDBY DSP MODE STEREO...
... button can use BASS +/- BASS + - STATION + MIN INPUT SELECTOR MASTER VOLUME MAX 3 1 Press the TONE button on the front panel to put the receiver in the following order: TONE Front TONE SurBack TONE Center TONE Surr. 3 Use the BASS or TREBLE (+/-) buttons to..., SURROUND and SURROUND BACK speakers. The button cycles though the possibilities in tone TONE: ON mode. 2 Press the CHANNEL SELECT button on the front panel to bypass the tone circuitry (see p.22). 1 2 AUDIO/VIDEO MULTI-CHANNEL RECEIVER N∫m¿≤≥ım STANDBY/ON STANDBY DSP MODE STEREO...

Owner's Manual
Page 51
... mode and MULTI CH IN. BASS + - The receiver will appear in USE. 2 Press the MULTI CH INPUT button on the remote control or the front panel. SIGNAL SELECT MIDNIGHT LIGHT MULTI CH INPUT THX DSP /DTS ADVANCED STEREO/ DIRECT STANDARD 1 AV PRE-PROGRAMMED AND LEARNING REMOTE CONTROL UNIT 1 Put the remote...
... mode and MULTI CH IN. BASS + - The receiver will appear in USE. 2 Press the MULTI CH INPUT button on the remote control or the front panel. SIGNAL SELECT MIDNIGHT LIGHT MULTI CH INPUT THX DSP /DTS ADVANCED STEREO/ DIRECT STANDARD 1 AV PRE-PROGRAMMED AND LEARNING REMOTE CONTROL UNIT 1 Put the remote...

Owner's Manual
Page 52
... (you add any effects to the sound. TUNING + SPEAKERS - STATION + MIN INPUT SELECTOR MASTER VOLUME MAX memo • None of STEREO mode on the front panel). Adjusting the Brightness of the STEREO button will be selected. When rotating through the options, the default brightness can also be brighter for playing back...
... (you add any effects to the sound. TUNING + SPEAKERS - STATION + MIN INPUT SELECTOR MASTER VOLUME MAX memo • None of STEREO mode on the front panel). Adjusting the Brightness of the STEREO button will be selected. When rotating through the options, the default brightness can also be brighter for playing back...
Owner's Manual
Page 53
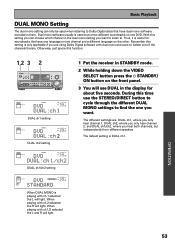
... SP A STEREO VOLUME dB 1 Put the receiver in STANDBY mode. 2 While holding down the VIDEO SELECT button press the STANDBY/ ON button on the front panel. 3 You will light. and DUAL ch1/ch2, where you only hear channel 2; When playing with ch 1 selected the L will see DUAL in them. With this...
... SP A STEREO VOLUME dB 1 Put the receiver in STANDBY mode. 2 While holding down the VIDEO SELECT button press the STANDBY/ ON button on the front panel. 3 You will light. and DUAL ch1/ch2, where you only hear channel 2; When playing with ch 1 selected the L will see DUAL in them. With this...
Owner's Manual
Page 54
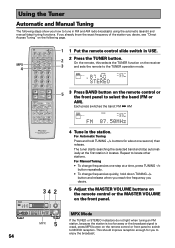
... MPX TUNER CONTROL MEMORY - Repeat to enjoy the broadcast. On the remote, this selects the TUNER function on the remote control or the front panel to the TUNER operation mode. SIGNAL SELECT ANALOG SP A FM STEREO VOLUME dB 5 3 Press BAND button on the receiver 3 and sets the... MASTER VOLUME buttons on the remote control or the MASTER VOLUME on the following steps show you desire, see "Direct Access Tuning" on the front panel. STATION + MIN INPUT SELECTOR MASTER VOLUME MAX MPX 5 54 4 Tune in USE. 2 2 Press the TUNER button. Each press switches the band: FM ...
... MPX TUNER CONTROL MEMORY - Repeat to enjoy the broadcast. On the remote, this selects the TUNER function on the remote control or the front panel to the TUNER operation mode. SIGNAL SELECT ANALOG SP A FM STEREO VOLUME dB 5 3 Press BAND button on the receiver 3 and sets the... MASTER VOLUME buttons on the remote control or the MASTER VOLUME on the following steps show you desire, see "Direct Access Tuning" on the front panel. STATION + MIN INPUT SELECTOR MASTER VOLUME MAX MPX 5 54 4 Tune in USE. 2 2 Press the TUNER button. Each press switches the band: FM ...
Owner's Manual
Page 55
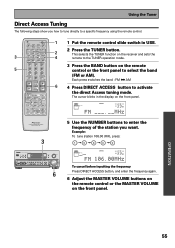
...USE. 2 Press the TUNER button. STATION + MIN INPUT SELECTOR MASTER VOLUME MAX 6 1 Put the remote control slide switch in the display on the front panel. SIGNAL SELECT MIDNIGHT LIGHT MULTI CH INPUT THX DSP /DTS ADVANCED STEREO/ DIRECT STANDARD 1 2 4 6 AV PRE-PROGRAMMED AND LEARNING REMOTE CONTROL UNIT 3 AUDIO...MASTER VOLUME buttons on the remote control or the MASTER VOLUME on the remote control or the front panel to the TUNER operation mode. 3 Press the BAND button on the front panel. This selects the TUNER function on the receiver and sets the remote to select the band (...
...USE. 2 Press the TUNER button. STATION + MIN INPUT SELECTOR MASTER VOLUME MAX 6 1 Put the remote control slide switch in the display on the front panel. SIGNAL SELECT MIDNIGHT LIGHT MULTI CH INPUT THX DSP /DTS ADVANCED STEREO/ DIRECT STANDARD 1 2 4 6 AV PRE-PROGRAMMED AND LEARNING REMOTE CONTROL UNIT 3 AUDIO...MASTER VOLUME buttons on the remote control or the MASTER VOLUME on the remote control or the front panel to the TUNER operation mode. 3 Press the BAND button on the front panel. This selects the TUNER function on the receiver and sets the remote to select the band (...
Owner's Manual
Page 69
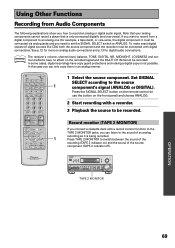
... + VIDEO TAPE 2 SELCT MONITOR MPX TUNER CONTROL MEMORY - Set SIGNAL SELECT according to switch between the sound of the recording (TAPE 2 indicator on the front panel) and choose ANALOG. 2 Start recording with digital connections. If you want to record from Audio Components The following explanations show you need to set the...
... + VIDEO TAPE 2 SELCT MONITOR MPX TUNER CONTROL MEMORY - Set SIGNAL SELECT according to switch between the sound of the recording (TAPE 2 indicator on the front panel) and choose ANALOG. 2 Start recording with digital connections. If you want to record from Audio Components The following explanations show you need to set the...
Owner's Manual
Page 70
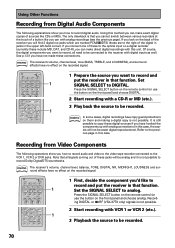
...Of course, the digital components you want to record and put the receiver in the upper left-hand corner). Recording DIGITAL or 2 RF (VSX-37TX only) signals is not possible to record, all signals coming out of these digital sources if you have hooked the components up with analog... connections (in that you cannot switch between various recorders at the touch of sources like you have copy guard protections on the front panel) and choose DIGITAL. 2 Start recording with this case, the copies will be exact digital reproductions). See p.13 if you can make exact ...
...Of course, the digital components you want to record and put the receiver in the upper left-hand corner). Recording DIGITAL or 2 RF (VSX-37TX only) signals is not possible to record, all signals coming out of these digital sources if you have hooked the components up with analog... connections (in that you cannot switch between various recorders at the touch of sources like you have copy guard protections on the front panel) and choose DIGITAL. 2 Start recording with this case, the copies will be exact digital reproductions). See p.13 if you can make exact ...
Owner's Manual
Page 77
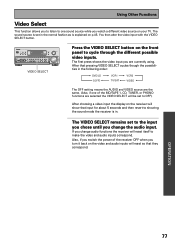
... Using Other Functions Video Select This function allows you to listen to one of the receiver OFF when you turn it back on the front panel to cycle through the different possible video inputs. If you are currently using. The sound source is explained on p.45.
... Using Other Functions Video Select This function allows you to listen to one of the receiver OFF when you turn it back on the front panel to cycle through the different possible video inputs. If you are currently using. The sound source is explained on p.45.
Owner's Manual
Page 78
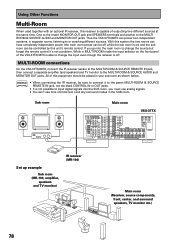
...While in MULTI ROOM mode the input selector on the front panel of the VSX-37TX/36TX is able to change the source but forget the remote control.... memo • When connecting the IR receiver, be sure to connect it 's not a problem. Sub room Main room VSX-37TX 2 RF IN IN 1 (AC-3) IN 2 IN 3 IN 4 SURR- Using Other Functions Multi-Room When used together...(etc.) and any surround modes in your sub-room as shown below. Thus the VSX-37TX/36TX can be off . MULTI-ROOM connections On the VSX-37TX/36TX, connect the IR receiver sensor to the MULTI-ROOM & SOURCE REMOTE IN jack, then...
...While in MULTI ROOM mode the input selector on the front panel of the VSX-37TX/36TX is able to change the source but forget the remote control.... memo • When connecting the IR receiver, be sure to connect it 's not a problem. Sub room Main room VSX-37TX 2 RF IN IN 1 (AC-3) IN 2 IN 3 IN 4 SURR- Using Other Functions Multi-Room When used together...(etc.) and any surround modes in your sub-room as shown below. Thus the VSX-37TX/36TX can be off . MULTI-ROOM connections On the VSX-37TX/36TX, connect the IR receiver sensor to the MULTI-ROOM & SOURCE REMOTE IN jack, then...


