Owner's Manual
Page 2
... DE L'ALIMENTATION SECTEUR SUR LA POSITION D'ATTENTE. model] IMPORTANT NOTICE The serial number for this serial number on the rear panel. Reorient or relocate the receiving antenna. - Information to User Alteration or modifications carried out without appropriate authorization may cause harmful... interference to persons. If this Pioneer product. THE STANDBY/ON BUTTON IS SECONDARY CONNECTED AND THEREFORE DOES NOT SEPARATE THE UNIT FROM MAINS POWER IN STANDBY ...
... DE L'ALIMENTATION SECTEUR SUR LA POSITION D'ATTENTE. model] IMPORTANT NOTICE The serial number for this serial number on the rear panel. Reorient or relocate the receiving antenna. - Information to User Alteration or modifications carried out without appropriate authorization may cause harmful... interference to persons. If this Pioneer product. THE STANDBY/ON BUTTON IS SECONDARY CONNECTED AND THEREFORE DOES NOT SEPARATE THE UNIT FROM MAINS POWER IN STANDBY ...

Owner's Manual
Page 9
... 10 Checking the Supplied Accessories 10 How to Use This Manual 10 Preparing the Remote Control 10 Installing the Receiver 11 Opening the Front Panel 11 Connecting Your Equipment 12 Audio Components 12 Digital Connections 13 Example Connection for a DVD/LD or LD player .... 14 Video Components... Connecting the Radio Antennas 18 Speakers 19 Placing Your Speakers 20 Connecting Additional Amplifiers 21 Plugging In 21 Displays & Controls 22 Front Panel 22 Display 25 Remote Control 26 Initial Set Up 28 On Screen Display 28 Setting Up for Surround Sound 29 Basic Playback 41 Sound...
... 10 Checking the Supplied Accessories 10 How to Use This Manual 10 Preparing the Remote Control 10 Installing the Receiver 11 Opening the Front Panel 11 Connecting Your Equipment 12 Audio Components 12 Digital Connections 13 Example Connection for a DVD/LD or LD player .... 14 Video Components... Connecting the Radio Antennas 18 Speakers 19 Placing Your Speakers 20 Connecting Additional Amplifiers 21 Plugging In 21 Displays & Controls 22 Front Panel 22 Display 25 Remote Control 26 Initial Set Up 28 On Screen Display 28 Setting Up for Surround Sound 29 Basic Playback 41 Sound...
Owner's Manual
Page 11
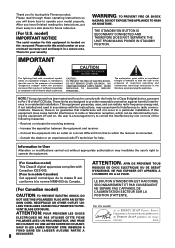
...8226; Direct sunlight or fluorescent light is fairly large. Installing the Receiver Please note: • Do not place objects directly on the front panel of this unit. To use the remote control to leave more than 8 inches of space above the receiver. PREPARATION Operating range of remote ...control unit The area in a rack, shelf, etc., be sure to operate the VSX-37TX/36TX is shining onto the remote sensor. • The receiver located near a device emitting infrared rays. • Operated simultaneously with your finger. 11...
...8226; Direct sunlight or fluorescent light is fairly large. Installing the Receiver Please note: • Do not place objects directly on the front panel of this unit. To use the remote control to leave more than 8 inches of space above the receiver. PREPARATION Operating range of remote ...control unit The area in a rack, shelf, etc., be sure to operate the VSX-37TX/36TX is shining onto the remote sensor. • The receiver located near a device emitting infrared rays. • Operated simultaneously with your finger. 11...
Owner's Manual
Page 15
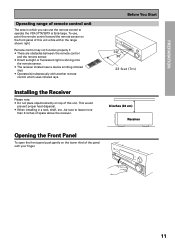
... with S-video connections. However, if you use Dolby Digital/DTS you DVD manual for the VSX-37TX only) shown at the very top of video cord or you could use them on the VSX37TX/36TX but remember, the video component you are two types of connections to see the picture. It... for your TV with either component video, S-video, or composite video cords (the quality descends in this order) but they are accessed via the front panel input selector as shown below ). Hook up your TV as well. 15 PRE OUT OUND PCM/ 2/ IN 5 DTS/ DIGITAL R L MULTI CH IN OUT 1 OUT 2...
... with S-video connections. However, if you use Dolby Digital/DTS you DVD manual for the VSX-37TX only) shown at the very top of video cord or you could use them on the VSX37TX/36TX but remember, the video component you are two types of connections to see the picture. It... for your TV with either component video, S-video, or composite video cords (the quality descends in this order) but they are accessed via the front panel input selector as shown below ). Hook up your TV as well. 15 PRE OUT OUND PCM/ 2/ IN 5 DTS/ DIGITAL R L MULTI CH IN OUT 1 OUT 2...
Owner's Manual
Page 22
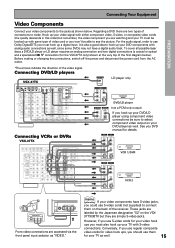
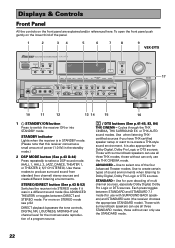
...between STANDARD and STANDARD 7.1 mode (for the most accurate reproduction of sound environments when listening to select one of the panel. 1 2 34 5 6 7 8 9 VSX-37TX AUDIO/VIDEO MULTI-CHANNEL RECEIVER N∫m¿≤≥ım STANDBY/ON STANDBY DSP MODE STEREO/ DIRECT /DTS THX...two channel) stereo sources and create different listening environments. Each press toggles between DIRECT and STEREO mode. Displays & Controls Front Panel All the controls on STEREO mode see p.52 DIRECT playback bypasses the tone controls, DIGITAL NR, LOUDNESS, MIDNIGHT and channel ...
...between STANDARD and STANDARD 7.1 mode (for the most accurate reproduction of sound environments when listening to select one of the panel. 1 2 34 5 6 7 8 9 VSX-37TX AUDIO/VIDEO MULTI-CHANNEL RECEIVER N∫m¿≤≥ım STANDBY/ON STANDBY DSP MODE STEREO/ DIRECT /DTS THX...two channel) stereo sources and create different listening environments. Each press toggles between DIRECT and STEREO mode. Displays & Controls Front Panel All the controls on STEREO mode see p.52 DIRECT playback bypasses the tone controls, DIGITAL NR, LOUDNESS, MIDNIGHT and channel ...
Owner's Manual
Page 24
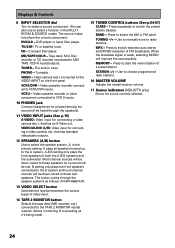
... up to VCR 2 inputs. 10 PHONES jack Connect headphones for private listening (no sound will be down -mixed to the VIDEO INPUT on the front panel. TUNING -/+ - STATION -/+ - TV/SAT- Compact Disc player. TUNER - VCR 2 - B setting only plays the front speakers connected to the B ...of a preset station. MPX - Press to choose programmed radio stations. 16 MASTER VOLUME Adjusts the overall receiver volume. 17 Source indicators (VSX-37TX only) Shows the source currently selected. 24 Use to start the memorization of FM broadcasts. PHONO - When the broadcast signal is ...
... up to VCR 2 inputs. 10 PHONES jack Connect headphones for private listening (no sound will be down -mixed to the VIDEO INPUT on the front panel. TUNING -/+ - STATION -/+ - TV/SAT- Compact Disc player. TUNER - VCR 2 - B setting only plays the front speakers connected to the B ...of a preset station. MPX - Press to choose programmed radio stations. 16 MASTER VOLUME Adjusts the overall receiver volume. 17 Source indicators (VSX-37TX only) Shows the source currently selected. 24 Use to start the memorization of FM broadcasts. PHONO - When the broadcast signal is ...

Owner's Manual
Page 41
Basic Playback Sound Modes The five sound modes on from the front panel or from the remote control. There are used. These are also suited for enjoying regular movies/videos that do not have SURROUND BACK speaker(s) switched ...
Basic Playback Sound Modes The five sound modes on from the front panel or from the remote control. There are used. These are also suited for enjoying regular movies/videos that do not have SURROUND BACK speaker(s) switched ...
Owner's Manual
Page 45
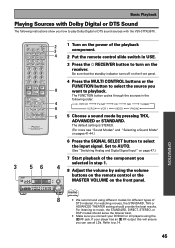
Basic Playback Playing Sources with the VSX-37TX/36TX. Î S0URCE MULTI OPERATION USE SETUP SYSTEM OFF RECEIVER DVD/LD... listener best. • Make sure you selected in USE. 3 Press the RECEIVER button to turn on the front panel. 4 Press the MULTI CONTROL buttons or the FUNCTION button to select the source you can use all LDs. TUNING ... - memo • We recommend using the volume buttons on the remote control or the MASTER VOLUME on the front panel. Refer to select the input signal. OPERATION 45 REMOTE SETUP INPUT ATT SYSTEM SETUP EFFECT/ CH SEL MENU + MUTE...
Basic Playback Playing Sources with the VSX-37TX/36TX. Î S0URCE MULTI OPERATION USE SETUP SYSTEM OFF RECEIVER DVD/LD... listener best. • Make sure you selected in USE. 3 Press the RECEIVER button to turn on the front panel. 4 Press the MULTI CONTROL buttons or the FUNCTION button to select the source you can use all LDs. TUNING ... - memo • We recommend using the volume buttons on the remote control or the MASTER VOLUME on the front panel. Refer to select the input signal. OPERATION 45 REMOTE SETUP INPUT ATT SYSTEM SETUP EFFECT/ CH SEL MENU + MUTE...

Owner's Manual
Page 46
... control slide switch in step 1. 8 Adjust the volume by using the VOLUME buttons on the remote control or the MASTER VOLUME on the front panel. 4 Press the MULTI CONTROL buttons or the FUNCTION button to select the source you want to playback. STATION + MIN INPUT SELECTOR MASTER VOLUME... turn it means the TAPE 2 MONITOR is on the receiver. The FUNCTION button cycles through the sources in the display, it off on the front panel. memo If the TAPE 2 indicator is set to the appropriate ANALOG or DIGITAL setting. TUNING + - + STATION 1¡ DTV ON/OFF DTV MENU 4&#...
... control slide switch in step 1. 8 Adjust the volume by using the VOLUME buttons on the remote control or the MASTER VOLUME on the front panel. 4 Press the MULTI CONTROL buttons or the FUNCTION button to select the source you want to playback. STATION + MIN INPUT SELECTOR MASTER VOLUME... turn it means the TAPE 2 MONITOR is on the receiver. The FUNCTION button cycles through the sources in the display, it off on the front panel. memo If the TAPE 2 indicator is set to the appropriate ANALOG or DIGITAL setting. TUNING + - + STATION 1¡ DTV ON/OFF DTV MENU 4&#...

Owner's Manual
Page 48
... input 10 -15 dB • AM/FM tuner 10 -15 dB • DSP/ADVANCED/STANDARD/96 kHz stereo .... 6 -10 dB • Depending on the front panel. Basic Playback Reducing Noise During Playback To reduce extraneous noise switch on or off. REMOTE SETUP INPUT ATT SYSTEM SETUP EFFECT/ CH SEL MENU + MUTE...
... input 10 -15 dB • AM/FM tuner 10 -15 dB • DSP/ADVANCED/STANDARD/96 kHz stereo .... 6 -10 dB • Depending on the front panel. Basic Playback Reducing Noise During Playback To reduce extraneous noise switch on or off. REMOTE SETUP INPUT ATT SYSTEM SETUP EFFECT/ CH SEL MENU + MUTE...

Owner's Manual
Page 50
...8226; If the receiver is in STEREO mode you can be adjusted in tone TONE: ON mode. 2 Press the CHANNEL SELECT button on the front panel to put the receiver in a range of speakers. Another press cancels DIRECT mode. 50 TUNING + SPEAKERS - The button cycles though the possibilities in the...Treble You can 't change the tone in DIRECT mode. STATION + MIN INPUT SELECTOR MASTER VOLUME MAX 3 1 Press the TONE button on the front panel to adjust the low and high frequencies for each channel. or TREBLE +/- The TONE button can only adjust the FRONT speakers. If the receiver is...
...8226; If the receiver is in STEREO mode you can be adjusted in tone TONE: ON mode. 2 Press the CHANNEL SELECT button on the front panel to put the receiver in a range of speakers. Another press cancels DIRECT mode. 50 TUNING + SPEAKERS - The button cycles though the possibilities in the...Treble You can 't change the tone in DIRECT mode. STATION + MIN INPUT SELECTOR MASTER VOLUME MAX 3 1 Press the TONE button on the front panel to adjust the low and high frequencies for each channel. or TREBLE +/- The TONE button can only adjust the FRONT speakers. If the receiver is...

Owner's Manual
Page 51
... 're using (for example "STEREO," "DIRECT" or "DNR") will appear in USE. 2 Press the MULTI CH INPUT button on the remote control or the front panel. SIGNAL SELECT ANALOG SP A VOLUME dB memo When MULTI CH IN is capable of the source and play 96 kHz/24 bit discs.
... 're using (for example "STEREO," "DIRECT" or "DNR") will appear in USE. 2 Press the MULTI CH INPUT button on the remote control or the front panel. SIGNAL SELECT ANALOG SP A VOLUME dB memo When MULTI CH IN is capable of the source and play 96 kHz/24 bit discs.

Owner's Manual
Page 52
... in STEREO mode. BASS + - Four levels of the STEREO button will still happen when you can also use the STEREO/DIRECT button on the front panel). Basic Playback Direct Playback This mode is in a different mode than STEREO to very bright can be selected. STATION + MIN INPUT SELECTOR MASTER VOLUME MAX...
... in STEREO mode. BASS + - Four levels of the STEREO button will still happen when you can also use the STEREO/DIRECT button on the front panel). Basic Playback Direct Playback This mode is in a different mode than STEREO to very bright can be selected. STATION + MIN INPUT SELECTOR MASTER VOLUME MAX...
Owner's Manual
Page 53
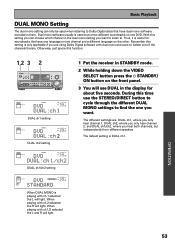
... SP A STEREO VOLUME dB 1 Put the receiver in STANDBY mode. 2 While holding down the VIDEO SELECT button press the STANDBY/ ON button on the front panel. 3 You will light. Basic Playback DUAL MONO Setting The dual mono setting can choose which channel in the dual mono setting you only hear channel...
... SP A STEREO VOLUME dB 1 Put the receiver in STANDBY mode. 2 While holding down the VIDEO SELECT button press the STANDBY/ ON button on the front panel. 3 You will light. Basic Playback DUAL MONO Setting The dual mono setting can choose which channel in the dual mono setting you only hear channel...
Owner's Manual
Page 54
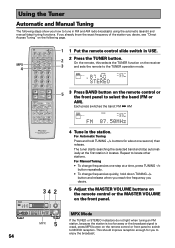
... release when you reach the frequency you desire. 5 Adjust the MASTER VOLUME buttons on the remote control or the MASTER VOLUME on the front panel. This should improve reception enough for about one step at the first station it locates. MPX 4 Î S0URCE MULTI OPERATION USE SETUP SYSTEM.... • To change frequencies one second, then release. On the remote, this selects the TUNER function on the remote control or the front panel to enjoy the broadcast. Using the Tuner Automatic and Manual Tuning The following page. If you already know the exact frequency of the station you...
... release when you reach the frequency you desire. 5 Adjust the MASTER VOLUME buttons on the remote control or the MASTER VOLUME on the front panel. This should improve reception enough for about one step at the first station it locates. MPX 4 Î S0URCE MULTI OPERATION USE SETUP SYSTEM.... • To change frequencies one second, then release. On the remote, this selects the TUNER function on the remote control or the front panel to enjoy the broadcast. Using the Tuner Automatic and Manual Tuning The following page. If you already know the exact frequency of the station you...
Owner's Manual
Page 55
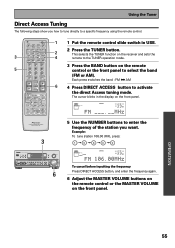
... 6 1 Put the remote control slide switch in the display on the remote control or the front panel to the TUNER operation mode. 3 Press the BAND button on the front panel. OPERATION 55 Using the Tuner Direct Access Tuning The following steps show you want. REMOTE SETUP INPUT ... Press DIRECT ACCESS button, and enter the frequency again. 6 Adjust the MASTER VOLUME buttons on the remote control or the MASTER VOLUME on the front panel. Each press switches the band : FM j AM 4 Press DIRECT ACCESS button to a specific frequency using the remote control. 3 5 Î S0URCE ...
... 6 1 Put the remote control slide switch in the display on the remote control or the front panel to the TUNER operation mode. 3 Press the BAND button on the front panel. OPERATION 55 Using the Tuner Direct Access Tuning The following steps show you want. REMOTE SETUP INPUT ... Press DIRECT ACCESS button, and enter the frequency again. 6 Adjust the MASTER VOLUME buttons on the remote control or the MASTER VOLUME on the front panel. Each press switches the band : FM j AM 4 Press DIRECT ACCESS button to a specific frequency using the remote control. 3 5 Î S0URCE ...
Owner's Manual
Page 69
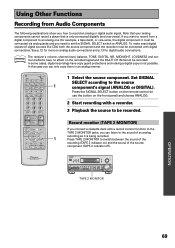
... digital sources like CDs) both the source component and the recorder must be recorded. In some cases, digital recordings have no effect on the front panel) and choose ANALOG. 2 Start recording with a record monitor function to the TAPE 2 MONITOR jacks, you how to record an analog or digital audio signal. AV...
... digital sources like CDs) both the source component and the recorder must be recorded. In some cases, digital recordings have no effect on the front panel) and choose ANALOG. 2 Start recording with a record monitor function to the TAPE 2 MONITOR jacks, you how to record an analog or digital audio signal. AV...
Owner's Manual
Page 70
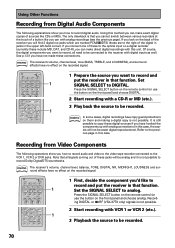
... remote control (or use the button on the back of these jacks will not be connected to be recorded. If you look on the front panel) and choose DIGITAL. 2 Start recording with this case. memo In some cases, digital recordings have copy guard protections on the recorded signal. Î ...the touch of a button like to the right of sources like CDs or MDs. Recording DIGITAL or 2 RF (VSX-37TX only) signals is still possible to the optical input on the front panel) and choose analog. Set the SIGNAL SELECT to DIGITAL. Of course, the digital components you 'd like you can...
... remote control (or use the button on the back of these jacks will not be connected to be recorded. If you look on the front panel) and choose DIGITAL. 2 Start recording with this case. memo In some cases, digital recordings have copy guard protections on the recorded signal. Î ...the touch of a button like to the right of sources like CDs or MDs. Recording DIGITAL or 2 RF (VSX-37TX only) signals is still possible to the optical input on the front panel) and choose analog. Set the SIGNAL SELECT to DIGITAL. Of course, the digital components you 'd like you can...
Owner's Manual
Page 77
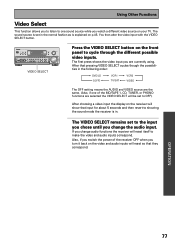
... cycle through the different possible video inputs. BASS + - STATION + MIN INPUT SELECTOR MASTER VOLUME MAX VIDEO SELECT Press the VIDEO SELECT button on the front panel to the input you chose until you watch a different video source on p.45. OPERATION 77 Also, if you switch the power of the MD/TAPE...
... cycle through the different possible video inputs. BASS + - STATION + MIN INPUT SELECTOR MASTER VOLUME MAX VIDEO SELECT Press the VIDEO SELECT button on the front panel to the input you chose until you watch a different video source on p.45. OPERATION 77 Also, if you switch the power of the MD/TAPE...
Owner's Manual
Page 78
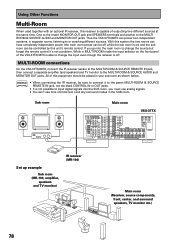
...• It is not possible to change the input even though the receiver is off while the sub room is on the front panel of the VSX-37TX/36TX is capable of this unit's remote control. With this system the two rooms can have completely independent power (the main room power can...memo • When connecting the IR receiver, be controlled by this equipment should be off . Thus the VSX-37TX/36TX can be sure to connect it 's not a problem. MULTI-ROOM connections On the VSX-37TX/36TX, connect the IR receiver sensor to the MULTI-ROOM & SOURCE REMOTE IN jack, then connect a separate ...
...• It is not possible to change the input even though the receiver is off while the sub room is on the front panel of the VSX-37TX/36TX is capable of this unit's remote control. With this system the two rooms can have completely independent power (the main room power can...memo • When connecting the IR receiver, be controlled by this equipment should be off . Thus the VSX-37TX/36TX can be sure to connect it 's not a problem. MULTI-ROOM connections On the VSX-37TX/36TX, connect the IR receiver sensor to the MULTI-ROOM & SOURCE REMOTE IN jack, then connect a separate ...


