
Owner's Manual
Page 1
Operating Instructions audio/video multi-channel receiver 33 VSX32 VSX-
Operating Instructions audio/video multi-channel receiver 33 VSX32 VSX-
Owner's Manual
Page 3
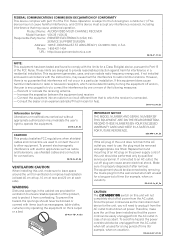
.../VIDEO MULTI-CHANNEL RECEIVER Model Number: VSX-33 / VSX-32 Responsible Party Name: PIONEER ELECTRONICS (USA) INC. These limits are designed to improve heat radiation (at least 40 cm at top, 10 cm at rear, and 20 cm at each side). Reorient or relocate the receiving antenna. - Connect... it is connected. - Since the power cord serves as radios and televisions, use , the plug must accept any interference received, including interference that the power cord can be disconnected by operating the equipment on vacation). FEDERAL COMMUNICATIONS COMMISSION DECLARATION OF CONFORMITY ...
.../VIDEO MULTI-CHANNEL RECEIVER Model Number: VSX-33 / VSX-32 Responsible Party Name: PIONEER ELECTRONICS (USA) INC. These limits are designed to improve heat radiation (at least 40 cm at top, 10 cm at rear, and 20 cm at each side). Reorient or relocate the receiving antenna. - Connect... it is connected. - Since the power cord serves as radios and televisions, use , the plug must accept any interference received, including interference that the power cord can be disconnected by operating the equipment on vacation). FEDERAL COMMUNICATIONS COMMISSION DECLARATION OF CONFORMITY ...

Owner's Manual
Page 5
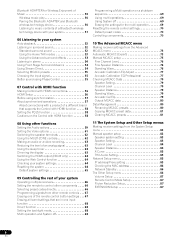
...input 32 Connecting an XM Radio tuner (VSX-33 only 33 Connecting a SiriusConnect™ tuner 33 Connecting an iPod 33 Connecting a USB device 34 Connecting a USB device for Advanced MCACC output 34 Connecting an IR receiver ... through these operating instructions so you have finished reading the instructions, put them away in the receiver 36 04 Basic Setup Switching the speaker impedance 37 Changing the OSD display language (OSD Language 37... and other video sources 27 Connecting a satellite/cable receiver or other set-top box 28 Connecting other Pioneer components with this...
...input 32 Connecting an XM Radio tuner (VSX-33 only 33 Connecting a SiriusConnect™ tuner 33 Connecting an iPod 33 Connecting a USB device 34 Connecting a USB device for Advanced MCACC output 34 Connecting an IR receiver ... through these operating instructions so you have finished reading the instructions, put them away in the receiver 36 04 Basic Setup Switching the speaker impedance 37 Changing the OSD display language (OSD Language 37... and other video sources 27 Connecting a satellite/cable receiver or other set-top box 28 Connecting other Pioneer components with this...
Owner's Manual
Page 6
...recording 63 Reducing the level of an analog signal 63 Using the sleep timer 63 Dimming the display 63 Switching the HDMI output (VSX-33 only 64 Using the Web Control function 64 Checking your system settings 64 Resetting the system 64 Default system settings 65 09... Controlling the rest of your system Operating multiple receivers 66 Setting the remote to control other components . . . . 66 Selecting preset codes directly 66 Programming signals from other remote controls . . ...
...recording 63 Reducing the level of an analog signal 63 Using the sleep timer 63 Dimming the display 63 Switching the HDMI output (VSX-33 only 64 Using the Web Control function 64 Checking your system settings 64 Resetting the system 64 Default system settings 65 09... Controlling the rest of your system Operating multiple receivers 66 Setting the remote to control other components . . . . 66 Selecting preset codes directly 66 Programming signals from other remote controls . . ...
Owner's Manual
Page 8
...Video options (page 61) 13 Other optional adjustments and settings • Control with an abundance of the remote control • Operating multiple receivers (page 66) • Setting the remote to control other than the recommended connections) 10 Basic playback (page 41) 11 ...Switching the HDMI output (VSX-33 only) (page 64) 12 Adjusting the sound and picture quality as desired • Using the various listening modes • Better ...
...Video options (page 61) 13 Other optional adjustments and settings • Control with an abundance of the remote control • Operating multiple receivers (page 66) • Setting the remote to control other than the recommended connections) 10 Basic playback (page 41) 11 ...Switching the HDMI output (VSX-33 only) (page 64) 12 Adjusting the sound and picture quality as desired • Using the various listening modes • Better ...
Owner's Manual
Page 9
... field. Before you start 01 Chapter 1: Before you start Features • Advanced Direct Energy design This receiver offers a new advancement in discrete design unique to Pioneer for reduced sound quality due to restore sound pressure and smooth jagged artifacts left and right speakers adds expressiveness...• iPod cable • Power cord • Warranty card • These operating instructions Note 1 XM Radio is only supported on the VSX-33. 2 The AS-BT100 is required to use the above the front left over after compression. The height channel strengthens the sound field's ...
... field. Before you start 01 Chapter 1: Before you start Features • Advanced Direct Energy design This receiver offers a new advancement in discrete design unique to Pioneer for reduced sound quality due to restore sound pressure and smooth jagged artifacts left and right speakers adds expressiveness...• iPod cable • Power cord • Warranty card • These operating instructions Note 1 XM Radio is only supported on the VSX-33. 2 The AS-BT100 is required to use the above the front left over after compression. The height channel strengthens the sound field's ...

Owner's Manual
Page 10
...heater. Do not use or store batteries in places where there is turned off a magnetic field). 01 Before you start Installing the receiver • When installing this receiver's bottom panel while the power is on or just after it is vibration or other excessively hot place, such as a kitchen) &#...° 7 m (23 ft.) The batteries included with another infrared remote control unit. near a device that is emitting infrared rays. • The receiver is located near a cassette deck (or close to a device that are to the marks in extremely hot or cold areas - in damp or wet ...
...heater. Do not use or store batteries in places where there is turned off a magnetic field). 01 Before you start Installing the receiver • When installing this receiver's bottom panel while the power is on or just after it is vibration or other excessively hot place, such as a kitchen) &#...° 7 m (23 ft.) The batteries included with another infrared remote control unit. near a device that is emitting infrared rays. • The receiver is located near a cassette deck (or close to a device that are to the marks in extremely hot or cold areas - in damp or wet ...
Owner's Manual
Page 11
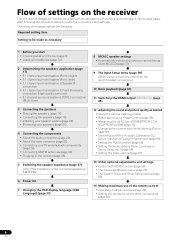
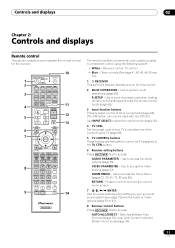
... 8 HDMI OUT AUDIO 1 2 3 SIGNAL SEL MCACC SLEEP INFO 4 5 6 DISP CH LEVEL A.ATT DIMMER 7 8 9 D.ACCESS / CLR 0 CLASS CH ENTER 9 ZONE 2 ZONE 3 LIGHT 14 RECEIVER The remote has been conveniently color-coded according to access: AUTO/ALC/DIRECT - Other controls (See page 41, 42, 45, 46, 50 and 70.) 1 ...(page 66). 3 Input function buttons Press to select control of other components (page 66). (The XM button can only be used with the VSX-33.) Use INPUT SELECT to select the input function (page 41). 4 TV CTRL Set the preset code of your surround sound system (see ...
... 8 HDMI OUT AUDIO 1 2 3 SIGNAL SEL MCACC SLEEP INFO 4 5 6 DISP CH LEVEL A.ATT DIMMER 7 8 9 D.ACCESS / CLR 0 CLASS CH ENTER 9 ZONE 2 ZONE 3 LIGHT 14 RECEIVER The remote has been conveniently color-coded according to access: AUTO/ALC/DIRECT - Other controls (See page 41, 42, 45, 46, 50 and 70.) 1 ...(page 66). 3 Input function buttons Press to select control of other components (page 66). (The XM button can only be used with the VSX-33.) Use INPUT SELECT to select the input function (page 41). 4 TV CTRL Set the preset code of your surround sound system (see ...

Owner's Manual
Page 12
...surround sound. 12 MASTER VOLUME +/- Use to perform operations in ZONE 2 and ZONE 3 (page 63). (The ZONE 3 button can be used with the VSX-33.) 10 Remote control LED Lights when a command is sent from four modes (page 68). PRESET / - PHASE CTRL - Use to prevent distortion...:6, etc.) (page 52). CH LEVEL - Switch to perform operations in sleep mode and select the amount of an analog input signal to put the receiver in the main zone. TUNE / - Switches between stereo playback and Front Stage Surround Advance modes (page 54). THX - Press to select...
...surround sound. 12 MASTER VOLUME +/- Use to perform operations in ZONE 2 and ZONE 3 (page 63). (The ZONE 3 button can be used with the VSX-33.) 10 Remote control LED Lights when a command is sent from four modes (page 68). PRESET / - PHASE CTRL - Use to prevent distortion...:6, etc.) (page 52). CH LEVEL - Switch to perform operations in sleep mode and select the amount of an analog input signal to put the receiver in the main zone. TUNE / - Switches between stereo playback and Front Stage Surround Advance modes (page 54). THX - Press to select...
Owner's Manual
Page 13
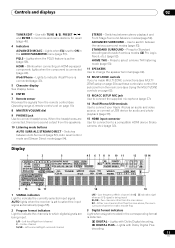
... is no sound output from the main zone (see MULTIZONE setup on page 30) use these controls to a compatible HDMI device (Video camera, etc.) (page 32). STEREO - Display 1 2 3 4 5 6 7 8 9 10 11 12 13 14 AUTO L C PCM HDMI SL DIGITAL XL XC ANALOG LFE AUTO SURROUND STREAM ...and Stream Direct mode (page 54). Use to select the input signal automatically (page 55). STANDARD SURROUND - HOME THX - AUTO lights when the receiver is detected. Low frequency effects channel (the (( )) indicators light when an LFE signal is being input. 3 Digital format indicators Light when a...
... is no sound output from the main zone (see MULTIZONE setup on page 30) use these controls to a compatible HDMI device (Video camera, etc.) (page 32). STEREO - Display 1 2 3 4 5 6 7 8 9 10 11 12 13 14 AUTO L C PCM HDMI SL DIGITAL XL XC ANALOG LFE AUTO SURROUND STREAM ...and Stream Direct mode (page 54). Use to select the input signal automatically (page 55). STANDARD SURROUND - HOME THX - AUTO lights when the receiver is detected. Low frequency effects channel (the (( )) indicators light when an LFE signal is being input. 3 Digital format indicators Light when a...
Owner's Manual
Page 14
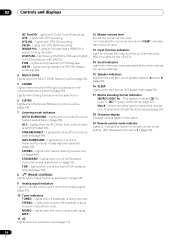
... indicates the maximum level. 13 Input function indicators Light to indicate the input function you have selected. (XM only lights for the VSX-33.) 14 Scroll indicators Light when there are more selectable items when making the various settings. 15 Speaker indicators Lights to indicate ...with Dolby TrueHD decoding. ALC - This lights to indicate the current speaker system, A and/or B (page 62). 16 SLEEP Lights when the receiver is switched on , this lights to indicate Neo:6 processing (page 52). 18 Character display Displays various system information. 19 Remote control mode indicator ...
... indicates the maximum level. 13 Input function indicators Light to indicate the input function you have selected. (XM only lights for the VSX-33.) 14 Scroll indicators Light when there are more selectable items when making the various settings. 15 Speaker indicators Lights to indicate ...with Dolby TrueHD decoding. ALC - This lights to indicate the current speaker system, A and/or B (page 62). 16 SLEEP Lights when the receiver is switched on , this lights to indicate Neo:6 processing (page 52). 18 Character display Displays various system information. 19 Remote control mode indicator ...
Owner's Manual
Page 15
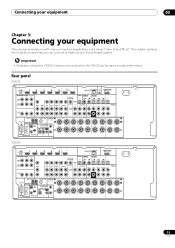
...; Illustration shows the VSX-33, however connections for the VSX-32 are the same except where noted. This chapter explains the kinds of components you with many connection possibilities, but it doesn't have to make up your home theater system. Connecting your equipment 03 Chapter 3: Connecting your equipment This receiver provides you can connect...
...; Illustration shows the VSX-33, however connections for the VSX-32 are the same except where noted. This chapter explains the kinds of components you with many connection possibilities, but it doesn't have to make up your home theater system. Connecting your equipment 03 Chapter 3: Connecting your equipment This receiver provides you can connect...
Owner's Manual
Page 16
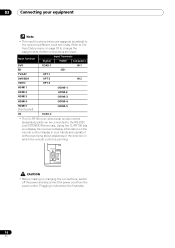
... disconnect the power cord from the power outlet. Using the CU-RF100 lets you display the receiver's display information on page 39 to change the assignments if other connections are assigned by default to the receiver's different input terminals. 03 Connecting your hands and operate it without worrying about obstacles or the...
... disconnect the power cord from the power outlet. Using the CU-RF100 lets you display the receiver's display information on page 39 to change the assignments if other connections are assigned by default to the receiver's different input terminals. 03 Connecting your hands and operate it without worrying about obstacles or the...

Owner's Manual
Page 19
... so that the sound of the center channel is not possible to connect using speaker cables. Use less of an angle for details on the receiver comprises a positive (+) and negative (-) terminal. Make sure the speakers don't face each other end of external shocks such as a safety measure. B fig. Doing so can...
... so that the sound of the center channel is not possible to connect using speaker cables. Use less of an angle for details on the receiver comprises a positive (+) and negative (-) terminal. Make sure the speakers don't face each other end of external shocks such as a safety measure. B fig. Doing so can...

Owner's Manual
Page 21
...; Don't connect different speakers from the same terminal in this (having separate terminals for high and low) and the sound improvement will depend on the receiver. Connecting your equipment 03 Bi-amping your speakers Front right High Bi-amp compatible Low speaker Center Subwoofer Front left High Low Bi-amp compatible...
...; Don't connect different speakers from the same terminal in this (having separate terminals for high and low) and the sound improvement will depend on the receiver. Connecting your equipment 03 Bi-amping your speakers Front right High Bi-amp compatible Low speaker Center Subwoofer Front left High Low Bi-amp compatible...

Owner's Manual
Page 22
... Connecting your component or display. Bi-Amping setup Bi-amping connection of speakers to do this . See Speaker system setting on page 83 to the receiver's HDMI video outputs when connecting this case, try adjusting the resolution settings on your equipment Selecting the Speaker system The front height terminals can be...
... Connecting your component or display. Bi-Amping setup Bi-amping connection of speakers to do this . See Speaker system setting on page 83 to the receiver's HDMI video outputs when connecting this case, try adjusting the resolution settings on your equipment Selecting the Speaker system The front height terminals can be...
Owner's Manual
Page 23
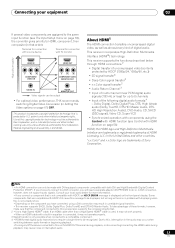
...to 8 channels • Input of Sony Corporation. patents and other limited viewing uses only unless otherwise authorized by U.S. This receiver incorporates High-Definition Multimedia Interface (HDMI®) technology. Note 1 • An HDMI connection can be recognized. Consult your ... output • For optimal video performance, THX recommends switching Digital Video Conversion (in unreliable signal transfers. • This receiver supports SACD, Dolby Digital Plus, Dolby TrueHD and DTS-HD Master Audio. "x.v.Color" and x.v.Color logo are assigned to...
...to 8 channels • Input of Sony Corporation. patents and other limited viewing uses only unless otherwise authorized by U.S. This receiver incorporates High-Definition Multimedia Interface (HDMI®) technology. Note 1 • An HDMI connection can be recognized. Consult your ... output • For optimal video performance, THX recommends switching Digital Video Conversion (in unreliable signal transfers. • This receiver supports SACD, Dolby Digital Plus, Dolby TrueHD and DTS-HD Master Audio. "x.v.Color" and x.v.Color logo are assigned to...
Owner's Manual
Page 24
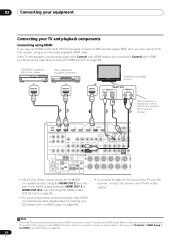
See Switching the HDMI output (VSX-33 only) on page 64. • For input components, connections other than HDMI connections are connected by HDMI connections, if the TV supports the HDMI Audio Return Channel function, the sound of the TV over the receiver.1 HDMI BD IN IN 1 IN 2 ASSIGNABLE 14 ...OUT AUDIO OUT COAXIAL OPTICAL R ANALOG L This connection is required in order to listen to the sound of the TV over the receiver, connect the receiver and TV with HDMI function on page 56). 24 En If the TV and playback components support the Control with HDMI feature, the...
See Switching the HDMI output (VSX-33 only) on page 64. • For input components, connections other than HDMI connections are connected by HDMI connections, if the TV supports the HDMI Audio Return Channel function, the sound of the TV over the receiver.1 HDMI BD IN IN 1 IN 2 ASSIGNABLE 14 ...OUT AUDIO OUT COAXIAL OPTICAL R ANALOG L This connection is required in order to listen to the sound of the TV over the receiver, connect the receiver and TV with HDMI function on page 56). 24 En If the TV and playback components support the Control with HDMI feature, the...

Owner's Manual
Page 25
... 150 mA MAX) IN 1 IN 2 OUT OUT 2 EXTENSION CONTROL IR • If you want to listen to the sound of the TV over the receiver, connect the receiver and TV with audio cables (page 24).1 • If you use an optical digital audio cable, you connected the player to (see HDMI Setup... HDMI Audio Return Channel function, the sound of a TV (with HDMI input) and DVD player (or other playback component with no need to tell the receiver which digital input you 'll need to connect an audio cable. Connecting your equipment 03 Connecting your DVD player with no HDMI output This diagram...
... 150 mA MAX) IN 1 IN 2 OUT OUT 2 EXTENSION CONTROL IR • If you want to listen to the sound of the TV over the receiver, connect the receiver and TV with audio cables (page 24).1 • If you use an optical digital audio cable, you connected the player to (see HDMI Setup... HDMI Audio Return Channel function, the sound of a TV (with HDMI input) and DVD player (or other playback component with no need to tell the receiver which digital input you 'll need to connect an audio cable. Connecting your equipment 03 Connecting your DVD player with no HDMI output This diagram...

Owner's Manual
Page 26
Please refer to the operating instructions supplied with your TV with no HDMI input This diagram shows connections of the TV over the receiver, connect the receiver and TV with audio cables (page 24). • If you use an HDMI cable to input video signals. Select one VIDEO OUT VIDEO COMPONENT...Y DVD player, etc. Depending on the video component, it may be possible to output signals connected by HDMI and other playback component) to the receiver. • With these connections, the picture is not output to the TV even if the DVD player is connected with an HDMI cable. 03 ...
Please refer to the operating instructions supplied with your TV with no HDMI input This diagram shows connections of the TV over the receiver, connect the receiver and TV with audio cables (page 24). • If you use an HDMI cable to input video signals. Select one VIDEO OUT VIDEO COMPONENT...Y DVD player, etc. Depending on the video component, it may be possible to output signals connected by HDMI and other playback component) to the receiver. • With these connections, the picture is not output to the TV even if the DVD player is connected with an HDMI cable. 03 ...


