Owner's Manual
Page 6
...codes 70 Controlling components 70 10 The Advanced MCACC menu Making receiver settings from the Advanced MCACC menu 73 Automatic MCACC (Expert 73 Manual MCACC setup 75 Fine Channel Level 76 Fine Speaker Distance 76 Standing Wave 76 Acoustic Calibration EQ Adjust 77 Acoustic Calibration EQ Professional ... recording 63 Reducing the level of an analog signal 63 Using the sleep timer 63 Dimming the display 63 Switching the HDMI output (VSX-33 only 64 Using the Web Control function 64 Checking your system settings 64 Resetting the system 64 Default system settings 65 09 Controlling...
...codes 70 Controlling components 70 10 The Advanced MCACC menu Making receiver settings from the Advanced MCACC menu 73 Automatic MCACC (Expert 73 Manual MCACC setup 75 Fine Channel Level 76 Fine Speaker Distance 76 Standing Wave 76 Acoustic Calibration EQ Adjust 77 Acoustic Calibration EQ Professional ... recording 63 Reducing the level of an analog signal 63 Using the sleep timer 63 Dimming the display 63 Switching the HDMI output (VSX-33 only 64 Using the Web Control function 64 Checking your system settings 64 Resetting the system 64 Default system settings 65 09 Controlling...

Owner's Manual
Page 19
... quality, but also reduces the risk of damage or injury resulting from the listening position than your speakers. • Use an RCA cable to the manual that the sound of the center channel is best to use speaker cables terminated with banana plugs, screw the speaker terminal fully shut, then plug...
... quality, but also reduces the risk of damage or injury resulting from the listening position than your speakers. • Use an RCA cable to the manual that the sound of the center channel is best to use speaker cables terminated with banana plugs, screw the speaker terminal fully shut, then plug...

Owner's Manual
Page 21
... from the same terminal in this (having separate terminals for high and low) and the sound improvement will depend on the receiver. See your speaker manual for more information. • If your speakers have two metal plates that connect the High to different amplifiers for bi-amping. Doing so may damage...
... from the same terminal in this (having separate terminals for high and low) and the sound improvement will depend on the receiver. See your speaker manual for more information. • If your speakers have two metal plates that connect the High to different amplifiers for bi-amping. Doing so may damage...
Owner's Manual
Page 32
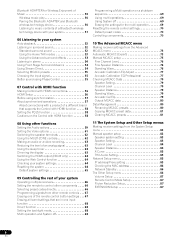
...LAN cable (CAT 5 or higher). Connecting an HDMI-equipped component to set up the network manually. 03 Connecting your equipment Connecting to the network through LAN interface By connecting this receiver to ...of your router. Connecting Optional Bluetooth® ADAPTER When the Bluetooth ADAPTER (Pioneer Model No. ASBT100)2 is connected to this unit with Bluetooth wireless technology ... server function of this receiver, a product equipped with all Bluetooth wireless technology enabled devices. 32 En Doing so could cause damage or faulty contact. In case your router (with or...
...LAN cable (CAT 5 or higher). Connecting an HDMI-equipped component to set up the network manually. 03 Connecting your equipment Connecting to the network through LAN interface By connecting this receiver to ...of your router. Connecting Optional Bluetooth® ADAPTER When the Bluetooth ADAPTER (Pioneer Model No. ASBT100)2 is connected to this unit with Bluetooth wireless technology ... server function of this receiver, a product equipped with all Bluetooth wireless technology enabled devices. 32 En Doing so could cause damage or faulty contact. In case your router (with or...
Owner's Manual
Page 35
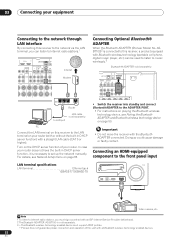
... in the chain, this receiver to link it to the IR receiver. Please see the manual supplied with your IR receiver for the type of cable necessary for the connection. • If you want to link a Pioneer component to the IR receiver, see Setting the remote to control other.... Note 1 • Remote operation may not use the IR terminology. When you want to use the remote sensor of. Closet or shelving unit Pioneer component Non-Pioneer component CONTROL IR IN OUT IN HDMI BD IN IN 1 IN 2 IN 3 ASSIGNABLE 14 COMPONENTVIDEO ASSIGNABLE Y PB PR IN 1 (DVD) IN 2 (DVR/...
... in the chain, this receiver to link it to the IR receiver. Please see the manual supplied with your IR receiver for the type of cable necessary for the connection. • If you want to link a Pioneer component to the IR receiver, see Setting the remote to control other.... Note 1 • Remote operation may not use the IR terminology. When you want to use the remote sensor of. Closet or shelving unit Pioneer component Non-Pioneer component CONTROL IR IN OUT IN HDMI BD IN IN 1 IN 2 IN 3 ASSIGNABLE 14 COMPONENTVIDEO ASSIGNABLE Y PB PR IN 1 (DVD) IN 2 (DVR/...
Owner's Manual
Page 38
... set Speaker System before - In this case, you don't need to measure after correcting data, take the measurement using the EQ Professional menu in the Manual MCACC setup (page 75). 4 If you do not have a tripod, use it to place the microphone so that it set to set .3 If the speakers...
... set Speaker System before - In this case, you don't need to measure after correcting data, take the measurement using the EQ Professional menu in the Manual MCACC setup (page 75). 4 If you do not have a tripod, use it to place the microphone so that it set to set .3 If the speakers...

Owner's Manual
Page 39
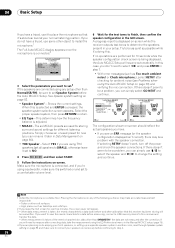
... to 10 minutes. 8 The Auto MCACC Setup procedure is displayed on-screen while the receiver outputs more test tones to adjust these settings manually using The Advanced MCACC menu on page 73 or The System Setup and Other Setup menus on page 82. • The subwoofer distance setting...the components you 've connected your TV. Again, try to be farther than the actual distance from the System Setup menu. 4.System Setup A/V RECEIVER a.Manual SP Setup b. If this , perform the Full Auto MCACC procedure again. - A Graphical User Interface (GUI) screen appears on the remote control, ...
... to 10 minutes. 8 The Auto MCACC Setup procedure is displayed on-screen while the receiver outputs more test tones to adjust these settings manually using The Advanced MCACC menu on page 73 or The System Setup and Other Setup menus on page 82. • The subwoofer distance setting...the components you 've connected your TV. Again, try to be farther than the actual distance from the System Setup menu. 4.System Setup A/V RECEIVER a.Manual SP Setup b. If this , perform the Full Auto MCACC procedure again. - A Graphical User Interface (GUI) screen appears on the remote control, ...

Owner's Manual
Page 41
...to operate the iPod on the iPod itself, without using this receiver, and we recommend switching the equalizer off before connecting. • Pioneer cannot under any circumstances accept responsibility for any direct or indirect loss arising from any inconvenience or loss of recorded material resulting from the ... If you are the basic instructions for playing a source (such as a DVD disc) with the iPod shuffle. • Compatibility may need to manually switch the input signal type press SIGNAL SEL (page 55). 2 You may vary depending on the software version of your iPod and iPhone. If ...
...to operate the iPod on the iPod itself, without using this receiver, and we recommend switching the equalizer off before connecting. • Pioneer cannot under any circumstances accept responsibility for any direct or indirect loss arising from any inconvenience or loss of recorded material resulting from the ... If you are the basic instructions for playing a source (such as a DVD disc) with the iPod shuffle. • Compatibility may need to manually switch the input signal type press SIGNAL SEL (page 55). 2 You may vary depending on the software version of your iPod and iPhone. If ...

Owner's Manual
Page 45
This saves the effort of 9 stations each time. See Listening to station presets below for stations in seven banks, or classes (A to G) of manually tuning in each . 1 Tune to a station you want to memorize. 2 Press T.EDIT (TUNER EDIT). The display shows PRESET NAME, then ... to select the tuner. 2 Press CLASS to select the class in to FM and AM radio broadcasts using the automatic (search) and manual (step) tuning functions. Manual tuning - Release the button at a time, press TUNE /. Saving station presets If you often listen to a particular radio station...
This saves the effort of 9 stations each time. See Listening to station presets below for stations in seven banks, or classes (A to G) of manually tuning in each . 1 Tune to a station you want to memorize. 2 Press T.EDIT (TUNER EDIT). The display shows PRESET NAME, then ... to select the tuner. 2 Press CLASS to select the class in to FM and AM radio broadcasts using the automatic (search) and manual (step) tuning functions. Manual tuning - Release the button at a time, press TUNE /. Saving station presets If you often listen to a particular radio station...

Owner's Manual
Page 48
...to select the channel preset you will have located the SID, write it down in the space provided near a window (refer to the manual for the SiriusConnect™ Home tuner for XM HD Surround listening. Using XM HD Surround XM HD Surround uses Neural Surround™ technologies ...to select a menu item, then press ENTER. The display shows a blinking memory class. 3 Press CLASS to recall this manual. See Using the XM Menu below to select one at : https:// activate.siriusradio.com Follow the prompts to activate your tuner. Using the XM...
...to select the channel preset you will have located the SID, write it down in the space provided near a window (refer to the manual for the SiriusConnect™ Home tuner for XM HD Surround listening. Using XM HD Surround XM HD Surround uses Neural Surround™ technologies ...to select a menu item, then press ENTER. The display shows a blinking memory class. 3 Press CLASS to recall this manual. See Using the XM Menu below to select one at : https:// activate.siriusradio.com Follow the prompts to activate your tuner. Using the XM...

Owner's Manual
Page 55
.... • You can also press / to select the MCACC preset. 2 • This receiver can only play back Dolby Digital, PCM (32 kHz to DIGITAL. • Some DVD players don't output DTS signals. The default setting is playing an analog signal. To prevent noise, make sure your... subwoofer to maximize the effect. For more details, refer to the instruction manual supplied with your DVD player. 3 When the HDMI audio output parameter is set to THROUGH, the sound will be produced. • The PHASE...
.... • You can also press / to select the MCACC preset. 2 • This receiver can only play back Dolby Digital, PCM (32 kHz to DIGITAL. • Some DVD players don't output DTS signals. The default setting is playing an analog signal. To prevent noise, make sure your... subwoofer to maximize the effect. For more details, refer to the instruction manual supplied with your DVD player. 3 When the HDMI audio output parameter is set to THROUGH, the sound will be produced. • The PHASE...

Owner's Manual
Page 60
... mode. g.This feature is the recommended value. DELAY to 2-channel sources in the standby mode. h.Only when listening to OFF and adjust the delay time manually. i.
... mode. g.This feature is the recommended value. DELAY to 2-channel sources in the standby mode. h.Only when listening to OFF and adjust the delay time manually. i.

Owner's Manual
Page 62
...the interlaced scan format (480i/576i or 1080i signals). • P.MOTION is disabled when PCINEMA is output from the speakers. Therefore, changing the station in Manual speaker setup on or off . You can only be selected on page 45 if you're unsure how to do this setting when the HDMI... signals below are switched off ) - The sound from the B-speaker terminals will be able to select a preset station (see Saving station presets on the VSX-33. 3 If the receiver is in standby, the display is dimmed, and ZONE and your selected sub zone(s) show in the other functions d.This setting...
...the interlaced scan format (480i/576i or 1080i signals). • P.MOTION is disabled when PCINEMA is output from the speakers. Therefore, changing the station in Manual speaker setup on or off . You can only be selected on page 45 if you're unsure how to do this setting when the HDMI... signals below are switched off ) - The sound from the B-speaker terminals will be able to select a preset station (see Saving station presets on the VSX-33. 3 If the receiver is in standby, the display is dimmed, and ZONE and your selected sub zone(s) show in the other functions d.This setting...

Owner's Manual
Page 63
....a MUTE Mutes the sound or restores the sound if it 's too strong. Most video recorders set the audio recording level automatically-check the component's instruction manual if you want to set the recording levels. Use the remote control to set the sleep timer. • Press RECEIVER , then press SLEEP repeatedly to...
....a MUTE Mutes the sound or restores the sound if it 's too strong. Most video recorders set the audio recording level automatically-check the component's instruction manual if you want to set the recording levels. Use the remote control to set the sleep timer. • Press RECEIVER , then press SLEEP repeatedly to...

Owner's Manual
Page 73
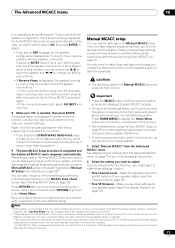
... are saved and no errors occur. You can customize your setup requires more detailed MCACC setup. • Manual MCACC - Furthermore, while it was developed in Pioneer's laboratories with the aim of making it possible for home users to perform adjustments of the same level as... Automatically conducting optimum sound tuning (Auto MCACC) on page 37, you can calibrate your speaker settings and customizes the Acoustic Calibration EQ (see Manual MCACC setup on page 37 for a quick and effective automatic surround setup. • Auto MCACC - A Graphical User Interface (GUI) screen...
... are saved and no errors occur. You can customize your setup requires more detailed MCACC setup. • Manual MCACC - Furthermore, while it was developed in Pioneer's laboratories with the aim of making it possible for home users to perform adjustments of the same level as... Automatically conducting optimum sound tuning (Auto MCACC) on page 37, you can calibrate your speaker settings and customizes the Acoustic Calibration EQ (see Manual MCACC setup on page 37 for a quick and effective automatic surround setup. • Auto MCACC - A Graphical User Interface (GUI) screen...

Owner's Manual
Page 74
...), but you can be switched on the front panel. In addition to measurements at your Auto MCACC menu, you can be stored separately in the Manual MCACC setup (page 75). • The EQ Pro & S-Wave measurement is also taken when Keep SP System or EQ Pro & S-Wave is selected. Try to...
...), but you can be switched on the front panel. In addition to measurements at your Auto MCACC menu, you can be stored separately in the Manual MCACC setup (page 75). • The EQ Pro & S-Wave measurement is also taken when Keep SP System or EQ Pro & S-Wave is selected. Try to...
Owner's Manual
Page 75
...unless you 're finished, select RETURN to go back to determine the optimum receiver settings. You only need to make these settings manually using the Manual speaker setup on page 82. • The subwoofer distance setting may be asked to place the mic at your main listening position... ERR message (or the speaker configuration displayed isn't correct), there may be a problem with the system. You can correct the setting manually using the Manual MCACC setup menu (starting below , you'll have already completed Automatically conducting optimum sound tuning (Auto MCACC) on page 37. In ...
...unless you 're finished, select RETURN to go back to determine the optimum receiver settings. You only need to make these settings manually using the Manual speaker setup on page 82. • The subwoofer distance setting may be asked to place the mic at your main listening position... ERR message (or the speaker configuration displayed isn't correct), there may be a problem with the system. You can correct the setting manually using the Manual MCACC setup menu (starting below , you'll have already completed Automatically conducting optimum sound tuning (Auto MCACC) on page 37. In ...

Owner's Manual
Page 76
... certain lower frequencies. Note that all channels) You can have plenty of your room, Note 1 • If you may not achieve using the Manual speaker setup on page 82. 1 Select 'Fine Channel Level' from the listening position. 3 Select each speaker in turn and adjust the levels (+/... on this. 76 En Control overly resonant low frequencies in your setup (depending on the low frequency response of the left channel from the Manual MCACC setup menu. Depending on which speaker you select. • If you 're finished, press RETURN. Fine Speaker Distance • Default...
... certain lower frequencies. Note that all channels) You can have plenty of your room, Note 1 • If you may not achieve using the Manual speaker setup on page 82. 1 Select 'Fine Channel Level' from the listening position. 3 Select each speaker in turn and adjust the levels (+/... on this. 76 En Control overly resonant low frequencies in your setup (depending on the low frequency response of the left channel from the Manual MCACC setup menu. Depending on which speaker you select. • If you 're finished, press RETURN. Fine Speaker Distance • Default...

Owner's Manual
Page 77
...results in Automatically conducting optimum sound tuning (Auto MCACC) on page 37 or Automatic MCACC (Expert) on the direct sound coming from the Manual MCACC setup menu. 2 Select the channel(s) you can raise or lower channel levels using the HDMI connection. 77 En low frequencies Level...), Center or SW (subwoofer). • TRIM (only available when the filter channel above , select the 30-50ms setting. disappears from the Manual MCACC setup menu. 2 Adjust the parameters for each of sources using test tones with the adjustment provided in an overly resonant ('boomy') sound....
...results in Automatically conducting optimum sound tuning (Auto MCACC) on page 37 or Automatic MCACC (Expert) on the direct sound coming from the Manual MCACC setup menu. 2 Select the channel(s) you can raise or lower channel levels using the HDMI connection. 77 En low frequencies Level...), Center or SW (subwoofer). • TRIM (only available when the filter channel above , select the 30-50ms setting. disappears from the Manual MCACC setup menu. 2 Adjust the parameters for each of sources using test tones with the adjustment provided in an overly resonant ('boomy') sound....

Owner's Manual
Page 79
... procedure of Automatically conducting optimum sound tuning (Auto MCACC) on page 37, the procedure of Automatic MCACC (Expert) on page 73 or after fineadjusting at Manual MCACC setup on page 75, you want to check. 79 En See Speaker Distance below for more on this . 1 Select 'Speaker Distance' from the MCACC...
... procedure of Automatically conducting optimum sound tuning (Auto MCACC) on page 37, the procedure of Automatic MCACC (Expert) on page 73 or after fineadjusting at Manual MCACC setup on page 75, you want to check. 79 En See Speaker Distance below for more on this . 1 Select 'Speaker Distance' from the MCACC...


