Owner's Manual
Page 6
...codes 70 Controlling components 70 10 The Advanced MCACC menu Making receiver settings from the Advanced MCACC menu 73 Automatic MCACC (Expert 73 Manual MCACC setup 75 Fine Channel Level 76 Fine Speaker Distance 76 Standing Wave 76 Acoustic Calibration EQ Adjust 77 Acoustic Calibration EQ Professional ... recording 63 Reducing the level of an analog signal 63 Using the sleep timer 63 Dimming the display 63 Switching the HDMI output (VSX-33 only 64 Using the Web Control function 64 Checking your system settings 64 Resetting the system 64 Default system settings 65 09 Controlling...
...codes 70 Controlling components 70 10 The Advanced MCACC menu Making receiver settings from the Advanced MCACC menu 73 Automatic MCACC (Expert 73 Manual MCACC setup 75 Fine Channel Level 76 Fine Speaker Distance 76 Standing Wave 76 Acoustic Calibration EQ Adjust 77 Acoustic Calibration EQ Professional ... recording 63 Reducing the level of an analog signal 63 Using the sleep timer 63 Dimming the display 63 Switching the HDMI output (VSX-33 only 64 Using the Web Control function 64 Checking your system settings 64 Resetting the system 64 Default system settings 65 09 Controlling...

Owner's Manual
Page 19
... measure. CAUTION • Make sure that all the bare speaker wire is not possible to connect using speaker cables. Important • Please refer to the manual that came with the terminals on the size of the speaker terminal. For DVD-Audio, the speakers should be more directly behind the listener than...
... measure. CAUTION • Make sure that all the bare speaker wire is not possible to connect using speaker cables. Important • Please refer to the manual that came with the terminals on the size of the speaker terminal. For DVD-Audio, the speakers should be more directly behind the listener than...

Owner's Manual
Page 21
.... CAUTION • Most speakers with both High and Low terminals have a removable crossover network, make sure you could severely damage the amplifier. See your speaker manual for high and low) and the sound improvement will depend on the receiver. Doing so may damage your speakers. These must be bi-wired if...
.... CAUTION • Most speakers with both High and Low terminals have a removable crossover network, make sure you could severely damage the amplifier. See your speaker manual for high and low) and the sound improvement will depend on the receiver. Doing so may damage your speakers. These must be bi-wired if...
Owner's Manual
Page 32
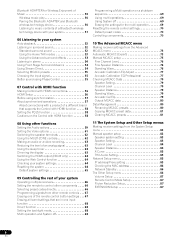
...Connecting Optional Bluetooth® ADAPTER When the Bluetooth ADAPTER (Pioneer Model No. Turn on the DHCP server function of this unit with all Bluetooth wireless technology enabled devices. 32 En ASBT100)2 is connected to this receiver, a product...it is sold separately. 3 • The Bluetooth wireless technology enabled device must support A2DP profiles. • Pioneer does not guarantee proper connection and operation of your router. 03 Connecting your equipment Connecting to the network through...2 The Bluetooth ADAPTER (AS-BT100) is necessary to set up the network manually.
...Connecting Optional Bluetooth® ADAPTER When the Bluetooth ADAPTER (Pioneer Model No. Turn on the DHCP server function of this unit with all Bluetooth wireless technology enabled devices. 32 En ASBT100)2 is connected to this receiver, a product...it is sold separately. 3 • The Bluetooth wireless technology enabled device must support A2DP profiles. • Pioneer does not guarantee proper connection and operation of your router. 03 Connecting your equipment Connecting to the network through...2 The Bluetooth ADAPTER (AS-BT100) is necessary to set up the network manually.
Owner's Manual
Page 35
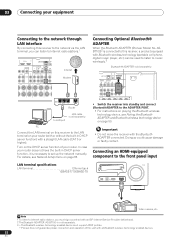
...with this unit's sensor below to connect to the CONTROL jacks instead of the IR OUT jack. Refer to the manual that if you use this unit's sensor Many Pioneer components have SR CONTROL jacks which can be possible if direct light from a strong fluorescent lamp is the remote sensor... remote control. 2 Connect the CONTROL OUT jack of that you can use an optional IR receiver (such as you have. Closet or shelving unit Pioneer component Non-Pioneer component CONTROL IR IN OUT IN HDMI BD IN IN 1 IN 2 IN 3 ASSIGNABLE 14 COMPONENTVIDEO ASSIGNABLE Y PB PR IN 1 (DVD) IN 2 (...
...with this unit's sensor below to connect to the CONTROL jacks instead of the IR OUT jack. Refer to the manual that if you use this unit's sensor Many Pioneer components have SR CONTROL jacks which can be possible if direct light from a strong fluorescent lamp is the remote sensor... remote control. 2 Connect the CONTROL OUT jack of that you can use an optional IR receiver (such as you have. Closet or shelving unit Pioneer component Non-Pioneer component CONTROL IR IN OUT IN HDMI BD IN IN 1 IN 2 IN 3 ASSIGNABLE 14 COMPONENTVIDEO ASSIGNABLE Y PB PR IN 1 (DVD) IN 2 (...
Owner's Manual
Page 38
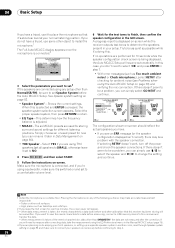
... check the speaker connections. Simply choose an unused preset for now (you can simply use some other object to determine the speakers present in the Manual MCACC setup (page 75). 4 If you are not measured after -calibration) that it 's doing this is selected and ENTER is displayed on page 39) and...
... check the speaker connections. Simply choose an unused preset for now (you can simply use some other object to determine the speakers present in the Manual MCACC setup (page 75). 4 If you are not measured after -calibration) that it 's doing this is selected and ENTER is displayed on page 39) and...

Owner's Manual
Page 39
... exit the current menu. 2 Select 'System Setup' from the Home Menu. 3 Select 'Input Setup' from the System Setup menu. 4.System Setup A/V RECEIVER a.Manual SP Setup b. Other Setup 4b.Input Setup A/V RECEIVER Input Input Name Input Skip : DVD : Rename : OFF Digital In : HDMI Input : Component In :...doing the Auto MCACC Setup. The numbering (OPT-1 to 3) corresponds with the names on page 82.2 Problems when using the Manual speaker setup on the characteristics of your digital equipment according to the default settings (see Input function default and possible settings on ...
... exit the current menu. 2 Select 'System Setup' from the Home Menu. 3 Select 'Input Setup' from the System Setup menu. 4.System Setup A/V RECEIVER a.Manual SP Setup b. Other Setup 4b.Input Setup A/V RECEIVER Input Input Name Input Skip : DVD : Rename : OFF Digital In : HDMI Input : Component In :...doing the Auto MCACC Setup. The numbering (OPT-1 to 3) corresponds with the names on page 82.2 Problems when using the Manual speaker setup on the characteristics of your digital equipment according to the default settings (see Input function default and possible settings on ...

Owner's Manual
Page 41
... may vary depending on the software version of the functions may need to play music from the iPod.4 Note 1 If you need to manually switch the input signal type press SIGNAL SEL (page 55). 2 You may be inoperable when connected to control playback of audio content from...to this receiver. 2 Select the input function you to this receiver, and we recommend switching the equalizer off before connecting. • Pioneer cannot under any circumstances accept responsibility for any direct or indirect loss arising from any inconvenience or loss of recorded material resulting from the iPod...
... may vary depending on the software version of the functions may need to play music from the iPod.4 Note 1 If you need to manually switch the input signal type press SIGNAL SEL (page 55). 2 You may be inoperable when connected to control playback of audio content from...to this receiver. 2 Select the input function you to this receiver, and we recommend switching the equalizer off before connecting. • Pioneer cannot under any circumstances accept responsibility for any direct or indirect loss arising from any inconvenience or loss of recorded material resulting from the iPod...

Owner's Manual
Page 45
...1 Press TUNER to select the tuner. 2 Use BAND to change the frequency one step at a time, press TUNE /. This saves the effort of manually tuning in each . 1 Tune to a station you to enjoy the broadcast. The display shows PRESET MEMORY, then a blinking memory class. 3 Press CLASS to ...presets 1 Press TUNER to select the tuner. 2 Press CLASS to select the class in to FM and AM radio broadcasts using the automatic (search) and manual (step) tuning functions. If you already know the frequency of the radio station. To change the band (FM or AM), if necessary. 3 Press D.ACCESS...
...1 Press TUNER to select the tuner. 2 Use BAND to change the frequency one step at a time, press TUNE /. This saves the effort of manually tuning in each . 1 Tune to a station you to enjoy the broadcast. The display shows PRESET MEMORY, then a blinking memory class. 3 Press CLASS to ...presets 1 Press TUNER to select the tuner. 2 Press CLASS to select the class in to FM and AM radio broadcasts using the automatic (search) and manual (step) tuning functions. If you already know the frequency of the radio station. To change the band (FM or AM), if necessary. 3 Press D.ACCESS...

Owner's Manual
Page 48
... XM channel. Using the XM Menu The XM Menu provides additional XM Radio features.2 1 Press TOP MENU. 2 Use / to recall this manual. The label will need to the channel guide. • Antenna Aiming - The display shows a blinking memory class. 3 Press CLASS to select one ...number buttons to activate your tuner. You can reset the Channel Skip/Add settings in the space provided near a window (refer to the manual for the SiriusConnect™ Home tuner for antenna placement recommendations).3 Note 1 You can reset the channel presets and memory in Resetting the system...
... XM channel. Using the XM Menu The XM Menu provides additional XM Radio features.2 1 Press TOP MENU. 2 Use / to recall this manual. The label will need to the channel guide. • Antenna Aiming - The display shows a blinking memory class. 3 Press CLASS to select one ...number buttons to activate your tuner. You can reset the Channel Skip/Add settings in the space provided near a window (refer to the manual for the SiriusConnect™ Home tuner for antenna placement recommendations).3 Note 1 You can reset the channel presets and memory in Resetting the system...

Owner's Manual
Page 55
...0°). When set the signal input to DIGITAL. • Some DVD players don't output DTS signals. For more details, refer to the instruction manual supplied with DTS is also recommended you try changing the orientation or the place of your subwoofer. • Set the built-in lowpass filter switch... very important factor in achieving proper sound reproduction. The default setting is available even when the headphones are : Dolby Digital, DTS, WMA9 Pro, PCM (32 kHz to 192 kHz), Dolby TrueHD, Dolby Digital Plus, DTS-EXPRESS, DTS-HD Master Audio and SACD. • You may not have a maximized...
...0°). When set the signal input to DIGITAL. • Some DVD players don't output DTS signals. For more details, refer to the instruction manual supplied with DTS is also recommended you try changing the orientation or the place of your subwoofer. • Set the built-in lowpass filter switch... very important factor in achieving proper sound reproduction. The default setting is available even when the headphones are : Dolby Digital, DTS, WMA9 Pro, PCM (32 kHz to 192 kHz), Dolby TrueHD, Dolby Digital Plus, DTS-EXPRESS, DTS-HD Master Audio and SACD. • You may not have a maximized...

Owner's Manual
Page 60
... DTS-ES.j When you find the automatically set delay time unsuitable, set to HIGH, the sound from front to OFF and adjust the delay time manually. If set A. C. b.With the iPod/USB, INTERNET RADIO or ADAPTER PORT input function, by maximizing the dynamic range (during digital processing). 0dB +6 dB HDMIf (HDMI...
... DTS-ES.j When you find the automatically set delay time unsuitable, set to HIGH, the sound from front to OFF and adjust the delay time manually. If set A. C. b.With the iPod/USB, INTERNET RADIO or ADAPTER PORT input function, by maximizing the dynamic range (during digital processing). 0dB +6 dB HDMIf (HDMI...

Owner's Manual
Page 62
... speakers using the SPEAKERS button. Important • The explanations for a while, turn off the MULTI-ZONE control first. • If you made in Manual speaker setup on page 82. Select both the sub and main rooms so that any operations for the sub zone. 5 When you have selected Normal...main speaker terminal (A) on the source). • SPB - You can use the tuner controls to select a preset station (see Saving station presets on the VSX-33. 3 If the receiver is in standby, the display is dimmed, and ZONE and your primary (ZONE 2) sub zone • ZONE 2&3 ON2 - Switching ...
... speakers using the SPEAKERS button. Important • The explanations for a while, turn off the MULTI-ZONE control first. • If you made in Manual speaker setup on page 82. Select both the sub and main rooms so that any operations for the sub zone. 5 When you have selected Normal...main speaker terminal (A) on the source). • SPB - You can use the tuner controls to select a preset station (see Saving station presets on the VSX-33. 3 If the receiver is in standby, the display is dimmed, and ZONE and your primary (ZONE 2) sub zone • ZONE 2&3 ON2 - Switching ...

Owner's Manual
Page 63
... your recorder as a CD player or TV).1 Keep in the sub zone. Most video recorders set the audio recording level automatically-check the component's instruction manual if you want to set the sleep time. 30 min 60 min Off 90 min • You can hear distortion in the sound.2 • Press...
... your recorder as a CD player or TV).1 Keep in the sub zone. Most video recorders set the audio recording level automatically-check the component's instruction manual if you want to set the sleep time. 30 min 60 min Off 90 min • You can hear distortion in the sound.2 • Press...

Owner's Manual
Page 73
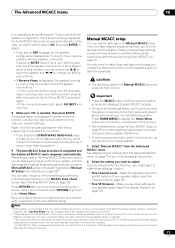
... 75). • Demo - A Graphical User Interface (GUI) screen appears on your speaker settings and customizes the Acoustic Calibration EQ (see Manual MCACC setup on page 37, you can calibrate your TV. See Automatically conducting optimum sound tuning (Auto MCACC) on the receiver and your ...You can customize your setup requires more detailed MCACC setup. • Manual MCACC - All rights reserved. 1 Select 'Auto MCACC' from the Advanced MCACC menu, then press ENTER. Furthermore, while it was developed in Pioneer's laboratories with the aim of making it possible for home users to...
... 75). • Demo - A Graphical User Interface (GUI) screen appears on your speaker settings and customizes the Acoustic Calibration EQ (see Manual MCACC setup on page 37, you can calibrate your TV. See Automatically conducting optimum sound tuning (Auto MCACC) on the receiver and your ...You can customize your setup requires more detailed MCACC setup. • Manual MCACC - All rights reserved. 1 Select 'Auto MCACC' from the Advanced MCACC menu, then press ENTER. Furthermore, while it was developed in Pioneer's laboratories with the aim of making it possible for home users to...

Owner's Manual
Page 74
... 39) and verifying the mic connection. ALL CH ADJ is a 'flat' setting where all the speakers are using THX speakers (set all speakers in the Manual MCACC setup (page 75). • The EQ Pro & S-Wave measurement is also taken when Keep SP System or EQ Pro & S-Wave is taken of Acoustic...
... 39) and verifying the mic connection. ALL CH ADJ is a 'flat' setting where all the speakers are using THX speakers (set all speakers in the Manual MCACC setup (page 75). • The EQ Pro & S-Wave measurement is also taken when Keep SP System or EQ Pro & S-Wave is taken of Acoustic...
Owner's Manual
Page 75
...select GO NEXT and continue. 8 Make sure 'OK' is being displayed, the Auto MCACC Setup will resume automatically. Before making these settings manually using the Manual speaker setup on page 82. • The subwoofer distance setting may take 3 to 7 minutes. • If you selected a STAND.... The Auto MCACC Setup procedure is also possible to make these settings in step 8. • If you can correct the setting manually using the Manual MCACC setup menu (starting below , you'll have already completed Automatically conducting optimum sound tuning (Auto MCACC) on page 76). Make...
...select GO NEXT and continue. 8 Make sure 'OK' is being displayed, the Auto MCACC Setup will resume automatically. Before making these settings manually using the Manual speaker setup on page 82. • The subwoofer distance setting may take 3 to 7 minutes. • If you selected a STAND.... The Auto MCACC Setup procedure is also possible to make these settings in step 8. • If you can correct the setting manually using the Manual MCACC setup menu (starting below , you'll have already completed Automatically conducting optimum sound tuning (Auto MCACC) on page 76). Make...

Owner's Manual
Page 76
...adjust the other speakers in Acoustic Calibration EQ Adjust on page 77). • EQ Professional - You can help you selected to the Manual MCACC setup menu. The following setting can adjust the Channel Level of the speaker you make detailed settings according to test tones (see ...speaker system. This will change the angle of the speaker you 're finished, press RETURN. This can 't seem to select it to the Manual MCACC setup menu. The volume increases to match the reference speaker. Fine Channel Level • Default setting: 0.0dB (all speakers) For proper...
...adjust the other speakers in Acoustic Calibration EQ Adjust on page 77). • EQ Professional - You can help you selected to the Manual MCACC setup menu. The following setting can adjust the Channel Level of the speaker you make detailed settings according to test tones (see ...speaker system. This will change the angle of the speaker you 're finished, press RETURN. This can 't seem to select it to the Manual MCACC setup menu. The volume increases to match the reference speaker. Fine Channel Level • Default setting: 0.0dB (all speakers) For proper...

Owner's Manual
Page 77
.... If the speaker balance seems uneven, you find that lower frequencies seem overly reverberant in Automatic MCACC (Expert) on page 73 to the Manual MCACC setup menu. You will return to calibrate the room automatically. • Type A: Reverberance of the screen and press to ...;/ to select TRIM, then use Acoustic Calibration EQ Professional If you can also adjust these settings manually to get a frequency balance that suits your tastes. 1 Select 'EQ Adjust' from the Manual MCACC setup menu. 2 Select the channel(s) you 're finished, press RETURN. If not, this happens,...
.... If the speaker balance seems uneven, you find that lower frequencies seem overly reverberant in Automatic MCACC (Expert) on page 73 to the Manual MCACC setup menu. You will return to calibrate the room automatically. • Type A: Reverberance of the screen and press to ...;/ to select TRIM, then use Acoustic Calibration EQ Professional If you can also adjust these settings manually to get a frequency balance that suits your tastes. 1 Select 'EQ Adjust' from the Manual MCACC setup menu. 2 Select the channel(s) you 're finished, press RETURN. If not, this happens,...

Owner's Manual
Page 79
... procedure of Automatically conducting optimum sound tuning (Auto MCACC) on page 37, the procedure of Automatic MCACC (Expert) on page 73 or after fineadjusting at Manual MCACC setup on page 75, you can be transferred to a computer using the GUI screen. The data can check your TV. Used to check the...
... procedure of Automatically conducting optimum sound tuning (Auto MCACC) on page 37, the procedure of Automatic MCACC (Expert) on page 73 or after fineadjusting at Manual MCACC setup on page 75, you can be transferred to a computer using the GUI screen. The data can check your TV. Used to check the...


