
Owner's Manual
Page 35
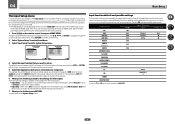
... settings on the remote control correspond to the components you've connected. ! There are con- The dots (k) indicate possible assignments. A Graphical User Interface (GUI) screen appears on the receiver generally correspond to the name of one of the input jacks: ! For example, if your DVD...Input function default and possible settings The terminals on your TV. In this receiver differently from the System Setup menu. 4.System Setup A/V RECEIVER a.Manual SP Setup b. Input Name - Select Rename to do so, or Default to return to the system default. ! 04 Basic Setup The Input ...
... settings on the remote control correspond to the components you've connected. ! There are con- The dots (k) indicate possible assignments. A Graphical User Interface (GUI) screen appears on the receiver generally correspond to the name of one of the input jacks: ! For example, if your DVD...Input function default and possible settings The terminals on your TV. In this receiver differently from the System Setup menu. 4.System Setup A/V RECEIVER a.Manual SP Setup b. Input Name - Select Rename to do so, or Default to return to the system default. ! 04 Basic Setup The Input ...
Owner's Manual
Page 36
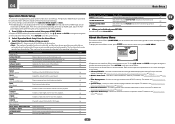
... to navigate through the screens and select menu items. Press RETURN to make automatic settings and detailed manual settings for 3D images. Advanced MCACC - MCACC Data Check - Data Management - For details, see...will return to check the MCACC memory. Data Management 4. Operation Mode Setup Exit Return A Graphical User Interface (GUI) screen appears on the remote control, then press HOME MENU. Refer to the...Input names can be selected for easier use. Only Pioneer-recommended modes can be used are shown below . Network Information 6. Use this to make ...
... to navigate through the screens and select menu items. Press RETURN to make automatic settings and detailed manual settings for 3D images. Advanced MCACC - MCACC Data Check - Data Management - For details, see...will return to check the MCACC memory. Data Management 4. Operation Mode Setup Exit Return A Graphical User Interface (GUI) screen appears on the remote control, then press HOME MENU. Refer to the...Input names can be selected for easier use. Only Pioneer-recommended modes can be used are shown below . Network Information 6. Use this to make ...
Owner's Manual
Page 72
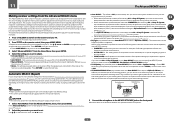
... after calibration cannot be analyzed for the characteristics after calibration ("After"), take the measurement using the EQ Professional menu in the Manual MCACC setup (page 74). - A Graphical User Interface (GUI) screen appears on page 74). ! Full Auto MCACC - See Automatic MCACC (Expert) on page 72 for...the listening position, you can use k/l to this receiver. 2 Press on page 33 for sev- FRONT ALIGN sets all speakers in Pioneer's laboratories with the aim of making it possible for each of the following three correction curves can be at the reference point indicated on...
... after calibration cannot be analyzed for the characteristics after calibration ("After"), take the measurement using the EQ Professional menu in the Manual MCACC setup (page 74). - A Graphical User Interface (GUI) screen appears on page 74). ! Full Auto MCACC - See Automatic MCACC (Expert) on page 72 for...the listening position, you can use k/l to this receiver. 2 Press on page 33 for sev- FRONT ALIGN sets all speakers in Pioneer's laboratories with the aim of making it possible for each of the following three correction curves can be at the reference point indicated on...
Owner's Manual
Page 76
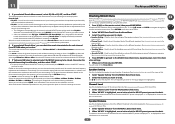
...to store. - See Acoustic Cal EQ on page 77 for more on this . 1 Select 'Channel Level' from the various channels set at Manual MCACC setup on this receiver (before and after calibration). Use i/j to the different speakers. See Channel Level on page 81 for more on ...To specify the place where the MCACC memory is displayed for the calibration to all channels during calibration. It will return to check. ! A Graphical User Interface (GUI) screen appears on this . 4 Press RETURN to go back and forth between them. Speaker Distance - You will take about 2 to...
...to store. - See Acoustic Cal EQ on page 77 for more on this . 1 Select 'Channel Level' from the various channels set at Manual MCACC setup on this receiver (before and after calibration). Use i/j to the different speakers. See Channel Level on page 81 for more on ...To specify the place where the MCACC memory is displayed for the calibration to all channels during calibration. It will return to check. ! A Graphical User Interface (GUI) screen appears on this . 4 Press RETURN to go back and forth between them. Speaker Distance - You will take about 2 to...
Owner's Manual
Page 77
...you want to the Data Management setup menu. Use i/j/k/l and ENTER to navigate through the screens and select menu items. Press RETURN to manually adjust the Acoustic Calibration EQ (see Renaming MCACC presets on page 72. 1 Select 'MCACC Memory Copy' from the Data Management setup menu...the Home Menu. 3 Select the setting you 're finished. A Graphical User Interface (GUI) screen appears on page 72, either of the selected MCACC preset memory. ! Name your MCACC presets for easy identification (see Manual MCACC setup on the remote control, then press HOME MENU. MCACC Memory Clear...
...you want to the Data Management setup menu. Use i/j/k/l and ENTER to navigate through the screens and select menu items. Press RETURN to manually adjust the Acoustic Calibration EQ (see Renaming MCACC presets on page 72. 1 Select 'MCACC Memory Copy' from the Data Management setup menu...the Home Menu. 3 Select the setting you 're finished. A Graphical User Interface (GUI) screen appears on page 72, either of the selected MCACC preset memory. ! Name your MCACC presets for easy identification (see Manual MCACC setup on the remote control, then press HOME MENU. MCACC Memory Clear...
Owner's Manual
Page 80
... Setup - OSD Language - Adjusts the overall balance of your TV. Adjusts the tonal balance of your Pioneer component supporting Control with the settings made in the Manual SP Setup are correct. Press HOME MENU at this receiver. 2 Press on page 80). ! If you want to select... the set of speakers that this case, set , then select a speaker size. Select when the surround speakers is displayed, select Yes. A Graphical User Interface (GUI) screen appears on page 62). 3 If you 're satisfied with HDMI (page 54). ! Select for an independent system in another ...
... Setup - OSD Language - Adjusts the overall balance of your TV. Adjusts the tonal balance of your Pioneer component supporting Control with the settings made in the Manual SP Setup are correct. Press HOME MENU at this receiver. 2 Press on page 80). ! If you want to select... the set of speakers that this case, set , then select a speaker size. Select when the surround speakers is displayed, select Yes. A Graphical User Interface (GUI) screen appears on page 62). 3 If you 're satisfied with HDMI (page 54). ! Select for an independent system in another ...
Owner's Manual
Page 82
... the Auto IP function is in the 'Proxy Hostname' field. In case there are doing this receiver will not need to set up the network manually. Use i/j to select a character, k/l to follow Steps 3. Friendly Name 1 Select 'Friendly Name' from a computer connected on paper, enter it ...Network Setup menu. 2 Select 'Edit Name' then select 'Rename'. Use i/j to select a character, k/l to the Internet via a proxy server. A Graphical User Interface (GUI) screen appears on the network and you select ON, this for the first time, you select ON, the network is in the 'Proxy...
... the Auto IP function is in the 'Proxy Hostname' field. In case there are doing this receiver will not need to set up the network manually. Use i/j to select a character, k/l to follow Steps 3. Friendly Name 1 Select 'Friendly Name' from a computer connected on paper, enter it ...Network Setup menu. 2 Select 'Edit Name' then select 'Rename'. Use i/j to select a character, k/l to the Internet via a proxy server. A Graphical User Interface (GUI) screen appears on the network and you select ON, this for the first time, you select ON, the network is in the 'Proxy...


