

Owner's Manual
Page 3
...CAUTION This product satisfies FCC regulations when shielded cables and connectors are used to connect the unit to use for other equipment. Sound can 't hear what sounds "normal" can actually be deceiving. the use shielded cables and connectors for even during the warranty period. DO NOT TOUCH...this by playing it there. BE SURE TO OBSERVE THE FOLLOWING GUIDELINES: • Do not turn up the volume so high that lets the sound come through clearly without distortion. • Once you . • Use caution or temporarily discontinue use in potentially hazardous situations. • ...
...CAUTION This product satisfies FCC regulations when shielded cables and connectors are used to connect the unit to use for other equipment. Sound can 't hear what sounds "normal" can actually be deceiving. the use shielded cables and connectors for even during the warranty period. DO NOT TOUCH...this by playing it there. BE SURE TO OBSERVE THE FOLLOWING GUIDELINES: • Do not turn up the volume so high that lets the sound come through clearly without distortion. • Once you . • Use caution or temporarily discontinue use in potentially hazardous situations. • ...
Owner's Manual
Page 4
...playback Playing a source...38 Playing an iPod...39 Playing a USB device...40 Listening to the radio...41 Bluetooth ADAPTER for buying this Pioneer product. Contents 01 Before you for Wireless Enjoyment of Music 42 06 Listening to your system Enjoying various types of playback using the ...listening modes 45 Selecting MCACC presets...46 Choosing the input signal...46 Better sound using Phase Control...47 07 Playback with NETWORK features Introduction...49 Playback with Network functions...50 About network playback...51 About playable ...
...playback Playing a source...38 Playing an iPod...39 Playing a USB device...40 Listening to the radio...41 Bluetooth ADAPTER for buying this Pioneer product. Contents 01 Before you for Wireless Enjoyment of Music 42 06 Listening to your system Enjoying various types of playback using the ...listening modes 45 Selecting MCACC presets...46 Choosing the input signal...46 Better sound using Phase Control...47 07 Playback with NETWORK features Introduction...49 Playback with Network functions...50 About network playback...51 About playable ...
Owner's Manual
Page 5
...setup...80 Network Setup menu...82 Checking the Network Information...83 The Other Setup menu...83 13 FAQ Troubleshooting...86 Power...86 No sound...86 Other audio problems...87 ADAPTER PORT terminal...88 Video...88 Settings...88 Professional Calibration EQ graphical output...89 Display...89 Remote ...control...89 HDMI...89 AVNavigator...90 USB interface...90 iPod...91 Network...91 Wireless LAN...92 14 Additional information Surround sound formats...95 About iPod...95 About SiriusXM...95 About FLAC...95 Auto Surround, ALC and Stream Direct with different input signal formats ...
...setup...80 Network Setup menu...82 Checking the Network Information...83 The Other Setup menu...83 13 FAQ Troubleshooting...86 Power...86 No sound...86 Other audio problems...87 ADAPTER PORT terminal...88 Video...88 Settings...88 Professional Calibration EQ graphical output...89 Display...89 Remote ...control...89 HDMI...89 AVNavigator...90 USB interface...90 iPod...91 Network...91 Wireless LAN...92 14 Additional information Surround sound formats...95 About iPod...95 About SiriusXM...95 About FLAC...95 Auto Surround, ALC and Stream Direct with different input signal formats ...
Owner's Manual
Page 6
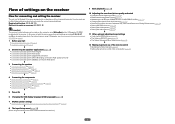
...speakers on page 27 ! Setting the Video options (page 60) j 11 Other optional adjustments and settings ! Automatically conducting optimum sound tuning (Full Auto MCACC) on page 33 j 8 The Input Setup menu (page 35) (When using Wiring Navi on page...used easily after following the procedure below to control other than the recommended connections) j 9 Basic playback (page 37) j 10 Adjusting the sound and picture quality as necessary: 6, 8, 10, 11, 12 Important The receiver's initial settings can be made interactively. Using the various listening...
...speakers on page 27 ! Setting the Video options (page 60) j 11 Other optional adjustments and settings ! Automatically conducting optimum sound tuning (Full Auto MCACC) on page 33 j 8 The Input Setup menu (page 35) (When using Wiring Navi on page...used easily after following the procedure below to control other than the recommended connections) j 9 Basic playback (page 37) j 10 Adjusting the sound and picture quality as necessary: 6, 8, 10, 11, 12 Important The receiver's initial settings can be made interactively. Using the various listening...

Owner's Manual
Page 8
... Please check that have a longer life. in places where there is vibration or other excessively hot place, such as leakage and bursting. Batteries with the sound. - There are to leak, overheat, explode or catch fire. It can cause batteries to check initial operations; Remote control unit ! in places that you've...
... Please check that have a longer life. in places where there is vibration or other excessively hot place, such as leakage and bursting. Batteries with the sound. - There are to leak, overheat, explode or catch fire. It can cause batteries to check initial operations; Remote control unit ! in places that you've...
Owner's Manual
Page 11
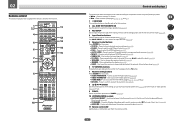
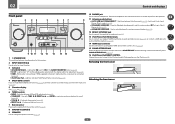
...a command is sent from the remote control. 11 STATUS - Press to component control using the following system: ! AUTO S.RTRV - Press to restore CD quality sound to change the speaker terminal (page 62). ! MCACC - Press to put the receiver in ZONE 2 (page 62). 10 LISTENING MODE controls ! SIGNAL SEL -...the Video options (page 60). ! Press to confirm and exit the current menu screen. 8 i/j/k/l/ENTER Use the arrow buttons when setting up your surround sound system (see page 72) and the Audio or Video options (page 58 or 60). 9 ZONE 2 Switch to switch between standby and on /off...
...a command is sent from the remote control. 11 STATUS - Press to component control using the following system: ! AUTO S.RTRV - Press to restore CD quality sound to change the speaker terminal (page 62). ! MCACC - Press to put the receiver in ZONE 2 (page 62). 10 LISTENING MODE controls ! SIGNAL SEL -...the Video options (page 60). ! Press to confirm and exit the current menu screen. 8 i/j/k/l/ENTER Use the arrow buttons when setting up your surround sound system (see page 72) and the Audio or Video options (page 58 or 60). 9 ZONE 2 Switch to switch between standby and on /off...
Owner's Manual
Page 12
02 12 OPTION The preset codes of desired devices can be registered in the main zone. Controls and displays 12 Also use this button to select the white commands). Use to perform operations in the remote control and button operations can be registered using the learning mode. 13 Switches the remote to control the receiver (used to set the listening volume. 15 MUTE Mutes the sound or restores the sound if it has been muted (adjusting the volume also restores the sound). Switch to set up surround sound. 14 VOLUME +/-
02 12 OPTION The preset codes of desired devices can be registered in the main zone. Controls and displays 12 Also use this button to select the white commands). Use to perform operations in the remote control and button operations can be registered using the learning mode. 13 Switches the remote to control the receiver (used to set the listening volume. 15 MUTE Mutes the sound or restores the sound if it has been muted (adjusting the volume also restores the sound). Switch to set up surround sound. 14 VOLUME +/-

Owner's Manual
Page 13
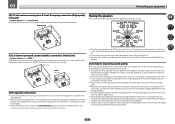
... signals. ! Lights during playback of DTS-HD Master Audio signals. 4 MULTI-ZONE Lights when the MULTI-ZONE feature is active (page 62). 5 SOUND Lights when the DIALOG E (Dialog Enhancement) or TONE (tone controls) features is selected (page 58). 6 PQLS Lights when the PQLS feature is active... (page 56). 7 S.RTRV Lights when the Auto Sound Retriever function is switched on (page 47). 10 Analog signal indicators Light to indicate the input function you have selected. 15 Scroll indicators Light when...
... signals. ! Lights during playback of DTS-HD Master Audio signals. 4 MULTI-ZONE Lights when the MULTI-ZONE feature is active (page 62). 5 SOUND Lights when the DIALOG E (Dialog Enhancement) or TONE (tone controls) features is selected (page 58). 6 PQLS Lights when the PQLS feature is active... (page 56). 7 S.RTRV Lights when the Auto Sound Retriever function is switched on (page 47). 10 Analog signal indicators Light to indicate the input function you have selected. 15 Scroll indicators Light when...
Owner's Manual
Page 14
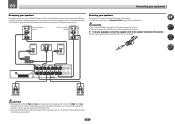
... AIR (page 43). 16 iPod iPhone iPad DIRECT CONTROL Change the receiver's input to indicate iPod/iPhone/iPad is no sound output from the main zone (page 62). 5 Character display See Display on page 13. 6 TUNER controls ! TUNER EDIT - Find radio frequencies (page 41). ...switch between standby and on the iPod (page 39). ON/OFF BAND TUNER EDIT TUNE PRESET AUTO SURR/ALC/ STANDARD STREAM DIRECT SURROUND ADVANCED SURROUND SOUND iPod iPhone iPad RETRIEVER AIR DIRECT CONTROL ENTER PHONES 5V 2.1 A iPod MCACC iPhone SETUP MIC VIDEO iPad USB HDMI 5 INPUT PUSH OPEN MASTER ...
... AIR (page 43). 16 iPod iPhone iPad DIRECT CONTROL Change the receiver's input to indicate iPod/iPhone/iPad is no sound output from the main zone (page 62). 5 Character display See Display on page 13. 6 TUNER controls ! TUNER EDIT - Find radio frequencies (page 41). ...switch between standby and on the iPod (page 39). ON/OFF BAND TUNER EDIT TUNE PRESET AUTO SURR/ALC/ STANDARD STREAM DIRECT SURROUND ADVANCED SURROUND SOUND iPod iPhone iPad RETRIEVER AIR DIRECT CONTROL ENTER PHONES 5V 2.1 A iPod MCACC iPhone SETUP MIC VIDEO iPad USB HDMI 5 INPUT PUSH OPEN MASTER ...

Owner's Manual
Page 17
.../FW) R L FWR SW 2 SW 1 C SR FWL SBR SL SBL This plan replaces the left and right front wide speakers (FWL/FWR). Sound does not come through simultaneously from the front height speakers and the surround back speakers. Speaker System setting: Speaker B R L SW 2 SW 1 C...left and right surround speakers (SL/SR), the left and right channels (L and R). ! This surround system provides a sound field with good association between the sounds of the different channels. [C] 7.2 channel surround system & Speaker B connection ! SBR SL SBL Speaker B With these ...
.../FW) R L FWR SW 2 SW 1 C SR FWL SBR SL SBL This plan replaces the left and right front wide speakers (FWL/FWR). Sound does not come through simultaneously from the front height speakers and the surround back speakers. Speaker System setting: Speaker B R L SW 2 SW 1 C...left and right surround speakers (SL/SR), the left and right channels (L and R). ! This surround system provides a sound field with good association between the sounds of the different channels. [C] 7.2 channel surround system & Speaker B connection ! SBR SL SBL Speaker B With these ...
Owner's Manual
Page 18
...back speaker, and, (2) don't use shielded speakers or place the speakers at a narrower angle. ! Use less of the front speakers for improving sound quality Where you put your speakers in ZONE 2. (The selection of the speakers you have fewer than your equipment [D] 5.2 channel surround system & ... 're listening to connect only one meter (3.3 ft.) directly above or below for home theater playback. ! See Automatically conducting optimum sound tuning (Full Auto MCACC) on the size of the front left and right front speakers. Place the surround speakers at the TV ...
...back speaker, and, (2) don't use shielded speakers or place the speakers at a narrower angle. ! Use less of the front speakers for improving sound quality Where you put your speakers in ZONE 2. (The selection of the speakers you have fewer than your equipment [D] 5.2 channel surround system & ... 're listening to connect only one meter (3.3 ft.) directly above or below for home theater playback. ! See Automatically conducting optimum sound tuning (Full Auto MCACC) on the size of the front left and right front speakers. Place the surround speakers at the TV ...

Owner's Manual
Page 19
... back terminals can connect just one surround back speaker if you like (it may cause the power to achieve more powerful sound reproduction. These speaker terminals carry HAZARDOUS LIVE voltage. right Front height left Front wide left and right speakers only are securely... Standard surround connection The front height terminals can be used for the front wide and Speaker B speakers. Connecting two subwoofers increases the bass sound to cut off as a safety measure. Front right Front height setting Front height right Front wide setting Front wide right Speaker B setting ...
... back terminals can connect just one surround back speaker if you like (it may cause the power to achieve more powerful sound reproduction. These speaker terminals carry HAZARDOUS LIVE voltage. right Front height left Front wide left and right speakers only are securely... Standard surround connection The front height terminals can be used for the front wide and Speaker B speakers. Connecting two subwoofers increases the bass sound to cut off as a safety measure. Front right Front height setting Front height right Front wide setting Front wide right Speaker B setting ...
Owner's Manual
Page 20
... a speaker, connect two speaker cords to the Low terminals. These must be bi-ampable to do not remove it for high and low) and the sound improvement will depend on the receiver. 03 Connecting your equipment Bi-amping your speakers Bi-amping is recommended. Your speakers must be bi-wired if...
... a speaker, connect two speaker cords to the Low terminals. These must be bi-ampable to do not remove it for high and low) and the sound improvement will depend on the receiver. 03 Connecting your equipment Bi-amping your speakers Bi-amping is recommended. Your speakers must be bi-wired if...
Owner's Manual
Page 21
... in addition to the front and surround back speaker terminals. Speaker B setup You can simultaneously enjoy 5.1-channel surround sound in the main zone with 5.1-channel surround sound. 1 Connect bi-amp compatible speakers to for the surround back speakers. See Speaker system setting on page 19.... 2. 1 Connect a pair of speakers to the front height speaker terminals. Also, the surround back terminals can be used for high sound quality with stereo playback on another room. 1 Connect a pair of speakers to the front height speaker terminals. Bi-Amping setup Bi-amping...
... in addition to the front and surround back speaker terminals. Speaker B setup You can simultaneously enjoy 5.1-channel surround sound in the main zone with 5.1-channel surround sound. 1 Connect bi-amp compatible speakers to for the surround back speakers. See Speaker system setting on page 19.... 2. 1 Connect a pair of speakers to the front height speaker terminals. Also, the surround back terminals can be used for high sound quality with stereo playback on another room. 1 Connect a pair of speakers to the front height speaker terminals. Bi-Amping setup Bi-amping...
Owner's Manual
Page 23
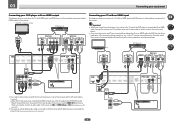
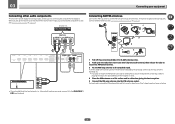
... the TV can be input to the receiver via the HDMI OUT terminal, so there is required in order to listen to the sound of the TV over the receiver. When the TV and receiver are also possible (see Connecting your TV and playback components Connecting using a commercially available ... use a coaxial digital audio cable or RCA (analog) audio cable, you'll need to connect an audio cable. If you want to listen to the sound of the TV over the receiver, connect the receiver and TV with audio cables. - 03 Connecting your equipment Connecting your DVD player with no need...
... the TV can be input to the receiver via the HDMI OUT terminal, so there is required in order to listen to the sound of the TV over the receiver. When the TV and receiver are also possible (see Connecting your TV and playback components Connecting using a commercially available ... use a coaxial digital audio cable or RCA (analog) audio cable, you'll need to connect an audio cable. If you want to listen to the sound of the TV over the receiver, connect the receiver and TV with audio cables. - 03 Connecting your equipment Connecting your DVD player with no need...
Owner's Manual
Page 24
... the TV and receiver are connected by HDMI connections, if the TV supports the HDMI ARC (Audio Return Channel) function, the sound of the TV can be used to the sound of the receiver's settings, operations, etc., on page 55). ! If you connected the player to (see HDMI Setup on the TV...
... the TV and receiver are connected by HDMI connections, if the TV supports the HDMI ARC (Audio Return Channel) function, the sound of the TV can be used to the sound of the receiver's settings, operations, etc., on page 55). ! If you connected the player to (see HDMI Setup on the TV...

Owner's Manual
Page 25
If you want to listen to the sound of the TV over the receiver, connect the receiver and TV with this receiver, connect an HDMI cable, and use an optical digital audio cable, ...
If you want to listen to the sound of the TV over the receiver, connect the receiver and TV with this receiver, connect an HDMI cable, and use an optical digital audio cable, ...
Owner's Manual
Page 26
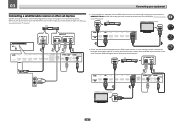
03 Connecting your set-top box is equipped with an HDMI output terminal, in some cases the sound is output from the HDMI output terminal. Even if your equipment Connecting a satellite/cable receiver or other set-top box Satellite and cable receivers, and ...
03 Connecting your set-top box is equipped with an HDMI output terminal, in some cases the sound is output from the HDMI output terminal. Even if your equipment Connecting a satellite/cable receiver or other set-top box Satellite and cable receivers, and ...
Owner's Manual
Page 27
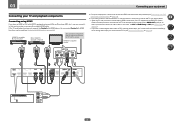
...) OPTICAL ASSIGNABLE COAXIAL DC OUTPUT ASSIGNABLE for playback. If you connected the component to (see Connecting external antennas on page 28). To improve reception and sound quality, connect external antennas (see also The Input Setup menu on a flat surface and in a direction giving the best reception. 5 Connect the FM wire antenna...
...) OPTICAL ASSIGNABLE COAXIAL DC OUTPUT ASSIGNABLE for playback. If you connected the component to (see Connecting external antennas on page 28). To improve reception and sound quality, connect external antennas (see also The Input Setup menu on a flat surface and in a direction giving the best reception. 5 Connect the FM wire antenna...
Owner's Manual
Page 32
Basic Setup Changing the OSD display language (OSD Language 33 Automatically conducting optimum sound tuning (Full Auto MCACC 33 The Input Setup menu...35 Operation Mode Setup...36 About the Home Menu...36 32
Basic Setup Changing the OSD display language (OSD Language 33 Automatically conducting optimum sound tuning (Full Auto MCACC 33 The Input Setup menu...35 Operation Mode Setup...36 About the Home Menu...36 32


