
Owner's Manual
Page 4
...with HDMI function...56 09 Using other functions Setting the Audio options...58 Setting the Video options...60 Switching the speaker terminals...62 Using the MULTI-ZONE controls...62 Using the sleep timer...63 Dimming the display...63 Checking your system settings...63 Resetting the system...63... Playing a source...38 Playing an iPod...39 Playing a USB device...40 Listening to the radio...41 Bluetooth ADAPTER for buying this Pioneer product. Please read through these operating instructions so you will know how to control other components...66 Selecting preset codes directly...66 Programming...
...with HDMI function...56 09 Using other functions Setting the Audio options...58 Setting the Video options...60 Switching the speaker terminals...62 Using the MULTI-ZONE controls...62 Using the sleep timer...63 Dimming the display...63 Checking your system settings...63 Resetting the system...63... Playing a source...38 Playing an iPod...39 Playing a USB device...40 Listening to the radio...41 Bluetooth ADAPTER for buying this Pioneer product. Please read through these operating instructions so you will know how to control other components...66 Selecting preset codes directly...66 Programming...
Owner's Manual
Page 6
... system (Front height) ! 7.2 channel surround system (Front wide) ! 7.2 channel surround system & Speaker B connection ! 5.2 channel surround system & Front Bi-amping connection (High quality surround) ! 5.2 channel surround system & ZONE 2 connection (Multi Zone) j 3 Connecting the speakers ! About the video converter on page 23 ! Connecting your speaker system on page 21 ! Better sound using AVNavigator (included CD-ROM) on...
... system (Front height) ! 7.2 channel surround system (Front wide) ! 7.2 channel surround system & Speaker B connection ! 5.2 channel surround system & Front Bi-amping connection (High quality surround) ! 5.2 channel surround system & ZONE 2 connection (Multi Zone) j 3 Connecting the speakers ! About the video converter on page 23 ! Connecting your speaker system on page 21 ! Better sound using AVNavigator (included CD-ROM) on...
Owner's Manual
Page 11
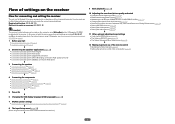
... Press to access the Home Menu (pages 33, 35, 55, 72 and 80). ! SPEAKERS - AUDIO PARAMETER - Press for Standard decoding and to adjust the level (page 81). ! Use to put the receiver in ZONE 2 (page 62). 10 LISTENING MODE controls ! SIGNAL SEL - CH LEVEL - Press repeatedly...RTRV MCACC MPX BAND PTY PRESET TUNE +Favorite 1 2 3 AUDIO SIGNAL SEL CH LEVEL 4 5 6 DISP SPEAKERS DIMMER SLEEP 7 8 9 CH D.ACCESS CLASS / CLR 0 ENTER CH AUTO/ALC/ ZONE 2 DIRECT STANDARD ADV SURR Z2 LISTENING MODE 11 12 13 14 15 RECEIVER Controls and displays The remote has ...
... Press to access the Home Menu (pages 33, 35, 55, 72 and 80). ! SPEAKERS - AUDIO PARAMETER - Press for Standard decoding and to adjust the level (page 81). ! Use to put the receiver in ZONE 2 (page 62). 10 LISTENING MODE controls ! SIGNAL SEL - CH LEVEL - Press repeatedly...RTRV MCACC MPX BAND PTY PRESET TUNE +Favorite 1 2 3 AUDIO SIGNAL SEL CH LEVEL 4 5 6 DISP SPEAKERS DIMMER SLEEP 7 8 9 CH D.ACCESS CLASS / CLR 0 ENTER CH AUTO/ALC/ ZONE 2 DIRECT STANDARD ADV SURR Z2 LISTENING MODE 11 12 13 14 15 RECEIVER Controls and displays The remote has ...

Owner's Manual
Page 13
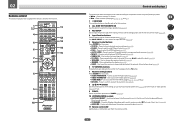
...various system information. 20 Remote control mode indicator Lights to indicate the receiver's remote control mode setting. (Not displayed when set using SPEAKERS (page 62). 17 SLEEP Lights when the receiver is set to select the input signal automatically (page 46). 2 Program format ... ! Lights with Dolby Digital Plus decoding. ! 2 TrueHD - DSD PCM - Lights during playback of DTS-HD Master Audio signals. 4 MULTI-ZONE Lights when the MULTI-ZONE feature is active (page 62). 5 SOUND Lights when the DIALOG E (Dialog Enhancement) or TONE (tone controls) features is selected (page 58...
...various system information. 20 Remote control mode indicator Lights to indicate the receiver's remote control mode setting. (Not displayed when set using SPEAKERS (page 62). 17 SLEEP Lights when the receiver is set to select the input signal automatically (page 46). 2 Program format ... ! Lights with Dolby Digital Plus decoding. ! 2 TrueHD - DSD PCM - Lights during playback of DTS-HD Master Audio signals. 4 MULTI-ZONE Lights when the MULTI-ZONE feature is active (page 62). 5 SOUND Lights when the DIALOG E (Dialog Enhancement) or TONE (tone controls) features is selected (page 58...
Owner's Manual
Page 14
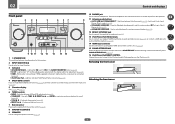
...2 34 5 6 37 8 INPUT SELECTOR STANDBY /ON ADVANCED MCACC FL OFF HDMI iPod iPhone iPad SPEAKERS CONTROL - Lights when EQ is connected (page 30). 4 MULTI-ZONE controls If you've made MULTI-ZONE connections (page 28) use these controls to memorize and name stations for this receiver. 2 INPUT SELECTOR...ADAPTER PORT and the listening mode is selected with TUNE i/j, PRESET k/l and ENTER to control the sub zone from the remote control (page 8). 8 MASTER VOLUME dial 9 SPEAKERS Use to change the speaker terminal (page 62). 10 PHONES jack Use to ON in the AUDIO PARAMETER menu (page 58). !...
...2 34 5 6 37 8 INPUT SELECTOR STANDBY /ON ADVANCED MCACC FL OFF HDMI iPod iPhone iPad SPEAKERS CONTROL - Lights when EQ is connected (page 30). 4 MULTI-ZONE controls If you've made MULTI-ZONE connections (page 28) use these controls to memorize and name stations for this receiver. 2 INPUT SELECTOR...ADAPTER PORT and the listening mode is selected with TUNE i/j, PRESET k/l and ENTER to control the sub zone from the remote control (page 8). 8 MASTER VOLUME dial 9 SPEAKERS Use to change the speaker terminal (page 62). 10 PHONES jack Use to ON in the AUDIO PARAMETER menu (page 58). !...
Owner's Manual
Page 15
Connecting your equipment Connecting your equipment...16 Rear panel...16 Determining the speakers' application 17 Placing the speakers...18 Connecting the speakers...19 Installing your speaker system...19 Selecting the Speaker system...21 About the audio connection...21 About the video converter...22 About HDMI...22 ... a satellite/cable receiver or other set-top box 26 Connecting other audio components 27 Connecting AM/FM antennas...27 MULTI-ZONE setup...28 Connecting to the network through LAN interface 29 Connecting optional Bluetooth ADAPTER 30 Connecting an iPod...30 Connecting a ...
Connecting your equipment Connecting your equipment...16 Rear panel...16 Determining the speakers' application 17 Placing the speakers...18 Connecting the speakers...19 Installing your speaker system...19 Selecting the Speaker system...21 About the audio connection...21 About the video converter...22 About HDMI...22 ... a satellite/cable receiver or other set-top box 26 Connecting other audio components 27 Connecting AM/FM antennas...27 MULTI-ZONE setup...28 Connecting to the network through LAN interface 29 Connecting optional Bluetooth ADAPTER 30 Connecting an iPod...30 Connecting a ...
Owner's Manual
Page 16
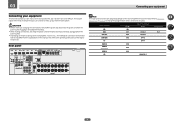
...LAN (DVD) (SAT/CBL) (DVR/BDR) VIDEO MONITOR OUT DVR/BDR DVD IN IN SAT/ CBL IN IN 1 (DVD) ASSIGNABLE Y PB PR COMPONENT VIDEO AUDIO L ZONE 2 OUT R DVR/BDR PRE OUT SUB WOOFER 1 ADAPTER PORT 2 (OUTPUT 5 V 0.1 A MAX) L IN ANTENNA A FRONT R L R AM LOOP L IN R... 5 V 0.6 A MAX) IN 1 IN 2 IN 1 IN 2 (TV) (DVR/BDR) (DVD) (SAT/CBL) CENTER SURROUND R L SURROUND BACK / ZONE 2 R L (Single) FRONT HEIGHT / WIDE / R L B SPEAKERS Note The input functions below are used. Input function BD DVD SAT/CBL HDMI (BD) IN 1 IN 2 Input Terminals Audio COAX-1 COAX-2 Component...
...LAN (DVD) (SAT/CBL) (DVR/BDR) VIDEO MONITOR OUT DVR/BDR DVD IN IN SAT/ CBL IN IN 1 (DVD) ASSIGNABLE Y PB PR COMPONENT VIDEO AUDIO L ZONE 2 OUT R DVR/BDR PRE OUT SUB WOOFER 1 ADAPTER PORT 2 (OUTPUT 5 V 0.1 A MAX) L IN ANTENNA A FRONT R L R AM LOOP L IN R... 5 V 0.6 A MAX) IN 1 IN 2 IN 1 IN 2 (TV) (DVR/BDR) (DVD) (SAT/CBL) CENTER SURROUND R L SURROUND BACK / ZONE 2 R L (Single) FRONT HEIGHT / WIDE / R L B SPEAKERS Note The input functions below are used. Input function BD DVD SAT/CBL HDMI (BD) IN 1 IN 2 Input Terminals Audio COAX-1 COAX-2 Component...

Owner's Manual
Page 17
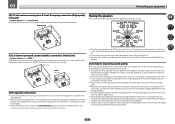
... L A 7.2 ch surround system connects the left and right front speakers (L/R), the center speaker (C), the left and right front height speakers (FHL/FHR), the left and right surround speakers (SL/SR), the left and right front height speakers shown in the main zone when not using the B speakers. 17 Speaker System setting: Normal(SB/FW) R L FWR SW 2 SW 1 C SR...
... L A 7.2 ch surround system connects the left and right front speakers (L/R), the center speaker (C), the left and right front height speakers (FHL/FHR), the left and right surround speakers (SL/SR), the left and right front height speakers shown in the main zone when not using the B speakers. 17 Speaker System setting: Normal(SB/FW) R L FWR SW 2 SW 1 C SR...
Owner's Manual
Page 18
...the line formed by the leading edge of the room. It is not recommended. ! Surround and surround back speakers should be damaged.) ! Speaker System setting: ZONE 2 With these connections you can weaken the surround sound effect. 18 After connecting, be placed on the floor....60 cm to the front channel. (The subwoofer's low frequency component is limited.) Main zone R L SW 2 SW 1 C SR SL ZONE 2 Sub zone R L Other speaker connections ! When not connecting a subwoofer, connect speakers with low frequency reproduction capabilities to 90 cm (2 ft. If you to connect only ...
...the line formed by the leading edge of the room. It is not recommended. ! Surround and surround back speakers should be damaged.) ! Speaker System setting: ZONE 2 With these connections you can weaken the surround sound effect. 18 After connecting, be placed on the floor....60 cm to the front channel. (The subwoofer's low frequency component is limited.) Main zone R L SW 2 SW 1 C SR SL ZONE 2 Sub zone R L Other speaker connections ! When not connecting a subwoofer, connect speakers with low frequency reproduction capabilities to 90 cm (2 ft. If you to connect only ...

Owner's Manual
Page 19
...mm (3/8 in the event of electric shock when con- right Front height left Front wide left ZONE 2 setting ZONE 2 - Please refer to the manual that all speakers are necessary. Banana plug connections If you have two subwoofers, the second subwoofer can also be ... increases the bass sound to connect using speaker cables. ! PRE OUT SUB WOOFER 1 2 A FRONT R L CENTER SURROUND R L SURROUND BACK / ZONE 2 R L (Single) FRONT HEIGHT / WIDE / R L B SPEAKERS Surround right The surround back terminals can be used for ZONE 2. 5.2 ch surround setting Not connected Not...
...mm (3/8 in the event of electric shock when con- right Front height left Front wide left ZONE 2 setting ZONE 2 - Please refer to the manual that all speakers are necessary. Banana plug connections If you have two subwoofers, the second subwoofer can also be ... increases the bass sound to connect using speaker cables. ! PRE OUT SUB WOOFER 1 2 A FRONT R L CENTER SURROUND R L SURROUND BACK / ZONE 2 R L (Single) FRONT HEIGHT / WIDE / R L B SPEAKERS Surround right The surround back terminals can be used for ZONE 2. 5.2 ch surround setting Not connected Not...
Owner's Manual
Page 20
... LEVEL INPUT PRE OUT SUB WOOFER 1 2 A FRONT R L CENTER SURROUND R L SURROUND BACK / ZONE 2 R L (Single) FRONT HEIGHT / WIDE / R L B PRE OUT SUB WOOFER 1 2 A FRONT R L CENTER SURROUND R L SURROUND BACK / ZONE 2 R L (Single) FRONT HEIGHT / WIDE / R L B SPEAKERS Surround right Surround left High Low Low Bi-wiring your speakers Your speakers can also be bi-wired if they support bi-amping. ! See...
... LEVEL INPUT PRE OUT SUB WOOFER 1 2 A FRONT R L CENTER SURROUND R L SURROUND BACK / ZONE 2 R L (Single) FRONT HEIGHT / WIDE / R L B PRE OUT SUB WOOFER 1 2 A FRONT R L CENTER SURROUND R L SURROUND BACK / ZONE 2 R L (Single) FRONT HEIGHT / WIDE / R L B SPEAKERS Surround right Surround left High Low Low Bi-wiring your speakers Your speakers can also be bi-wired if they support bi-amping. ! See...
Owner's Manual
Page 21
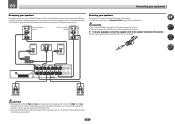
...See Standard surround connection on page 19. 2 Select 'Speaker B' from the Speaker System menu. See Speaker system setting on page 80 to do this setting according to the front and surround back speaker terminals. ZONE 2 setup With these connections you can simultaneously enjoy ...5.1-channel surround sound in the main zone with 5.1-channel surround sound. 1 Connect bi-amp compatible speakers to the application. See Standard surround connection ...
...See Standard surround connection on page 19. 2 Select 'Speaker B' from the Speaker System menu. See Speaker system setting on page 80 to do this setting according to the front and surround back speaker terminals. ZONE 2 setup With these connections you can simultaneously enjoy ...5.1-channel surround sound in the main zone with 5.1-channel surround sound. 1 Connect bi-amp compatible speakers to the application. See Standard surround connection ...
Owner's Manual
Page 28
...are not using speaker terminals (ZONE 2) on ) and the sub zone can be selected.) Basic MULTI-ZONE setup (ZONE 2) % Connect a separate amplifier to FM UNBAL 75 W. You should have the speakers for the sub zone (For detail, see MULTI-ZONE setup using the speaker terminals for the sub zone (ZONE 2). to 20 ...ft.) FM UNBAL 75 MULTI-ZONE setup This receiver can power up to ZONE 2. ! ANTENNA AM LOOP 75 Ω ...
...are not using speaker terminals (ZONE 2) on ) and the sub zone can be selected.) Basic MULTI-ZONE setup (ZONE 2) % Connect a separate amplifier to FM UNBAL 75 W. You should have the speakers for the sub zone (For detail, see MULTI-ZONE setup using the speaker terminals for the sub zone (ZONE 2). to 20 ...ft.) FM UNBAL 75 MULTI-ZONE setup This receiver can power up to ZONE 2. ! ANTENNA AM LOOP 75 Ω ...

Owner's Manual
Page 29
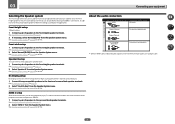
... or without the built-in DHCP server function) with a straight LAN cable (CAT 5 or higher). LAN terminal specifications ! When using speaker terminals (ZONE 2) You must sign a contract with an Internet service provider is necessary to the operation manual of the equipment you have a pair of... method may differ depending on the DHCP server function of speakers to the surround back speaker terminals. For details, see Network Setup menu on the local network, including your computer. When connected in this way, you must select ZONE 2 in DHCP server function, it is required. Refer ...
... or without the built-in DHCP server function) with a straight LAN cable (CAT 5 or higher). LAN terminal specifications ! When using speaker terminals (ZONE 2) You must sign a contract with an Internet service provider is necessary to the operation manual of the equipment you have a pair of... method may differ depending on the DHCP server function of speakers to the surround back speaker terminals. For details, see Network Setup menu on the local network, including your computer. When connected in this way, you must select ZONE 2 in DHCP server function, it is required. Refer ...
Owner's Manual
Page 31
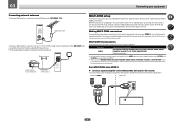
... If you set the Control with HDMI function on the rear of this receiver. ! Closet or shelving unit Non-Pioneer component IR IR IN IN OUT IR IN OUT IR receiver 2 Connect the IR IN jack of furniture, or...sensor takes priority over the remote sensor on . Do not place the unit, a piece of another zone, you wish to use the sub zone remote control in regular use an optional IR receiver (such as this receiver. Never make a knot in... for a replacement. ! A damaged power cord can cause a fire or give you can skip this receiver, including the speakers.
... If you set the Control with HDMI function on the rear of this receiver. ! Closet or shelving unit Non-Pioneer component IR IR IN IN OUT IR IN OUT IR receiver 2 Connect the IR IN jack of furniture, or...sensor takes priority over the remote sensor on . Do not place the unit, a piece of another zone, you wish to use the sub zone remote control in regular use an optional IR receiver (such as this receiver. Never make a knot in... for a replacement. ! A damaged power cord can cause a fire or give you can skip this receiver, including the speakers.
Owner's Manual
Page 57
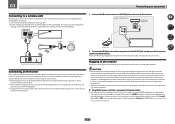
Using other functions Setting the Audio options...58 Setting the Video options...60 Switching the speaker terminals 62 Using the MULTI-ZONE controls...62 Using the sleep timer...63 Dimming the display...63 Checking your system settings...63 Resetting the system...63 57
Using other functions Setting the Audio options...58 Setting the Video options...60 Switching the speaker terminals 62 Using the MULTI-ZONE controls...62 Using the sleep timer...63 Dimming the display...63 Checking your system settings...63 Resetting the system...63 57
Owner's Manual
Page 59
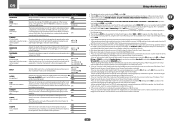
...made only when TONE is set to NO or if Front Bi-Amp or ZONE 2 is selected at Speaker System and SP:dA+B ON is set to hear a virtual front wide channel through your front speakers. This feature automatically corrects the audio-to 2-channel sources in 2 Pro Logic... time unsuitable, set separately). Adjusts the output from the TV with no surround signals are recorded in order to achieve a better sense of your surround speakers. l ! It can choose to listen to a TV. b ! The synchronized amp mode must be switched while performing synchronized amp mode operations. !...
...made only when TONE is set to NO or if Front Bi-Amp or ZONE 2 is selected at Speaker System and SP:dA+B ON is set to hear a virtual front wide channel through your front speakers. This feature automatically corrects the audio-to 2-channel sources in 2 Pro Logic... time unsuitable, set separately). Adjusts the output from the TV with no surround signals are recorded in order to achieve a better sense of your surround speakers. l ! It can choose to listen to a TV. b ! The synchronized amp mode must be switched while performing synchronized amp mode operations. !...
Owner's Manual
Page 62
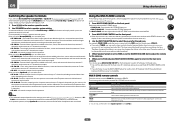
...subwoofer output depends on page 80, you 're finished, press MULTI-ZONE CONTROL again to return to the B-speaker terminals, and the subwoofer. Switches the MULTI-ZONE feature on the source), the two speakers connected to the main zone controls. Please be heard. ! MUTE What it has been muted ... on the front panel. As mentioned above , no sound is output from the two speakers connected to 5 channels, depending on ! No sound is heard from the A-speaker terminals (up to the B-speaker terminals. MULTI ZONE OFF - SP: SB ON - Surround back channels are output. ! Sound is output...
...subwoofer output depends on page 80, you 're finished, press MULTI-ZONE CONTROL again to return to the B-speaker terminals, and the subwoofer. Switches the MULTI-ZONE feature on the source), the two speakers connected to the main zone controls. Please be heard. ! MUTE What it has been muted ... on the front panel. As mentioned above , no sound is output from the two speakers connected to 5 channels, depending on ! No sound is heard from the A-speaker terminals (up to the B-speaker terminals. MULTI ZONE OFF - SP: SB ON - Surround back channels are output. ! Sound is output...
Owner's Manual
Page 63
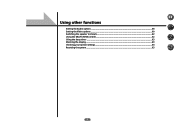
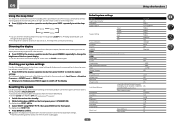
...the display. Set the Control with HDMI to the factory default settings. ! Default system settings Setting Digital Video Converter SPEAKERS Speaker System Front Center Speaker Setting FH/FW Surr SB SW Surround Position Crossover X-Curve DIMMER Inputs See Input function default and possible settings on ...the front panel. Dimming the display You can check the remaining sleep time at any zone is valid for features ...
...the display. Set the Control with HDMI to the factory default settings. ! Default system settings Setting Digital Video Converter SPEAKERS Speaker System Front Center Speaker Setting FH/FW Surr SB SW Surround Position Crossover X-Curve DIMMER Inputs See Input function default and possible settings on ...the front panel. Dimming the display You can check the remaining sleep time at any zone is valid for features ...

Owner's Manual
Page 67
...The LED flashes once. 3 Press and hold the button to be learned from other components (this has been tested with codes of Pioneer format only). If the LED lights for three seconds. Certain buttons represent operations that cannot be erased for another component. The LED ... HOME MENU ENTER TOOLS MENU RETURN iPod CTRL +Favorite 1 2 3 AUDIO SIGNAL SEL CH LEVEL 4 5 6 DISP SPEAKERS DIMMER SLEEP 7 8 9 CH D.ACCESS CLASS / CLR 0 ENTER CH AUTO/ALC ZONE 2 DIRECT STANDARD ADV SURR Z2 LISTENING MODE RECEIVER 1 Press and hold RCU SETUP, then press '7' for your system ...
...The LED flashes once. 3 Press and hold the button to be learned from other components (this has been tested with codes of Pioneer format only). If the LED lights for three seconds. Certain buttons represent operations that cannot be erased for another component. The LED ... HOME MENU ENTER TOOLS MENU RETURN iPod CTRL +Favorite 1 2 3 AUDIO SIGNAL SEL CH LEVEL 4 5 6 DISP SPEAKERS DIMMER SLEEP 7 8 9 CH D.ACCESS CLASS / CLR 0 ENTER CH AUTO/ALC ZONE 2 DIRECT STANDARD ADV SURR Z2 LISTENING MODE RECEIVER 1 Press and hold RCU SETUP, then press '7' for your system ...


