

Owner's Manual
Page 1
AV Receiver VSX-1122-K Register your product on http://www.pioneerelectronics.com (US) http://www.pioneerelectronics.ca (Canada) • Protect your new investment The details of your purchase will be on file for reference in the event of an insurance claim such as loss or theft. • Receive free tips, updates and service bulletins on your new product • Improve product development Your input helps us continue to design products that meet your needs. • Receive a free Pioneer newsletter Registered customers can opt in to receive a monthly newsletter. Operating Instructions
AV Receiver VSX-1122-K Register your product on http://www.pioneerelectronics.com (US) http://www.pioneerelectronics.ca (Canada) • Protect your new investment The details of your purchase will be on file for reference in the event of an insurance claim such as loss or theft. • Receive free tips, updates and service bulletins on your new product • Improve product development Your input helps us continue to design products that meet your needs. • Receive a free Pioneer newsletter Registered customers can opt in to receive a monthly newsletter. Operating Instructions
Owner's Manual
Page 2
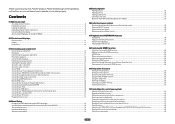
..., and can be removed and appropriate one or more of the polarized or grounding-type plug. Increase the separation between the equipment and receiver. - The exclamation point within the product's enclosure that may be of sufficient magnitude to constitute a risk of the area where this unit...NOT REMOVE COVER (OR BACK). When a cart is required when the apparatus has been damaged in a particular installation. Reorient or relocate the receiving antenna. - D8-10-2_A1_En WARNING: Handling the cord on this apparatus during lightning storms or when unused for the unit, you to chemicals ...
..., and can be removed and appropriate one or more of the polarized or grounding-type plug. Increase the separation between the equipment and receiver. - The exclamation point within the product's enclosure that may be of sufficient magnitude to constitute a risk of the area where this unit...NOT REMOVE COVER (OR BACK). When a cart is required when the apparatus has been damaged in a particular installation. Reorient or relocate the receiving antenna. - D8-10-2_A1_En WARNING: Handling the cord on this apparatus during lightning storms or when unused for the unit, you to chemicals ...
Owner's Manual
Page 4
...27 Connecting AM/FM antennas...27 MULTI-ZONE setup...28 Connecting to the network through these operating instructions so you for buying this Pioneer product. Please read through LAN interface...29 Connecting optional Bluetooth ADAPTER...30 Connecting an iPod...30 Connecting a USB device...30 Connecting...Connecting your TV and playback components...23 Connecting an HDD/DVD recorder, BD recorder and other video sources 25 Connecting a satellite/cable receiver or other set-top box 26 Connecting other remote controls...67 Erasing one input function 67 Direct function...68 About the ALL ZONE...
...27 Connecting AM/FM antennas...27 MULTI-ZONE setup...28 Connecting to the network through these operating instructions so you for buying this Pioneer product. Please read through LAN interface...29 Connecting optional Bluetooth ADAPTER...30 Connecting an iPod...30 Connecting a USB device...30 Connecting...Connecting your TV and playback components...23 Connecting an HDD/DVD recorder, BD recorder and other video sources 25 Connecting a satellite/cable receiver or other set-top box 26 Connecting other remote controls...67 Erasing one input function 67 Direct function...68 About the ALL ZONE...
Owner's Manual
Page 5
... 72 Automatic MCACC (Expert)...72 Manual MCACC setup...74 Checking MCACC Data...76 Data Management...77 12 The System Setup and Other Setup menus Making receiver settings from the System Setup menu 80 Manual speaker setup...80 Network Setup menu...82 Checking the Network Information...83 The Other Setup menu...83...
... 72 Automatic MCACC (Expert)...72 Manual MCACC setup...74 Checking MCACC Data...76 Data Management...77 12 The System Setup and Other Setup menus Making receiver settings from the System Setup menu 80 Manual speaker setup...80 Network Setup menu...82 Checking the Network Information...83 The Other Setup menu...83...
Owner's Manual
Page 6
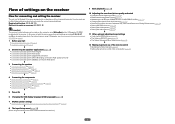
... (page 81) ! Flow of settings on page 19 ! Installing your speaker system on the receiver Flow for connecting and setting the receiver The unit is a full-fledged AV receiver equipped with an abundance of the remote control ! Setting the remote to make the connections and ...below to control other than the recommended connections) j 9 Basic playback (page 37) j 10 Adjusting the sound and picture quality as in the receiver on page 9. 1 Before you start ! In this case, virtually the same connections and settings as desired ! Loading the batteries on page 19...
... (page 81) ! Flow of settings on page 19 ! Installing your speaker system on the receiver Flow for connecting and setting the receiver The unit is a full-fledged AV receiver equipped with an abundance of the remote control ! Setting the remote to make the connections and ...below to control other than the recommended connections) j 9 Basic playback (page 37) j 10 Adjusting the sound and picture quality as in the receiver on page 9. 1 Before you start ! In this case, virtually the same connections and settings as desired ! Loading the batteries on page 19...
Owner's Manual
Page 7
Before you start Checking what's in the box...8 Installing the receiver...8 Loading the batteries...8 Operating range of remote control unit 8 Canceling the demo display...8 About using AVNavigator (included CD-ROM 9 7
Before you start Checking what's in the box...8 Installing the receiver...8 Loading the batteries...8 Operating range of remote control unit 8 Canceling the demo display...8 About using AVNavigator (included CD-ROM 9 7

Owner's Manual
Page 8
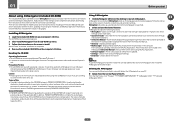
...01 Before you start guide ! in your country/area. (Symbol examples for batteries) These symbols are obstacles between the remote control and the receiver's remote sensor. ! Insert the plus and minus sides of remote control unit The remote control may result in such hazards as a kitchen)... ! To cancel the demo display, connect the power cord, then perform the operation below. ! iPod cable ! Warranty sheet Installing the receiver ! near a device that have different voltages. The bottom panel becomes hot when the power is set and various indications are shown on the...
...01 Before you start guide ! in your country/area. (Symbol examples for batteries) These symbols are obstacles between the remote control and the receiver's remote sensor. ! Insert the plus and minus sides of remote control unit The remote control may result in such hazards as a kitchen)... ! To cancel the demo display, connect the power cord, then perform the operation below. ! iPod cable ! Warranty sheet Installing the receiver ! near a device that have different voltages. The bottom panel becomes hot when the power is set and various indications are shown on the...
Owner's Manual
Page 9
...-ROM belongs to use this CD-ROM and is not liable for MCACC Application. General Disclaimer ! Describes the receiver's playback operations and how to PIONEER CORPORATION. Displays glossary pages. ! Settings - Used to them when using this CD-ROM. This CD-ROM can... instructions on 3D graphs. Guides you through videos and illustrations. ! Refer to detect the receiver. Software Update - Permission to make various AVNavigator settings. ! Do not use . PIONEER CORPORATION does not guarantee the operation of its use if you check the MCACC measurement results on...
...-ROM belongs to use this CD-ROM and is not liable for MCACC Application. General Disclaimer ! Describes the receiver's playback operations and how to PIONEER CORPORATION. Displays glossary pages. ! Settings - Used to them when using this CD-ROM. This CD-ROM can... instructions on 3D graphs. Guides you through videos and illustrations. ! Refer to detect the receiver. Software Update - Permission to make various AVNavigator settings. ! Do not use . PIONEER CORPORATION does not guarantee the operation of its use if you check the MCACC measurement results on...
Owner's Manual
Page 11
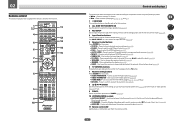
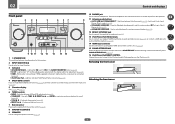
... ! CH LEVEL - Use to access: ! Use to access the Audio options (page 58). ! STANDARD - Press for the receiver. 1 2,3 4 5 6 7 8 5 5 9 10 RECEIVER ALL ZONE STBY SOURCE DISCRETE ON RCU SETUP BDR BD DVD DVR HDMI TV CD NET ADPT USB iPod CBL OPTION SAT TUNER INPUT ...7 8 9 CH D.ACCESS CLASS / CLR 0 ENTER CH AUTO/ALC/ ZONE 2 DIRECT STANDARD ADV SURR Z2 LISTENING MODE 11 12 13 14 15 RECEIVER Controls and displays The remote has been conveniently color-coded according to component control using the following system: ! MCACC - SPEAKERS - DIMMER - Use to access...
... ! CH LEVEL - Use to access: ! Use to access the Audio options (page 58). ! STANDARD - Press for the receiver. 1 2,3 4 5 6 7 8 5 5 9 10 RECEIVER ALL ZONE STBY SOURCE DISCRETE ON RCU SETUP BDR BD DVD DVR HDMI TV CD NET ADPT USB iPod CBL OPTION SAT TUNER INPUT ...7 8 9 CH D.ACCESS CLASS / CLR 0 ENTER CH AUTO/ALC/ ZONE 2 DIRECT STANDARD ADV SURR Z2 LISTENING MODE 11 12 13 14 15 RECEIVER Controls and displays The remote has been conveniently color-coded according to component control using the following system: ! MCACC - SPEAKERS - DIMMER - Use to access...
Owner's Manual
Page 12
02 12 OPTION The preset codes of desired devices can be registered in the remote control and button operations can be registered using the learning mode. 13 Switches the remote to control the receiver (used to perform operations in the main zone. Controls and displays 12 Use to set the listening volume. 15 MUTE Mutes the sound or restores the sound if it has been muted (adjusting the volume also restores the sound). Also use this button to set up surround sound. 14 VOLUME +/- Switch to select the white commands).
02 12 OPTION The preset codes of desired devices can be registered in the remote control and button operations can be registered using the learning mode. 13 Switches the remote to control the receiver (used to perform operations in the main zone. Controls and displays 12 Use to set the listening volume. 15 MUTE Mutes the sound or restores the sound if it has been muted (adjusting the volume also restores the sound). Also use this button to set up surround sound. 14 VOLUME +/- Switch to select the white commands).

Owner's Manual
Page 13
...! MSTR - ALC - Lights when Direct/Pure Direct is selected (page 45). ! STANDARD - STEREO - Lights when a stereo FM broadcast is being received. ! "---" indicates the minimum level, and "+12dB" indicates the maximum level. 14 Input function indicators Light to indicate the input function you have selected....page 58). 11 Tuner indicators ! L/R - PCM - AUTO SURROUND - Lights when one channel other than the ones above ! When one of the receiver is muted. 13 Master volume level Shows the overall volume level. Center channel ! Lights with DTS decoding. ! DTS - SL/SR - Low ...
...! MSTR - ALC - Lights when Direct/Pure Direct is selected (page 45). ! STANDARD - STEREO - Lights when a stereo FM broadcast is being received. ! "---" indicates the minimum level, and "+12dB" indicates the maximum level. 14 Input function indicators Light to indicate the input function you have selected....page 58). 11 Tuner indicators ! L/R - PCM - AUTO SURROUND - Lights when one channel other than the ones above ! When one of the receiver is muted. 13 Master volume level Shows the overall volume level. Center channel ! Lights with DTS decoding. ! DTS - SL/SR - Low ...
Owner's Manual
Page 14
... audio and video source (page 30), or connect a USB device for audio and photo playback (page 30). 14 HDMI input connector Use for this receiver. 2 INPUT SELECTOR dial Use to select an input function. 3 Indicators ! Lights when EQ is selected with TUNE i/j, PRESET k/l and ENTER to...to connect headphones. Lights when "off" (nothing displayed) is set to SOUND RETRIEVER AIR (page 43). 16 iPod iPhone iPad DIRECT CONTROL Change the receiver's input to ON in the AUDIO PARAMETER menu (page 58). ! STANDARD SURROUND - FL OFF - Blinks when connecting an HDMI-equipped component; iPod ...
... audio and video source (page 30), or connect a USB device for audio and photo playback (page 30). 14 HDMI input connector Use for this receiver. 2 INPUT SELECTOR dial Use to select an input function. 3 Indicators ! Lights when EQ is selected with TUNE i/j, PRESET k/l and ENTER to...to connect headphones. Lights when "off" (nothing displayed) is set to SOUND RETRIEVER AIR (page 43). 16 iPod iPhone iPad DIRECT CONTROL Change the receiver's input to ON in the AUDIO PARAMETER menu (page 58). ! STANDARD SURROUND - FL OFF - Blinks when connecting an HDMI-equipped component; iPod ...
Owner's Manual
Page 15
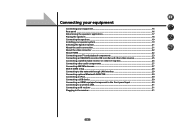
... About HDMI...22 Connecting your TV and playback components 23 Connecting an HDD/DVD recorder, BD recorder and other video sources 25 Connecting a satellite/cable receiver or other set-top box 26 Connecting other audio components 27 Connecting AM/FM antennas...27 MULTI-ZONE setup...28 Connecting to the network through... iPod...30 Connecting a USB device...30 Connecting an HDMI-equipped component to the front panel input 30 Connecting to a wireless LAN...31 Connecting an IR receiver...31 Plugging in the...
... About HDMI...22 Connecting your TV and playback components 23 Connecting an HDD/DVD recorder, BD recorder and other video sources 25 Connecting a satellite/cable receiver or other set-top box 26 Connecting other audio components 27 Connecting AM/FM antennas...27 MULTI-ZONE setup...28 Connecting to the network through... iPod...30 Connecting a USB device...30 Connecting an HDMI-equipped component to the front panel input 30 Connecting to a wireless LAN...31 Connecting an IR receiver...31 Plugging in the...
Owner's Manual
Page 16
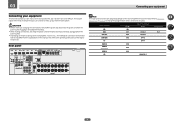
... (front panel) IN 5 HDMI 6 IN 6 CD ANALOG-1 16 Plugging in this manual. 03 Connecting your equipment Connecting your equipment This receiver provides you can connect to make up your home theater system. Before making connections, also keep the power cords of the devices being connected ...power outlets. ! Also refer to the operating instructions of components you with many connection possibilities, but it doesn't have to the receiver's different input terminals. CAUTION ! Depending on page 35 to change the assignments if other connections are assigned by default to be...
... (front panel) IN 5 HDMI 6 IN 6 CD ANALOG-1 16 Plugging in this manual. 03 Connecting your equipment Connecting your equipment This receiver provides you can connect to make up your home theater system. Before making connections, also keep the power cords of the devices being connected ...power outlets. ! Also refer to the operating instructions of components you with many connection possibilities, but it doesn't have to the receiver's different input terminals. CAUTION ! Depending on page 35 to change the assignments if other connections are assigned by default to be...

Owner's Manual
Page 19
CAUTION ! Note that came with the terminals on the receiver comprises a positive (+) and negative (-) terminal. To prevent the risk of 6 W to the left and right speakers only are securely installed. If any uninsulated parts. ! Standard ...
CAUTION ! Note that came with the terminals on the receiver comprises a positive (+) and negative (-) terminal. To prevent the risk of 6 W to the left and right speakers only are securely installed. If any uninsulated parts. ! Standard ...
Owner's Manual
Page 20
... high frequency driver and low frequency driver of your speakers to different amplifiers for high and low) and the sound improvement will depend on the receiver. 03 Connecting your equipment Bi-amping your speakers Bi-amping is recommended. With these connections, the Speaker System setting makes no difference. Your speakers must...
... high frequency driver and low frequency driver of your speakers to different amplifiers for high and low) and the sound improvement will depend on the receiver. 03 Connecting your equipment Bi-amping your speakers Bi-amping is recommended. With these connections, the Speaker System setting makes no difference. Your speakers must...
Owner's Manual
Page 22
... that is not compatible with HDCP still cause this unit's HDMI OUT terminal during playback, may not be dis- This receiver supports the functions described below through composite connections. x.v.Color signal transfer ! Consult your component or dis- necting the HDMI ... other than a High Speed HDMI® cable is protected by HDCP (1080p/24, 1080p/60, etc.)) ! 3D signal transfer ! This receiver incorporates High-Definition Multimedia Interface (HDMI®) technology. ARC (Audio Return Channel) ! Input of Rovi Corporation. Dolby Digital, Dolby Digital Plus,...
... that is not compatible with HDCP still cause this unit's HDMI OUT terminal during playback, may not be dis- This receiver supports the functions described below through composite connections. x.v.Color signal transfer ! Consult your component or dis- necting the HDMI ... other than a High Speed HDMI® cable is protected by HDCP (1080p/24, 1080p/60, etc.)) ! 3D signal transfer ! This receiver incorporates High-Definition Multimedia Interface (HDMI®) technology. ARC (Audio Return Channel) ! Input of Rovi Corporation. Dolby Digital, Dolby Digital Plus,...
Owner's Manual
Page 23
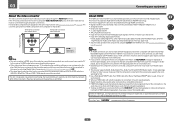
..., the sound of the TV can connect it to this case, set ARC at HDMI Setup to the sound of the TV over the receiver, connect the receiver and TV with HDCP) equipped component (Blu-ray Disc player (BD), etc.), you have an HDMI or DVI (with audio cables. - HDMI/DVI-...compatible Blu-ray Disc player Other HDMI/DVIequipped component This connection is no HDMI output on page 24). ! When the TV and receiver are also possible (see HDMI Setup on page 55). - If you want to listen to ON (see Connecting your TV and playback components Connecting using...
..., the sound of the TV can connect it to this case, set ARC at HDMI Setup to the sound of the TV over the receiver, connect the receiver and TV with HDCP) equipped component (Blu-ray Disc player (BD), etc.), you have an HDMI or DVI (with audio cables. - HDMI/DVI-...compatible Blu-ray Disc player Other HDMI/DVIequipped component This connection is no HDMI output on page 24). ! When the TV and receiver are also possible (see HDMI Setup on page 55). - If you want to listen to ON (see Connecting your TV and playback components Connecting using...
Owner's Manual
Page 24
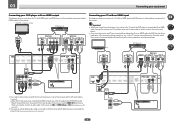
...HDMI ARC (Audio Return Channel) function, the sound of the TV can be used to connect the receiver and player. ! In this case, set ARC at HDMI Setup to ON (see The Input Setup... menu on page 35). In this case, watch the receiver's front panel display while performing the various operations and making settings. If you use an optical digital...TV with no HDMI input This diagram shows connections of a TV (with no need to tell the receiver which digital input you connected the player to (see HDMI Setup on page 55). ! HDMI/DVI-compatible...
...HDMI ARC (Audio Return Channel) function, the sound of the TV can be used to connect the receiver and player. ! In this case, set ARC at HDMI Setup to ON (see The Input Setup... menu on page 35). In this case, watch the receiver's front panel display while performing the various operations and making settings. If you use an optical digital...TV with no HDMI input This diagram shows connections of a TV (with no need to tell the receiver which digital input you connected the player to (see HDMI Setup on page 55). ! HDMI/DVI-compatible...

Owner's Manual
Page 25
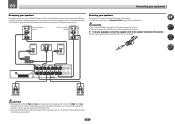
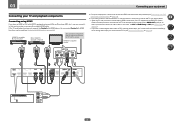
... recorder, BD recorder, etc. If you want to listen to (see also The Input Setup menu on page 35). When doing so, also connect the receiver and TV by HDMI (see The Input Setup menu on page 35). HDMI IN 1 IN 2 IN 3 BD IN IN 4 IN 6 OUT LAN (10/100) OPTICAL... with an HDMI output terminal, we recommend connecting it may not be possible to output video signals to both HDMI and other video sources This receiver has audio/video inputs suitable for video signal input. HDMI OUT HDD/DVD recorder, BD recorder, etc. Please refer to (see Connecting using HDMI on...
... recorder, BD recorder, etc. If you want to listen to (see also The Input Setup menu on page 35). When doing so, also connect the receiver and TV by HDMI (see The Input Setup menu on page 35). HDMI IN 1 IN 2 IN 3 BD IN IN 4 IN 6 OUT LAN (10/100) OPTICAL... with an HDMI output terminal, we recommend connecting it may not be possible to output video signals to both HDMI and other video sources This receiver has audio/video inputs suitable for video signal input. HDMI OUT HDD/DVD recorder, BD recorder, etc. Please refer to (see Connecting using HDMI on...


