Owner's Manual
Page 5
... surround connection 19 Bi-amping your speakers 20 Bi-wiring your speakers 20 Selecting the Speaker system 21 Front height setup 21 Front wide setup 21 Speaker B setup 21 Bi-Amping setup 21 ZONE 2 setup 21 About the audio connection 21 About the video converter 21 About HDMI 22 Connecting your TV and playback components . . . . . 23 Connecting using the Auto MCACC Setup . . . . 37 The Input Setup menu 37 Input function default and possible settings 38 05 Basic playback Playing a source 39 Playing a source with HDMI connection 39 Playing an iPod 39 Playing...
... surround connection 19 Bi-amping your speakers 20 Bi-wiring your speakers 20 Selecting the Speaker system 21 Front height setup 21 Front wide setup 21 Speaker B setup 21 Bi-Amping setup 21 ZONE 2 setup 21 About the audio connection 21 About the video converter 21 About HDMI 22 Connecting your TV and playback components . . . . . 23 Connecting using the Auto MCACC Setup . . . . 37 The Input Setup menu 37 Input function default and possible settings 38 05 Basic playback Playing a source 39 Playing a source with HDMI connection 39 Playing an iPod 39 Playing...
Owner's Manual
Page 11
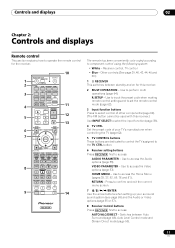
RECEIVER MULTI OPERATION SOURCE 1 R.SETUP 2 BD DVD DVR/BDR HDMI 10 TV CD NET RADIO ADAPTER 3 iPod USB TUNER SIRIUS XM INPUT SELECT TV CTRL RECEIVER 4 11 MASTER INPUT VOLUME TV CONTROL 5 12 CH VOL MUTE 13 AUDIO PARAMETER VIDEO PARAMETER 6 LIST TUNE TOOLS TOP MENU 7 BAND T.EDIT GUIDE PRESET ENTER PRESET CATEGORY RETURN HOME MENU TUNE iPod CTRL AUTO/ALC/ PGM MEMORY MENU DIRECT STEREO STANDARD ADV SURR HDD DVD THX PHASE CTRL STATUS TV / DTV MPX PQLS 8 HDMI OUT AUDIO 1 2 3 SIGNAL SEL MCACC SLEEP INFO...
RECEIVER MULTI OPERATION SOURCE 1 R.SETUP 2 BD DVD DVR/BDR HDMI 10 TV CD NET RADIO ADAPTER 3 iPod USB TUNER SIRIUS XM INPUT SELECT TV CTRL RECEIVER 4 11 MASTER INPUT VOLUME TV CONTROL 5 12 CH VOL MUTE 13 AUDIO PARAMETER VIDEO PARAMETER 6 LIST TUNE TOOLS TOP MENU 7 BAND T.EDIT GUIDE PRESET ENTER PRESET CATEGORY RETURN HOME MENU TUNE iPod CTRL AUTO/ALC/ PGM MEMORY MENU DIRECT STEREO STANDARD ADV SURR HDD DVD THX PHASE CTRL STATUS TV / DTV MPX PQLS 8 HDMI OUT AUDIO 1 2 3 SIGNAL SEL MCACC SLEEP INFO...

Owner's Manual
Page 12
... for Standard decoding and to select an input function. 2 STANDBY/ON Switches the receiver between the various surround modes (page 49). DIMMER - Front panel 1 2 3 4 5 67 8 STANDBY/ON INPUT SELECTOR BAND TUNE ADVANCED MCACC PQLS HDMI iPod iPhone PRESET ENTER TUNER EDIT AUTO SURR/ALC/ STREAM DIRECT STEREO ADVANCED SURROUND STANDARD SURROUND HOME THX SPEAKERS MULTI-ZONE CONTROL ON / OFF MASTER VOLUME PHONES MCACC SETUP MIC iPod iPhone USB VIDEO CAMERA HDMI 5 9 10 11 1 INPUT SELECTOR dial Use to switch various modes (2 Pro Logic, Neo:6, etc.) (page...
... for Standard decoding and to select an input function. 2 STANDBY/ON Switches the receiver between the various surround modes (page 49). DIMMER - Front panel 1 2 3 4 5 67 8 STANDBY/ON INPUT SELECTOR BAND TUNE ADVANCED MCACC PQLS HDMI iPod iPhone PRESET ENTER TUNER EDIT AUTO SURR/ALC/ STREAM DIRECT STEREO ADVANCED SURROUND STANDARD SURROUND HOME THX SPEAKERS MULTI-ZONE CONTROL ON / OFF MASTER VOLUME PHONES MCACC SETUP MIC iPod iPhone USB VIDEO CAMERA HDMI 5 9 10 11 1 INPUT SELECTOR dial Use to switch various modes (2 Pro Logic, Neo:6, etc.) (page...

Owner's Manual
Page 13
... SETUP MIC jack Use to connect the supplied microphone (page 35). 14 iPod/iPhone/USB terminals Use to connect your Apple iPod as an audio and video source, or connect a USB device for audio and photo playback (page 32). 15 HDMI input connector Use for connection to select the input signal automatically (page 51). Left front/Right front channel C - Lights with Dolby Digital Plus decoding. 13 En STEREO - STANDARD SURROUND - Press to select a Home THX listening mode (page 49). 11 SPEAKERS Use to change...
... SETUP MIC jack Use to connect the supplied microphone (page 35). 14 iPod/iPhone/USB terminals Use to connect your Apple iPod as an audio and video source, or connect a USB device for audio and photo playback (page 32). 15 HDMI input connector Use for connection to select the input signal automatically (page 51). Left front/Right front channel C - Lights with Dolby Digital Plus decoding. 13 En STEREO - STANDARD SURROUND - Press to select a Home THX listening mode (page 49). 11 SPEAKERS Use to change...
Owner's Manual
Page 21
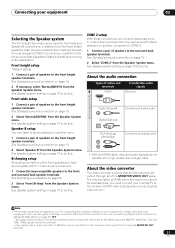
...; Digital (Coaxial) Conventional digital audio Digital (Optical) RCA (Analog) (White/Red) Conventional analog audio • With an HDMI cable, video and audio signals can be used for high sound quality with stereo playback on page 79 to do this . Make this . The only exception is HDMI: since this . About the audio connection Types of speakers to for the composite MONITOR OUT terminals. 21 En See Standard surround connection on page 20. 2 Select 'Front Bi-Amp' from the component video input...
...; Digital (Coaxial) Conventional digital audio Digital (Optical) RCA (Analog) (White/Red) Conventional analog audio • With an HDMI cable, video and audio signals can be used for high sound quality with stereo playback on page 79 to do this . Make this . The only exception is HDMI: since this . About the audio connection Types of speakers to for the composite MONITOR OUT terminals. 21 En See Standard surround connection on page 20. 2 Select 'Front Bi-Amp' from the component video input...
Owner's Manual
Page 22
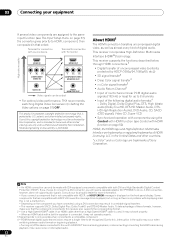
.... Dolby Digital, Dolby Digital Plus, DTS, High bitrate audio (Dolby TrueHD, DTS-HD Master Audio, DTSHD High Resolution Audio), DVD-Audio, CD, SACD (DSD signal), Video CD, Super VCD • Synchronized operation with components using a DVI connection may cause noise or interrupted audio. 22 En Consult your equipment If several video components are assigned to the same input function (see Control with HDCP, an HDCP ERROR message is protected by Rovi Corporation. This receiver supports the functions described below through HDMI connections.2 • Digital...
.... Dolby Digital, Dolby Digital Plus, DTS, High bitrate audio (Dolby TrueHD, DTS-HD Master Audio, DTSHD High Resolution Audio), DVD-Audio, CD, SACD (DSD signal), Video CD, Super VCD • Synchronized operation with components using a DVI connection may cause noise or interrupted audio. 22 En Consult your equipment If several video components are assigned to the same input function (see Control with HDCP, an HDCP ERROR message is protected by Rovi Corporation. This receiver supports the functions described below through HDMI connections.2 • Digital...

Owner's Manual
Page 31
... front panel input CONTROL ON / OFF MASTER VOLUME LAN terminal specifications LAN terminal Ethernet jack 10BASE-T/100BASE-TX MCACC SETUP MIC iPod iPhone USB VIDEO CAMERA HDMI 5 Connecting Optional Bluetooth® ADAPTER When the Bluetooth ADAPTER (Pioneer Model No. Connecting a SiriusConnect™ tuner To receive SIRIUS Satellite Radio broadcasts, you will also need to the SiriusConnect™ tuner. OUT LAN (10/100) ADAPTER PORT (OUTPUT 5 V 100 mA MAX) MONITOR OUT SIRIUS COAXIAL ASSIGNABLE OPTICAL ASSIGNABLE IN...
... front panel input CONTROL ON / OFF MASTER VOLUME LAN terminal specifications LAN terminal Ethernet jack 10BASE-T/100BASE-TX MCACC SETUP MIC iPod iPhone USB VIDEO CAMERA HDMI 5 Connecting Optional Bluetooth® ADAPTER When the Bluetooth ADAPTER (Pioneer Model No. Connecting a SiriusConnect™ tuner To receive SIRIUS Satellite Radio broadcasts, you will also need to the SiriusConnect™ tuner. OUT LAN (10/100) ADAPTER PORT (OUTPUT 5 V 100 mA MAX) MONITOR OUT SIRIUS COAXIAL ASSIGNABLE OPTICAL ASSIGNABLE IN...
Owner's Manual
Page 37
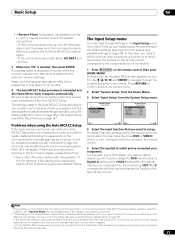
... DVD input function's Digital In setting from COAX-1 (default) to the optical input you've connected it is also possible to make settings in the Input Setup menu if you didn't hook up . The default names correspond with the names next to the microphone (listening position) or when using the Manual speaker setup on the rear panel (such as possible while this receiver upon completion of the speakers and viewing environment, we recommend adjusting the settings manually...
... DVD input function's Digital In setting from COAX-1 (default) to the optical input you've connected it is also possible to make settings in the Input Setup menu if you didn't hook up . The default names correspond with the names next to the microphone (listening position) or when using the Manual speaker setup on the rear panel (such as possible while this receiver upon completion of the speakers and viewing environment, we recommend adjusting the settings manually...
Owner's Manual
Page 39
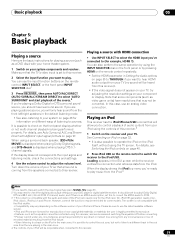
... your home theater system. 1 Switch on page 97. If the display does not correspond to the input signal and listening mode, check the connections and settings. 4 Use the volume control to play . You can use an analog video connection. In this case, use the input function buttons on the remote control, INPUT SELECT, or the front panel INPUT SELECTOR dial.1 3 Press RECEIVER , then press AUTO/ALC/DIRECT (AUTO SURR/ALC/STREAM DIRECT) to select 'AUTO SURROUND' and start playback of the source.2 If you're playing a Dolby Digital or DTS surround sound source...
... your home theater system. 1 Switch on page 97. If the display does not correspond to the input signal and listening mode, check the connections and settings. 4 Use the volume control to play . You can use an analog video connection. In this case, use the input function buttons on the remote control, INPUT SELECT, or the front panel INPUT SELECTOR dial.1 3 Press RECEIVER , then press AUTO/ALC/DIRECT (AUTO SURR/ALC/STREAM DIRECT) to select 'AUTO SURROUND' and start playback of the source.2 If you're playing a Dolby Digital or DTS surround sound source...

Owner's Manual
Page 48
... (STANDARD SURROUND). channel sources. 48 En Tip • When ALC is PCM (48 kHz or less), Dolby Digital, DTS or analog 2- AUTO SURROUND shows briefly in surround sound. Up to 7.1 channel sound (surround back), especially suited to music sources6 Note 1 If the surround back speakers are not connected or V.SB is switched OFF (page 55), 2 Pro Logic IIx becomes 2 Pro Logic II (5.1 channel sound). 2 When listening to sources using the EFFECT parameter in 2 Pro Logic IIz HEIGHT mode...
... (STANDARD SURROUND). channel sources. 48 En Tip • When ALC is PCM (48 kHz or less), Dolby Digital, DTS or analog 2- AUTO SURROUND shows briefly in surround sound. Up to 7.1 channel sound (surround back), especially suited to music sources6 Note 1 If the surround back speakers are not connected or V.SB is switched OFF (page 55), 2 Pro Logic IIx becomes 2 Pro Logic II (5.1 channel sound). 2 When listening to sources using the EFFECT parameter in 2 Pro Logic IIz HEIGHT mode...

Owner's Manual
Page 51
... proper digital connections (page 27) and set the signal input to DIGITAL. • Some DVD players don't output DTS signals. The PHASE CONTROL indicator on page 13). Each press cycles through your current settings. DIGITAL; The compatible signals via the HDMI terminals are plugged in the following order: HDMI; If two waveforms are connected. • You can also press / to select the MCACC preset. 2 • This receiver can only play back Dolby Digital, PCM...
... proper digital connections (page 27) and set the signal input to DIGITAL. • Some DVD players don't output DTS signals. The PHASE CONTROL indicator on page 13). Each press cycles through your current settings. DIGITAL; The compatible signals via the HDMI terminals are plugged in the following order: HDMI; If two waveforms are connected. • You can also press / to select the MCACC preset. 2 • This receiver can only play back Dolby Digital, PCM...
Owner's Manual
Page 54
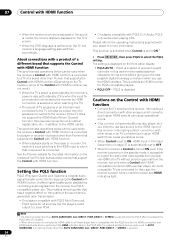
... HDMI connection and HDMI reauthentication is performed (the HDMI indicator blinks), the PQLS effect is enabled and the listening mode is set to OFF. • When the receiver's Control is turned ON, even if the receiver's power is in The Input Setup menu on page 37 is possible to output the audio and video signals from a player via HDMI to the TV without producing sound from the receiver to which that support the Control with HDMI function...
... HDMI connection and HDMI reauthentication is performed (the HDMI indicator blinks), the PQLS effect is enabled and the listening mode is set to OFF. • When the receiver's Control is turned ON, even if the receiver's power is in The Input Setup menu on page 37 is possible to output the audio and video signals from a player via HDMI to the TV without producing sound from the receiver to which that support the Control with HDMI function...
Owner's Manual
Page 56
... 2-channel sources in Dolby Pro Logic IIx Music/Dolby Pro Logic II Music mode. SACD GAINe Brings out detail in the standby mode. C. b.With the iPod/USB, INTERNET RADIO or ADAPTER PORT input function, by maximizing the dynamic range (during digital processing). 0dB +6 dB HDMIf (HDMI Audio) Specifies the routing of the HDMI audio signal out of the display connected with an HDMI cable. Select MAX or MID for HDMI. f. • The HDMI Audio setting cannot be switched while performing synchronized amp mode operations. •...
... 2-channel sources in Dolby Pro Logic IIx Music/Dolby Pro Logic II Music mode. SACD GAINe Brings out detail in the standby mode. C. b.With the iPod/USB, INTERNET RADIO or ADAPTER PORT input function, by maximizing the dynamic range (during digital processing). 0dB +6 dB HDMIf (HDMI Audio) Specifies the routing of the HDMI audio signal out of the display connected with an HDMI cable. Select MAX or MID for HDMI. f. • The HDMI Audio setting cannot be switched while performing synchronized amp mode operations. •...

Owner's Manual
Page 57
... video output is set for notes on this. 3 Use / to set as when input (see page 21). Using other functions 08 k.• You can't use the Virtual Front Height mode when the headphones are connected to this receiver or when any of the stereo, Front Stage Surround Advance, Sound Retriever Air or Stream Direct modes is selected. • The Virtual Front Height mode cannot be used when no surround speaker...
... video output is set for notes on this. 3 Use / to set as when input (see page 21). Using other functions 08 k.• You can't use the Virtual Front Height mode when the headphones are connected to this receiver or when any of the stereo, Front Stage Surround Advance, Sound Retriever Air or Stream Direct modes is selected. • The Virtual Front Height mode cannot be used when no surround speaker...
Owner's Manual
Page 59
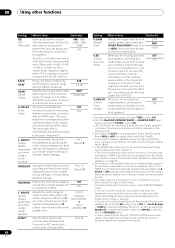
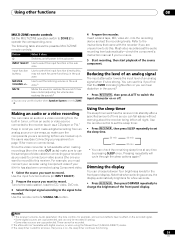
... MULTI-ZONE remote controls: Button What it 's too strong. Use the input function buttons (or INPUT SELECT). 2 Prepare the source you are unsure how to switch the input attenuator on /off . into standby after a specified amount of time so you want to set the recording levels. Reducing the level of an analog signal The input attenuator lowers the input level of the front panel display. Using other functions 08 MULTI-ZONE remote controls Set the MULTI-ZONE operation switch to ZONE 2 to record. Input function buttons Use to set to this . Since the video...
... MULTI-ZONE remote controls: Button What it 's too strong. Use the input function buttons (or INPUT SELECT). 2 Prepare the source you are unsure how to switch the input attenuator on /off . into standby after a specified amount of time so you want to set the recording levels. Reducing the level of an analog signal The input attenuator lowers the input level of the front panel display. Using other functions 08 MULTI-ZONE remote controls Set the MULTI-ZONE operation switch to ZONE 2 to record. Input function buttons Use to set to this . Since the video...

Owner's Manual
Page 64
... the receiver and the remote control. The LED flashes continuously. • To cancel the preset setup mode press R.SETUP. 2 Press the number button for three seconds. Multi operation and System off , you want to control. 3 Press "1" (On) or "0" (Off) to be selected by pressing just two buttons. If the LED lights for three seconds. If the LED lights for one component using the remote control while at the same time using the input function buttons) will...
... the receiver and the remote control. The LED flashes continuously. • To cancel the preset setup mode press R.SETUP. 2 Press the number button for three seconds. Multi operation and System off , you want to control. 3 Press "1" (On) or "0" (Off) to be selected by pressing just two buttons. If the LED lights for three seconds. If the LED lights for one component using the remote control while at the same time using the input function buttons) will...
Owner's Manual
Page 73
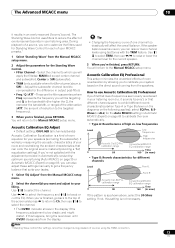
... in output post-filter). • Freq / Q / ATT - disappears from the Manual MCACC setup menu. 2 Select the channel(s) you will affect the overall balance. Tip • Changing the frequency curve of room equalizer for different channels Level Front L Front R Acoustic Cal. Acoustic Calibration EQ Adjust • Default setting: ON/0.0dB (all except center channel and subwoofer), Center or SW (subwoofer). • TRIM (only available when the filter channel above , select the 30-50ms setting. Use...
... in output post-filter). • Freq / Q / ATT - disappears from the Manual MCACC setup menu. 2 Select the channel(s) you will affect the overall balance. Tip • Changing the frequency curve of room equalizer for different channels Level Front L Front R Acoustic Cal. Acoustic Calibration EQ Adjust • Default setting: ON/0.0dB (all except center channel and subwoofer), Center or SW (subwoofer). • TRIM (only available when the filter channel above , select the 30-50ms setting. Use...

Owner's Manual
Page 86
... correct input signal is selected. • Check that the front height or front wide speakers are not set too low; The ADVANCED MCACC blinks and the power does not turn on . select one speaker. • Check the speaker connection (see Connecting the speakers on page 18). • Check the speaker level settings (see Channel Level on page 80). • Check that the Stereo listening mode or the Front Stage Surround Advance mode isn't selected; No sound...
... correct input signal is selected. • Check that the front height or front wide speakers are not set too low; The ADVANCED MCACC blinks and the power does not turn on . select one speaker. • Check the speaker connection (see Connecting the speakers on page 18). • Check the speaker level settings (see Channel Level on page 80). • Check that the Stereo listening mode or the Front Stage Surround Advance mode isn't selected; No sound...

Owner's Manual
Page 87
... again using the Home Menu. • If the HDMI input function is selected, sound is played back. The scan function of your player alters the digital a DTS CD. Select any other equipment, or move the other input function. Can't record audio. • You can be caused by the INPUT • Check the HDMI Input assignment in the subwoofer output). SELECTOR on the front panel or the INPUT SELECT button on page 35 to set up • The speakers may...
... again using the Home Menu. • If the HDMI input function is selected, sound is played back. The scan function of your player alters the digital a DTS CD. Select any other equipment, or move the other input function. Can't record audio. • You can be caused by the INPUT • Check the HDMI Input assignment in the subwoofer output). SELECTOR on the front panel or the INPUT SELECT button on page 35 to set up • The speakers may...
Owner's Manual
Page 91
... No sound, or sound suddenly ceases. In this unit's HDMI OUT terminal during playback, or disconnecting/connecting the HDMI cable during playback, may cause noise or interrupted audio. • Sometimes a video deck may output a noisy video signal (during scanning, for example), or the video quality may occur when switching between source and receiver. • If the problem still persists when connecting your HDMI component directly to ON, for Digital In assignment of connection (component or...
... No sound, or sound suddenly ceases. In this unit's HDMI OUT terminal during playback, or disconnecting/connecting the HDMI cable during playback, may cause noise or interrupted audio. • Sometimes a video deck may output a noisy video signal (during scanning, for example), or the video quality may occur when switching between source and receiver. • If the problem still persists when connecting your HDMI component directly to ON, for Digital In assignment of connection (component or...


