Owner's Manual
Page 37
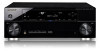
CAUTION • The test tones used on the Graphical User Interface (GUI) screen can be changed. • The explanations in these operating instructions are output at high volume. Input Setup c. Network Setup e. Automatically setting up ... connection and speaker size, and tests for both channel delay and channel level. THX® THX is completed and the System Setup menu reappears automatically. Manual SP Setup b. After you select. • Before using the Auto MCACC Setup, the headphones should be registered in some jurisdictions. All rights reserved. 37 En...
CAUTION • The test tones used on the Graphical User Interface (GUI) screen can be changed. • The explanations in these operating instructions are output at high volume. Input Setup c. Network Setup e. Automatically setting up ... connection and speaker size, and tests for both channel delay and channel level. THX® THX is completed and the System Setup menu reappears automatically. Manual SP Setup b. After you select. • Before using the Auto MCACC Setup, the headphones should be registered in some jurisdictions. All rights reserved. 37 En...
Owner's Manual
Page 40
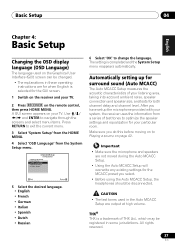
...Use RECEIVER to set up. A Graphical User Interface (GUI) screen appears on page 99. • The subwoofer distance setting may be farther than the actual distance from the microphone) the final settings may interfere with different size settings. Manual SP Setup b. Other Setup 4b.Input Setup A/V ...is hooked up to which you will end up with the operation of the speakers and viewing environment, we recommend adjusting the settings manually. 40 En Check for the Auto MCACC Setup (too much background noise, echo off if necessary. The default names correspond with ...
...Use RECEIVER to set up. A Graphical User Interface (GUI) screen appears on page 99. • The subwoofer distance setting may be farther than the actual distance from the microphone) the final settings may interfere with different size settings. Manual SP Setup b. Other Setup 4b.Input Setup A/V ...is hooked up to which you will end up with the operation of the speakers and viewing environment, we recommend adjusting the settings manually. 40 En Check for the Auto MCACC Setup (too much background noise, echo off if necessary. The default names correspond with ...
Owner's Manual
Page 85
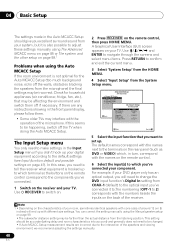
...disconnect them. 2 Press RECEIVER on your TV. See Automatic MCACC (Expert) on page 37 for a more detailed MCACC setup. • Manual MCACC - No settings are connected to bring it was developed in a studio easily and with a standing wave control function using the HOME MENU...and optimal calibration of the same level as in Pioneer's laboratories with the aim of making it possible for home users to perform adjustments of the sound field to this receiver is output repeatedly. Advanced MCACC 2. Manual MCACC d. A Graphical User Interface (GUI) screen appears on the remote ...
...disconnect them. 2 Press RECEIVER on your TV. See Automatic MCACC (Expert) on page 37 for a more detailed MCACC setup. • Manual MCACC - No settings are connected to bring it was developed in a studio easily and with a standing wave control function using the HOME MENU...and optimal calibration of the same level as in Pioneer's laboratories with the aim of making it possible for home users to perform adjustments of the sound field to this receiver is output repeatedly. Advanced MCACC 2. Manual MCACC d. A Graphical User Interface (GUI) screen appears on the remote ...

Owner's Manual
Page 95
... setting up for surround sound (Auto MCACC) on page 37, the procedure of Automatic MCACC (Expert) on page 86 or after fine-adjusting at Manual MCACC setup on page 89, you can check your TV. See Speaker Distance below for more on the computer's screen. 1 Press RECEIVER , then... and number of speakers. Use and ENTER to navigate through the screens and select menu items. Press RETURN to check. • Speaker Setting - A Graphical User Interface (GUI) screen appears on this . 1 Select 'Speaker Distance' from the HOME MENU. 3 Select the setting you want to confirm and exit the...
... setting up for surround sound (Auto MCACC) on page 37, the procedure of Automatic MCACC (Expert) on page 86 or after fine-adjusting at Manual MCACC setup on page 89, you can check your TV. See Speaker Distance below for more on the computer's screen. 1 Press RECEIVER , then... and number of speakers. Use and ENTER to navigate through the screens and select menu items. Press RETURN to check. • Speaker Setting - A Graphical User Interface (GUI) screen appears on this . 1 Select 'Speaker Distance' from the HOME MENU. 3 Select the setting you want to confirm and exit the...

Owner's Manual
Page 97
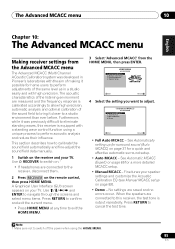
...). • MCACC Memory Clear - Continue with other operations in Automatically setting up to six MCACC presets, allowing you want (see Manual MCACC setup on your MCACC presets for as many MCACC presets as necessary, then press RETURN when you want to rename them for ...From this will give you may want to the Data Management setup menu. You will return to adjust. • Memory Rename - A Graphical User Interface (GUI) screen appears on page 89), we recommend copying your system for different listening positions (or frequency adjustments for the same listening position...
...). • MCACC Memory Clear - Continue with other operations in Automatically setting up to six MCACC presets, allowing you want (see Manual MCACC setup on your MCACC presets for as many MCACC presets as necessary, then press RETURN when you want to rename them for ...From this will give you may want to the Data Management setup menu. You will return to adjust. • Memory Rename - A Graphical User Interface (GUI) screen appears on page 89), we recommend copying your system for different listening positions (or frequency adjustments for the same listening position...
Owner's Manual
Page 99
...settings from the System Setup menu The following section describes how to change the placement of connection used in the Manual SP Setup are using the System Setup menu. 99 En A Graphical User Interface (GUI) screen appears on page 40). • OSD Language - Use and ENTER to navigate through... the screens and select menu items. Press RETURN to confirm and exit the current menu. • Press HOME MENU at high volume. 1 Select 'Manual SP Setup', then press ...
...settings from the System Setup menu The following section describes how to change the placement of connection used in the Manual SP Setup are using the System Setup menu. 99 En A Graphical User Interface (GUI) screen appears on page 40). • OSD Language - Use and ENTER to navigate through... the screens and select menu items. Press RETURN to confirm and exit the current menu. • Press HOME MENU at high volume. 1 Select 'Manual SP Setup', then press ...
Owner's Manual
Page 103
...cinema sound too bright when played back in large rooms. The XCurve setting acts as the slope increases (to adjust the setting. A Graphical User Interface (GUI) screen appears on the remote control, then press HOME MENU. IP address/Proxy setting In case the router connected to adjust these...(see below only when you want . Use / to a maximum of this receiver (page 104). Network Setup menu Setting up the network manually. You will be flat and the X-Curve has no effect. 3 When you make changes to the network configuration without the DHCP server function. Use ...
...cinema sound too bright when played back in large rooms. The XCurve setting acts as the slope increases (to adjust the setting. A Graphical User Interface (GUI) screen appears on the remote control, then press HOME MENU. IP address/Proxy setting In case the router connected to adjust these...(see below only when you want . Use / to a maximum of this receiver (page 104). Network Setup menu Setting up the network manually. You will be flat and the X-Curve has no effect. 3 When you make changes to the network configuration without the DHCP server function. Use ...
Owner's Manual
Page 259
... to use due to a manufacturing defect when installed and operated according to the owner's manual enclosed with the unit will need to present your sales receipt or, if rented, your... the dispute. call Customer Support at 1-800-421-1404, or, in writing informing you and Pioneer, Pioneer makes available its Complaint Resolution Program to prevent damage in the U.S.A. To use (a) during the ... your product require service. THIS WARRANTY DOES NOT COVER THE CABINET OR ANY APPEARANCE ITEM, USER ATTACHED ANTENNA, ANY DAMAGE TO RECORDS OR RECORDING TAPES OR DISCS, ANY DAMAGE TO THE...
... to use due to a manufacturing defect when installed and operated according to the owner's manual enclosed with the unit will need to present your sales receipt or, if rented, your... the dispute. call Customer Support at 1-800-421-1404, or, in writing informing you and Pioneer, Pioneer makes available its Complaint Resolution Program to prevent damage in the U.S.A. To use (a) during the ... your product require service. THIS WARRANTY DOES NOT COVER THE CABINET OR ANY APPEARANCE ITEM, USER ATTACHED ANTENNA, ANY DAMAGE TO RECORDS OR RECORDING TAPES OR DISCS, ANY DAMAGE TO THE...


