
Owner's Manual
Page 1
... RECEIVER VSX-1017TXV-K Register your product at http://www.pioneerelectronics.com (US) http://www.pioneerelectronics.ca (Canada) • Protect your new investment The details of your purchase will be on file for reference in the event of an insurance claim such as loss or theft. • Receive ...free tips, updates and service bulletins on your new product • Improve product development Your input helps us continue to design products that meet your needs. • Receive a free Pioneer newsletter Registered customers can opt in to...
... RECEIVER VSX-1017TXV-K Register your product at http://www.pioneerelectronics.com (US) http://www.pioneerelectronics.ca (Canada) • Protect your new investment The details of your purchase will be on file for reference in the event of an insurance claim such as loss or theft. • Receive ...free tips, updates and service bulletins on your new product • Improve product development Your input helps us continue to design products that meet your needs. • Receive a free Pioneer newsletter Registered customers can opt in to...
Owner's Manual
Page 2
... no guarantee that may cause harmful interference to other reproductive harm. Product Name: AUDIO/VIDEO MULTI-CHANNEL RECEIVER Model Number: VSX-1017TXV-K Responsible Party Name: PIONEER ELECTRONICS SERVICE, INC. If this product or cords associated with accessories sold with the limits for a ...SERIAL NUMBER FOR THIS EQUIPMENT IS LOCATED IN THE REAR. However, there is connected. - Increase the separation between the equipment and receiver. - ATTENTION - and Australia Model C67-7-3_En TO PREVENT ELECTRIC SHOCK, DO NOT USE THIS (POLARIZED) PLUG WITH AN EXTENSION ...
... no guarantee that may cause harmful interference to other reproductive harm. Product Name: AUDIO/VIDEO MULTI-CHANNEL RECEIVER Model Number: VSX-1017TXV-K Responsible Party Name: PIONEER ELECTRONICS SERVICE, INC. If this product or cords associated with accessories sold with the limits for a ...SERIAL NUMBER FOR THIS EQUIPMENT IS LOCATED IN THE REAR. However, there is connected. - Increase the separation between the equipment and receiver. - ATTENTION - and Australia Model C67-7-3_En TO PREVENT ELECTRIC SHOCK, DO NOT USE THIS (POLARIZED) PLUG WITH AN EXTENSION ...

Owner's Manual
Page 4
...34 Listening to station presets 34 07 The System Setup menu Making receiver settings from the System Setup menu 35 Surround back speaker setting 35... 12 Connecting your TV and DVD player 13 Connecting a satellite/cable receiver or other set-top box 13 Connecting a DVD/HDD recorder, VCR... 20 Connecting antennas 20 Connecting external antennas 21 Plugging in the receiver 21 AC outlet 21 04 Controls and displays Front panel 22 ...Checking what's in the box 7 Ventilation 7 Installing the receiver 7 Loading the batteries 7 02 5 minute guide Introduction to home theater 8 Listening to...
...34 Listening to station presets 34 07 The System Setup menu Making receiver settings from the System Setup menu 35 Surround back speaker setting 35... 12 Connecting your TV and DVD player 13 Connecting a satellite/cable receiver or other set-top box 13 Connecting a DVD/HDD recorder, VCR... 20 Connecting antennas 20 Connecting external antennas 21 Plugging in the receiver 21 AC outlet 21 04 Controls and displays Front panel 22 ...Checking what's in the box 7 Ventilation 7 Installing the receiver 7 Loading the batteries 7 02 5 minute guide Introduction to home theater 8 Listening to...

Owner's Manual
Page 5
... 48 Bi-amping your front speakers 49 Bi-wiring your system Setting the remote to use in a restaurant or use for other Pioneer components with this unit's sensor 61 12 Additional information Troubleshooting 62 Power 62 No sound 62 Other audio problems 63 Video 64 Settings... the speaker impedance 56 Resetting the system 56 11 Controlling the rest of your speakers 49 Connecting additional amplifiers 50 Using this receiver with a Pioneer plasma display 50 Using the SR+ mode with different input signal formats 70 Specifications 72 Cleaning the unit 72 This product is...
... 48 Bi-amping your front speakers 49 Bi-wiring your system Setting the remote to use in a restaurant or use for other Pioneer components with this unit's sensor 61 12 Additional information Troubleshooting 62 Power 62 No sound 62 Other audio problems 63 Video 64 Settings... the speaker impedance 56 Resetting the system 56 11 Controlling the rest of your speakers 49 Connecting additional amplifiers 50 Using this receiver with a Pioneer plasma display 50 Using the SR+ mode with different input signal formats 70 Specifications 72 Cleaning the unit 72 This product is...

Owner's Manual
Page 6
...covering every aspect of the product. 01 Before you start Chapter 1: Before you start Features • Advanced Direct Energy design This receiver offers a new advancement in Dolby Pro Logic IIx and DTS Neo:6 decoders not only provide full surround sound decoding for Dolby Surround ... pre-amplifier and power amplifier performance and operation, and hundreds of other components in no time, now that this receiver's enhanced compatibility makes on Pioneer's unique Phase Control Technology, the Phase Control feature incorporated into your home with up for home theater sound is compatible...
...covering every aspect of the product. 01 Before you start Chapter 1: Before you start Features • Advanced Direct Energy design This receiver offers a new advancement in Dolby Pro Logic IIx and DTS Neo:6 decoders not only provide full surround sound decoding for Dolby Surround ... pre-amplifier and power amplifier performance and operation, and hundreds of other components in no time, now that this receiver's enhanced compatibility makes on Pioneer's unique Phase Control Technology, the Phase Control feature incorporated into your home with up for home theater sound is compatible...
Owner's Manual
Page 7
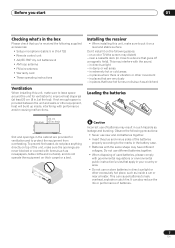
... DOWN Caution Incorrect use or store batteries in such hazards as a kitchen) Loading the batteries 20 cm Receiver (8 inches) Slot and openings in damp or wet areas - Installing the receiver • When installing this unit, make sure to leave space around the unit for ventilation and to protect... may have hot fumes or oils (such as leakage and bursting. Before you start 01 Checking what's in the box Please check that you've received the following supplied accessories: • Setup microphone (cable: 5 m (16.4 ft.)) • Remote control unit • AA/IEC R6P dry cell batteries ...
... DOWN Caution Incorrect use or store batteries in such hazards as a kitchen) Loading the batteries 20 cm Receiver (8 inches) Slot and openings in damp or wet areas - Installing the receiver • When installing this unit, make sure to leave space around the unit for ventilation and to protect... may have hot fumes or oils (such as leakage and bursting. Before you start 01 Checking what's in the box Please check that you've received the following supplied accessories: • Setup microphone (cable: 5 m (16.4 ft.)) • Remote control unit • AA/IEC R6P dry cell batteries ...

Owner's Manual
Page 8
...Setup, make changes for your particular room. Make sure you do this . The surround sound you get from the DVD player to the receiver. 2 Connect your speakers and place them for the best surround sound effect. Where you place the speakers will automatically decode multichannel Dolby ... and speakers are disconnected from the System Setup menu on this unit to complete all . Caution • The test tones used in the receiver's display, indicating that the headphones are not moved during the Auto MCACC Setup. • Before using a digital connection from a home theater...
...Setup, make changes for your particular room. Make sure you do this . The surround sound you get from the DVD player to the receiver. 2 Connect your speakers and place them for the best surround sound effect. Where you place the speakers will automatically decode multichannel Dolby ... and speakers are disconnected from the System Setup menu on this unit to complete all . Caution • The test tones used in the receiver's display, indicating that the headphones are not moved during the Auto MCACC Setup. • Before using a digital connection from a home theater...

Owner's Manual
Page 9
...press ENTER. Auto MCACC EQ TYPE TYPE1 • • ALL CH ADJUST Enter : Start : Cancel 5 Follow the instructions on -screen while the receiver outputs test tones to Surround Sound above indicates (in your TV. Try to be changed. 9 En In this .4 If no operations are no obstacles ... microphone so that it 's doing this case, you excellent surround sound from the listening position. A progress report is displayed on-screen while the receiver outputs more test tones to be a problem with different size settings. Select 'SKIP' to go to the next step. For details on the ...
...press ENTER. Auto MCACC EQ TYPE TYPE1 • • ALL CH ADJUST Enter : Start : Cancel 5 Follow the instructions on -screen while the receiver outputs test tones to Surround Sound above indicates (in your TV. Try to be changed. 9 En In this .4 If no operations are no obstacles ... microphone so that it 's doing this case, you excellent surround sound from the listening position. A progress report is displayed on-screen while the receiver outputs more test tones to be a problem with different size settings. Select 'SKIP' to go to the next step. For details on the ...

Owner's Manual
Page 10
...If this ) if you want multichannel surround sound. 4 Phase matching is on and we recommend leaving Phase Control switched on phase correction. RECEIVER INPUT SELECT SYSTEM OFF SOURCE GUIDE TV CONTROL TV VOL INPUT SELECT TV CH VOL Sound source Subwoofer PHASE CONTROL ON Front speaker Listening position... DTS and 88.2 kHz / 96 kHz PCM (2 channel) audio, and if there is now selected.) 2 If you have one), then the receiver (press RECEIVER). • Make sure the setup mic is coming from the microphone) the final settings may interfere with your TV so that all sound sources. ...
...If this ) if you want multichannel surround sound. 4 Phase matching is on and we recommend leaving Phase Control switched on phase correction. RECEIVER INPUT SELECT SYSTEM OFF SOURCE GUIDE TV CONTROL TV VOL INPUT SELECT TV CH VOL Sound source Subwoofer PHASE CONTROL ON Front speaker Listening position... DTS and 88.2 kHz / 96 kHz PCM (2 channel) audio, and if there is now selected.) 2 If you have one), then the receiver (press RECEIVER). • Make sure the setup mic is coming from the microphone) the final settings may interfere with your TV so that all sound sources. ...

Owner's Manual
Page 11
... page 44. 3 Coaxial digital audio inputs (x2) Use for digital audio sources, including DVD players/recorders, digital satellite receivers, CD players, etc. Operating other Pioneer components with many connection possibilities, but it doesn't have to make up your home theater system. Connecting analog audio sources... digital audio sources on page 20. 11 En Use the IN jacks for digital audio sources, including DVD players/ recorders, digital satellite receivers, CD players, etc. Use the output for connection to a monitor or TV. Each set of components you can control all your Apple...
... page 44. 3 Coaxial digital audio inputs (x2) Use for digital audio sources, including DVD players/recorders, digital satellite receivers, CD players, etc. Operating other Pioneer components with many connection possibilities, but it doesn't have to make up your home theater system. Connecting analog audio sources... digital audio sources on page 20. 11 En Use the IN jacks for digital audio sources, including DVD players/ recorders, digital satellite receivers, CD players, etc. Use the output for connection to a monitor or TV. Each set of components you can control all your Apple...
Owner's Manual
Page 12
...to damage the shutter protecting the optical socket. • When storing optical cable, coil loosely. Power to a DVD player with the receiver. Note 1 You must be damaged if bent around sharp corners. In this copyright protection technology must connect your monitor/TV to connect ... the outlet switches on or off with multichannel analog outputs. 03 Connecting your equipment 11 Multichannel pre-amplifier outputs Use to the receiver's HDMI/component video outputs when connecting these video sources. About the video converter When the video converter is prohibited. Use of...
...to damage the shutter protecting the optical socket. • When storing optical cable, coil loosely. Power to a DVD player with the receiver. Note 1 You must be damaged if bent around sharp corners. In this copyright protection technology must connect your monitor/TV to connect ... the outlet switches on or off with multichannel analog outputs. 03 Connecting your equipment 11 Multichannel pre-amplifier outputs Use to the receiver's HDMI/component video outputs when connecting these video sources. About the video converter When the video converter is prohibited. Use of...
Owner's Manual
Page 13
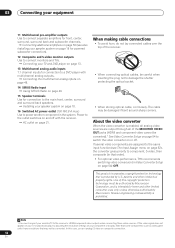
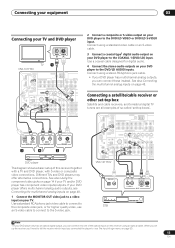
...DVR/VCR1 VSX-1017TXV AM LOOP L OUT PR CENTER L IN 3 R SUB R FRONT WOOFER OUT IN MONITOR OUT OUT IN L DVR/VCR2 R FRONT MULTI CH DIGITAL OUT R AUDIO L VIDEO S-VIDEO AV OUT STB Note 1 If your TV. When you set up the receiver you'll need to tell the receiver which ...The diagram shows a basic setup of this receiver using an optical cable. Different TVs and DVD players may offer alternative connections. See also Connecting the multichannel analog inputs on page 14 if your TV and DVD player VIDEO S-VIDEO IN IN TV 1 VSX-1017TXV OPTICAL DIGITAL ANTENNA IN 1 (DVD/LD)...
...DVR/VCR1 VSX-1017TXV AM LOOP L OUT PR CENTER L IN 3 R SUB R FRONT WOOFER OUT IN MONITOR OUT OUT IN L DVR/VCR2 R FRONT MULTI CH DIGITAL OUT R AUDIO L VIDEO S-VIDEO AV OUT STB Note 1 If your TV. When you set up the receiver you'll need to tell the receiver which ...The diagram shows a basic setup of this receiver using an optical cable. Different TVs and DVD players may offer alternative connections. See also Connecting the multichannel analog inputs on page 14 if your TV and DVD player VIDEO S-VIDEO IN IN TV 1 VSX-1017TXV OPTICAL DIGITAL ANTENNA IN 1 (DVD/LD)...
Owner's Manual
Page 14
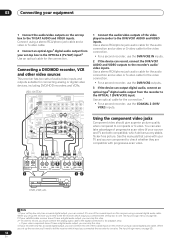
... device can output digital audio, connect an optical-type3 digital audio output from your set-top box to the DVR/VCR1 AUDIO and VIDEO inputs. VSX-1017TXV OPTICAL DIGITAL ANTENNA IN 1 (DVD/LD) IN 2 (TV/SAT) OUT IN 1 (DVR/ VCR1) IN 2 (TV/SAT) IN 3 (CD) COMPONENT VIDEO Y PB..., flicker-free picture. 03 Connecting your equipment 1 Connect the audio/video outputs on this receiver using a coaxial digital audio cable. OPTICAL COAXIAL DIGITAL OUT 3 R AUDIO L VIDEO S-VIDEO AV IN R AUDIO L VIDEO S-VIDEO AV OUT 12 DVR, VCR, etc. You can also take advantage of progressive scan video (...
... device can output digital audio, connect an optical-type3 digital audio output from your set-top box to the DVR/VCR1 AUDIO and VIDEO inputs. VSX-1017TXV OPTICAL DIGITAL ANTENNA IN 1 (DVD/LD) IN 2 (TV/SAT) OUT IN 1 (DVR/ VCR1) IN 2 (TV/SAT) IN 3 (CD) COMPONENT VIDEO Y PB..., flicker-free picture. 03 Connecting your equipment 1 Connect the audio/video outputs on this receiver using a coaxial digital audio cable. OPTICAL COAXIAL DIGITAL OUT 3 R AUDIO L VIDEO S-VIDEO AV IN R AUDIO L VIDEO S-VIDEO AV OUT 12 DVR, VCR, etc. You can also take advantage of progressive scan video (...

Owner's Manual
Page 15
...ASSIGNABLE 12 OUT IN IN IN OUT IN CD-R/TAPE/MD DVD/LD TV/SAT DVR/VCR1 AM L OUT IN 3 R OUT OUT DVR/ VSX-1017TXV Y PB PR 1 COMPONENT VIDEO DVD player 1 Connect the component video outputs of your source to an HDMI interconnect on an HDMI-compatible monitor...this receiver with a composite video, component video or S-video cable. • For optimum performance, the output settings for an HDMI component (screen resolution, the DeepColor feature, etc.) should be facing right for limitations), Video CD/Super VCD, CD and MP3. Connecting your equipment 03 VSX-1017TXV OPTICAL...
...ASSIGNABLE 12 OUT IN IN IN OUT IN CD-R/TAPE/MD DVD/LD TV/SAT DVR/VCR1 AM L OUT IN 3 R OUT OUT DVR/ VSX-1017TXV Y PB PR 1 COMPONENT VIDEO DVD player 1 Connect the component video outputs of your source to an HDMI interconnect on an HDMI-compatible monitor...this receiver with a composite video, component video or S-video cable. • For optimum performance, the output settings for an HDMI component (screen resolution, the DeepColor feature, etc.) should be facing right for limitations), Video CD/Super VCD, CD and MP3. Connecting your equipment 03 VSX-1017TXV OPTICAL...

Owner's Manual
Page 16
... also have resolutions that some digital sources, you must connect to the audio jacks from a set of the coaxial inputs on your component or display. VSX-1017TXV OPTICAL DIGITAL ANTENNA IN 1 (DVD/LD) IN 2 (TV/SAT) OUT IN 1 (DVR/ VCR1) IN 2 (TV/SAT) IN 3 (CD) COMPONENT VIDEO Y PB PR... with HDTV signals), one connector (instead of several cables and connectors), and communication between the AV source and AV devices such as necessary. See Connecting analog audio sources on this receiver. Note that may not be connected to any spare digital audio inputs on the following page ...
... also have resolutions that some digital sources, you must connect to the audio jacks from a set of the coaxial inputs on your component or display. VSX-1017TXV OPTICAL DIGITAL ANTENNA IN 1 (DVD/LD) IN 2 (TV/SAT) OUT IN 1 (DVR/ VCR1) IN 2 (TV/SAT) IN 3 (CD) COMPONENT VIDEO Y PB PR... with HDTV signals), one connector (instead of several cables and connectors), and communication between the AV source and AV devices such as necessary. See Connecting analog audio sources on this receiver. Note that may not be connected to any spare digital audio inputs on the following page ...

Owner's Manual
Page 17
... VIDEO/ GAME. FRONT WOOFER ROUND OUT SIRIU IN MONITOR OUT OUT IN L CENTER DVR/VCR2 R FRONT SUB WOOFER MULTI CH IN VSX-1017TXV VIDEO OUTPUT DIGITAL OUT TV game, video camera, etc. • Select these connections for portable equipment such as camcorders, video games...audio signals through a coaxial or optical digital output. Connecting a component to a WMA9 Pro-compatible player. Connecting analog audio sources This receiver features two stereo audio-only inputs. Connect using a coaxial or optical digital connection when connected to the front panel inputs The front panel...
... VIDEO/ GAME. FRONT WOOFER ROUND OUT SIRIU IN MONITOR OUT OUT IN L CENTER DVR/VCR2 R FRONT SUB WOOFER MULTI CH IN VSX-1017TXV VIDEO OUTPUT DIGITAL OUT TV game, video camera, etc. • Select these connections for portable equipment such as camcorders, video games...audio signals through a coaxial or optical digital output. Connecting a component to a WMA9 Pro-compatible player. Connecting analog audio sources This receiver features two stereo audio-only inputs. Connect using a coaxial or optical digital connection when connected to the front panel inputs The front panel...
Owner's Manual
Page 18
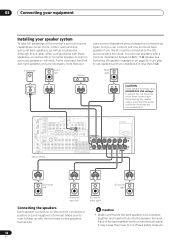
... Switching the speaker impedance on the receiver comprises a positive (+) and negative (-) terminal. SURROUND WOOFER ROUND BACK MULTI CH IN CENTER AC OUTLET SWITCHED 100 W(0.8 A) MAX R SURROUND L SURROUND BACK / B R L (Single) SEE INSTRUCTION MANUAL SELECTABLE VSX-1017TXV Surround left Surround right Surround back left...a pair, but you can use speakers with a nominal impedance between 6 Ω to use speakers with an impedance of the receiver's surround sound capabilities connect front, center, surround and surround back speakers, as well as a safety measure. 18 En Make sure...
... Switching the speaker impedance on the receiver comprises a positive (+) and negative (-) terminal. SURROUND WOOFER ROUND BACK MULTI CH IN CENTER AC OUTLET SWITCHED 100 W(0.8 A) MAX R SURROUND L SURROUND BACK / B R L (Single) SEE INSTRUCTION MANUAL SELECTABLE VSX-1017TXV Surround left Surround right Surround back left...a pair, but you can use speakers with a nominal impedance between 6 Ω to use speakers with an impedance of the receiver's surround sound capabilities connect front, center, surround and surround back speakers, as well as a safety measure. 18 En Make sure...
Owner's Manual
Page 21
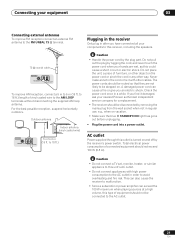
...be stepped on the power cord or pinch the cord in a while. If you an electric shock. Connecting your nearest Pioneer authorized independent service company for a replacement. • The receiver should not exceed 100 W (0.8 A). AC outlet Power supplied through this could cause a short circuit or electric shock....75 Ω AM LOOP To improve AM reception, connect a 5 m to the FM UNBAL 75 Ω terminal. This can also cause the receiver to malfunction. • Since a subwoofer or power amplifier can cause a fire or give you find it with high power consumption to the AC outlet...
...be stepped on the power cord or pinch the cord in a while. If you an electric shock. Connecting your nearest Pioneer authorized independent service company for a replacement. • The receiver should not exceed 100 W (0.8 A). AC outlet Power supplied through this could cause a short circuit or electric shock....75 Ω AM LOOP To improve AM reception, connect a 5 m to the FM UNBAL 75 Ω terminal. This can also cause the receiver to malfunction. • Since a subwoofer or power amplifier can cause a fire or give you find it with high power consumption to the AC outlet...

Owner's Manual
Page 22
... (for example, it disappears when listening through the multichannel analog inputs). 7 Character display See Display on page 24. 8 Remote sensor Receives the signals from the remote control (see Operating range of remote control unit on /off Phase Control(page 10). LISTENING MODE Use with...and standby. 04 Controls and displays Chapter 4: Controls and displays Front panel 12 3 4 56 7 8 9 10 AUDIO/VIDEO MULTI-CHANNEL RECEIVER VSX-1017TXV STANDBY/ON PHASE CONTROL PHASE ACOUSTIC LISTENING CONTROL EQ MODE DIGITAL PRECISION PROCESSING DVD / LD TV / SAT DVR/VCR 1 DVR/VCR 2 VIDEO...
... (for example, it disappears when listening through the multichannel analog inputs). 7 Character display See Display on page 24. 8 Remote sensor Receives the signals from the remote control (see Operating range of remote control unit on /off Phase Control(page 10). LISTENING MODE Use with...and standby. 04 Controls and displays Chapter 4: Controls and displays Front panel 12 3 4 56 7 8 9 10 AUDIO/VIDEO MULTI-CHANNEL RECEIVER VSX-1017TXV STANDBY/ON PHASE CONTROL PHASE ACOUSTIC LISTENING CONTROL EQ MODE DIGITAL PRECISION PROCESSING DVD / LD TV / SAT DVR/VCR 1 DVR/VCR 2 VIDEO...

Owner's Manual
Page 23
...with another infrared remote control unit. 30 30 DOWN DOWN 7 m (23 ft.) 23 En When the headphones are obstacles between the remote control and the receiver's remote sensor. • Direct sunlight or fluorescent light is shining onto the remote sensor. • The... receiver is located near a device that is emitting infrared rays. • The receiver is no sound output from the speakers. 13 Input source buttons Press to select an input source. 14 VIDEO/GAME INPUT See Connecting a ...
...with another infrared remote control unit. 30 30 DOWN DOWN 7 m (23 ft.) 23 En When the headphones are obstacles between the remote control and the receiver's remote sensor. • Direct sunlight or fluorescent light is shining onto the remote sensor. • The... receiver is located near a device that is emitting infrared rays. • The receiver is no sound output from the speakers. 13 Input source buttons Press to select an input source. 14 VIDEO/GAME INPUT See Connecting a ...


