
Owner s Manual
Page 5
...settings...99 Controlling components...100 11 The MCACC PRO menu Making receiver settings from the MCACC PRO menu 103 Automatic MCACC (Expert)...103 Manual MCACC setup...105 Checking MCACC Data...107 Data Management...108 12 The System Setup and Other Setup menus Making receiver settings from the System... Setup menu 110 Manual speaker setup...110 MHL Setup...112 The Other Setup menu...112 Making network settings using Safari...115 Using Safari to set a friendly name...
...settings...99 Controlling components...100 11 The MCACC PRO menu Making receiver settings from the MCACC PRO menu 103 Automatic MCACC (Expert)...103 Manual MCACC setup...105 Checking MCACC Data...107 Data Management...108 12 The System Setup and Other Setup menus Making receiver settings from the System... Setup menu 110 Manual speaker setup...110 MHL Setup...112 The Other Setup menu...112 Making network settings using Safari...115 Using Safari to set a friendly name...

Owner s Manual
Page 8
...the subwoofer output can be adjusted and set independently. The quality of each speaker. 01 Before you start Our philosophy Pioneer is dedicated to making your taste by manual correction. % Virtual Speakers By turning on the 'Virtual Surround Back', 'Virtual Height', and 'Virtual Wide' modes, ... Dolby Atmos. Dolby Atmos is a new technology in the audio signal, a surround sound space is only available when the connected Pioneer Blu-ray Disc Player supports the PQLS function. % Independent dual subwoofer output The output for subwoofer output can be passed through real...
...the subwoofer output can be adjusted and set independently. The quality of each speaker. 01 Before you start Our philosophy Pioneer is dedicated to making your taste by manual correction. % Virtual Speakers By turning on the 'Virtual Surround Back', 'Virtual Height', and 'Virtual Wide' modes, ... Dolby Atmos. Dolby Atmos is a new technology in the audio signal, a surround sound space is only available when the connected Pioneer Blu-ray Disc Player supports the PQLS function. % Independent dual subwoofer output The output for subwoofer output can be passed through real...

Owner s Manual
Page 19
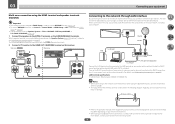
... the power outlet. Refer to The Input Setup menu on the device being connected unplugged from the explanations in should be difficult. Plugging in this manual. minal names may differ from the power outlets. ! Also refer to the receiver's different input terminals. The input functions below are used. Before making connections...
... the power outlet. Refer to The Input Setup menu on the device being connected unplugged from the explanations in should be difficult. Plugging in this manual. minal names may differ from the power outlets. ! Also refer to the receiver's different input terminals. The input functions below are used. Before making connections...

Owner s Manual
Page 26
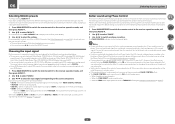
Please refer to the manual that connect the High to do not remove it may damage your speakers for bi-amping. Use an RCA cable to achieve more information. ! Connecting ...) and the sound improvement will depend on the receiver comprises a positive (+) and negative (-) terminal. If you could severely damage the amplifier. 03 Connecting your speaker manual for more powerful sound reproduction. Make sure to use speaker cables terminated with your speakers. 26 These speaker terminals carry HAZARDOUS LIVE voltage. To prevent...
Please refer to the manual that connect the High to do not remove it may damage your speakers for bi-amping. Use an RCA cable to achieve more information. ! Connecting ...) and the sound improvement will depend on the receiver comprises a positive (+) and negative (-) terminal. If you could severely damage the amplifier. 03 Connecting your speaker manual for more powerful sound reproduction. Make sure to use speaker cables terminated with your speakers. 26 These speaker terminals carry HAZARDOUS LIVE voltage. To prevent...

Owner s Manual
Page 38
... the receiver. Please refer to 4:4:4, the video image may be required for the TV. ! When the 4K/60p setting is changed to the TV's operation manual for directions on page 92 . Use the BD IN, HDMI IN 1 or HDMI IN 2 terminal. ! The HDMI OUT 3 terminal outputs 4K/60p 4:4:4 24 bit video...
... the receiver. Please refer to 4:4:4, the video image may be required for the TV. ! When the 4K/60p setting is changed to the TV's operation manual for directions on page 92 . Use the BD IN, HDMI IN 1 or HDMI IN 2 terminal. ! The HDMI OUT 3 terminal outputs 4K/60p 4:4:4 24 bit video...
Owner s Manual
Page 46
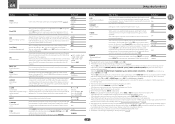
It is neccessary to set Control or Control Mode in HDMI Setup to OFF. Turn on your router. Refer to the operation manual of the equipment you have the built-in this way, you can listen to the LAN terminal on page 83 . ! For details, ...ISP (Internet Service Provider) beforehand. NETWORK HDMI OUT NETWORK Internet Modem NAS to LAN port Computer LAN 3 2 1 WAN Router to set up the network manually. Wireless antenna ! The settings must sign a contract with the wireless antenna upright. ! For details, see HDMI Setup on your speaker system on the ...
It is neccessary to set Control or Control Mode in HDMI Setup to OFF. Turn on your router. Refer to the operation manual of the equipment you have the built-in this way, you can listen to the LAN terminal on page 83 . ! For details, ...ISP (Internet Service Provider) beforehand. NETWORK HDMI OUT NETWORK Internet Modem NAS to LAN port Computer LAN 3 2 1 WAN Router to set up the network manually. Wireless antenna ! The settings must sign a contract with the wireless antenna upright. ! For details, see HDMI Setup on your speaker system on the ...

Owner s Manual
Page 48
... be disconnected by pressing the input function(s) you 've specified the input functions that will only work with your com- For details, see the manual supplied with other than that described below. ! CAUTION ! Check the power cord once in a while. Do not use any purpose other way....but also with switching of cable necessary for a replacement. ! Never make a knot in the cord or tie it damaged, ask your nearest Pioneer authorized independent service company for the connection. If you wish to use the supplied power cord for the connection. Please see HDMI Setup on ...
... be disconnected by pressing the input function(s) you 've specified the input functions that will only work with your com- For details, see the manual supplied with other than that described below. ! CAUTION ! Check the power cord once in a while. Do not use any purpose other way....but also with switching of cable necessary for a replacement. ! Never make a knot in the cord or tie it damaged, ask your nearest Pioneer authorized independent service company for the connection. If you wish to use the supplied power cord for the connection. Please see HDMI Setup on ...

Owner s Manual
Page 52
... or iPad (iOS version 7.1 or later) The wireless LAN settings for your computer or smart phone (wired LAN only) Automatically setting the connection Manually setting the connection Your computer or smart phone has a wireless LAN function A B C D E F G A Graphical User Interface (GUI) ...compatible only with this receiver Directly connect this receiver. ! Some network functions may want to initial factory settings (page 95 ), the WIRELESS indicator slowly flashes. Network Information - Network Connection - This part explains the connection settings for connection ...
... or iPad (iOS version 7.1 or later) The wireless LAN settings for your computer or smart phone (wired LAN only) Automatically setting the connection Manually setting the connection Your computer or smart phone has a wireless LAN function A B C D E F G A Graphical User Interface (GUI) ...compatible only with this receiver Directly connect this receiver. ! Some network functions may want to initial factory settings (page 95 ), the WIRELESS indicator slowly flashes. Network Information - Network Connection - This part explains the connection settings for connection ...

Owner s Manual
Page 53
... DNS Server and Secondary DNS Server. Check the setting value with a LAN cable (wired LAN) Simply connect the LAN cable. Also refer to the user's manual for the Enable Proxy Server setting to select 'Wired'. 3 Select 'OK', then press ENTER. Class A: 10.0.0.1 to 10.255.255.254 Class B: 172.16.0.1 to...
... DNS Server and Secondary DNS Server. Check the setting value with a LAN cable (wired LAN) Simply connect the LAN cable. Also refer to the user's manual for the Enable Proxy Server setting to select 'Wired'. 3 Select 'OK', then press ENTER. Class A: 10.0.0.1 to 10.255.255.254 Class B: 172.16.0.1 to...

Owner s Manual
Page 55
... wireless LAN is compatible with i/j, and press ENTER. 10 Enter the password or WEP KEY at i/j/k/l, and press ENTER. ! This receiver is to the user's manual of this receiver. 3 Enter the PIN code in the access point whose indicated PIN code is compatible with the PBC function, select 'PBC'. ! Moves the...
... wireless LAN is compatible with i/j, and press ENTER. 10 Enter the password or WEP KEY at i/j/k/l, and press ENTER. ! This receiver is to the user's manual of this receiver. 3 Enter the PIN code in the access point whose indicated PIN code is compatible with the PBC function, select 'PBC'. ! Moves the...

Owner s Manual
Page 56
... Safari on page 53 . Select 'YES' and press ENTER. "xxxxxxxx" represents a number unique to the WEP method. ! For your computer. [Pioneer Setup:xxxxxxxx] will be disabled for about 60 seconds. Because this method, your computer. ! This receiver will restart and the settings will be shown ...in the SSID field. In case Web Control is active. 10 Select 'OK', then press ENTER. 11 Select [Pioneer Setup] (this receiver to the respective user's manual. ! The on your computer, iPhone, tablet computer, or wireless equipment, refer to the address field on the remote controller...
... Safari on page 53 . Select 'YES' and press ENTER. "xxxxxxxx" represents a number unique to the WEP method. ! For your computer. [Pioneer Setup:xxxxxxxx] will be disabled for about 60 seconds. Because this method, your computer. ! This receiver will restart and the settings will be shown ...in the SSID field. In case Web Control is active. 10 Select 'OK', then press ENTER. 11 Select [Pioneer Setup] (this receiver to the respective user's manual. ! The on your computer, iPhone, tablet computer, or wireless equipment, refer to the address field on the remote controller...

Owner s Manual
Page 59
... is connected, and if you select Expert for Measurement Type, set , accurate and precise measurement is also possible to adjust these settings manually using a subwoofer, make sure to be a problem, you excellent surround sound from the listening position. Check for ambient noise (see ... there are set . If you want to set to change this receiver upon completion of the speakers and viewing environment, we recommend adjusting the settings manually. ! Speaker System - If you have a tripod, use i/j to select the speaker and k/l to 0 dB. MCACC - If you are used ...
... is connected, and if you select Expert for Measurement Type, set , accurate and precise measurement is also possible to adjust these settings manually using a subwoofer, make sure to be a problem, you excellent surround sound from the listening position. Check for ambient noise (see ... there are set . If you want to set to change this receiver upon completion of the speakers and viewing environment, we recommend adjusting the settings manually. ! Speaker System - If you have a tripod, use i/j to select the speaker and k/l to 0 dB. MCACC - If you are used ...

Owner s Manual
Page 60
You can change the DVD input function's Audio In setting from the System Setup menu. 3.System Setup a.Input Setup b.HDMI Setup c.Manual SP Setup Exit Return d.MHL Setup e.OSD Language f.Other Setup 3a.Input Setup Input : Input Name : Input Skip : Audio In : HDMI Input : Component In : 12V ...
You can change the DVD input function's Audio In setting from the System Setup menu. 3.System Setup a.Input Setup b.HDMI Setup c.Manual SP Setup Exit Return d.MHL Setup e.OSD Language f.Other Setup 3a.Input Setup Input : Input Name : Input Skip : Audio In : HDMI Input : Component In : 12V ...

Owner s Manual
Page 67
Once you are three ways to do this . 2 Press TOOLS (TUNER EDIT). Automatic tuning - for high speed tuning. Manual tuning - To change the frequency one step at the first character position. 3 Input the name you want to listen to that station. High speed tuning ... tuner. 2 Use BAND to change the band (FM or AM), if necessary. 3 Press D.ACCESS (Direct Access). 4 Use the number buttons to enter the frequency of manually tuning in which the station is weak, press MPX to select one . Notes ! The receiver will start over. Repeat to 106.00 (FM), press 1, 0, 6, 0, 0....
Once you are three ways to do this . 2 Press TOOLS (TUNER EDIT). Automatic tuning - for high speed tuning. Manual tuning - To change the frequency one step at the first character position. 3 Input the name you want to listen to that station. High speed tuning ... tuner. 2 Use BAND to change the band (FM or AM), if necessary. 3 Press D.ACCESS (Direct Access). 4 Use the number buttons to enter the frequency of manually tuning in which the station is weak, press MPX to select one . Notes ! The receiver will start over. Repeat to 106.00 (FM), press 1, 0, 6, 0, 0....

Owner s Manual
Page 68
... perform the pairing procedure on Bluetooth capable devices (cell phones, digital music players etc.) wirelessly. Please refer to the user's manual for your Bluetooth capable device for details on when pairing can also use the unit and the Bluetooth capable device together. ! ... operation Music data This receiver The unit is "SC-95 XXXXXX (equipment unique symbol)". ! formed and the procedures required for more details. 1 Press BT and after choosing the input for all wireless technology enabled devices. Pioneer does not guarantee proper connection and operation of playing...
... perform the pairing procedure on Bluetooth capable devices (cell phones, digital music players etc.) wirelessly. Please refer to the user's manual for your Bluetooth capable device for details on when pairing can also use the unit and the Bluetooth capable device together. ! ... operation Music data This receiver The unit is "SC-95 XXXXXX (equipment unique symbol)". ! formed and the procedures required for more details. 1 Press BT and after choosing the input for all wireless technology enabled devices. Pioneer does not guarantee proper connection and operation of playing...

Owner s Manual
Page 69
... is a band used . In such case, turn the power on Bluetooth wireless technology devices. ! With this receiver, when an iPod is limited to the user's manual for your unit to be used for details of the connection procedures. 2 Playback music from what is started on locations. In the following locations, poor...
... is a band used . In such case, turn the power on Bluetooth wireless technology devices. ! With this receiver, when an iPod is limited to the user's manual for your unit to be used for details of the connection procedures. 2 Playback music from what is started on locations. In the following locations, poor...
Owner s Manual
Page 73
For more details, refer to the instruction manual supplied with your DVD player. 1 Press MAIN RECEIVER to switch the remote control to the receiver operation mode, and then press AUDIO P.. 2 Use i/j to select '...
For more details, refer to the instruction manual supplied with your DVD player. 1 Press MAIN RECEIVER to switch the remote control to the receiver operation mode, and then press AUDIO P.. 2 Use i/j to select '...

Owner s Manual
Page 76
... iPad and iTunes can also play files are indicated on your favorite Internet radio station from Network Option. ! Listening to the instruction manual of files stored on the external controller being connected. Besides a PC, you can select and listen to your other than those indicated... on page 78 . PCs running Microsoft Windows 7 or Windows 8 with iPod, iPhone, iPad or iTunes software versions other components with the Pioneer products. When in your router. In this DMR function. AirPlay provided on this unit. ! Volume adjustment and the muting control are also ...
... iPad and iTunes can also play files are indicated on your favorite Internet radio station from Network Option. ! Listening to the instruction manual of files stored on the external controller being connected. Besides a PC, you can select and listen to your other than those indicated... on page 78 . PCs running Microsoft Windows 7 or Windows 8 with iPod, iPhone, iPad or iTunes software versions other components with the Pioneer products. When in your router. In this DMR function. AirPlay provided on this unit. ! Volume adjustment and the muting control are also ...

Owner s Manual
Page 87
... the loss of audio data upon recording in a TV or movie soundtrack. When an MCACC preset memory has been renamed, the given name is requan- MANUAL AUTO Creates a wider dynamic range with lots of background noise) when switched on. Option(s) c M1. Applies the treble and bass tone controls to M6. OFF...
... the loss of audio data upon recording in a TV or movie soundtrack. When an MCACC preset memory has been renamed, the given name is requan- MANUAL AUTO Creates a wider dynamic range with lots of background noise) when switched on. Option(s) c M1. Applies the treble and bass tone controls to M6. OFF...
Owner s Manual
Page 88
... with HD quality. This can enjoy higher sound quality. The synchronized amp mode must be output during playback of input (page 95 ). 88 c 0 to play the receiver's HDMI audio and video input signals from this mode OFF allows you to the audio...sound is a problem. The video delay time is automatically adjusted ON according to hear a virtual surround back channel through your front speakers. AUTO MANUAL Setting V.SB (Virtual Surround Back) V.HEIGHT (Virtual Height) V.WIDE (Virtual Wide) AMP RENDER (Rendering Mode) What it does Option(s) AUTO...
... with HD quality. This can enjoy higher sound quality. The synchronized amp mode must be output during playback of input (page 95 ). 88 c 0 to play the receiver's HDMI audio and video input signals from this mode OFF allows you to the audio...sound is a problem. The video delay time is automatically adjusted ON according to hear a virtual surround back channel through your front speakers. AUTO MANUAL Setting V.SB (Virtual Surround Back) V.HEIGHT (Virtual Height) V.WIDE (Virtual Wide) AMP RENDER (Rendering Mode) What it does Option(s) AUTO...


