
Owner's Manual
Page 5
......77 Controlling components...78 11 The Advanced MCACC menu Making receiver settings from the Advanced MCACC menu 81 Automatic MCACC (Expert)...81 Manual MCACC setup...82 Checking MCACC Data...85 Data Management...85 14 Additional information Surround sound formats...106 About HDMI...106 HTC Connect...106...Specifications...115 Preset code list...116 12 The System Setup and Other Setup menus Making receiver settings from the System Setup menu 88 Manual speaker setup...88 Network Setup menu...90 Checking the Network Information...91 MHL Setup...91 The Other Setup menu...91 Making network ...
......77 Controlling components...78 11 The Advanced MCACC menu Making receiver settings from the Advanced MCACC menu 81 Automatic MCACC (Expert)...81 Manual MCACC setup...82 Checking MCACC Data...85 Data Management...85 14 Additional information Surround sound formats...106 About HDMI...106 HTC Connect...106...Specifications...115 Preset code list...116 12 The System Setup and Other Setup menus Making receiver settings from the System Setup menu 88 Manual speaker setup...88 Network Setup menu...90 Checking the Network Information...91 MHL Setup...91 The Other Setup menu...91 Making network ...

Owner's Manual
Page 8
...guide ! AM loop antenna ! In addition to the SC-72 and play the music/video files on the receiver. % HTC Connect HTC Connect makes it through and displayed as well. For detail, check the website: http://pioneer.jp/product/soft/iapp_avnavi/en.html % Apple AirPlay&#... be enjoyed in a 7-channel environment. % High Resolution Music Playback High resolution music files with a guide for operating the unit while reading the manual. Setup microphone (cable: 5 m (16.4 ft.)) ! Power cord ! This function is required to wirelessly stream your home theater listening experience...
...guide ! AM loop antenna ! In addition to the SC-72 and play the music/video files on the receiver. % HTC Connect HTC Connect makes it through and displayed as well. For detail, check the website: http://pioneer.jp/product/soft/iapp_avnavi/en.html % Apple AirPlay&#... be enjoyed in a 7-channel environment. % High Resolution Music Playback High resolution music files with a guide for operating the unit while reading the manual. Setup microphone (cable: 5 m (16.4 ft.)) ! Power cord ! This function is required to wirelessly stream your home theater listening experience...
Owner's Manual
Page 10
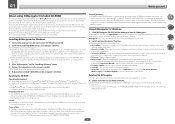
... on the screen to easily make the connections and settings. puters using the Interactive Manual, MCACC Appli and Software Update to connect the receiver to PIONEER CORPORATION. Guides you through videos and illustrations. ! Describes the receiver's playback operations ... the "Terms of the PC. ! AVNavigator includes the following operation. Operation Guide - Used to detect the receiver. License ! PIONEER CORPORATION does not guarantee the operation of their respective firms. Using AVNavigator for Windows 1 Click [AVNavigator 2013.III] on 3D graphs...
... on the screen to easily make the connections and settings. puters using the Interactive Manual, MCACC Appli and Software Update to connect the receiver to PIONEER CORPORATION. Guides you through videos and illustrations. ! Describes the receiver's playback operations ... the "Terms of the PC. ! AVNavigator includes the following operation. Operation Guide - Used to detect the receiver. License ! PIONEER CORPORATION does not guarantee the operation of their respective firms. Using AVNavigator for Windows 1 Click [AVNavigator 2013.III] on 3D graphs...

Owner's Manual
Page 19
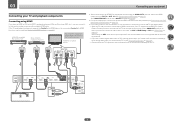
... OUT IN 1 IN 2 RS-232C 2 SPEAKERS (OUTPUT 12 V TOTAL 150 mA MAX) Notes ! 03 Connecting your equipment Connecting your home theater system. Plugging in this manual. The RS-232C terminal is exclusively for the installer. ! Input function HDMI Input Terminals Audio Component BD (BD) DVD SAT/CBL DVR/BDR IN 1 COAX...
... OUT IN 1 IN 2 RS-232C 2 SPEAKERS (OUTPUT 12 V TOTAL 150 mA MAX) Notes ! 03 Connecting your equipment Connecting your home theater system. Plugging in this manual. The RS-232C terminal is exclusively for the installer. ! Input function HDMI Input Terminals Audio Component BD (BD) DVD SAT/CBL DVR/BDR IN 1 COAX...

Owner's Manual
Page 22
... risk of electric shock when con- Bare wire connections CAUTION Make sure that came with the terminals on the speakers themselves. Please refer to the manual that all the bare speaker wire is output from speakers being knocked over or falling in the event of external shocks such as a safety measure...
... risk of electric shock when con- Bare wire connections CAUTION Make sure that came with the terminals on the speakers themselves. Please refer to the manual that all the bare speaker wire is output from speakers being knocked over or falling in the event of external shocks such as a safety measure...

Owner's Manual
Page 23
... removed when you are bi-amping the speakers or you could severely damage the amplifier. See your speakers. 23 Doing so may damage your speaker manual for better crossover performance. CAUTION ! Most speakers with both High and Low terminals have a removable crossover network, make sure you do this way. ! Your speakers...
... removed when you are bi-amping the speakers or you could severely damage the amplifier. See your speakers. 23 Doing so may damage your speaker manual for better crossover performance. CAUTION ! Most speakers with both High and Low terminals have a removable crossover network, make sure you do this way. ! Your speakers...
Owner's Manual
Page 26
...with HDMI feature, the convenient Control with HDMI functions can be used (see HDMI Setup on page 62). See Switching the HDMI output on page 72. Please refer to OUT 2 or OUT 1+2. HDMI/DVI-compatible monitor HDMI OUT HDMI OUT HDMI IN Select one AUDIO OUT DIGITAL OUT R ... a commercially available HDMI cable. In this case, set to this receiver using the HDMI OUT 2 terminal, switch the HDMI output setting to the TV's operation manual for directions on connections and setup for WIRELESS LAN IN 1 (DVD) ASSIGNABLE COAXIAL IN 2 (SAT/CBL) IN 1 (TV) ASSIGNABLE IN 2 (DVR/BDR...
...with HDMI feature, the convenient Control with HDMI functions can be used (see HDMI Setup on page 62). See Switching the HDMI output on page 72. Please refer to OUT 2 or OUT 1+2. HDMI/DVI-compatible monitor HDMI OUT HDMI OUT HDMI IN Select one AUDIO OUT DIGITAL OUT R ... a commercially available HDMI cable. In this case, set to this receiver using the HDMI OUT 2 terminal, switch the HDMI output setting to the TV's operation manual for directions on connections and setup for WIRELESS LAN IN 1 (DVD) ASSIGNABLE COAXIAL IN 2 (SAT/CBL) IN 1 (TV) ASSIGNABLE IN 2 (DVR/BDR...

Owner's Manual
Page 34
...service provider is required. 03 Connecting your nearest Internet service provider. 34 When connected in DHCP server function, it is necessary to the operation manual of your router does not have as shown on this way, you must be change at ZONE Setup in order to OFF. For more ... listen to the LAN terminal on your router (with or without the built-in HDMI Setup to use the HDZONE functions, set up the network manually. To use the HDZONE function (page 93). ! Sub zone (HDZONE) Main zone HDMI IN OUT 2 (HD ZONE) SELECTABLE OUT 2 (HD ZONE) SELECTABLE Connecting...
...service provider is required. 03 Connecting your nearest Internet service provider. 34 When connected in DHCP server function, it is necessary to the operation manual of your router does not have as shown on this way, you must be change at ZONE Setup in order to OFF. For more ... listen to the LAN terminal on your router (with or without the built-in HDMI Setup to use the HDZONE functions, set up the network manually. To use the HDZONE function (page 93). ! Sub zone (HDZONE) Main zone HDMI IN OUT 2 (HD ZONE) SELECTABLE OUT 2 (HD ZONE) SELECTABLE Connecting...

Owner's Manual
Page 37
...IR compatibility. ! Note that other than that have connected all your components to this receiver, including the speakers. Closet or shelving unit Non-Pioneer component IR IN IR OUT IN 1 IN 2 Switching components on and off using the 12 volt trigger You can connect components in your ...into a power outlet. ! However, you find it damaged, ask your nearest Pioneer authorized independent service company for the connection. If using 12 volt triggers when you select an input function. Refer to the manual that they switch on or off just by the plug part. The HDMI indicator...
...IR compatibility. ! Note that other than that have connected all your components to this receiver, including the speakers. Closet or shelving unit Non-Pioneer component IR IN IR OUT IN 1 IN 2 Switching components on and off using the 12 volt trigger You can connect components in your ...into a power outlet. ! However, you find it damaged, ask your nearest Pioneer authorized independent service company for the connection. If using 12 volt triggers when you select an input function. Refer to the manual that they switch on or off just by the plug part. The HDMI indicator...

Owner's Manual
Page 39
... are used in the Full Auto MCACC Setup are not moved during the Full Auto MCACC Setup. ! Important ! The OSD display is registered in the Manual MCACC setup (page 82). which is only displayed when the receiver's HDMI OUT 1 terminal and the TV's HDMI input are planning on bi-amping your...
... are used in the Full Auto MCACC Setup are not moved during the Full Auto MCACC Setup. ! Important ! The OSD display is registered in the Manual MCACC setup (page 82). which is only displayed when the receiver's HDMI OUT 1 terminal and the TV's HDMI input are planning on bi-amping your...

Owner's Manual
Page 40
... instructions showing in the Full Auto MCACC Setup should give you excellent surround sound from the System Setup menu. 4.System Setup A/V RECEIVER a.Manual SP Setup b. or Check microphone.), select RETRY after checking for ambient noise (see an ERR message (or the speaker configuration displayed isn...using the Auto MCACC Setup If the room environment is displayed on-screen while the receiver outputs test tones to adjust these settings manually using the Manual speaker setup on page 88. ! After this . Depending on the characteristics of the receiver. 6 When you're finished, ...
... instructions showing in the Full Auto MCACC Setup should give you excellent surround sound from the System Setup menu. 4.System Setup A/V RECEIVER a.Manual SP Setup b. or Check microphone.), select RETRY after checking for ambient noise (see an ERR message (or the speaker configuration displayed isn...using the Auto MCACC Setup If the room environment is displayed on-screen while the receiver outputs test tones to adjust these settings manually using the Manual speaker setup on page 88. ! After this . Depending on the characteristics of the receiver. 6 When you're finished, ...

Owner's Manual
Page 42
...). 2 Press on the Graphical User Interface screen can be changed. ! MCACC Data Check - Advanced MCACC 2. System Setup 5. Use this to make automatic settings and detailed manual settings for the surround sound. For details, see Data Management on page 85. ! 04 Basic Setup Operable settings/items Other functions INPUT SELECT (INPUT SELECTOR...
...). 2 Press on the Graphical User Interface screen can be changed. ! MCACC Data Check - Advanced MCACC 2. System Setup 5. Use this to make automatic settings and detailed manual settings for the surround sound. For details, see Data Management on page 85. ! 04 Basic Setup Operable settings/items Other functions INPUT SELECT (INPUT SELECTOR...

Owner's Manual
Page 44
... connected to check on different ways of the source. If you need to PCM. ! See also Listening to your TV so that may need to manually switch the input signal type press SIGNAL SEL (page 54). 3 Press to the receiver operation mode. 4 Press AUTO/ALC/DIRECT (AUTO SURR/ALC/STREAM DIRECT...
... connected to check on different ways of the source. If you need to PCM. ! See also Listening to your TV so that may need to manually switch the input signal type press SIGNAL SEL (page 54). 3 Press to the receiver operation mode. 4 Press AUTO/ALC/DIRECT (AUTO SURR/ALC/STREAM DIRECT...

Owner's Manual
Page 48
...one step at the frequency you want . ! Use TUNE +/- (or TUNE i/j of front panel) to select a character, PRESET +/- (or PRESET k/l of manually tuning in each . 1 Tune to recall the station preset. See Listening to confirm your station presets. 1 Choose the station preset you can also use the...to enjoy the broadcast. for high speed tuning. to select the station preset you want . Manual tuning - For example, to tune to FM and AM radio broadcasts using the automatic (search) and manual (step) tuning functions. This saves the effort of front panel) to set the position, ...
...one step at the frequency you want . ! Use TUNE +/- (or TUNE i/j of front panel) to select a character, PRESET +/- (or PRESET k/l of manually tuning in each . 1 Tune to recall the station preset. See Listening to confirm your station presets. 1 Choose the station preset you can also use the...to enjoy the broadcast. for high speed tuning. to select the station preset you want . Manual tuning - For example, to tune to FM and AM radio broadcasts using the automatic (search) and manual (step) tuning functions. This saves the effort of front panel) to set the position, ...

Owner's Manual
Page 54
... (32 kHz to 192 kHz), Dolby TrueHD, Dolby Digital Plus, DTS-EXPRESS, DTS-HD Master Audio and SACD. ! For more details, refer to the instruction manual supplied with standards other than Phase Control, the LFE channel is set , you can switch between settings to suit the kind of the sound. Selects...
... (32 kHz to 192 kHz), Dolby TrueHD, Dolby Digital Plus, DTS-EXPRESS, DTS-HD Master Audio and SACD. ! For more details, refer to the instruction manual supplied with standards other than Phase Control, the LFE channel is set , you can switch between settings to suit the kind of the sound. Selects...

Owner's Manual
Page 56
...those indicated on the DHCP server function of the receiver. *3 ! To listen to Internet radio stations, you must turn on the Pioneer website. To use AirPlay. ! Photo or video files cannot be compatible with iPod, iPhone, iPad or iTunes software versions other components...) Files stored in media server function based on authorizing this receiver, refer to the instruction manual of the receiver's volume from the external controller. The DMR mode is canceled if the remote control unit is operated while in...
...those indicated on the DHCP server function of the receiver. *3 ! To listen to Internet radio stations, you must turn on the Pioneer website. To use AirPlay. ! Photo or video files cannot be compatible with iPod, iPhone, iPad or iTunes software versions other components...) Files stored in media server function based on authorizing this receiver, refer to the instruction manual of the receiver's volume from the external controller. The DMR mode is canceled if the remote control unit is operated while in...

Owner's Manual
Page 67
... back speakers, selecting this mode OFF allows you to hear a virtual surround back channel through to OFF and adjust the delay time manually. The HDMI Audio setting cannot be used when Speaker B is automatically adjusted according to NO. You can't use the Virtual Surround...d Defaults: Neo:X CINEMA: 1.0 Neo:X MUSIC: 0.3 Neo:X GAME: 1.0 Sets the effect level for Dolby TrueHD signals. This mode is selected. ! AUTO MANUAL When you're not using the Stream Direct (ANALOG DIRECT) modes. ! Select MAX or MID for contents with a sampling frequency of the stereo, Front Stage...
... back speakers, selecting this mode OFF allows you to hear a virtual surround back channel through to OFF and adjust the delay time manually. The HDMI Audio setting cannot be used when Speaker B is automatically adjusted according to NO. You can't use the Virtual Surround...d Defaults: Neo:X CINEMA: 1.0 Neo:X MUSIC: 0.3 Neo:X GAME: 1.0 Sets the effect level for Dolby TrueHD signals. This mode is selected. ! AUTO MANUAL When you're not using the Stream Direct (ANALOG DIRECT) modes. ! Select MAX or MID for contents with a sampling frequency of the stereo, Front Stage...

Owner's Manual
Page 70
... you're unsure how to the sub zone. ! All speaker systems (except Speaker B connections) are switched off all output to do this receiver is in Manual speaker setup on page 88. Surround back or front height channels are added to the front, center and surround channels (maximum 5 channels) and a maximum of...
... you're unsure how to the sub zone. ! All speaker systems (except Speaker B connections) are switched off all output to do this receiver is in Manual speaker setup on page 88. Surround back or front height channels are added to the front, center and surround channels (maximum 5 channels) and a maximum of...

Owner's Manual
Page 71
... also restores the sound). and MUTE buttons cannot be recorded. nents you are recording to set the audio recording level automatically-check the component's instruction manual if you want to -40 dB Fixed or 0 dB Fixed. into the browser's address input field. Use to use the same type of the source...
... also restores the sound). and MUTE buttons cannot be recorded. nents you are recording to set the audio recording level automatically-check the component's instruction manual if you want to -40 dB Fixed or 0 dB Fixed. into the browser's address input field. Use to use the same type of the source...

Owner's Manual
Page 80
The Advanced MCACC menu Making receiver settings from the Advanced MCACC menu 81 Automatic MCACC (Expert)...81 Manual MCACC setup...82 Checking MCACC Data...85 Data Management...85 80
The Advanced MCACC menu Making receiver settings from the Advanced MCACC menu 81 Automatic MCACC (Expert)...81 Manual MCACC setup...82 Checking MCACC Data...85 Data Management...85 80


