
Owner's Manual
Page 2
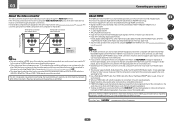
... other governmental entities to ensure reliable operation of the following section carefully. The equipment should never be disconnected by operating the equipment on the rear panel. These limits are provided for your outlet, consult an electrician for connection with dry cloth. 7) Do not block any way, such as newspapers, table-cloths...
... other governmental entities to ensure reliable operation of the following section carefully. The equipment should never be disconnected by operating the equipment on the rear panel. These limits are provided for your outlet, consult an electrician for connection with dry cloth. 7) Do not block any way, such as newspapers, table-cloths...
Owner's Manual
Page 4
...43 Playing a USB device...44 Listening to the radio...45 Bluetooth ADAPTER for buying this Pioneer product. Please read through LAN interface...32 Connecting optional Bluetooth ADAPTER...33 Connecting an iPod......33 Connecting a USB device...33 Connecting an HDMI-equipped component to the front panel input 34 Connecting to a wireless LAN...34 Connecting an IR receiver...34 Switching components...HDMI function About the Control with HDMI function...59 Making Control with HDMI function...61 09 Using other audio components...29 Connecting additional amplifiers...30 Connecting AM/FM ...
...43 Playing a USB device...44 Listening to the radio...45 Bluetooth ADAPTER for buying this Pioneer product. Please read through LAN interface...32 Connecting optional Bluetooth ADAPTER...33 Connecting an iPod......33 Connecting a USB device...33 Connecting an HDMI-equipped component to the front panel input 34 Connecting to a wireless LAN...34 Connecting an IR receiver...34 Switching components...HDMI function About the Control with HDMI function...59 Making Control with HDMI function...61 09 Using other audio components...29 Connecting additional amplifiers...30 Connecting AM/FM ...
Owner's Manual
Page 9
...instructions on the following places: - When "Finish" is selected, installation is shining onto the remote sensor. ! When installing this receiver's bottom panel while the power is on a color TV (the screen may not work properly if: ! Operating range of the functions in extremely hot or... cold areas - The receiver is Microsoft Internet Explorer 8 or 9. ! in direct sunlight - The bottom panel becomes hot when the power is on a level and stable surface. ! in AVNavigator. Do not touch this unit, make the receiver's connections ...
...instructions on the following places: - When "Finish" is selected, installation is shining onto the remote sensor. ! When installing this receiver's bottom panel while the power is on a color TV (the screen may not work properly if: ! Operating range of the functions in extremely hot or... cold areas - The receiver is Microsoft Internet Explorer 8 or 9. ! in direct sunlight - The bottom panel becomes hot when the power is on a level and stable surface. ! in AVNavigator. Do not touch this unit, make the receiver's connections ...

Owner's Manual
Page 10
...the receiver. Allows various types of software to operate the receiver from the Control Panel of the applicable OS. Refer to personal computers using MCACC Application. ! License ! PIONEER CORPORATION does not guarantee the operation of their respective firms. Using AVNavigator 1 ...Displays glossary pages. ! Deleting the AVNavigator You can be used with respect to them when using any damages incurred as defined by PIONEER CORPORATION. Interactive Manual - There are included in dialog fashion. It cannot be made easily. ! General Disclaimer ! 01 Precautions For ...
...the receiver. Allows various types of software to operate the receiver from the Control Panel of the applicable OS. Refer to personal computers using MCACC Application. ! License ! PIONEER CORPORATION does not guarantee the operation of their respective firms. Using AVNavigator 1 ...Displays glossary pages. ! Deleting the AVNavigator You can be used with respect to them when using any damages incurred as defined by PIONEER CORPORATION. Interactive Manual - There are included in dialog fashion. It cannot be made easily. ! General Disclaimer ! 01 Precautions For ...

Owner's Manual
Page 11
Controls and displays Remote control...12 Display...14 Front panel...15 11
Controls and displays Remote control...12 Display...14 Front panel...15 11
Owner's Manual
Page 15
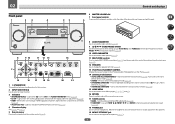
... to memorize and name stations for Standard decoding and to select an input function. 3 Indicators ! 02 Controls and displays Front panel 1 2 3 4 35 6 MASTER VOLUME dial 7 Front panel controls 6 To access the front panel controls, catch the sides of the door with your Home Menu. INPUT SELECTOR STANDBY / ON ADVANCED MCACC FL OFF HDMI...
... to memorize and name stations for Standard decoding and to select an input function. 3 Indicators ! 02 Controls and displays Front panel 1 2 3 4 35 6 MASTER VOLUME dial 7 Front panel controls 6 To access the front panel controls, catch the sides of the door with your Home Menu. INPUT SELECTOR STANDBY / ON ADVANCED MCACC FL OFF HDMI...

Owner's Manual
Page 17
Connecting your equipment Connecting your equipment...18 Rear panel...18 Determining the speakers' application 19 Placing the speakers...20 Connecting the speakers...21 Installing your speaker system...21 Selecting the Speaker system...23 About ... through LAN interface 32 Connecting optional Bluetooth ADAPTER 33 Connecting an iPod...33 Connecting a USB device...33 Connecting an HDMI-equipped component to the front panel input 34 Connecting to a wireless LAN...34 Connecting an IR receiver...34 Switching components on and off using the 12 volt trigger 35 Plugging in...
Connecting your equipment Connecting your equipment...18 Rear panel...18 Determining the speakers' application 19 Placing the speakers...20 Connecting the speakers...21 Installing your speaker system...21 Selecting the Speaker system...23 About ... through LAN interface 32 Connecting optional Bluetooth ADAPTER 33 Connecting an iPod...33 Connecting a USB device...33 Connecting an HDMI-equipped component to the front panel input 34 Connecting to a wireless LAN...34 Connecting an IR receiver...34 Switching components on and off using the 12 volt trigger 35 Plugging in...

Owner's Manual
Page 18
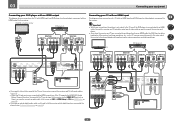
...DVR/BDR VIDEO HDMI (BD) IN 1 IN 2 IN 3 IN 4 Input Terminals Audio COAX-1 COAX-2 OPT-2 Component IN 1 IN 2 HDMI 5 (front panel) HDMI 6 TV IN 5 IN 6 OPT-1 CD ANALOG-1 ! The CU-RF100 omni-directional remote control (separately sold) can connect to the RS-232C and ...EXTENSION terminals. Also refer to the receiver's different input terminals. The input functions below are used. Rear panel HDMI ASSIGNABLE 1 -6 IN 1 (DVD) IN 2 (SAT/CBL) ASSIGNABLE COMPONENT VIDEO Y PB PR IN 1 (DVD) IN 3 BD IN (DVR/BDR) IN 4 IN 6 (VIDEO) ...
...DVR/BDR VIDEO HDMI (BD) IN 1 IN 2 IN 3 IN 4 Input Terminals Audio COAX-1 COAX-2 OPT-2 Component IN 1 IN 2 HDMI 5 (front panel) HDMI 6 TV IN 5 IN 6 OPT-1 CD ANALOG-1 ! The CU-RF100 omni-directional remote control (separately sold) can connect to the RS-232C and ...EXTENSION terminals. Also refer to the receiver's different input terminals. The input functions below are used. Rear panel HDMI ASSIGNABLE 1 -6 IN 1 (DVD) IN 2 (SAT/CBL) ASSIGNABLE COMPONENT VIDEO Y PB PR IN 1 (DVD) IN 3 BD IN (DVR/BDR) IN 4 IN 6 (VIDEO) ...

Owner's Manual
Page 21
... exposed wire strands together. 2 Loosen terminal and insert exposed wire. 3 Tighten terminal. 1 2 3 10 mm (3/8 in the event of the bare speaker wire touches the back panel it must be connected to match these up with banana plugs, screw the speaker terminal fully shut, then plug the banana plug into the speaker...
... exposed wire strands together. 2 Loosen terminal and insert exposed wire. 3 Tighten terminal. 1 2 3 10 mm (3/8 in the event of the bare speaker wire touches the back panel it must be connected to match these up with banana plugs, screw the speaker terminal fully shut, then plug the banana plug into the speaker...
Owner's Manual
Page 24
... About HDMI The HDMI connection transfers uncompressed digital video, as well as there is no problem with a built-in equalizer is displayed on the front panel display. This receiver supports the functions described below through the HDMI OUT terminal. Deep Color signal transfer ! Synchronized operation with components using a DVI connection may...
... About HDMI The HDMI connection transfers uncompressed digital video, as well as there is no problem with a built-in equalizer is displayed on the front panel display. This receiver supports the functions described below through the HDMI OUT terminal. Deep Color signal transfer ! Synchronized operation with components using a DVI connection may...
Owner's Manual
Page 26
... tell the receiver which digital input you 'll need to connect the receiver and player. ! DVD player, etc. In this case, watch the receiver's front panel display while performing the various operations and making settings. If you want to listen to the sound of the TV over the receiver, connect the...
... tell the receiver which digital input you 'll need to connect the receiver and player. ! DVD player, etc. In this case, watch the receiver's front panel display while performing the various operations and making settings. If you want to listen to the sound of the TV over the receiver, connect the...

Owner's Manual
Page 31
... ZONE 2 OUT jacks on your secondary (ZONE 3) sub zone. When a subwoofer is on) and the sub zones can be controlled by the remote or front panel controls. Choose whichever works best for your equipment Connecting external antennas To improve FM reception, connect an external FM antenna to FM UNBAL 75 W. 75...
... ZONE 2 OUT jacks on your secondary (ZONE 3) sub zone. When a subwoofer is on) and the sub zones can be controlled by the remote or front panel controls. Choose whichever works best for your equipment Connecting external antennas To improve FM reception, connect an external FM antenna to FM UNBAL 75 W. 75...

Owner's Manual
Page 33
... to connect using the controls of this receiver. ! For instructions on playing the iPod, see Playing an iPod on the front panel of this unit with the Bluetooth ADAPTER connected. The Bluetooth wireless technology enabled device must support A2DP profiles. ! Do not move ... receiver, a product equipped with Bluetooth wireless technology (portable cell phone, digital music player, etc.) can be connected to the receiver. Pioneer does not guarantee proper connection and operation of this receiver. ! iPod iPhone iPad AUTO SURR/ALC/ DIRECT CONTROL STREAM DIRECT STEREO STANDARD ...
... to connect using the controls of this receiver. ! For instructions on playing the iPod, see Playing an iPod on the front panel of this unit with the Bluetooth ADAPTER connected. The Bluetooth wireless technology enabled device must support A2DP profiles. ! Do not move ... receiver, a product equipped with Bluetooth wireless technology (portable cell phone, digital music player, etc.) can be connected to the receiver. Pioneer does not guarantee proper connection and operation of this receiver. ! iPod iPhone iPad AUTO SURR/ALC/ DIRECT CONTROL STREAM DIRECT STEREO STANDARD ...

Owner's Manual
Page 34
...on the rear of this receiver to link it to the IR receiver. Closet or shelving unit Non-Pioneer component IR IN IR OUT IN 1 IN 2 IR receiver IR OUT IN 1 IN 2 2 ...the same time), the IR receiver's remote sensor takes priority over the remote sensor on the front panel. 1 Connect the IR receiver sensor to check for connection. ! Please see the operating instructions included... with your system instead of the remote sensor on the front panel of cable necessary for the connection. ponent to the IR IN jack on the rear of this...
...on the rear of this receiver to link it to the IR receiver. Closet or shelving unit Non-Pioneer component IR IN IR OUT IN 1 IN 2 IR receiver IR OUT IN 1 IN 2 2 ...the same time), the IR receiver's remote sensor takes priority over the remote sensor on the front panel. 1 Connect the IR receiver sensor to check for connection. ! Please see the operating instructions included... with your system instead of the remote sensor on the front panel of cable necessary for the connection. ponent to the IR IN jack on the rear of this...

Owner's Manual
Page 35
... so that will only work with other way. Do not place the unit, a piece of another component. Never make a knot in the front panel display blinks during this receiver is connected to an AC outlet, a 2 second to this receiver so that described below. ! You cannot carry out... any other cables. Note that have connected all your nearest Pioneer authorized independent service company for a replacement. ! CAUTION ! The power cords should be able to OFF, you can cause a fire or give you 've...
... so that will only work with other way. Do not place the unit, a piece of another component. Never make a knot in the front panel display blinks during this receiver is connected to an AC outlet, a 2 second to this receiver so that described below. ! You cannot carry out... any other cables. Note that have connected all your nearest Pioneer authorized independent service company for a replacement. ! CAUTION ! The power cords should be able to OFF, you can cause a fire or give you 've...

Owner's Manual
Page 37
... object to place the microphone so that the VIDEO input is registered in some other than an HDMI cable, watch the front panel display while performing the various operations and making settings. The test tones used on the receiver and your system, the receiver uses... Select 'OK' to switch on the Graphical User Interface screen can be disconnected. ! Sofas or other than an HDMI cable, watch the front panel display while performing the various operations and making settings. 1 Press u RECEIVER to change the language. Placing the microphone on the remote control, then...
... object to place the microphone so that the VIDEO input is registered in some other than an HDMI cable, watch the front panel display while performing the various operations and making settings. The test tones used on the receiver and your system, the receiver uses... Select 'OK' to switch on the Graphical User Interface screen can be disconnected. ! Sofas or other than an HDMI cable, watch the front panel display while performing the various operations and making settings. 1 Press u RECEIVER to change the language. Placing the microphone on the remote control, then...

Owner's Manual
Page 38
If you will need to SMALL). If the speakers are connected using any instructions showing in the front panel display, please follow them off if necessary. Shows the current settings. Normally select SYMMETRY. For details, see Problems when using THX speakers (all speakers other ...
If you will need to SMALL). If the speakers are connected using any instructions showing in the front panel display, please follow them off if necessary. Shows the current settings. Normally select SYMMETRY. For details, see Problems when using THX speakers (all speakers other ...

Owner's Manual
Page 39
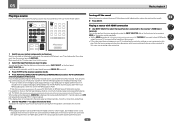
... on the remote control, then press HOME MENU. Input function HDMI Input Terminals Audio Component BD (BD) DVD SAT/CBL DVR/BDR VIDEO HDMI 5 (front panel) IN 1 COAX-1 IN 1 IN 2 COAX-2 k IN 3 OPT-2 IN 2 IN 4 k k IN 5 HDMI 6 IN 6 INTERNET RADIO SiriusXM PANDORA MEDIA SERVER FAVORITES iPod/...using the 12 volt trigger on page 35), select MAIN, ZONE 2, ZONE 3 or OFF for other than an HDMI cable, watch the front panel display while performing the various operations and making settings. 1 Press on the remote control. 5 Select the input(s) to which terminal so the ...
... on the remote control, then press HOME MENU. Input function HDMI Input Terminals Audio Component BD (BD) DVD SAT/CBL DVR/BDR VIDEO HDMI 5 (front panel) IN 1 COAX-1 IN 1 IN 2 COAX-2 k IN 3 OPT-2 IN 2 IN 4 k k IN 5 HDMI 6 IN 6 INTERNET RADIO SiriusXM PANDORA MEDIA SERVER FAVORITES iPod/...using the 12 volt trigger on page 35), select MAIN, ZONE 2, ZONE 3 or OFF for other than an HDMI cable, watch the front panel display while performing the various operations and making settings. 1 Press on the remote control. 5 Select the input(s) to which terminal so the ...

Owner's Manual
Page 40
... the data in the MCACC memory. Updates to the Home Menu. Plays with anything other than an HDMI cable, watch the front panel display while performing the various operations and making settings. 1 Press on the remote control, then press HOME MENU. Plays using the PQLS... (Virtual Depth) Other functions INPUT SELECT (INPUT SELECTOR) VOLUME +/-, MUTE LISTENING MODE PQLS Descriptions Makes high precision sound field settings easily. Only Pioneer-recommended modes can be operated are shown below . To display the Home Menu screen, press on the remote control, then press HOME MENU. ...
... the data in the MCACC memory. Updates to the Home Menu. Plays with anything other than an HDMI cable, watch the front panel display while performing the various operations and making settings. 1 Press on the remote control, then press HOME MENU. Plays using the PQLS... (Virtual Depth) Other functions INPUT SELECT (INPUT SELECTOR) VOLUME +/-, MUTE LISTENING MODE PQLS Descriptions Makes high precision sound field settings easily. Only Pioneer-recommended modes can be operated are shown below . To display the Home Menu screen, press on the remote control, then press HOME MENU. ...
Owner's Manual
Page 42
...the input function connected to PCM. ! Playing a source with different input signal formats on the remote control, INPUT SELECT, or the front panel INPUT SELECTOR dial. ! You can also perform the same operation by using surround speakers, 2DIGITAL is displayed when playing Dolby Digital 5.1 channel... will be converted. If you are connected with anything other than an HDMI cable, perform the various operations while watching the front panel. 42 The playback operation can use an analog video connection. 1 Switch on your TV and subwoofer (if you want to check...
...the input function connected to PCM. ! Playing a source with different input signal formats on the remote control, INPUT SELECT, or the front panel INPUT SELECTOR dial. ! You can also perform the same operation by using surround speakers, 2DIGITAL is displayed when playing Dolby Digital 5.1 channel... will be converted. If you are connected with anything other than an HDMI cable, perform the various operations while watching the front panel. 42 The playback operation can use an analog video connection. 1 Switch on your TV and subwoofer (if you want to check...


