Owner's Manual
Page 4
......39 Operation Mode Setup...40 About the Home Menu...40 05 Basic playback Playing a source...42 Playing an iPod...43 Playing a USB device...44 Listening to the radio...45 Bluetooth ADAPTER for buying this Pioneer product. Contents 01 Before you will know how to your system Enjoying various ...the front panel input 34 Connecting to a wireless LAN...34 Connecting an IR receiver...34 Switching components on the Control with HDMI function...61 09 Using other functions Setting the Audio options...63 Setting the Video options...65 Switching the speaker terminals...67 Using the MULTI-ZONE ...
......39 Operation Mode Setup...40 About the Home Menu...40 05 Basic playback Playing a source...42 Playing an iPod...43 Playing a USB device...44 Listening to the radio...45 Bluetooth ADAPTER for buying this Pioneer product. Contents 01 Before you will know how to your system Enjoying various ...the front panel input 34 Connecting to a wireless LAN...34 Connecting an IR receiver...34 Switching components on the Control with HDMI function...61 09 Using other functions Setting the Audio options...63 Setting the Video options...65 Switching the speaker terminals...67 Using the MULTI-ZONE ...
Owner's Manual
Page 5
......74 11 The Advanced MCACC menu Making receiver settings from the Advanced MCACC menu 77 Automatic MCACC (Expert)...77 Manual MCACC setup...79 Checking MCACC Data...81 Data Management...82 14 Additional information Surround sound formats...101 About iPod...101 About SiriusXM...101 About...108 Specifications...109 Preset code list...110 12 The System Setup and Other Setup menus Making receiver settings from the System Setup menu 85 Manual speaker setup...85 Network Setup menu...87 Checking the Network Information...88 The Other Setup menu...88 13 FAQ Troubleshooting...92 Power...92 No ...
......74 11 The Advanced MCACC menu Making receiver settings from the Advanced MCACC menu 77 Automatic MCACC (Expert)...77 Manual MCACC setup...79 Checking MCACC Data...81 Data Management...82 14 Additional information Surround sound formats...101 About iPod...101 About SiriusXM...101 About...108 Specifications...109 Preset code list...110 12 The System Setup and Other Setup menus Making receiver settings from the System Setup menu 85 Manual speaker setup...85 Network Setup menu...87 Checking the Network Information...88 The Other Setup menu...88 13 FAQ Troubleshooting...92 Power...92 No ...
Owner's Manual
Page 6
... adjustments and settings ! Installing your TV and playback components on page 25 ! Connecting AM/FM antennas on page 20 ! The System Setup and Other Setup menus (page 84) j 12 Making maximum use of functions and terminals. Placing the speakers on page 30 ! Bi-amping your speakers...on page 22 j 4 Connecting the components ! Automatically conducting optimum sound tuning (Full Auto MCACC) on page 37 j 8 The Input Setup menu (page 39) (When using Wiring Navi on the AVNavigator CD-ROM included with the receiver. In this case, virtually the same connections...
... adjustments and settings ! Installing your TV and playback components on page 25 ! Connecting AM/FM antennas on page 20 ! The System Setup and Other Setup menus (page 84) j 12 Making maximum use of functions and terminals. Placing the speakers on page 30 ! Bi-amping your speakers...on page 22 j 4 Connecting the components ! Automatically conducting optimum sound tuning (Full Auto MCACC) on page 37 j 8 The Input Setup menu (page 39) (When using Wiring Navi on the AVNavigator CD-ROM included with the receiver. In this case, virtually the same connections...

Owner's Manual
Page 8
... sheet % HDMI (3D, Audio Return Channel) A compatible component is required to use the above the front left over after compression. % Easy setup using front wide speakers, selecting this unit provides a variety of functions, such as Wiring Navi with a guide for connecting the unit and setting...function. % PQLS Bit-stream Jitterless high quality playback is only available when the connected Pioneer Blu-ray Disc Player supporting the PQLS function. We do this receiver to the SC-63 and SC-61 and play them with standards other Bluetooth wireless technology device wirelessly. % Auto Sound ...
... sheet % HDMI (3D, Audio Return Channel) A compatible component is required to use the above the front left over after compression. % Easy setup using front wide speakers, selecting this unit provides a variety of functions, such as Wiring Navi with a guide for connecting the unit and setting...function. % PQLS Bit-stream Jitterless high quality playback is only available when the connected Pioneer Blu-ray Disc Player supporting the PQLS function. We do this receiver to the SC-63 and SC-61 and play them with standards other Bluetooth wireless technology device wirelessly. % Auto Sound ...
Owner's Manual
Page 12
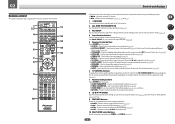
... Level Control mode and Stream Direct mode (page 50). ! VIDEO PARAMETER - With this button to perform unique operations (page 73). 3 RCU SETUP Use to input the preset code when making remote control settings and to set for the remote control's operation mode (page 71). 7 Receiver setting...control This section explains how to operate the remote control for the receiver. 1 2,3 4 5 6 7 8 9 5 10 RECEIVER ALL ZONE STBY SOURCE DISCRETE ON RCU SETUP BDR BD DVD DVR HDMI TV CD NET ADPT USB iPod CBL OPTION 1 SAT TUNER INPUT SELECT STATUS RECEIVER INPUT VOLUME TV CONTROL CH VOL...
... Level Control mode and Stream Direct mode (page 50). ! VIDEO PARAMETER - With this button to perform unique operations (page 73). 3 RCU SETUP Use to input the preset code when making remote control settings and to set for the remote control's operation mode (page 71). 7 Receiver setting...control This section explains how to operate the remote control for the receiver. 1 2,3 4 5 6 7 8 9 5 10 RECEIVER ALL ZONE STBY SOURCE DISCRETE ON RCU SETUP BDR BD DVD DVR HDMI TV CD NET ADPT USB iPod CBL OPTION 1 SAT TUNER INPUT SELECT STATUS RECEIVER INPUT VOLUME TV CONTROL CH VOL...
Owner's Manual
Page 15
...-ZONE controls If you've made MULTI-ZONE connections (page 31) use these controls to control the sub zone from the speakers. 19 MCACC SETUP MIC jack Use to connect the supplied microphone (page 37). 15 Press for Standard decoding and to select stereo playback mode (page 49). !... iPhone iPad AUTO SURR/ALC/ DIRECT CONTROL STREAM DIRECT STEREO STANDARD SURROUND ADVANCED SURROUND ENTER BAND 7 PRESET PRESET HOME MENU RETURN TUNER EDIT PHONES MCACC SETUP MIC USB 5V 2.1 A HDMI 5 INPUT TUNE iPod iPhone iPad 15 16 17 18 19 20 21 1 u STANDBY/ON This switches between the ...
...-ZONE controls If you've made MULTI-ZONE connections (page 31) use these controls to control the sub zone from the speakers. 19 MCACC SETUP MIC jack Use to connect the supplied microphone (page 37). 15 Press for Standard decoding and to select stereo playback mode (page 49). !... iPhone iPad AUTO SURR/ALC/ DIRECT CONTROL STREAM DIRECT STEREO STANDARD SURROUND ADVANCED SURROUND ENTER BAND 7 PRESET PRESET HOME MENU RETURN TUNER EDIT PHONES MCACC SETUP MIC USB 5V 2.1 A HDMI 5 INPUT TUNE iPod iPhone iPad 15 16 17 18 19 20 21 1 u STANDBY/ON This switches between the ...

Owner's Manual
Page 17
... a satellite/cable receiver or other set-top box 28 Connecting other audio components 29 Connecting additional amplifiers 30 Connecting AM/FM antennas...30 MULTI-ZONE setup...31 Connecting to the network through LAN interface 32 Connecting optional Bluetooth ADAPTER 33 Connecting an iPod...33 Connecting a USB device...33 Connecting an HDMI...
... a satellite/cable receiver or other set-top box 28 Connecting other audio components 29 Connecting additional amplifiers 30 Connecting AM/FM antennas...30 MULTI-ZONE setup...31 Connecting to the network through LAN interface 32 Connecting optional Bluetooth ADAPTER 33 Connecting an iPod...33 Connecting a USB device...33 Connecting an HDMI...

Owner's Manual
Page 18
..., receiver, etc.), the methods of components you display the receiver's display information on page 39 to the receiver's different input terminals. Refer to The Input Setup menu on the remote control display in this manual. This chapter explains the kinds of connection and terminal names may differ from the power outlets...
..., receiver, etc.), the methods of components you display the receiver's display information on page 39 to the receiver's different input terminals. Refer to The Input Setup menu on the remote control display in this manual. This chapter explains the kinds of connection and terminal names may differ from the power outlets...

Owner's Manual
Page 23
... the Speaker System menu. See Speaker system setting on another room. 1 Connect a pair of speakers to the front height speaker terminals. Speaker B setup You can listen to stereo playback in another component in ZONE 2. 1 Connect a pair of speakers to the front height speaker terminals. See Speaker... and surround back speaker terminals. About the audio connection Types of speakers to the front height speaker terminals. Make this . Front wide setup 1 Connect a pair of speakers to the surround back speaker terminals. See Speaker system setting on page 22. 2 Select 'Front Bi...
... the Speaker System menu. See Speaker system setting on another room. 1 Connect a pair of speakers to the front height speaker terminals. Speaker B setup You can listen to stereo playback in another component in ZONE 2. 1 Connect a pair of speakers to the front height speaker terminals. See Speaker... and surround back speaker terminals. About the audio connection Types of speakers to the front height speaker terminals. Make this . Front wide setup 1 Connect a pair of speakers to the surround back speaker terminals. See Speaker system setting on page 22. 2 Select 'Front Bi...
Owner's Manual
Page 24
... playback, may not operate properly. ! Note that some components (such as video game units) have connected, using the Control with HDMI function (see The Input Setup menu on page 65) OFF. ! patents and other countries. This receiver supports the functions described below through the HDMI OUT terminal. An HDMI connection can...
... playback, may not operate properly. ! Note that some components (such as video game units) have connected, using the Control with HDMI function (see The Input Setup menu on page 65) OFF. ! patents and other countries. This receiver supports the functions described below through the HDMI OUT terminal. An HDMI connection can...

Owner's Manual
Page 25
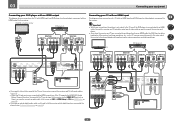
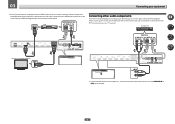
... (DVD) (SAT/CBL) for WIRELESS LAN OPTICAL ASSIGNABLE COAXIAL IN 1 (CD) ASSIGNABLE IN 1 (CD) ASSIGNABLE 25 If you want to listen to (see The Input Setup menu on page 26). ! If you use a coaxial digital audio cable or RCA (analog) audio cable, you'll need to ON (see Control with audio... be input to the receiver via the HDMI OUT terminal, so there is required in order to listen to this case, set ARC at HDMI Setup to connect an audio cable. When the TV and receiver are also possible (see Connecting your TV and playback components Connecting using a commercially available ...
... (DVD) (SAT/CBL) for WIRELESS LAN OPTICAL ASSIGNABLE COAXIAL IN 1 (CD) ASSIGNABLE IN 1 (CD) ASSIGNABLE 25 If you want to listen to (see The Input Setup menu on page 26). ! If you use a coaxial digital audio cable or RCA (analog) audio cable, you'll need to ON (see Control with audio... be input to the receiver via the HDMI OUT terminal, so there is required in order to listen to this case, set ARC at HDMI Setup to connect an audio cable. When the TV and receiver are also possible (see Connecting your TV and playback components Connecting using a commercially available ...
Owner's Manual
Page 26
...) (SAT/CBL) for WIRELESS LAN OPTICAL ASSIGNABLE COAXIAL ASSIGNABLE ! HDMI/DVI-compatible monitor DVD player, etc. Important ! If you connected the player to (see HDMI Setup on page 39). When the TV and receiver are connected by HDMI connections, if the TV supports the HDMI ARC (Audio Return Channel) function, the...) DC OUTPUT (TV) (DVR/BDR) (DVD) (SAT/CBL) for WIRELESS LAN OPTICAL ASSIGNABLE COAXIAL ASSIGNABLE MONITOR OUT 26 In this case, set ARC at HDMI Setup to ON (see The Input Setup menu on page 59). !
...) (SAT/CBL) for WIRELESS LAN OPTICAL ASSIGNABLE COAXIAL ASSIGNABLE ! HDMI/DVI-compatible monitor DVD player, etc. Important ! If you connected the player to (see HDMI Setup on page 39). When the TV and receiver are connected by HDMI connections, if the TV supports the HDMI ARC (Audio Return Channel) function, the...) DC OUTPUT (TV) (DVR/BDR) (DVD) (SAT/CBL) for WIRELESS LAN OPTICAL ASSIGNABLE COAXIAL ASSIGNABLE MONITOR OUT 26 In this case, set ARC at HDMI Setup to ON (see The Input Setup menu on page 59). !

Owner's Manual
Page 27
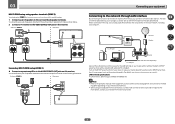
...to the operating instructions supplied with audio cables (page 25). ! In order to record, you connected the player to (see The Input Setup menu on the player, it may not be necessary to both HDMI and other video sources This receiver has audio/video inputs suitable for playback...cable for WIRELESS LAN OPTICAL ASSIGNABLE COAXIAL ASSIGNABLE DVR/BDR OUT IN AUDIO AUDIO ! If you connected the recorder to (see also The Input Setup menu on page 39). HDD/DVD recorder, BD recorder, etc. Depending on page 39). Connecting an HDD/DVD recorder, BD recorder and other...
...to the operating instructions supplied with audio cables (page 25). ! In order to record, you connected the player to (see The Input Setup menu on the player, it may not be necessary to both HDMI and other video sources This receiver has audio/video inputs suitable for playback...cable for WIRELESS LAN OPTICAL ASSIGNABLE COAXIAL ASSIGNABLE DVR/BDR OUT IN AUDIO AUDIO ! If you connected the recorder to (see also The Input Setup menu on page 39). HDD/DVD recorder, BD recorder, etc. Depending on page 39). Connecting an HDD/DVD recorder, BD recorder and other...

Owner's Manual
Page 28
.../CBL) IN 3 (DVR/BDR) BD IN IN 4 IN 6 (VIDEO) OUT 28 When doing so, also connect the receiver and TV by HDMI (see The Input Setup menu on page 39). HDMI OUT HDD/DVD recorder, BD recorder, etc. When you set up the receiver you'll need to tell the receiver...
.../CBL) IN 3 (DVR/BDR) BD IN IN 4 IN 6 (VIDEO) OUT 28 When doing so, also connect the receiver and TV by HDMI (see The Input Setup menu on page 39). HDMI OUT HDD/DVD recorder, BD recorder, etc. When you set up the receiver you'll need to tell the receiver...
Owner's Manual
Page 29
... video is output from the HDMI output terminal. CD player, etc. 03 Connecting your turntable has line-level outputs (i.e., it to (see also The Input Setup menu on page 39). Even if your set up the receiver you'll need to tell the receiver which input you to connect audio components...
... video is output from the HDMI output terminal. CD player, etc. 03 Connecting your turntable has line-level outputs (i.e., it to (see also The Input Setup menu on page 39). Even if your set up the receiver you'll need to tell the receiver which input you to connect audio components...

Owner's Manual
Page 31
... zone, and a separate amplifier (and speakers) for the sub zone. (Inputs other than the ones listed here can be selected.) Basic MULTI-ZONE setup (ZONE 2) 1 Connect a separate amplifier to the AUDIO ZONE 2 OUT jacks on ) and the sub zones can also be playing in separate rooms... Making MULTI-ZONE connections It is on this receiver. Choose whichever works best for your primary sub zone (For detail, see MULTI-ZONE setup using the speaker terminals for you have a separate TV, subwoofer and speakers for your equipment Connecting external antennas To improve FM reception, connect...
... zone, and a separate amplifier (and speakers) for the sub zone. (Inputs other than the ones listed here can be selected.) Basic MULTI-ZONE setup (ZONE 2) 1 Connect a separate amplifier to the AUDIO ZONE 2 OUT jacks on ) and the sub zones can also be playing in separate rooms... Making MULTI-ZONE connections It is on this receiver. Choose whichever works best for your primary sub zone (For detail, see MULTI-ZONE setup using the speaker terminals for you have a separate TV, subwoofer and speakers for your equipment Connecting external antennas To improve FM reception, connect...
Owner's Manual
Page 32
... function of speakers to the LAN terminal on your router (with or without the built-in Speaker system setting (page 85) to use this setup. 1 Connect a pair of your router. LAN terminal : Ethernet jack (10BASE-T/100BASE-TX) Note ! LAN terminal specifications ! Sub zone ... using speaker terminals (ZONE 2) You must sign a contract with an ISP (Internet Service Provider) beforehand. 03 Connecting your equipment MULTI-ZONE setup using a broadband Internet connection, a contract with an Internet service provider is necessary to the VIDEO ZONE 2 OUT jack on your Internet environment...
... function of speakers to the LAN terminal on your router (with or without the built-in Speaker system setting (page 85) to use this setup. 1 Connect a pair of your router. LAN terminal : Ethernet jack (10BASE-T/100BASE-TX) Note ! LAN terminal specifications ! Sub zone ... using speaker terminals (ZONE 2) You must sign a contract with an ISP (Internet Service Provider) beforehand. 03 Connecting your equipment MULTI-ZONE setup using a broadband Internet connection, a contract with an Internet service provider is necessary to the VIDEO ZONE 2 OUT jack on your Internet environment...

Owner's Manual
Page 35
... component on or off just by the plug part. Note that this will only work with HDMI function on page 58. 35 Connecting your nearest Pioneer authorized independent service company for a replacement. ! Use a cable with this receiver is connected to an AC outlet, a 2 second to be routed so that ...a fire or give you can turn on this process. If you must specify which input functions switch on the trigger using the The Input Setup menu on the back of this process. The HDMI indicator in the front panel display blinks during this receiver once it has stopped blinking. 03...
... component on or off just by the plug part. Note that this will only work with HDMI function on page 58. 35 Connecting your nearest Pioneer authorized independent service company for a replacement. ! Use a cable with this receiver is connected to an AC outlet, a 2 second to be routed so that ...a fire or give you can turn on this process. If you must specify which input functions switch on the trigger using the The Input Setup menu on the back of this process. The HDMI indicator in the front panel display blinks during this receiver once it has stopped blinking. 03...

Owner's Manual
Page 36
Basic Setup Changing the OSD display language (OSD Language 37 Automatically conducting optimum sound tuning (Full Auto MCACC 37 The Input Setup menu...39 Operation Mode Setup...40 About the Home Menu...40 36
Basic Setup Changing the OSD display language (OSD Language 37 Automatically conducting optimum sound tuning (Full Auto MCACC 37 The Input Setup menu...39 Operation Mode Setup...40 About the Home Menu...40 36

Owner's Manual
Page 37
.... Use i/j/k/l and ENTER to navigate through the screens and select menu items. Press RETURN to exit the current menu. 3 Select 'System Setup' from the Home Menu. 4 Select 'OSD Language' from a series of your normal listening position. Automatically conducting optimum sound tuning (Full Auto... size, and tests for both channel delay and channel level. nected with an HDMI cable. CAUTION ! Before using the Full Auto MCACC Setup, the headphones should be changed. ! A Graphical User Interface (GUI) screen appears on the Graphical User Interface screen can be disconnected. ...
.... Use i/j/k/l and ENTER to navigate through the screens and select menu items. Press RETURN to exit the current menu. 3 Select 'System Setup' from the Home Menu. 4 Select 'OSD Language' from a series of your normal listening position. Automatically conducting optimum sound tuning (Full Auto... size, and tests for both channel delay and channel level. nected with an HDMI cable. CAUTION ! Before using the Full Auto MCACC Setup, the headphones should be changed. ! A Graphical User Interface (GUI) screen appears on the Graphical User Interface screen can be disconnected. ...


