Owner's Manual
Page 5
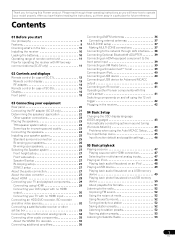
...video sources 32 Connecting a satellite/cable receiver or other set-top box 33 Connecting the multichannel analog inputs 34 Connecting other Pioneer components with this Pioneer product. Contents 01 Before you start Our philosophy 9 Features 9 Checking what's in the box 10 Installing the receiver ...18 03 Connecting your equipment Rear panel 20 Connecting the RF adapter (SC-37 only 21 Determining the speakers' application 22 Other speaker connections 23 Placing the speakers 23 THX speaker system setup 23 Some tips for improving sound quality 23 Connecting the speakers 24 ...
...video sources 32 Connecting a satellite/cable receiver or other set-top box 33 Connecting the multichannel analog inputs 34 Connecting other Pioneer components with this Pioneer product. Contents 01 Before you start Our philosophy 9 Features 9 Checking what's in the box 10 Installing the receiver ...18 03 Connecting your equipment Rear panel 20 Connecting the RF adapter (SC-37 only 21 Determining the speakers' application 22 Other speaker connections 23 Placing the speakers 23 THX speaker system setup 23 Some tips for improving sound quality 23 Connecting the speakers 24 ...
Owner's Manual
Page 6
... signal 62 Better sound using Phase Control 62 Better sound using Phase Control and Full Band Phase Control (SC-37 only 63 07 Playback with HOME MEDIA GALLERY inputs (SC-37 only) Enjoying the Home Media Gallery 64 Features of Home Media Gallery 64 Introduction 64 Authorizing this receiver...Checking your system settings 81 Resetting the system 82 Default system settings 82 10 Controlling the rest of your system (In case of SC-37) About the Remote Setup menu 83 Operating multiple receivers 84 Setting the remote to control other components . . . . 84 Selecting preset codes directly 84 ...
... signal 62 Better sound using Phase Control 62 Better sound using Phase Control and Full Band Phase Control (SC-37 only 63 07 Playback with HOME MEDIA GALLERY inputs (SC-37 only) Enjoying the Home Media Gallery 64 Features of Home Media Gallery 64 Introduction 64 Authorizing this receiver...Checking your system settings 81 Resetting the system 82 Default system settings 82 10 Controlling the rest of your system (In case of SC-37) About the Remote Setup menu 83 Operating multiple receivers 84 Setting the remote to control other components . . . . 84 Selecting preset codes directly 84 ...

Owner's Manual
Page 7
... address/Proxy setting 118 Checking the MAC address 118 Network Standby 118 The Other Setup menu 119 Volume Setup 119 Remote Control Mode Setup 119 Flicker Reduction Setup 120 RF Remote Setup (SC-37 only 120 EXTENSION Setup (SC-35 only 120 Multi Channel Input Setup 120 11 The Advanced MCACC menu Making receiver settings from the Advanced MCACC menu...
... address/Proxy setting 118 Checking the MAC address 118 Network Standby 118 The Other Setup menu 119 Volume Setup 119 Remote Control Mode Setup 119 Flicker Reduction Setup 120 RF Remote Setup (SC-37 only 120 EXTENSION Setup (SC-35 only 120 Multi Channel Input Setup 120 11 The Advanced MCACC menu Making receiver settings from the Advanced MCACC menu...
Owner's Manual
Page 8
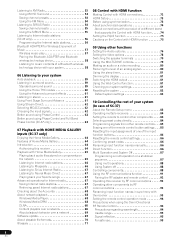
...with HDMI function (page 72) • The Advanced MCACC menu (page 104) • The System Setup and Other Setup menus (page 114) 13 Making maximum use of the remote control SC-37: • Operating multiple receivers (page 84) • Setting the remote to control other components (page... speaker settings • Automatically conducting optimum sound tuning (Full Auto MCACC) (page 43) 8 The Input Setup menu (page 45) (When using Phase Control and Full Band Phase Control (SC-37 only) (page 63) • Measuring the all EQ type (SYMMETRY/ALL CH ADJ/FRONT ALIGN) (page 104)...
...with HDMI function (page 72) • The Advanced MCACC menu (page 104) • The System Setup and Other Setup menus (page 114) 13 Making maximum use of the remote control SC-37: • Operating multiple receivers (page 84) • Setting the remote to control other components (page... speaker settings • Automatically conducting optimum sound tuning (Full Auto MCACC) (page 43) 8 The Input Setup menu (page 45) (When using Phase Control and Full Band Phase Control (SC-37 only) (page 63) • Measuring the all EQ type (SYMMETRY/ALL CH ADJ/FRONT ALIGN) (page 104)...
Owner's Manual
Page 9
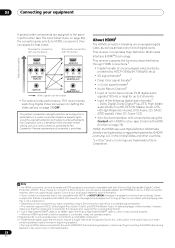
...as shown below. Note 1 The PQLS functions supported for reduced sound quality due to compression when sending Bluetooth signals. • Easy setup using a browser from the iTunes Store. • iPhone/iPod playback Your iPhone or iPod can be connected to the receiver's USB...designated AIR Studios Monitor: Features • Direct Energy HD Amplifier Through a collaboration, Pioneer and ICEpower have jointly development a unique class D amplifier called a "Direct Energy HD (High Fidelity Class D) amplifier". SC-37: PQLS Bit-stream/PQLS Multi Surround/PQLS 2ch Audio. We do this by focusing ...
...as shown below. Note 1 The PQLS functions supported for reduced sound quality due to compression when sending Bluetooth signals. • Easy setup using a browser from the iTunes Store. • iPhone/iPod playback Your iPhone or iPod can be connected to the receiver's USB...designated AIR Studios Monitor: Features • Direct Energy HD Amplifier Through a collaboration, Pioneer and ICEpower have jointly development a unique class D amplifier called a "Direct Energy HD (High Fidelity Class D) amplifier". SC-37: PQLS Bit-stream/PQLS Multi Surround/PQLS 2ch Audio. We do this by focusing ...

Owner's Manual
Page 10
...'s bottom panel while the power is on (or right after it on a level and stable surface. Loading the batteries In case of SC-37 In case of the batteries properly according to check initial operations; Do not use different batteries together. • When disposing of used batteries... the power is on or just after it on a color TV (the screen may have different voltages. Observe the following supplied accessories: In case of SC-37 • Setup microphone (cable: 5 m (16.4 ft.)) • Omni-directional remote control (CU-RF100) • RF adapter • IR blaster cable x2 ...
...'s bottom panel while the power is on (or right after it on a level and stable surface. Loading the batteries In case of SC-37 In case of the batteries properly according to check initial operations; Do not use different batteries together. • When disposing of used batteries... the power is on or just after it on a color TV (the screen may have different voltages. Observe the following supplied accessories: In case of SC-37 • Setup microphone (cable: 5 m (16.4 ft.)) • Omni-directional remote control (CU-RF100) • RF adapter • IR blaster cable x2 ...
Owner's Manual
Page 11
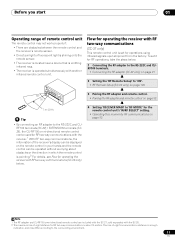
...-sight communications distance is a rough indication, and may not work properly if: • There are included with the SC-37, sold separately with RF two-way communications (SC-37 only) below. To set for RF two-way communications with the receiver.1 With RF two-way communications, the information ...1 Connecting the RF adapter to the RS-232C and CURF100 terminals. • Connecting the RF adapter (SC-37 only) on page 21 2 Setting the 'RF Remote Setup' to 'ON'. • RF Remote Setup (SC-37 only) on page 120 3 Pairing the RF adapter and remote control. • Pairing the...
...-sight communications distance is a rough indication, and may not work properly if: • There are included with the SC-37, sold separately with RF two-way communications (SC-37 only) below. To set for RF two-way communications with the receiver.1 With RF two-way communications, the information ...1 Connecting the RF adapter to the RS-232C and CURF100 terminals. • Connecting the RF adapter (SC-37 only) on page 21 2 Setting the 'RF Remote Setup' to 'ON'. • RF Remote Setup (SC-37 only) on page 120 3 Pairing the RF adapter and remote control. • Pairing the...
Owner's Manual
Page 13
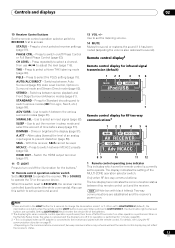
... change the illumination mode 1 or 2. Press to switch various modes (2 Pro Logic, Neo:6, etc.) (page 59). Use to put the receiver in the Remote Setup mode, the setup is canceled and the display turns off the illumination for Standard decoding and to switch on /off if no other operation is connected to...
... change the illumination mode 1 or 2. Press to switch various modes (2 Pro Logic, Neo:6, etc.) (page 59). Use to put the receiver in the Remote Setup mode, the setup is canceled and the display turns off the illumination for Standard decoding and to switch on /off if no other operation is connected to...

Owner's Manual
Page 15
... control of other components (page 83). STEREO - Press to component control using the following system: • White - STATUS - RECEIVER MULTI OPERATION SOURCE 1 R.SETUP 2 BD DVD DVR/BDR HDMI 10 TV CD NET RADIO ADAPTER 3 iPod USB TUNER SIRIUS XM INPUT SELECT TV CTRL RECEIVER 4 11 MASTER INPUT VOLUME... to switch on for the receiver. RETURN - Press to access the Video options (page 78). Controls and displays 02 Remote control (In case of SC-35) This section explains how to access the Home Menu (pages 43, 45, 73, 104, 114 and 117). Other controls (See page 48,...
... control of other components (page 83). STEREO - Press to component control using the following system: • White - STATUS - RECEIVER MULTI OPERATION SOURCE 1 R.SETUP 2 BD DVD DVR/BDR HDMI 10 TV CD NET RADIO ADAPTER 3 iPod USB TUNER SIRIUS XM INPUT SELECT TV CTRL RECEIVER 4 11 MASTER INPUT VOLUME... to switch on for the receiver. RETURN - Press to access the Video options (page 78). Controls and displays 02 Remote control (In case of SC-35) This section explains how to access the Home Menu (pages 43, 45, 73, 104, 114 and 117). Other controls (See page 48,...
Owner's Manual
Page 18
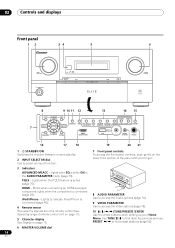
... STANDARD ADVANCED STEREO MULTI-ZONE SPEAKERS (PRESET) ENTER (PRESET) 7 STREAM DIRECT THX SURROUND SURROUND iPod iPhone (TUNE) HOME MENU RETURN HDMI 5 USB VIDEO CAMERA MCACC SETUP MIC PHONES 16 17 18 19 20 21 1 STANDBY/ON Switches the receiver between on page 16. 8 AUDIO PARAMETER Use to access the Audio...
... STANDARD ADVANCED STEREO MULTI-ZONE SPEAKERS (PRESET) ENTER (PRESET) 7 STREAM DIRECT THX SURROUND SURROUND iPod iPhone (TUNE) HOME MENU RETURN HDMI 5 USB VIDEO CAMERA MCACC SETUP MIC PHONES 16 17 18 19 20 21 1 STANDBY/ON Switches the receiver between on page 16. 8 AUDIO PARAMETER Use to access the Audio...
Owner's Manual
Page 19
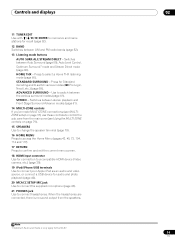
...FM radio bands (page 52). 13 Listening mode buttons AUTO SURR/ALC/STREAM DIRECT - When the headphones are connected, there is only apply to the SC-37. 19 En Switches between the various surround modes (page 61). STANDARD SURROUND - Use to switch between Auto Surround (page 59), Auto Level Control,... stereo playback and Front Stage Surround Advance modes (page 61). 14 MULTI-ZONE controls If you've made MULTI-ZONE connections (see MULTIZONE setup on page 37) use these controls to control the sub zone from the speakers. HOME THX - Note 1 Optimum Surround mode is no sound output from...
...FM radio bands (page 52). 13 Listening mode buttons AUTO SURR/ALC/STREAM DIRECT - When the headphones are connected, there is only apply to the SC-37. 19 En Switches between the various surround modes (page 61). STANDARD SURROUND - Use to switch between Auto Surround (page 59), Auto Level Control,... stereo playback and Front Stage Surround Advance modes (page 61). 14 MULTI-ZONE controls If you've made MULTI-ZONE connections (see MULTIZONE setup on page 37) use these controls to control the sub zone from the speakers. HOME THX - Note 1 Optimum Surround mode is no sound output from...
Owner's Manual
Page 21
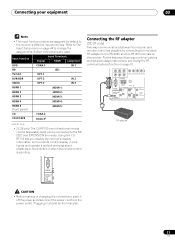
... Component COAX-1 IN 1 (BD) OPT-1 OPT-2 IN 2 OPT-3 IN 3 (HDMI-1) (HDMI-2) (HDMI-3) (HDMI-4) (HDMI-5) CD CD-R/TAPE COAX-2 COAX-3a a.SC-37 only. • SC-35 only: The CU-RF100 omni-directional remote control (separately sold) can be the final step. 21 En Using the CURF100 lets you display... it without worrying about obstacles or the direction in should be connected to the RS232C and EXTENSION terminals. Connecting the RF adapter (SC-37 only) Two-way communications between the receiver and remote control are possible by connecting the included RF adapter to the RS-232C and...
... Component COAX-1 IN 1 (BD) OPT-1 OPT-2 IN 2 OPT-3 IN 3 (HDMI-1) (HDMI-2) (HDMI-3) (HDMI-4) (HDMI-5) CD CD-R/TAPE COAX-2 COAX-3a a.SC-37 only. • SC-35 only: The CU-RF100 omni-directional remote control (separately sold) can be the final step. 21 En Using the CURF100 lets you display... it without worrying about obstacles or the direction in should be connected to the RS232C and EXTENSION terminals. Connecting the RF adapter (SC-37 only) Two-way communications between the receiver and remote control are possible by connecting the included RF adapter to the RS-232C and...
Owner's Manual
Page 23
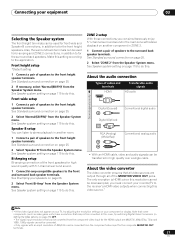
See Automatically conducting optimum sound tuning (Full Auto MCACC) on page 43. THX speaker system setup If you are different depending on the input signal or listening mode. Some tips for placement of input devices is not recommended. • For the ...
See Automatically conducting optimum sound tuning (Full Auto MCACC) on page 43. THX speaker system setup If you are different depending on the input signal or listening mode. Some tips for placement of input devices is not recommended. • For the ...
Owner's Manual
Page 27
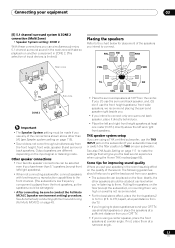
...on page 115 to do this . See Speaker system setting on page 25. 2 Select 'ZONE 2' from the Speaker System menu. ZONE 2 setup With these connections you must connect your monitor/TV to for the surround back speakers. See Speaker system setting on another room. 1 Connect a ...be converted. • Only signals with 5.1-channel surround sound. 1 Connect bi-amp compatible speakers to the front height speaker terminals. Front height setup *Default setting 1 Connect a pair of speakers to stereo playback in addition to do this . See Bi-amping your component or display. About...
...on page 115 to do this . See Speaker system setting on page 25. 2 Select 'ZONE 2' from the Speaker System menu. ZONE 2 setup With these connections you must connect your monitor/TV to for the surround back speakers. See Speaker system setting on another room. 1 Connect a ...be converted. • Only signals with 5.1-channel surround sound. 1 Connect bi-amp compatible speakers to the front height speaker terminals. Front height setup *Default setting 1 Connect a pair of speakers to stereo playback in addition to do this . See Bi-amping your component or display. About...
Owner's Manual
Page 28
... the component connected to this is not a malfunction. • Depending on the component you have connected, using the Control with HDMI function (see The Input Setup menu on page 45), the converter gives priority to HDMI, component, then composite (in the audio may result in the United States and other limited...
... the component connected to this is not a malfunction. • Depending on the component you have connected, using the Control with HDMI function (see The Input Setup menu on page 45), the converter gives priority to HDMI, component, then composite (in the audio may result in the United States and other limited...
Owner's Manual
Page 29
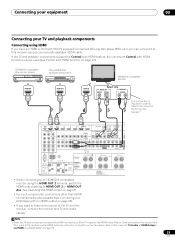
... 2 or HDMI OUT ALL. In this receiver using the HDMI OUT 2 terminal, switch the HDMI output setting to this case, set TV Audio at HDMI Setup to via the HDMI terminal, so there is required in order to listen to the sound of the TV over the receiver.1 HDMI BD IN... one DIGITAL OUT AUDIO OUT COAXIAL OPTICAL R ANALOG L This connection is no HDMI output on page 30). • If you can be used (see HDMI Setup on page 72). ATTENTION: ENCEINTE D'IMPEDANCE DE 6 Ω - 16 Ω . • When connecting to an HDMI/DVI-compatible monitor using a commercially available HDMI cable...
... 2 or HDMI OUT ALL. In this receiver using the HDMI OUT 2 terminal, switch the HDMI output setting to this case, set TV Audio at HDMI Setup to via the HDMI terminal, so there is required in order to listen to the sound of the TV over the receiver.1 HDMI BD IN... one DIGITAL OUT AUDIO OUT COAXIAL OPTICAL R ANALOG L This connection is no HDMI output on page 30). • If you can be used (see HDMI Setup on page 72). ATTENTION: ENCEINTE D'IMPEDANCE DE 6 Ω - 16 Ω . • When connecting to an HDMI/DVI-compatible monitor using a commercially available HDMI cable...
Owner's Manual
Page 30
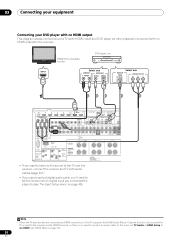
... Return Channel function, the sound of the TV is input to the receiver via HDMI (see The Input Setup menu on page 73). 30 En In this case, set TV Audio at HDMI Setup to connect an audio cable. HDMI IN HDMI/DVI-compatible monitor DVD player, etc. 03 Connecting your equipment...; If you use an optical digital audio cable, you'll need to via the HDMI terminal, so there is no HDMI output) to (see HDMI Setup on page 45). Select one AUDIO OUT DIGITAL OUT R ANALOG L COAXIAL OPTICAL VIDEO OUT VIDEO Select one COMPONENT VIDEO OUT PR PB Y HDMI BD IN...
... Return Channel function, the sound of the TV is input to the receiver via HDMI (see The Input Setup menu on page 73). 30 En In this case, set TV Audio at HDMI Setup to connect an audio cable. HDMI IN HDMI/DVI-compatible monitor DVD player, etc. 03 Connecting your equipment...; If you use an optical digital audio cable, you'll need to via the HDMI terminal, so there is no HDMI output) to (see HDMI Setup on page 45). Select one AUDIO OUT DIGITAL OUT R ANALOG L COAXIAL OPTICAL VIDEO OUT VIDEO Select one COMPONENT VIDEO OUT PR PB Y HDMI BD IN...
Owner's Manual
Page 31
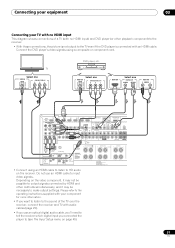
... tell the receiver which digital input you connected the player to the TV even if the DVD player is not output to (see The Input Setup menu on page 45). 31 En TV VIDEO IN VIDEO Select one DIGITAL OUT COAXIAL OPTICAL AUDIO OUT R ANALOG L HDMI BD IN IN 1 IN 2 IN...
... tell the receiver which digital input you connected the player to the TV even if the DVD player is not output to (see The Input Setup menu on page 45). 31 En TV VIDEO IN VIDEO Select one DIGITAL OUT COAXIAL OPTICAL AUDIO OUT R ANALOG L HDMI BD IN IN 1 IN 2 IN...

Owner's Manual
Page 32
... digital video devices, including HDD/DVD recorders and BD recorders. When doing so, also connect the receiver and TV by HDMI (see also The Input Setup menu on page 29). 32 En
... digital video devices, including HDD/DVD recorders and BD recorders. When doing so, also connect the receiver and TV by HDMI (see also The Input Setup menu on page 29). 32 En

Owner's Manual
Page 33
When doing so, also connect the receiver and TV by HDMI (see The Input Setup menu on page 29). 33 En ATTENTION: ENCEINTE D'IMPEDANCE DE 6 Ω - 16 Ω . • If your equipment 03 Connecting a satellite/cable receiver or other set-...
When doing so, also connect the receiver and TV by HDMI (see The Input Setup menu on page 29). 33 En ATTENTION: ENCEINTE D'IMPEDANCE DE 6 Ω - 16 Ω . • If your equipment 03 Connecting a satellite/cable receiver or other set-...


