Owner's Manual
Page 5
... antenna 29 FM wire antenna 29 Connecting external antennas 29 Plugging in the receiver 29 04 Controls and displays Front panel 30 Operating range of remote control unit 31 Display 32 Remote control 33 05 Listening to your model properly. After you have finished reading the instructions, ... surround effects 36 Listening in a safe place for buying this Pioneer product. Please read through these operating instructions so you will know how to station presets 42 07 The Advanced MCACC menu Making receiver settings from the Advanced MCACC menu 43 Automatic MCACC (Expert 44...
... antenna 29 FM wire antenna 29 Connecting external antennas 29 Plugging in the receiver 29 04 Controls and displays Front panel 30 Operating range of remote control unit 31 Display 32 Remote control 33 05 Listening to your model properly. After you have finished reading the instructions, ... surround effects 36 Listening in a safe place for buying this Pioneer product. Please read through these operating instructions so you will know how to station presets 42 07 The Advanced MCACC menu Making receiver settings from the Advanced MCACC menu 43 Automatic MCACC (Expert 44...

Owner's Manual
Page 8
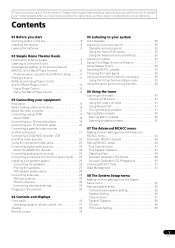
... such hazards as leakage and bursting. 01 Before you start Chapter 1: Before you start Checking what's in the box Please check that you've received the following places: - in damp or wet areas - The bottom panel gets hot when the power is turned on a color TV (the ...to leak, overheat, explode or catch fire. Don't install it on the following supplied accessories: • Setup microphone (cable: 5 m (16.4 ft.)) • Remote control unit • AA/IEC R6P dry cell batteries x2 • AM loop antenna • FM wire antenna • Warranty card • These operating instructions...
... such hazards as leakage and bursting. 01 Before you start Chapter 1: Before you start Checking what's in the box Please check that you've received the following places: - in damp or wet areas - The bottom panel gets hot when the power is turned on a color TV (the ...to leak, overheat, explode or catch fire. Don't install it on the following supplied accessories: • Setup microphone (cable: 5 m (16.4 ft.)) • Remote control unit • AA/IEC R6P dry cell batteries x2 • AM loop antenna • FM wire antenna • Warranty card • These operating instructions...

Owner's Manual
Page 9
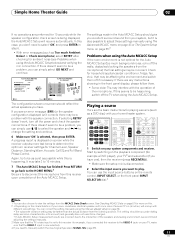
...out any operations during this process, and you can simply leave the receiver in Installing your speaker setup, but other sound options you can skip this receiver. See also Placing the speakers on page 27 for more on the remote control to set the HDMI Control mode to OFF, you can ...select. In most cases, you won't have to make changes for surround sound in the receiver's display, indicating that came with multichannel surround sound) are several other...
...out any operations during this process, and you can simply leave the receiver in Installing your speaker setup, but other sound options you can skip this receiver. See also Placing the speakers on page 27 for more on the remote control to set the HDMI Control mode to OFF, you can ...select. In most cases, you won't have to make changes for surround sound in the receiver's display, indicating that came with multichannel surround sound) are several other...

Owner's Manual
Page 10
...MENU T.EDIT ST CATEGORY HOME MENU iPod CTRL TUNE RETURN The Full Auto MCACC display appears once the microphone is connected.1 1a.Full Auto MCACC A/V RECEIVER Surr Back System : Normal Save SYMMETRY to : M1.MEMORY 1 START Exit Return 3 Make sure 'Normal' is selected,2 select an MCACC preset3..., then select START.4 Check that the remote control's operation selector switch is switched on and set to a comfortable volume level. 5 Wait for more on page 53). 4 Note that it's about...
...MENU T.EDIT ST CATEGORY HOME MENU iPod CTRL TUNE RETURN The Full Auto MCACC display appears once the microphone is connected.1 1a.Full Auto MCACC A/V RECEIVER Surr Back System : Normal Save SYMMETRY to : M1.MEMORY 1 START Exit Return 3 Make sure 'Normal' is selected,2 select an MCACC preset3..., then select START.4 Check that the remote control's operation selector switch is switched on and set to a comfortable volume level. 5 Wait for more on page 53). 4 Note that it's about...
Owner's Manual
Page 11
...the Auto MCACC Setup (too much Ambient Noise! If you have . Again, try to the VIDEO 1 jacks on your system components and receiver. RECEIVER MAIN ZONE2 DVD BD SOURCE 3 MULTI OPERATION DVR1 DVR2 VIDEO1 VIDEO2 VIDEO3 TV HOME MEDIA GALLERY CD CD-R PHONO HDMI TUNER XM SIRIUS ... YES/NO : L : C : R : SR : SBR : SBL : SL : SW : 10 OK 1a.Full Auto MCACC A/V RECEIVER YES YES YES YES YES YES YES YES RETRY Exit Cancel Exit Cancel The configuration shown on the remote control, INPUT SELECT, or the front panel INPUT SELECTOR dial.4 Note 1 You can use /...
...the Auto MCACC Setup (too much Ambient Noise! If you have . Again, try to the VIDEO 1 jacks on your system components and receiver. RECEIVER MAIN ZONE2 DVD BD SOURCE 3 MULTI OPERATION DVR1 DVR2 VIDEO1 VIDEO2 VIDEO3 TV HOME MEDIA GALLERY CD CD-R PHONO HDMI TUNER XM SIRIUS ... YES/NO : L : C : R : SR : SBR : SBL : SL : SW : 10 OK 1a.Full Auto MCACC A/V RECEIVER YES YES YES YES YES YES YES YES RETRY Exit Cancel Exit Cancel The configuration shown on the remote control, INPUT SELECT, or the front panel INPUT SELECTOR dial.4 Note 1 You can use /...
Owner's Manual
Page 15
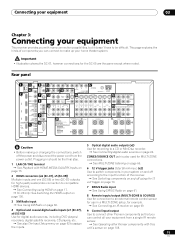
...remote sensor. See Operating other Pioneer components so that you can connect to make up your home theater system. ATTENTION: ENCEINTE D'IMPEDANCE DE 6Ω - 16Ω . Connecting your equipment 03 Chapter 3: Connecting your equipment This receiver provides you with HOME MEDIA GALLERY inputs on page 73. 2 HDMI connectors (x6 (SC-07), x5 (SC-05... to an external remote control sensor for use in a MULTI-ZONE setup, for example. See Connecting an IR receiver on page 69. 4 Optical and coaxial digital audio inputs (x7 (SC-07), x6 (SC-05)) Use for the SC-05 are the same ...
...remote sensor. See Operating other Pioneer components so that you can connect to make up your home theater system. ATTENTION: ENCEINTE D'IMPEDANCE DE 6Ω - 16Ω . Connecting your equipment 03 Chapter 3: Connecting your equipment This receiver provides you with HOME MEDIA GALLERY inputs on page 73. 2 HDMI connectors (x6 (SC-07), x5 (SC-05... to an external remote control sensor for use in a MULTI-ZONE setup, for example. See Connecting an IR receiver on page 69. 4 Optical and coaxial digital audio inputs (x7 (SC-07), x6 (SC-05)) Use for the SC-05 are the same ...
Owner's Manual
Page 18
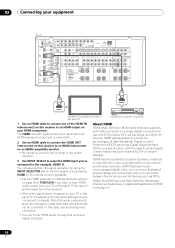
...AV devices such as DTVs. HDMI, the HDMI logo and High-Definition Multimedia Interface are trademarks or registered trademarks of the HDMI IN interconnects on this receiver to an HDMI output on page 96 to THROUGH if you 've connected to protect digital content transmitted and received by pressing HDMI on the remote... displays. 03 Connecting your HDMI component. Note that some components (such as Digital Visual Interface (DVI) in Setting the Audio options on your equipment SC-07 LAN(10/100) XM IN HDMI COAXIAL ASSIGNABLE IN 1 (DVD) BD IN IN 2 (CD) IN 3 (DVR2) IN 1 IN ...
...AV devices such as DTVs. HDMI, the HDMI logo and High-Definition Multimedia Interface are trademarks or registered trademarks of the HDMI IN interconnects on this receiver to an HDMI output on page 96 to THROUGH if you 've connected to protect digital content transmitted and received by pressing HDMI on the remote... displays. 03 Connecting your HDMI component. Note that some components (such as Digital Visual Interface (DVI) in Setting the Audio options on your equipment SC-07 LAN(10/100) XM IN HDMI COAXIAL ASSIGNABLE IN 1 (DVD) BD IN IN 2 (CD) IN 3 (DVR2) IN 1 IN ...

Owner's Manual
Page 25
...Connect the analog audio outputs of the source component to the CD inputs instead. Connect using INPUT SELECT (remote) or the INPUT SELECTOR dial (front panel) to the ground terminal on the recorder. AUDIO PARAMETER VIDEO ...outputs to the PHONO inputs. • If your equipment 03 Connecting analog audio sources This receiver features five stereo audio-only inputs. You can use with audio recorders. CONTROL ON/OFF...level outputs (i.e., it has a built-in phono pre-amp), connect it to select VIDEO 3. 25 En SC-07 LAN(10/100) XM IN HDMI COAXIAL ASSIGNABLE IN 1 (DVD) BD IN IN 2 (CD) ...
...Connect the analog audio outputs of the source component to the CD inputs instead. Connect using INPUT SELECT (remote) or the INPUT SELECTOR dial (front panel) to the ground terminal on the recorder. AUDIO PARAMETER VIDEO ...outputs to the PHONO inputs. • If your equipment 03 Connecting analog audio sources This receiver features five stereo audio-only inputs. You can use with audio recorders. CONTROL ON/OFF...level outputs (i.e., it has a built-in phono pre-amp), connect it to select VIDEO 3. 25 En SC-07 LAN(10/100) XM IN HDMI COAXIAL ASSIGNABLE IN 1 (DVD) BD IN IN 2 (CD) ...

Owner's Manual
Page 30
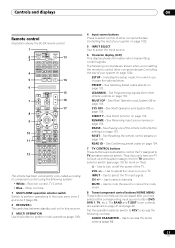
... 30 En 04 Controls and displays Chapter 4: Controls and displays Front panel Illustration shows the SC-07 front panel. 12 34 5 INPUT SELECTOR STANDBY/ON PHASE CONTROL ADVANCED MCACC DIGITAL VIDEO SCALER HDMI 6 SC-07 MASTER VOLUME 8 9 10 11 12 13 14 15 AUDIO PARAMETER (TUNE) VIDEO...memory currently being selected has not been corrected with Acoustic Calibration EQ Professional or when EQ is connected (page 17). 4 Remote sensor Receives the signals from the remote control (see Setting the Audio options on page 38 is upscaled (page 17)). Lights when Resolution is set to a ...
... 30 En 04 Controls and displays Chapter 4: Controls and displays Front panel Illustration shows the SC-07 front panel. 12 34 5 INPUT SELECTOR STANDBY/ON PHASE CONTROL ADVANCED MCACC DIGITAL VIDEO SCALER HDMI 6 SC-07 MASTER VOLUME 8 9 10 11 12 13 14 15 AUDIO PARAMETER (TUNE) VIDEO...memory currently being selected has not been corrected with Acoustic Calibration EQ Professional or when EQ is connected (page 17). 4 Remote sensor Receives the signals from the remote control (see Setting the Audio options on page 38 is upscaled (page 17)). Lights when Resolution is set to a ...

Owner's Manual
Page 31
...front panel controls, push gently on the lower third portion of remote control unit The remote control may not work properly if: • There are connected, there is operated simultaneously with another infrared remote control unit. 13 Listening mode buttons AUTO SURR/STREAM DIRECT -... (page 38) listening. Switches between the remote control and the receiver's remote sensor. • Direct sunlight or fluorescent light is shining onto the remote sensor. • The receiver is located near a device that is emitting infrared rays. • The receiver is no sound output from the main zone...
...front panel controls, push gently on the lower third portion of remote control unit The remote control may not work properly if: • There are connected, there is operated simultaneously with another infrared remote control unit. 13 Listening mode buttons AUTO SURR/STREAM DIRECT -... (page 38) listening. Switches between the remote control and the receiver's remote sensor. • Direct sunlight or fluorescent light is shining onto the remote sensor. • The receiver is located near a device that is emitting infrared rays. • The receiver is no sound output from the main zone...
Owner's Manual
Page 33
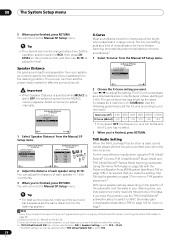
...this system assign it to select control of other components (see page 102 for this receiver. 3 MULTI OPERATION Use this ). - Use to turn on/off the power of the remote control button settings on this button to perform multi operations (page 105). 4 Input...directly on page 104. READ ID - CH +/- - See Direct function on page 102. Receiver control, TV Control • Blue - Controls and displays 04 Remote control Illustration shows the SC-07 remote control. 1 RECEIVER MAIN SOURCE 2 ZONE2 3 3 MULTI OPERATION DVD BD DVR1 DVR2 VIDEO1 VIDEO2 VIDEO3 TV HOME ...
...this system assign it to select control of other components (see page 102 for this receiver. 3 MULTI OPERATION Use this ). - Use to turn on/off the power of the remote control button settings on this button to perform multi operations (page 105). 4 Input...directly on page 104. READ ID - CH +/- - See Direct function on page 102. Receiver control, TV Control • Blue - Controls and displays 04 Remote control Illustration shows the SC-07 remote control. 1 RECEIVER MAIN SOURCE 2 ZONE2 3 3 MULTI OPERATION DVD BD DVR1 DVR2 VIDEO1 VIDEO2 VIDEO3 TV HOME ...

Owner's Manual
Page 34
...receiver via HDMI) (page 40). Use to access: MPX - Press TUNER first to select the surround/virtual back channel mode (page 39). NOISE CUT MODE 1 to select Auto Surround (page 35) or Stream Direct (page 38) listening. SC...to check selected receiver settings (page 100). MCACC - Attenuates (lowers) the level of the source currently being played back (this feature is available only when a Pioneer DVD recorder supporting ... of the buttons and the LCD light.1 15 Remote control operation selector switch Set to RCV to operate the receiver, TV or SOURCE to this switch is set ...
...receiver via HDMI) (page 40). Use to access: MPX - Press TUNER first to select the surround/virtual back channel mode (page 39). NOISE CUT MODE 1 to select Auto Surround (page 35) or Stream Direct (page 38) listening. SC...to check selected receiver settings (page 100). MCACC - Attenuates (lowers) the level of the source currently being played back (this feature is available only when a Pioneer DVD recorder supporting ... of the buttons and the LCD light.1 15 Remote control operation selector switch Set to RCV to operate the receiver, TV or SOURCE to this switch is set ...

Owner's Manual
Page 41
... three ways to FM and AM radio broadcasts using the number buttons on the remote control. 1 Press TUNER to select the tuner. 2 Use BAND to select ... at a time, press TUNE /. Press MPX to select the noise cut modes can be used when receiving AM broadcasts. In this case, you can simply enter the frequency directly using the automatic (search) and manual (...step) tuning functions. STANDARD ADV SURR 1 Press TUNER to change the frequency one . The receiver will start over. 41 En Press and hold TUNE / for about a second. If you want...
... three ways to FM and AM radio broadcasts using the number buttons on the remote control. 1 Press TUNER to select the tuner. 2 Use BAND to select ... at a time, press TUNE /. Press MPX to select the noise cut modes can be used when receiving AM broadcasts. In this case, you can simply enter the frequency directly using the automatic (search) and manual (...step) tuning functions. STANDARD ADV SURR 1 Press TUNER to change the frequency one . The receiver will start over. 41 En Press and hold TUNE / for about a second. If you want...

Owner's Manual
Page 42
See Listening to the radio on page 41 for more on the remote control to recall the station preset. 42 En Tip • To erase a station name, ...2 Press T.EDIT (TUNER EDIT). After pressing ENTER, the preset class and number stop blinking and the receiver stores the station. 06 Using the tuner Saving station presets If you often listen to a particular radio station, it's... convenient to have the receiver store the frequency for easy recall whenever you want to name. When saving an FM frequency, the MPX...
See Listening to the radio on page 41 for more on the remote control to recall the station preset. 42 En Tip • To erase a station name, ...2 Press T.EDIT (TUNER EDIT). After pressing ENTER, the preset class and number stop blinking and the receiver stores the station. 06 Using the tuner Saving station presets If you often listen to a particular radio station, it's... convenient to have the receiver store the frequency for easy recall whenever you want to name. When saving an FM frequency, the MPX...
Owner's Manual
Page 58
...be played with the Advanced Speaker Array (ASA) system (see About THX on the remote control, and then use the THX Ultra2/Select22 subwoofer setup to switch on BGC (boundary...-1.5 -2.0 -2.5 -3.0 • If you 're finished, press RETURN. 08 The System Setup menu 5 When you want. The receiver can adjust the distance of movie soundtracks.1 1 Select 'X-Curve' from the listening position. Speaker Distance 5. MCACC OFF M1.MEMORY 1...modes (see Using the Home THX modes on page 36). 2 Ultra2 for the SC-07, Select2 for the SC-05. 3 If you don't have surround back speakers, or just have one, you ...
...be played with the Advanced Speaker Array (ASA) system (see About THX on the remote control, and then use the THX Ultra2/Select22 subwoofer setup to switch on BGC (boundary...-1.5 -2.0 -2.5 -3.0 • If you 're finished, press RETURN. 08 The System Setup menu 5 When you want. The receiver can adjust the distance of movie soundtracks.1 1 Select 'X-Curve' from the listening position. Speaker Distance 5. MCACC OFF M1.MEMORY 1...modes (see Using the Home THX modes on page 36). 2 Ultra2 for the SC-07, Select2 for the SC-05. 3 If you don't have surround back speakers, or just have one, you ...

Owner's Manual
Page 61
...select one of 10 channels each. 1 Select the channel you want. After pressing ENTER, the preset class and number stop blinking and the receiver stores the XM channel. Required subscription plus superior sports coverage, uncensored talk and comedy, world-class entertainment, news, weather and more on ...which the channel is available on this information. Use / and ENTER to select channels you get The Best Radio on the remote control to recall the channel preset. XM HD Surround can be selected also with all presets is automatically chosen (without pressing ENTER) ...
...select one of 10 channels each. 1 Select the channel you want. After pressing ENTER, the preset class and number stop blinking and the receiver stores the XM channel. Required subscription plus superior sports coverage, uncensored talk and comedy, world-class entertainment, news, weather and more on ...which the channel is available on this information. Use / and ENTER to select channels you get The Best Radio on the remote control to recall the channel preset. XM HD Surround can be selected also with all presets is automatically chosen (without pressing ENTER) ...
Owner's Manual
Page 63
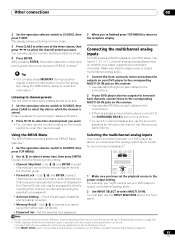
...inputting their channel number and providing the parental lock password. • Antenna Aiming - See Using the SIRIUS Menu below to recall this receiver. • Use standard RCA/phono jack cables for the connections. • If there is possible to play pictures simultaneously. Make ... select a preset. 4 Press ENTER. Selecting the multichannel analog inputs If you have 5.1, 6.1 or 7.1 channel analog outputs (depending on the remote control to recall the channel preset. 3 When you might need to have set the playback source to your player supports surround back channels). You...
...inputting their channel number and providing the parental lock password. • Antenna Aiming - See Using the SIRIUS Menu below to recall this receiver. • Use standard RCA/phono jack cables for the connections. • If there is possible to play pictures simultaneously. Make ... select a preset. 4 Press ENTER. Selecting the multichannel analog inputs If you have 5.1, 6.1 or 7.1 channel analog outputs (depending on the remote control to recall the channel preset. 3 When you might need to have set the playback source to your player supports surround back channels). You...

Owner's Manual
Page 66
d.SC-07 only: The video convert function does not work for the MULTI CH IN and PHONO inputs.) b.JPEG files cannot be played with your needs, the same source can also be controlled by the remote or front panel controls. Note 1 You can't use the features available with the input... INSTRUCTION MANUAL SELECTABLE VOIR LE MODE D'EMPLOI AUDIO IN DIGITAL IN AUDIO IN Different sources can be output. 09 Other connections MULTI-ZONE listening This receiver can power up your system. Sub zone (ZONE 3) Sub zone (ZONE 2) Main zone ( ) IN LAN(10/100) IN 4 CONTROL12 V XM IN TRIGGER ...
d.SC-07 only: The video convert function does not work for the MULTI CH IN and PHONO inputs.) b.JPEG files cannot be played with your needs, the same source can also be controlled by the remote or front panel controls. Note 1 You can't use the features available with the input... INSTRUCTION MANUAL SELECTABLE VOIR LE MODE D'EMPLOI AUDIO IN DIGITAL IN AUDIO IN Different sources can be output. 09 Other connections MULTI-ZONE listening This receiver can power up your system. Sub zone (ZONE 3) Sub zone (ZONE 2) Main zone ( ) IN LAN(10/100) IN 4 CONTROL12 V XM IN TRIGGER ...

Owner's Manual
Page 68
.... CONTROL ON/OFF SPEAKERS iPod DIRECT USB VIDEO3 INPUT MULTI-ZONE & SOURCE DIGITAL IN S-VIDEO VIDEO L AUDIO R MCACC SETUP MIC PHONES SC-07 INPUT SELECTOR STANDBY/ON PHASE CONTROL ADVANCED MCACC DIGITAL VIDEO SCALER HDMI MASTER VOLUME 1 Press MULTI-ZONE & SOURCE ON/OFF on the...-ZONE control has been switched ON. 2 Press CONTROL to select the sub zone(s) you to show in the display. 68 En See MULTIZONE remote controls on ,1 make this receiver. Sub zone (ZONE 3) Main zone ( ) IN LAN(10/100) CONTROL12 V IN 4 XM TRIGGER OUT IN (OUTPUT (CD-R) 1 - 3 ASSIGNABLE ...
.... CONTROL ON/OFF SPEAKERS iPod DIRECT USB VIDEO3 INPUT MULTI-ZONE & SOURCE DIGITAL IN S-VIDEO VIDEO L AUDIO R MCACC SETUP MIC PHONES SC-07 INPUT SELECTOR STANDBY/ON PHASE CONTROL ADVANCED MCACC DIGITAL VIDEO SCALER HDMI MASTER VOLUME 1 Press MULTI-ZONE & SOURCE ON/OFF on the...-ZONE control has been switched ON. 2 Press CONTROL to select the sub zone(s) you to show in the display. 68 En See MULTIZONE remote controls on ,1 make this receiver. Sub zone (ZONE 3) Main zone ( ) IN LAN(10/100) CONTROL12 V IN 4 XM TRIGGER OUT IN (OUTPUT (CD-R) 1 - 3 ASSIGNABLE ...

Owner's Manual
Page 69
... and SIRIUS Radio in different zones. (It is in standby. 4 • Remote operation may not work for the connection. • If you don't plan to use a separate IR receiver in the other Pioneer components with this receiver. You can also press MULTI-ZONE & SOURCE ON/OFF on the front panel ...8226; If you want to link a Pioneer component to the IR receiver, see the manual supplied with your IR receiver for the type of cable necessary for some functions) in one station at the same time), the IR receiver's remote sensor takes priority over the remote sensor on the rear of the IR ...
... and SIRIUS Radio in different zones. (It is in standby. 4 • Remote operation may not work for the connection. • If you don't plan to use a separate IR receiver in the other Pioneer components with this receiver. You can also press MULTI-ZONE & SOURCE ON/OFF on the front panel ...8226; If you want to link a Pioneer component to the IR receiver, see the manual supplied with your IR receiver for the type of cable necessary for some functions) in one station at the same time), the IR receiver's remote sensor takes priority over the remote sensor on the rear of the IR ...


