
Owner's Manual
Page 4
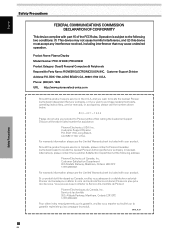
... renseignements sur la garantie, veuillez vous reporter au feuillet sur la garantie restreinte qui accompagne le produit. Product Name: Plasma Display Model Number: PRO-1010HD / PRO-810HD Product Category: Class B Personal Computers & Peripherals Responsible Party Name: PIONEER ELECTRONICS [USA] INC. BOX 1760, Long Beach, CA 90801-1760, U.S.A. Customer Support Division Address: P.O. and you wish to...
... renseignements sur la garantie, veuillez vous reporter au feuillet sur la garantie restreinte qui accompagne le produit. Product Name: Plasma Display Model Number: PRO-1010HD / PRO-810HD Product Category: Class B Personal Computers & Peripherals Responsible Party Name: PIONEER ELECTRONICS [USA] INC. BOX 1760, Long Beach, CA 90801-1760, U.S.A. Customer Support Division Address: P.O. and you wish to...
Owner's Manual
Page 5
... and Screen Adjustment ......... 35 Picture Adjustment (1 35 Picture Adjustment (2 36 Picture Adjustment (3 37 Returning to operate the Plasma Display properly. English Notes on this manual in the future. Before using your dealer install and set up the product....Installation and Connections 10 Installation of Terms 55 1 EN Contents Contents Safety Precautions i Before Proceeding 2 How to deliver this PIONEER product. PIONEER cannot assume liabilities for damage caused by qualified personnel with enough skill and competence. ENHANCE 43 Energy Saving Settings (ENERGY ...
... and Screen Adjustment ......... 35 Picture Adjustment (1 35 Picture Adjustment (2 36 Picture Adjustment (3 37 Returning to operate the Plasma Display properly. English Notes on this manual in the future. Before using your dealer install and set up the product....Installation and Connections 10 Installation of Terms 55 1 EN Contents Contents Safety Precautions i Before Proceeding 2 How to deliver this PIONEER product. PIONEER cannot assume liabilities for damage caused by qualified personnel with enough skill and competence. ENHANCE 43 Energy Saving Settings (ENERGY ...
Owner's Manual
Page 6
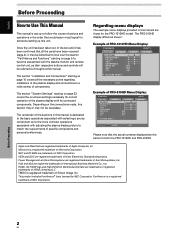
... operations in the order that would seem most logical for someone setting up to the more complex operations associated with the plasma monitor and remote control unit, as shown: Example of PRO-1010HD Menu Display: S TA N D A R D PICTURE SCREEN SETUP CONTRAST BRIGHTNESS COLOR TINT SHARPNESS MPEG NR DNR CTI :0 :0 :0 :0 :0 : MID : MID : ON INPUT1 OPTION...
... operations in the order that would seem most logical for someone setting up to the more complex operations associated with the plasma monitor and remote control unit, as shown: Example of PRO-1010HD Menu Display: S TA N D A R D PICTURE SCREEN SETUP CONTRAST BRIGHTNESS COLOR TINT SHARPNESS MPEG NR DNR CTI :0 :0 :0 :0 :0 : MID : MID : ON INPUT1 OPTION...
Owner's Manual
Page 7
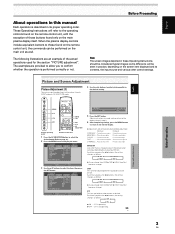
...SHARPNESS ... DNR This function reduced graininess to display the menu. CTI is not operating. 35 EN 3 EN When the plasma display controls include equivalent buttons to the desired setting. Before Proceeding Note The screen images depicted in these Operating Instructions should ...be seen in practice, depending on the main plasma display itself. Picture and Screen Adjustment Before Proceeding MENU 5/∞ 2/3 SET MENU 2/3 SET 5/∞ AV SELECTION Display operating panel...
...SHARPNESS ... DNR This function reduced graininess to display the menu. CTI is not operating. 35 EN 3 EN When the plasma display controls include equivalent buttons to the desired setting. Before Proceeding Note The screen images depicted in these Operating Instructions should ...be seen in practice, depending on the main plasma display itself. Picture and Screen Adjustment Before Proceeding MENU 5/∞ 2/3 SET MENU 2/3 SET 5/∞ AV SELECTION Display operating panel...
Owner's Manual
Page 9
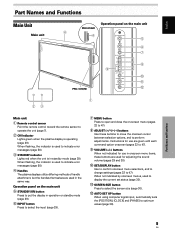
...29). 6 INPUT button Press to select the input (page 29). 7 MENU button Press to open and close the on the main unit PRO-810HD 4 4 5 6 7 8 9 0 = PRO-1010HD 1 23 Main unit 1 Remote control sensor Point the remote control toward the remote sensor to perform adjustments. When not indicated by onscreen ...error messages (page 50). 3 STANDBY indicator Lights red when the unit is used to indicate error messages (page 50). 4 Handles The plasma displays utilize differing methods of handle attachment, but the handles themselves are used for use are given with each command option onscreen (pages ...
...29). 6 INPUT button Press to select the input (page 29). 7 MENU button Press to open and close the on the main unit PRO-810HD 4 4 5 6 7 8 9 0 = PRO-1010HD 1 23 Main unit 1 Remote control sensor Point the remote control toward the remote sensor to perform adjustments. When not indicated by onscreen ...error messages (page 50). 3 STANDBY indicator Lights red when the unit is used to indicate error messages (page 50). 4 Handles The plasma displays utilize differing methods of handle attachment, but the handles themselves are used for use are given with each command option onscreen (pages ...
Owner's Manual
Page 11
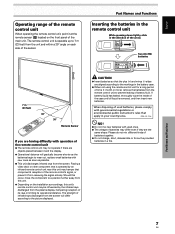
... new batteries with used batteries, please comply with governmental regulations or environmental public instruction's rules that is operated by the infrared rays discharged from the plasma display, hampering reception of batteries together. ¶ Do not charge, short, disassemble or throw the provided batteries in the direction of infrared rays discharged from...
... new batteries with used batteries, please comply with governmental regulations or environmental public instruction's rules that is operated by the infrared rays discharged from the plasma display, hampering reception of batteries together. ¶ Do not charge, short, disassemble or throw the provided batteries in the direction of infrared rays discharged from...
Owner's Manual
Page 12
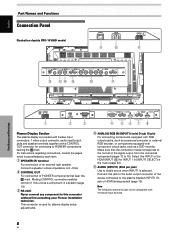
...;- 1 OUT CONTROL 2 RS-232C 3 ANALOG RGB IN D-Sub IINNPPUUTT11 AUDIO R L HDMI AUDIO INPUT2 R L HDMI 4 567 8 Plasma Display Section The plasma display is provided with 6 video input connectors, 1 video output connector, audio input/output jacks and speaker terminals together with monaural input sources.... (page 19). 3 RS-232C Never connect any component to PIONEER components bearing the Î mark. or components equipped with RGB outputs jacks, such as a DVD recorder. L - English Part Names and Functions Connection Panel Illustration depicts PRO-1010HD model.
...;- 1 OUT CONTROL 2 RS-232C 3 ANALOG RGB IN D-Sub IINNPPUUTT11 AUDIO R L HDMI AUDIO INPUT2 R L HDMI 4 567 8 Plasma Display Section The plasma display is provided with 6 video input connectors, 1 video output connector, audio input/output jacks and speaker terminals together with monaural input sources.... (page 19). 3 RS-232C Never connect any component to PIONEER components bearing the Î mark. or components equipped with RGB outputs jacks, such as a DVD recorder. L - English Part Names and Functions Connection Panel Illustration depicts PRO-1010HD model.

Owner's Manual
Page 13
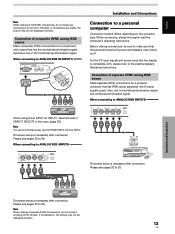
... Functions @ AUDIO R/L (INPUT3/4) (RCA Pin jacks) Use to INPUT3 or INPUT4 (page 19). # ANALOG RGB (INPUT5) (BNC jacks) For connecting components equipped with the plasma display; Connect these jacks to the audio output connectors of components connected to obtain sound when INPUT3 or INPUT4 is furnished with RGB outputs jacks...) Use the VIDEO OUT (INPUT4) jack to output the video signal to an external monitor or other end to switch the main power of the plasma display on and off or in the menu (page 23). 7 AUDIO (INPUT2) (RCA Pin jacks) Use to INPUT5 (page 19). 9 EN Part Names and...
... Functions @ AUDIO R/L (INPUT3/4) (RCA Pin jacks) Use to INPUT3 or INPUT4 (page 19). # ANALOG RGB (INPUT5) (BNC jacks) For connecting components equipped with the plasma display; Connect these jacks to the audio output connectors of components connected to obtain sound when INPUT3 or INPUT4 is furnished with RGB outputs jacks...) Use the VIDEO OUT (INPUT4) jack to output the video signal to an external monitor or other end to switch the main power of the plasma display on and off or in the menu (page 23). 7 AUDIO (INPUT2) (RCA Pin jacks) Use to INPUT5 (page 19). 9 EN Part Names and...
Owner's Manual
Page 15
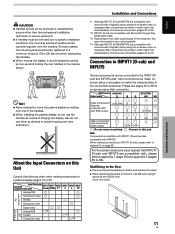
...247; If handles must be removed due to this jack. NO! ÷ Never attempt to move the plasma display by two persons holding only one of the handles. ÷ When installing the plasma display, do not use M6 with , please refer to appendix 1 (page 52) and appendix 2 (...connect anything. : Connect to specific installation conditions, the mounting screws should always be stored carefully together with the handles. When making connections to a plasma display (pages 12 to match the characteristics of 2N·m (20 kgf·cm) when reattaching the handles. ÷ When moving the display,...
...247; If handles must be removed due to this jack. NO! ÷ Never attempt to move the plasma display by two persons holding only one of the handles. ÷ When installing the plasma display, do not use M6 with , please refer to appendix 1 (page 52) and appendix 2 (...connect anything. : Connect to specific installation conditions, the mounting screws should always be stored carefully together with the handles. When making connections to a plasma display (pages 12 to match the characteristics of 2N·m (20 kgf·cm) when reattaching the handles. ÷ When moving the display,...
Owner's Manual
Page 17
... that the display is necessary after connection. Connection of composite SYNC analog RGB source Make composite SYNC connections for a component with , please refer to the plasma display's Operating Instructions. Please see pages 23 to 25. Connection of separate SYNC analog RGB source Make separate SYNC connections for INPUT1, select [D-sub] in...
... that the display is necessary after connection. Connection of composite SYNC analog RGB source Make composite SYNC connections for a component with , please refer to the plasma display's Operating Instructions. Please see pages 23 to 25. Connection of separate SYNC analog RGB source Make separate SYNC connections for INPUT1, select [D-sub] in...

Owner's Manual
Page 22
... secure the wire in place. Then, close tab firmly to the open position, and insert the wire. Insecure connections will produce excessive load on the plasma display, causing operation to protrude excessively, since they may touch each other, causing a short circuit. This will result in their terminals. The following the accompanying...
... secure the wire in place. Then, close tab firmly to the open position, and insert the wire. Insecure connections will produce excessive load on the plasma display, causing operation to protrude excessively, since they may touch each other, causing a short circuit. This will result in their terminals. The following the accompanying...
Owner's Manual
Page 24
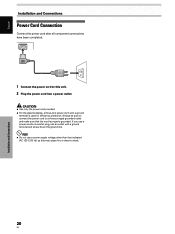
CAUTION ÷ Use only the power cord provided. ÷ For the plasma display, a three-core power cord with a ground terminal and screw down the ground line. Always be sure to connect the power cord to this may ...
CAUTION ÷ Use only the power cord provided. ÷ For the plasma display, a three-core power cord with a ground terminal and screw down the ground line. Always be sure to connect the power cord to this may ...
Owner's Manual
Page 25
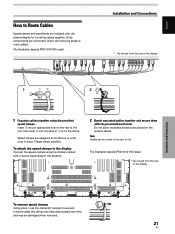
... model. Note Cables can be placed on the ends of the display. 12 1 Organize cables together using the 6 holes marked with the plasma display for bunching cables together. In some cases the clamp may have deteriorated over time and may be damaged when removed. 21 EN Installation ...and Connections * As viewed from the rear of 1 to fix the clamp. To attach the speed clamps to route cables. The illustration depicts PRO-1010 HD model. * As viewed from the rear of cables. Once components are connected, follow the following steps to the display Connect the speed ...
... model. Note Cables can be placed on the ends of the display. 12 1 Organize cables together using the 6 holes marked with the plasma display for bunching cables together. In some cases the clamp may have deteriorated over time and may be damaged when removed. 21 EN Installation ...and Connections * As viewed from the rear of 1 to fix the clamp. To attach the speed clamps to route cables. The illustration depicts PRO-1010 HD model. * As viewed from the rear of cables. Once components are connected, follow the following steps to the display Connect the speed ...
Owner's Manual
Page 29
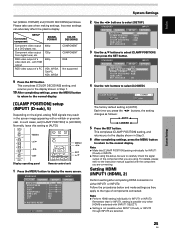
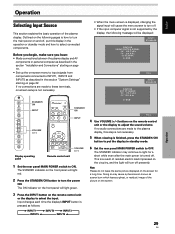
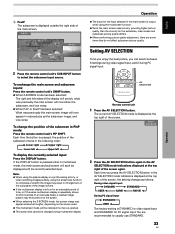
... the display shown in Step 3. 6 After completing settings, press the MENU button to return to either INPUT1 or INPUT2. Incorrect settings can adversely affect the plasma display. Normally, leave this setup, be sure to carefully check the signal output of a PC 480p 720p 480p VGA, WVGA, 720-PC, XGA, WXGA COLOR...
... the display shown in Step 3. 6 After completing settings, press the MENU button to return to either INPUT1 or INPUT2. Incorrect settings can adversely affect the plasma display. Normally, leave this setup, be sure to carefully check the signal output of a PC 480p 720p 480p VGA, WVGA, 720-PC, XGA, WXGA COLOR...
Owner's Manual
Page 33
...front panel will cause the menu screen to ON. Doing so may continue to select connected components. If no audio connections are made to the plasma display, this display in standby mode. SUB CAUTION OUT OF RANGE fH : 75.7kHz fV :120.0Hz D - The STANDBY indicator on ... displayed on page 22. Input changes each time the display's INPUT button is a result of the plasma display. Before you begin, make sure you have: • Made connections between the plasma display and AV components or personal computer as described in the section "Installation and Connections" starting on...
...front panel will cause the menu screen to ON. Doing so may continue to select connected components. If no audio connections are made to the plasma display, this display in standby mode. SUB CAUTION OUT OF RANGE fH : 75.7kHz fV :120.0Hz D - The STANDBY indicator on ... displayed on page 22. Input changes each time the display's INPUT button is a result of the plasma display. Before you begin, make sure you have: • Made connections between the plasma display and AV components or personal computer as described in the section "Installation and Connections" starting on...
Owner's Manual
Page 36
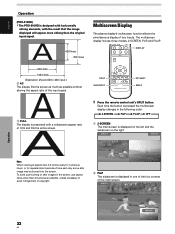
...the screen. The multiscreen display include three modes, 2-SCREEN, PinP, and PoutP. INPUT1 Operation 32 EN INPUT2 English Operation [PRO-810HD] * The PRO-810HD is designed with horizontally oblong elements, with a widescreen aspect ratio of 16:9 and fills the entire screen. DISPLAY 640...display fills the screen as much as possible without altering the aspect ratio of two inputs. A 480 lines 768 lines Multiscreen Display The plasma display's multiscreen function allows the simultaneous display of the input signal. A SPLIT SUB INPUT AXD1496 PIP SHIFT SWAP 1 Press the remote ...
...the screen. The multiscreen display include three modes, 2-SCREEN, PinP, and PoutP. INPUT1 Operation 32 EN INPUT2 English Operation [PRO-810HD] * The PRO-810HD is designed with horizontally oblong elements, with a widescreen aspect ratio of 16:9 and fills the entire screen. DISPLAY 640...display fills the screen as much as possible without altering the aspect ratio of two inputs. A 480 lines 768 lines Multiscreen Display The plasma display's multiscreen function allows the simultaneous display of the input signal. A SPLIT SUB INPUT AXD1496 PIP SHIFT SWAP 1 Press the remote ...
Owner's Manual
Page 37
... current AV SELECTION mode is displayed at the top right of the subscreen moves in a profit-making activity, or when exhibiting images publicly, using the plasma display in the following order: 3 Lower right 3 Upper right Lower left 2 Upper left sides of the main screen. 3 PoutP The subscreen is displayed outside the...
... current AV SELECTION mode is displayed at the top right of the subscreen moves in a profit-making activity, or when exhibiting images publicly, using the plasma display in the following order: 3 Lower right 3 Upper right Lower left 2 Upper left sides of the main screen. 3 PoutP The subscreen is displayed outside the...
Owner's Manual
Page 52
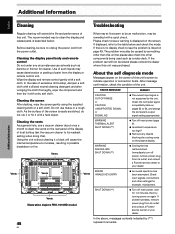
...gently using the supplied cleaning cloth or a soft cloth. Immediately turn off power, remove power plug from its outlet and consult a Pioneer service center or your dealer. Vents Vents Vents ERROR INVALID KEY ENTRY ¶ An invalid operation has been attempted. The recommended way...a month to clean the vents on the plasma display. ¶ Cooling fan has malfunctioned. Vents WARNING THERMAL ALERT SHUT DOWN (**) WARNING FAN FAILURE SHUT DOWN (**) ¶ Turn off main power, wait for cleaner. Vents Illustration depicts PRO-1010HD model. Cleaning the display panel body and ...
...gently using the supplied cleaning cloth or a soft cloth. Immediately turn off power, remove power plug from its outlet and consult a Pioneer service center or your dealer. Vents Vents Vents ERROR INVALID KEY ENTRY ¶ An invalid operation has been attempted. The recommended way...a month to clean the vents on the plasma display. ¶ Cooling fan has malfunctioned. Vents WARNING THERMAL ALERT SHUT DOWN (**) WARNING FAN FAILURE SHUT DOWN (**) ¶ Turn off main power, wait for cleaner. Vents Illustration depicts PRO-1010HD model. Cleaning the display panel body and ...
Owner's Manual
Page 53
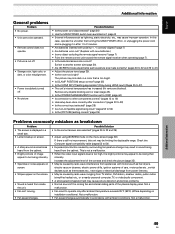
... to another screen size (page 30). • Are [SCREEN] mode adjustments such as hair dryers, electric vacuum cleaners, electric power drills, ignition systems of the plasma display panel. Remove any object occluding the remote signal receiver? (page 7) • Point the remote control unit toward the remote signal receiver when operating (page...
... to another screen size (page 30). • Are [SCREEN] mode adjustments such as hair dryers, electric vacuum cleaners, electric power drills, ignition systems of the plasma display panel. Remove any object occluding the remote signal receiver? (page 7) • Point the remote control unit toward the remote signal receiver when operating (page...
Owner's Manual
Page 54
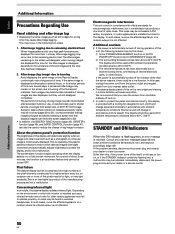
...displays images over a long period of about three minutes; The time for electromagnetic interference, but it is an inevitable by the plasma panel's protection function which the monitor is installed and used within ambient temperature conditions below 40°C (104°F). 3 The...1. Consult any onscreen messages (page 48) and check ambient conditions (temperature, etc.) and respond accordingly (page 49). Pixel failure The plasma display screen is composed of a high numbers of internal electronic parts, or other than 1 minute, after-image lagging may become less ...
...displays images over a long period of about three minutes; The time for electromagnetic interference, but it is an inevitable by the plasma panel's protection function which the monitor is installed and used within ambient temperature conditions below 40°C (104°F). 3 The...1. Consult any onscreen messages (page 48) and check ambient conditions (temperature, etc.) and respond accordingly (page 49). Pixel failure The plasma display screen is composed of a high numbers of internal electronic parts, or other than 1 minute, after-image lagging may become less ...


