Owner's Manual
Page 3
...1760, U.S.A. Increase the separation between the equipment and receiver. - Consult the dealer or an experienced radio/TV technician for connections. To prevent electromagnetic interference with the instructions, may cause harmful interference to radio communications. D1...Name: Plasma Display System (Plasma Display) (Media Receiver) Model Number: PDP-5060HD PDP-4360HD (PDP-506PU) (PDP-436PU) (PDP-R06U) (PDP-R06U) Product Category: Class B Personal Computers & Peripherals Responsible Party Name: PIONEER ELECTRONICS SERVICE, INC. DOMINGUEZ ST. If this device must accept any ...
...1760, U.S.A. Increase the separation between the equipment and receiver. - Consult the dealer or an experienced radio/TV technician for connections. To prevent electromagnetic interference with the instructions, may cause harmful interference to radio communications. D1...Name: Plasma Display System (Plasma Display) (Media Receiver) Model Number: PDP-5060HD PDP-4360HD (PDP-506PU) (PDP-436PU) (PDP-R06U) (PDP-R06U) Product Category: Class B Personal Computers & Peripherals Responsible Party Name: PIONEER ELECTRONICS SERVICE, INC. DOMINGUEZ ST. If this device must accept any ...
Owner's Manual
Page 4
... Setting Canadian French ratings ........ 42 Temporarily deactivating the Parental Control 43 Setting your model properly. Contents Contents Thank you for watching digital and/or conventional TV channels 20 Connecting VHF/UHF antennas and a Cable 20 Connecting a Cable box 20 Inserting the CableCARD 21 Switching between antenna A and B .......21 Preparing the remote... Setup Menu Configuration 37 AV mode menus 37 PC mode menus 37 Menu operations 37 Connecting the system cable 19 Cable connections for buying this Pioneer product.
... Setting Canadian French ratings ........ 42 Temporarily deactivating the Parental Control 43 Setting your model properly. Contents Contents Thank you for watching digital and/or conventional TV channels 20 Connecting VHF/UHF antennas and a Cable 20 Connecting a Cable box 20 Inserting the CableCARD 21 Switching between antenna A and B .......21 Preparing the remote... Setup Menu Configuration 37 AV mode menus 37 PC mode menus 37 Menu operations 37 Connecting the system cable 19 Cable connections for buying this Pioneer product.

Owner's Manual
Page 5
...size for received 4:3 aspect ratio signals 65 Changing the brightness at both sides of the screen (Side Mask 66 Language setting 66 TV Guide On Screen™ navigation ....... 47 12 Enjoying through External Equipment The Listings screen 47 About External Equipment 67 Recording programs ... only) ........ 63 Power Management (PC mode only 63 Image position adjustment (AV mode only 63 console or camcorder 69 Recording digital TV programs using a VCR 69 Avoiding unwanted feedback 69 Connecting a recorder 70 Connecting other audio equipment ......... 70 Connecting an AV receiver 70...
...size for received 4:3 aspect ratio signals 65 Changing the brightness at both sides of the screen (Side Mask 66 Language setting 66 TV Guide On Screen™ navigation ....... 47 12 Enjoying through External Equipment The Listings screen 47 About External Equipment 67 Recording programs ... only) ........ 63 Power Management (PC mode only 63 Image position adjustment (AV mode only 63 console or camcorder 69 Recording digital TV programs using a VCR 69 Avoiding unwanted feedback 69 Connecting a recorder 70 Connecting other audio equipment ......... 70 Connecting an AV receiver 70...
Owner's Manual
Page 7
... and accessories manufactured by other component. • Images which furthers Pioneer's continued goal of the Pioneer PDP-5060HD/PDP-4360HD Plasma Display System will not be displayed for over 3 times longer than the PIONEER stand or installation bracket may cause the internal temperature to rise, ... tube-type televisions) can be installed by using the still picture mode from a TV, VCR, DVD player or any still image, it is strongly recommended. With the Pioneer PureVision PDP-5060HD/PDP-4360HD, you can be assured of a high quality Plasma Display System with all ...
... and accessories manufactured by other component. • Images which furthers Pioneer's continued goal of the Pioneer PDP-5060HD/PDP-4360HD Plasma Display System will not be displayed for over 3 times longer than the PIONEER stand or installation bracket may cause the internal temperature to rise, ... tube-type televisions) can be installed by using the still picture mode from a TV, VCR, DVD player or any still image, it is strongly recommended. With the Pioneer PureVision PDP-5060HD/PDP-4360HD, you can be assured of a high quality Plasma Display System with all ...

Owner's Manual
Page 14
...COMPONENT VIDEO S-VIDEO VIDEO INPUT 4 L AUDIO R PC ANALOG RGB PC 4 56 7 8 1 POWER ON indicator 2 STANDBY indicator 3 REC TIMER indicator 4 STANDBY/ON button 5 TV GUIDE button* 6 INPUT button (ENTER button*) 7 VOLUME UP/DOWN buttons (UP/DOWN buttons*) 8 CHANNEL UP/DOWN buttons (LEFT/ RIGHT buttons*) 9 10 11 12 13 9... 4 terminal (VIDEO) 12 INPUT 4/PC terminals (AUDIO) 13 PC INPUT terminal (ANALOG RGB) The buttons with asterisks (*) can operate the TV Guide On Screen™ system. 14 En 04 Part Names Media Receiver Front view 123 STANDBY/ON REC ON STANDBY TIMER PULL OPEN Pull this...
...COMPONENT VIDEO S-VIDEO VIDEO INPUT 4 L AUDIO R PC ANALOG RGB PC 4 56 7 8 1 POWER ON indicator 2 STANDBY indicator 3 REC TIMER indicator 4 STANDBY/ON button 5 TV GUIDE button* 6 INPUT button (ENTER button*) 7 VOLUME UP/DOWN buttons (UP/DOWN buttons*) 8 CHANNEL UP/DOWN buttons (LEFT/ RIGHT buttons*) 9 10 11 12 13 9... 4 terminal (VIDEO) 12 INPUT 4/PC terminals (AUDIO) 13 PC INPUT terminal (ANALOG RGB) The buttons with asterisks (*) can operate the TV Guide On Screen™ system. 14 En 04 Part Names Media Receiver Front view 123 STANDBY/ON REC ON STANDBY TIMER PULL OPEN Pull this...
Owner's Manual
Page 16
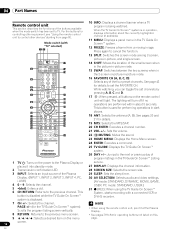
...MENU: Displays a panel menu in -picture mode. 4 16 FAVORITE CH (A, B, C, D): Selects any of the four preset channels. When the TV Guide On Screen™ system is being watched. places it at the Plasma Display. 8 RETURN: Returns to the previous menu screen. • ...0 - 9: Selects the channel. Mode switch (with a connected VCR or D-VHS recorder. 7 CH +/-: Selects the channel. This button is disabled while the TV Guide On Screen™ system is used for performing operations in operation, displays information about 5 seconds. 9 24 This button is displayed. 31 (REC...
...MENU: Displays a panel menu in -picture mode. 4 16 FAVORITE CH (A, B, C, D): Selects any of the four preset channels. When the TV Guide On Screen™ system is being watched. places it at the Plasma Display. 8 RETURN: Returns to the previous menu screen. • ...0 - 9: Selects the channel. Mode switch (with a connected VCR or D-VHS recorder. 7 CH +/-: Selects the channel. This button is disabled while the TV Guide On Screen™ system is used for performing operations in operation, displays information about 5 seconds. 9 24 This button is displayed. 31 (REC...

Owner's Manual
Page 20
...Similarly, do not connect a cable from an antenna to enjoy clearer pictures. 05 Preparation Cable connections for watching digital and/or conventional TV channels This system is equipped with an F-type connector, plug it into the antenna terminal at the rear of the INPUT 1 VIDEO...1 COM V Connecting VHF/UHF antennas and a Cable VHF antenna UHF antenna U/Vmixer AV cable (commercially available) Cable TV Coaxial ANT B IN ANT/ CABLE A IN Media Receiver (rear) Cable TV Coaxial Cable box NOTE • You can connect that terminal to the ANT/CABLE A IN terminal using a Cable ...
...Similarly, do not connect a cable from an antenna to enjoy clearer pictures. 05 Preparation Cable connections for watching digital and/or conventional TV channels This system is equipped with an F-type connector, plug it into the antenna terminal at the rear of the INPUT 1 VIDEO...1 COM V Connecting VHF/UHF antennas and a Cable VHF antenna UHF antenna U/Vmixer AV cable (commercially available) Cable TV Coaxial ANT B IN ANT/ CABLE A IN Media Receiver (rear) Cable TV Coaxial Cable box NOTE • You can connect that terminal to the ANT/CABLE A IN terminal using a Cable ...

Owner's Manual
Page 21
...IN terminal has been connected with the coaxial cable from the other antenna. • Pressing ANT while watching in the 2-screen mode (TV image and video image) with TV selected will display the TV image of the other antenna. • Pressing ANT while watching in the 2-screen mode with two...DIOGPITTAICLASOLUUBT WOOFER Cable CARD WHITE 3 LACK M CABLE Insert the specified CableCARD™ into the Cable CARD slot as far as it by the cable TV company; Tab Switching between antenna A and B To watch broadcasts via the two antennas, you use the POD service provided by pressing ANT on ...
...IN terminal has been connected with the coaxial cable from the other antenna. • Pressing ANT while watching in the 2-screen mode (TV image and video image) with TV selected will display the TV image of the other antenna. • Pressing ANT while watching in the 2-screen mode with two...DIOGPITTAICLASOLUUBT WOOFER Cable CARD WHITE 3 LACK M CABLE Insert the specified CableCARD™ into the Cable CARD slot as far as it by the cable TV company; Tab Switching between antenna A and B To watch broadcasts via the two antennas, you use the POD service provided by pressing ANT on ...
Owner's Manual
Page 25
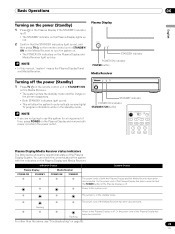
...En The system is in the standby mode. Plasma Display STANDBY indicator POWER ON indicator POWER button Media Receiver Turning off the power (Standby) 1 Press TV a on the remote control unit or STANDBY/ON on the Media Receiver. • The system enters the standby mode and the image on the ...screen disappears. • Both STANDBY indicators light up red. • This will allow the system to automatically receive digital TV program information while in the standby mode. Power to the Plasma Display is off. Or the power cord of the system with the indicators on...
...En The system is in the standby mode. Plasma Display STANDBY indicator POWER ON indicator POWER button Media Receiver Turning off the power (Standby) 1 Press TV a on the remote control unit or STANDBY/ON on the Media Receiver. • The system enters the standby mode and the image on the ...screen disappears. • Both STANDBY indicators light up red. • This will allow the system to automatically receive digital TV program information while in the standby mode. Power to the Plasma Display is off. Or the power cord of the system with the indicators on...

Owner's Manual
Page 26
...to 9. Using 0 - 9 and • (dot) on the remote control unit Select channels directly by TV stations as CH +/- NOTE • When watching a digital TV program, you may see "Setting up TV channels that shows information about the currently selected channel. To decrease the channel number, press CH -. •... Screen™ system, the channel banner may press CH ENTER to restore the currently tuned channel. 06 Basic Operations Watching TV channels Unless you set to "TV", press ANT on the remote control unit to select antenna A or B. • Make this selection depending on the ...
...to 9. Using 0 - 9 and • (dot) on the remote control unit Select channels directly by TV stations as CH +/- NOTE • When watching a digital TV program, you may see "Setting up TV channels that shows information about the currently selected channel. To decrease the channel number, press CH -. •... Screen™ system, the channel banner may press CH ENTER to restore the currently tuned channel. 06 Basic Operations Watching TV channels Unless you set to "TV", press ANT on the remote control unit to select antenna A or B. • Make this selection depending on the ...

Owner's Manual
Page 27
...is available when the channel or program is changed, you will appear. With a language other than English, French, and Spanish are watching a digital TV program without sound or language information, "N/A" appears on the remote control unit. To decrease the volume, press VOL -. • VOLUME UP/DOWN ... the sound output, press MUTING. To quit muting, press MUTING again. Media Receiver (front view) STANDBY/ON REC ON STANDBY TIMER TV GUIDE ENTER DOWN UP LEFT RIGHT INPUT DOWN UP VOLUME DOWN UP CHANNEL VOLUME UP/DOWN Each time you can switch among the languages by...
...is available when the channel or program is changed, you will appear. With a language other than English, French, and Spanish are watching a digital TV program without sound or language information, "N/A" appears on the remote control unit. To decrease the volume, press VOL -. • VOLUME UP/DOWN ... the sound output, press MUTING. To quit muting, press MUTING again. Media Receiver (front view) STANDBY/ON REC ON STANDBY TIMER TV GUIDE ENTER DOWN UP LEFT RIGHT INPUT DOWN UP VOLUME DOWN UP CHANNEL VOLUME UP/DOWN Each time you can switch among the languages by...
Owner's Manual
Page 28
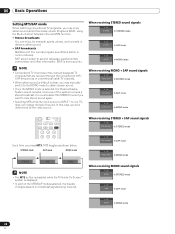
... selected, the Plasma Display System sound remains mono even if the system receives a stereo broadcast. 06 Basic Operations Setting MTS/SAP mode When watching conventional TV programs, you may manually switch to the MONO mode to 4 or PC does not change the type of the MTS/SAP modes selected, the display... A 125 MONO In MONO mode 28 En STEREO mode SAP mode MONO mode STEREO SAP MONO NOTE • The MTS button is disabled while the TV Guide On Screen™ system is determined by the video source. You must reselect the STEREO mode if you want to hear stereo sound again...
... selected, the Plasma Display System sound remains mono even if the system receives a stereo broadcast. 06 Basic Operations Setting MTS/SAP mode When watching conventional TV programs, you may manually switch to the MONO mode to 4 or PC does not change the type of the MTS/SAP modes selected, the display... A 125 MONO In MONO mode 28 En STEREO mode SAP mode MONO mode STEREO SAP MONO NOTE • The MTS button is disabled while the TV Guide On Screen™ system is determined by the video source. You must reselect the STEREO mode if you want to hear stereo sound again...

Owner's Manual
Page 29
... logo NOTE • The above information is switched among 2-screen, picture-in broadcast signals. • If you do not setup the TV Guide On Screen™ system, the channel banner may not display certain types of useful information, using HTML text. 1 Press SPLIT to...picture, and single-screen. This service presents various types of program information. Basic Operations 06 English Viewing a channel banner While watching a TV program, pressing INFO causes the following procedure to view the POD display. 29 En Using the multiscreen functions Splitting the screen Use the following...
... logo NOTE • The above information is switched among 2-screen, picture-in broadcast signals. • If you do not setup the TV Guide On Screen™ system, the channel banner may not display certain types of useful information, using HTML text. 1 Press SPLIT to...picture, and single-screen. This service presents various types of program information. Basic Operations 06 English Viewing a channel banner While watching a TV program, pressing INFO causes the following procedure to view the POD display. 29 En Using the multiscreen functions Splitting the screen Use the following...

Owner's Manual
Page 30
Freezing images Use the following procedure to operate picture and sound. NOTE • The SPLIT button is disabled while the TV Guide On Screen™ system is the active screen which will be frozen. • When you are watching. Left screen is displayed. • The ... Operations • In 2-screen or picture-in anti-clockwise. 2 To select the desired input source, press the appropriate input source button. • If watching TV programs, press CH +/- to use this function when it is not available, a warning message appears. • Image FREEZE is shown on the right screen while...
Freezing images Use the following procedure to operate picture and sound. NOTE • The SPLIT button is disabled while the TV Guide On Screen™ system is the active screen which will be frozen. • When you are watching. Left screen is displayed. • The ... Operations • In 2-screen or picture-in anti-clockwise. 2 To select the desired input source, press the appropriate input source button. • If watching TV programs, press CH +/- to use this function when it is not available, a warning message appears. • Image FREEZE is shown on the right screen while...
Owner's Manual
Page 31
... International, Inc. Follow the instructions shown on page 32). 31 En Setup may be accessed from the one given in order to receive updated TV program listings (see Screen 14). • If you to begin to find out what's on right now or during the coming week, by channel ... the setup screens may take up leads you connect a cable box through the setup process. and/or one week (see Screen 23). NOTE • The TV Guide On Screen™ interactive program guide provides listings for satellite services. • Depending on for a device in the Guide. • Press ENTER to...
... International, Inc. Follow the instructions shown on page 32). 31 En Setup may be accessed from the one given in order to receive updated TV program listings (see Screen 14). • If you to begin to find out what's on right now or during the coming week, by channel ... the setup screens may take up leads you connect a cable box through the setup process. and/or one week (see Screen 23). NOTE • The TV Guide On Screen™ interactive program guide provides listings for satellite services. • Depending on for a device in the Guide. • Press ENTER to...

Owner's Manual
Page 32
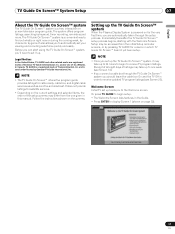
...8226; pressing the number keys or • pressing / to display a number, and then / to move to another field. • Press ENTER to watching TV. • "Don't remind me again"). If you realize you to display Screen 3. Screen 1: Country • This screen asks you the location of the procedure... gives you the opportunity to the previous screens. 07 TV Guide On Screen™ System Setup Reminder Screen If you previously skipped Guide setup, you see the Reminder Screen when you power on your...
...8226; pressing the number keys or • pressing / to display a number, and then / to move to another field. • Press ENTER to watching TV. • "Don't remind me again"). If you realize you to display Screen 3. Screen 1: Country • This screen asks you the location of the procedure... gives you the opportunity to the previous screens. 07 TV Guide On Screen™ System Setup Reminder Screen If you previously skipped Guide setup, you see the Reminder Screen when you power on your...

Owner's Manual
Page 33
... Box Brand Name • Press / to select a cable box brand. • Press ENTER to the cable box. Screen 5: Which TV Guide input is properly installed. • Press ENTER to display Screen 7. TV Guide On Screen™ System Setup 07 Screen 3: Do you have a Cable Box? • If you select "Yes", you see...
... Box Brand Name • Press / to select a cable box brand. • Press ENTER to the cable box. Screen 5: Which TV Guide input is properly installed. • Press ENTER to display Screen 7. TV Guide On Screen™ System Setup 07 Screen 3: Do you have a Cable Box? • If you select "Yes", you see...
Owner's Manual
Page 34
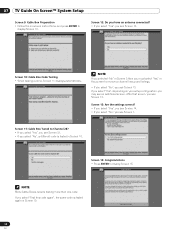
... you have an antenna connected? • If you select "Yes", you see Screen 13. Screen 14: Congratulations • Press ENTER to display Screen 10. 07 TV Guide On Screen™ System Setup Screen 9: Cable Box Preparation • Follow the on your setup configuration, you select "Test this screen to Channel 28...
... you have an antenna connected? • If you select "Yes", you see Screen 13. Screen 14: Congratulations • Press ENTER to display Screen 10. 07 TV Guide On Screen™ System Setup Screen 9: Cable Box Preparation • Follow the on your setup configuration, you select "Test this screen to Channel 28...

Owner's Manual
Page 35
... • When testing is properly installed. • Press ENTER, and you see Screen 21. Make sure the G-LINK cable is done, Screen 20 displays automatically. TV Guide On Screen™ System Setup 07 Screen 15: Is a VCR Connected? • If you select "Yes", you see Screen 16. • If you select...
... • When testing is properly installed. • Press ENTER, and you see Screen 21. Make sure the G-LINK cable is done, Screen 20 displays automatically. TV Guide On Screen™ System Setup 07 Screen 15: Is a VCR Connected? • If you select "Yes", you see Screen 16. • If you select...

Owner's Manual
Page 36
... On Screen™ System Setup Screen 20: Did your Guide. • Press ENTER to watch TV. 36 En Screen 21: Confirming Your Settings Verify the Setup information is correct. • If it is, select "Yes, end setup", and you see Screen ...
... On Screen™ System Setup Screen 20: Did your Guide. • Press ENTER to watch TV. 36 En Screen 21: Confirming Your Settings Verify the Setup information is correct. • If it is, select "Yes, end setup", and you see Screen ...


