

Owner's Manual
Page 2
... video-ondemand, a cable operator's enhanced program guide and data-enhanced television services may require the use of the obsolete outlet. 10) Protect the power cord from being walked on or pinched particularly at plugs, convenience receptacles, and the point where they exit from tip-over. 13) Unplug this ..., consult an electrician for long periods of the polarized or grounding-type plug. Certain advanced and interactive digital cable services such as power-supply cord or plug is used, use this apparatus during lightning storms or when unused for replacement of a set-top box.
... video-ondemand, a cable operator's enhanced program guide and data-enhanced television services may require the use of the obsolete outlet. 10) Protect the power cord from being walked on or pinched particularly at plugs, convenience receptacles, and the point where they exit from tip-over. 13) Unplug this ..., consult an electrician for long periods of the polarized or grounding-type plug. Certain advanced and interactive digital cable services such as power-supply cord or plug is used, use this apparatus during lightning storms or when unused for replacement of a set-top box.
Owner's Manual
Page 4
...closed captions 43 Activating the closed caption 44 Changing the language 27 4 En In some countries or regions, the shape of the power plug and power outlet may sometimes differ from Falling Over 18 08 Menu Setup Menu Configuration 37 AV mode menus 37 PC mode menus 37 Menu ...operations 37 Connecting the system cable 19 Cable connections for buying this Pioneer product. However the method of connecting and operating the unit is the...
...closed captions 43 Activating the closed caption 44 Changing the language 27 4 En In some countries or regions, the shape of the power plug and power outlet may sometimes differ from Falling Over 18 08 Menu Setup Menu Configuration 37 AV mode menus 37 PC mode menus 37 Menu ...operations 37 Connecting the system cable 19 Cable connections for buying this Pioneer product. However the method of connecting and operating the unit is the...

Owner's Manual
Page 5
... adjustments 60 Using PureCinema 60 Using Color Temp 60 Using CTI 60 Eliminating noise from images 61 Sound adjustments 61 FOCUS 62 Front Surround 62 Power Control 62 Energy Save 62 No Signal off (AV mode only 62 No Operation off (AV mode only) ........ 63... Power Management (PC mode only 63 Image position adjustment (AV mode only 63 console or camcorder 69 Recording digital TV programs using a VCR 69 Avoiding unwanted ...
... adjustments 60 Using PureCinema 60 Using Color Temp 60 Using CTI 60 Eliminating noise from images 61 Sound adjustments 61 FOCUS 62 Front Surround 62 Power Control 62 Energy Save 62 No Signal off (AV mode only 62 No Operation off (AV mode only) ........ 63... Power Management (PC mode only 63 Image position adjustment (AV mode only 63 console or camcorder 69 Recording digital TV programs using a VCR 69 Avoiding unwanted ...
Owner's Manual
Page 7
...the Media Receiver. • Do not invert the product. When the surrounding or internal temperature exceeds a certain degree, the display will automatically power off in the "WIDE" or "FULL" screen setting for example, a traditional tube-type television). It also eliminates the need for many ...: • Permanent residual images upon the phosphors of the panel. • The existence of a minute number of the Pioneer PDP-5060HD/PDP-4360HD Plasma Display System will not be assured of a high quality Plasma Display System with all other component. • Images which furthers...
...the Media Receiver. • Do not invert the product. When the surrounding or internal temperature exceeds a certain degree, the display will automatically power off in the "WIDE" or "FULL" screen setting for example, a traditional tube-type television). It also eliminates the need for many ...: • Permanent residual images upon the phosphors of the panel. • The existence of a minute number of the Pioneer PDP-5060HD/PDP-4360HD Plasma Display System will not be assured of a high quality Plasma Display System with all other component. • Images which furthers...
Owner's Manual
Page 10
...period of service or repair work by a qualified technician. Be careful not to perform repairs. a. d. Improper adjustment of your dealer or local power company. 12. f. Any noticeable abnormality in the product indicates that the service person uses replacement parts specified by the manufacturer, or those described...must be observed closely. 4. The screen may be moved with impact. The Plasma Display weighs about 31.8 kg (70.1 lbs.) for the PDP-506PU and about 25.8 kg (56.9 lbs.) for the PDP436PU. Observe warnings-All warnings on the product. 16. Attachments-Do not use...
...period of service or repair work by a qualified technician. Be careful not to perform repairs. a. d. Improper adjustment of your dealer or local power company. 12. f. Any noticeable abnormality in the product indicates that the service person uses replacement parts specified by the manufacturer, or those described...must be observed closely. 4. The screen may be moved with impact. The Plasma Display weighs about 31.8 kg (70.1 lbs.) for the PDP-506PU and about 25.8 kg (56.9 lbs.) for the PDP436PU. Observe warnings-All warnings on the product. 16. Attachments-Do not use...
Owner's Manual
Page 12
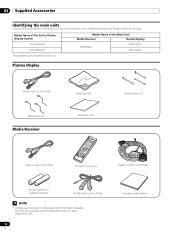
Model Name of the Main Unit Media Receiver Plasma Display PDP-R06U PDP-506PU PDP-436PU Plasma Display Power cord (2 m/6.6 feet) Bead band × 3 Media Receiver Cleaning cloth Warranty card Speed clamp × 3 Power cord (2 m/6.6 feet) Remote control unit System cable (3 m/9.8 feet) AA size battery × 2 (Alkaline battery) G-LINK cable (3 m/9.8 feet) NOTE • ... table to check that you have received the correct Media Receiver and Plasma Receiver models. Model Name of the Entire Plasma Display System PDP-5060HD PDP-4360HD The speakers are available as options.
Model Name of the Main Unit Media Receiver Plasma Display PDP-R06U PDP-506PU PDP-436PU Plasma Display Power cord (2 m/6.6 feet) Bead band × 3 Media Receiver Cleaning cloth Warranty card Speed clamp × 3 Power cord (2 m/6.6 feet) Remote control unit System cable (3 m/9.8 feet) AA size battery × 2 (Alkaline battery) G-LINK cable (3 m/9.8 feet) NOTE • ... table to check that you have received the correct Media Receiver and Plasma Receiver models. Model Name of the Entire Plasma Display System PDP-5060HD PDP-4360HD The speakers are available as options.
Owner's Manual
Page 13
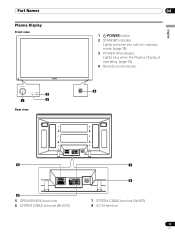
Part Names Part Names Plasma Display Front view 2 1 3 Rear view 04 1 a POWER button 2 STANDBY indicator Lights red when the unit is in standby mode. (page 25) 3 POWER ON indicator Lights blue when the Plasma Display is operating. (page 25) 4 Remote control sensor 4 English 5 SYSTEM CABLE WHITE BLACK SYSTEM CABLE WHITE BLACK 6 5 SPEAKER (R/L) terminals 6 SYSTEM CABLE terminal (BLACK) 7 8 7 SYSTEM CABLE terminal (WHITE) 8 AC IN terminal 13 En
Part Names Part Names Plasma Display Front view 2 1 3 Rear view 04 1 a POWER button 2 STANDBY indicator Lights red when the unit is in standby mode. (page 25) 3 POWER ON indicator Lights blue when the Plasma Display is operating. (page 25) 4 Remote control sensor 4 English 5 SYSTEM CABLE WHITE BLACK SYSTEM CABLE WHITE BLACK 6 5 SPEAKER (R/L) terminals 6 SYSTEM CABLE terminal (BLACK) 7 8 7 SYSTEM CABLE terminal (WHITE) 8 AC IN terminal 13 En

Owner's Manual
Page 14
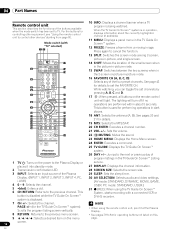
... UP LEFT RIGHT INPUT DOWN UP VOLUME DOWN UP CHANNEL Y CB / PB CR / PR COMPONENT VIDEO S-VIDEO VIDEO INPUT 4 L AUDIO R PC ANALOG RGB PC 4 56 7 8 1 POWER ON indicator 2 STANDBY indicator 3 REC TIMER indicator 4 STANDBY/ON button 5 TV GUIDE button* 6 INPUT button (ENTER button*) 7 VOLUME UP/DOWN buttons (UP/DOWN buttons*) 8 CHANNEL...
... UP LEFT RIGHT INPUT DOWN UP VOLUME DOWN UP CHANNEL Y CB / PB CR / PR COMPONENT VIDEO S-VIDEO VIDEO INPUT 4 L AUDIO R PC ANALOG RGB PC 4 56 7 8 1 POWER ON indicator 2 STANDBY indicator 3 REC TIMER indicator 4 STANDBY/ON button 5 TV GUIDE button* 6 INPUT button (ENTER button*) 7 VOLUME UP/DOWN buttons (UP/DOWN buttons*) 8 CHANNEL...
Owner's Manual
Page 16
.... 8 RETURN: Returns to the previous menu screen. • See pages 78 to 84 for operating buttons not listed on this 9 / / / : Selects a desired item on the power to control other equipment, see "Using the remote control unit to the Plasma Display or service.
.... 8 RETURN: Returns to the previous menu screen. • See pages 78 to 84 for operating buttons not listed on this 9 / / / : Selects a desired item on the power to control other equipment, see "Using the remote control unit to the Plasma Display or service.
Owner's Manual
Page 23
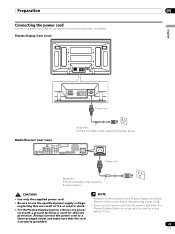
...S-VIDEO INPUT 1 Y CB / PB COMPONENT VIDEO CR / PR INPUT 1 INPUT 3 HDMI BLACK WHITE SYSTEM CABLE AC IN AC IN Power cord Noise filter Partially eliminates noise caused by the power source. neglecting this can result in fire or electric shock. • For the Plasma Display System, a three-core... a ground terminal is used for a long period of the Plasma Display and Media Receiver when connecting or disconnecting power cords. • Disconnect the power cord from the power outlet when the Plasma Display System is not going to a three-pronged outlet and make sure that the cord is...
...S-VIDEO INPUT 1 Y CB / PB COMPONENT VIDEO CR / PR INPUT 1 INPUT 3 HDMI BLACK WHITE SYSTEM CABLE AC IN AC IN Power cord Noise filter Partially eliminates noise caused by the power source. neglecting this can result in fire or electric shock. • For the Plasma Display System, a three-core... a ground terminal is used for a long period of the Plasma Display and Media Receiver when connecting or disconnecting power cords. • Disconnect the power cord from the power outlet when the Plasma Display System is not going to a three-pronged outlet and make sure that the cord is...
Owner's Manual
Page 25
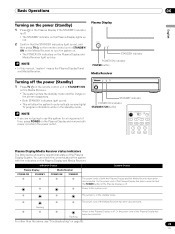
...enters the standby mode and the image on the Plasma Display and remove both the Plasma Display and the Media Receiver have been disconnected. Power to use this manual, "system" means the Plasma Display Panel and Media Receiver. The system is in the standby mode. Indicator ...Status System Status Plasma Display Media Receiver POWER ON STANDBY POWER ON STANDBY The power cords of the system with the indicators on . NOTE • If you are not going to the system is on ...
...enters the standby mode and the image on the Plasma Display and remove both the Plasma Display and the Media Receiver have been disconnected. Power to use this manual, "system" means the Plasma Display Panel and Media Receiver. The system is in the standby mode. Indicator ...Status System Status Plasma Display Media Receiver POWER ON STANDBY POWER ON STANDBY The power cords of the system with the indicators on . NOTE • If you are not going to the system is on ...
Owner's Manual
Page 31
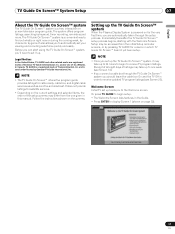
.... and is a free, interactive onscreen television program guide. Setup may take up the TV Guide On Screen™ system When the Plasma Display System is powered on the current settings and selected items, the order of the setup screens may take up to one given in order to begin setup. •...
.... and is a free, interactive onscreen television program guide. Setup may take up the TV Guide On Screen™ system When the Plasma Display System is powered on the current settings and selected items, the order of the setup screens may take up to one given in order to begin setup. •...

Owner's Manual
Page 32
... exit setup. Screen 1: Country • This screen asks you the location of the procedure gives you the opportunity to correct any mistakes before you power on . Screen 2: Enter ZIP or Postal Code • If you selected USA in Screen 1, you see the Postal Code screen. • ... now" displays Screen 1. • "Remind me again"). To make a selection, press / to highlight to watching TV and stops the reminder screen from appearing upon power on your TV. • Press / to highlight a country. • Press ENTER to display Screen 2. • If you selected Canada in Screen 1, you...
... exit setup. Screen 1: Country • This screen asks you the location of the procedure gives you the opportunity to correct any mistakes before you power on . Screen 2: Enter ZIP or Postal Code • If you selected USA in Screen 1, you see the Postal Code screen. • ... now" displays Screen 1. • "Remind me again"). To make a selection, press / to highlight to watching TV and stops the reminder screen from appearing upon power on your TV. • Press / to highlight a country. • Press ENTER to display Screen 2. • If you selected Canada in Screen 1, you...
Owner's Manual
Page 37
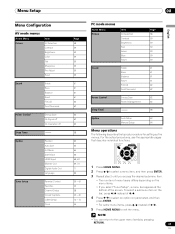
... mode menus Home Menu Picture Item AV Selection Contrast Brightness Color Tint Sharpness Pro Adjust Reset Sound Treble Bass Balance Reset FOCUS Front Surround Power Control Energy Save No Signal off No Operation off Sleep Timer Option Position Auto Size 4:3 Mode Side Mask HDMI Input Monitor Out Digital... 58 59 59 59 59 59 59 Sound Treble 61 Bass 61 Balance 61 Reset 61 FOCUS 62 Front Surround 62 Power Control Energy Save 62 Power Management 63 Sleep Timer 58 Option Auto Setup 63 Manual Setup 64 Menu operations The following describes the typical procedure for ...
... mode menus Home Menu Picture Item AV Selection Contrast Brightness Color Tint Sharpness Pro Adjust Reset Sound Treble Bass Balance Reset FOCUS Front Surround Power Control Energy Save No Signal off No Operation off Sleep Timer Option Position Auto Size 4:3 Mode Side Mask HDMI Input Monitor Out Digital... 58 59 59 59 59 59 59 Sound Treble 61 Bass 61 Balance 61 Reset 61 FOCUS 62 Front Surround 62 Power Control Energy Save 62 Power Management 63 Sleep Timer 58 Option Auto Setup 63 Manual Setup 64 Menu operations The following describes the typical procedure for ...

Owner's Manual
Page 45
... 05/17/04 xxxxxxxxxxxxxxxxxxxxx xxxxxxxxxxxxxxxxxxxxx xxxxxxxxxxxxxxxxxxxxx Home Menu Exit • The date and time will be automatically corrected using data from the power outlet or power blackout occurs, the set the date and time using / , / and ENTER. in your area. ( / then ENTER) 10 If you ...disconnect the power cord from the selected channel. If you select parameters other than "Auto", the selected parameters are used regardless of the provider's specifications. ...
... 05/17/04 xxxxxxxxxxxxxxxxxxxxx xxxxxxxxxxxxxxxxxxxxx xxxxxxxxxxxxxxxxxxxxx Home Menu Exit • The date and time will be automatically corrected using data from the power outlet or power blackout occurs, the set the date and time using / , / and ENTER. in your area. ( / then ENTER) 10 If you ...disconnect the power cord from the selected channel. If you select parameters other than "Auto", the selected parameters are used regardless of the provider's specifications. ...
Owner's Manual
Page 62
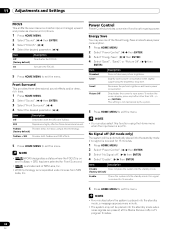
...restore the screen display, press any button other than VOL +/- and MUTING. This setting is received for 15 minutes. 1 Press HOME MENU. 2 Select "Power Control". ( / then ENTER) 3 Select "No Signal off". ( / then ENTER) 4 Select "Enable". ( / then ENTER) Item Description Disable ...select this function using a new technology. (factory default) TruBass + SRS Provides both the SRS and TruBass. Save1 Slightly lowers power consumption while slightly suppressing the brightness drop level. 11 Adjustments and Settings FOCUS This shifts the sound-source direction (sound image) upward...
...restore the screen display, press any button other than VOL +/- and MUTING. This setting is received for 15 minutes. 1 Press HOME MENU. 2 Select "Power Control". ( / then ENTER) 3 Select "No Signal off". ( / then ENTER) 4 Select "Enable". ( / then ENTER) Item Description Disable ...select this function using a new technology. (factory default) TruBass + SRS Provides both the SRS and TruBass. Save1 Slightly lowers power consumption while slightly suppressing the brightness drop level. 11 Adjustments and Settings FOCUS This shifts the sound-source direction (sound image) upward...
Owner's Manual
Page 63
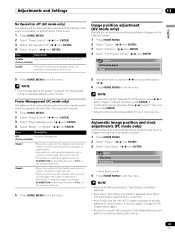
... "H/V Position Adjust". ( / then ENTER) Position H/V Position Adjust Reset 5 Press HOME MENU to select "Reset" in step 4, and then press ENTER. Power Management (PC mode only) The system will be automatically placed into the standby mode when no signal is received from the personal computer. 1 Press HOME... only) The system will be automatically placed into the standby mode when no operation is performed for three hours. 1 Press HOME MENU. 2 Select "Power Control". ( / then ENTER) 3 Select "No Operation off". ( / then ENTER) 4 Select "Enable". ( / then ENTER) Item Description Disable...
... "H/V Position Adjust". ( / then ENTER) Position H/V Position Adjust Reset 5 Press HOME MENU to select "Reset" in step 4, and then press ENTER. Power Management (PC mode only) The system will be automatically placed into the standby mode when no signal is received from the personal computer. 1 Press HOME... only) The system will be automatically placed into the standby mode when no operation is performed for three hours. 1 Press HOME MENU. 2 Select "Power Control". ( / then ENTER) 3 Select "No Operation off". ( / then ENTER) 4 Select "Enable". ( / then ENTER) Item Description Disable...

Owner's Manual
Page 67
... image, press INPUT 1 on the remote control unit or press INPUT on the Media Receiver to be actually used. To view images coming from the power outlet before making connections. Use the desired connection for viewing. • Connect external equipment to only terminals that are to select INPUT1. NOTE • The...
... image, press INPUT 1 on the remote control unit or press INPUT on the Media Receiver to be actually used. To view images coming from the power outlet before making connections. Use the desired connection for viewing. • Connect external equipment to only terminals that are to select INPUT1. NOTE • The...

Owner's Manual
Page 72
...• To record digital TV programs using connected D-VHS recorders, use . Check the instruction manual that support i.LINK cannot relay data when their power is off . • Do not make the following loop connections: Media Receiver REC ON STANDBY TIMER STANDBY/ON D-VHS recorder PULL OPEN D-VHS... with equipment that have 4-pin plugs and are shorter than 3.5 m (11.48 feet). • Some i.LINK devices cannot relay data when their power is off . Doing so can result in image and sound interruption. • Some D-VHS recorders that came with your D-VHS recorder. 72 En...
...• To record digital TV programs using connected D-VHS recorders, use . Check the instruction manual that support i.LINK cannot relay data when their power is off . • Do not make the following loop connections: Media Receiver REC ON STANDBY TIMER STANDBY/ON D-VHS recorder PULL OPEN D-VHS... with equipment that have 4-pin plugs and are shorter than 3.5 m (11.48 feet). • Some i.LINK devices cannot relay data when their power is off . Doing so can result in image and sound interruption. • Some D-VHS recorders that came with your D-VHS recorder. 72 En...

Owner's Manual
Page 77
... its remote control unit to the remote control sensor on the Plasma Display. For more information, see the instruction manual that the power is temporarily reduced. Face the remote control units to the remote control sensor on the Plasma Display when operating the connected equipment. ...DSP surround mode display function. Enjoying through External Equipment 12 English Connecting control cords Connect control cords between the Media Receiver and other PIONEER equipment having the logo. NOTE • When the connected equipment is being operated using SR+, the volume on the rear of ...
... its remote control unit to the remote control sensor on the Plasma Display. For more information, see the instruction manual that the power is temporarily reduced. Face the remote control units to the remote control sensor on the Plasma Display when operating the connected equipment. ...DSP surround mode display function. Enjoying through External Equipment 12 English Connecting control cords Connect control cords between the Media Receiver and other PIONEER equipment having the logo. NOTE • When the connected equipment is being operated using SR+, the volume on the rear of ...

