
Technical Manual
Page 1
... this manual are subject to change without notice. Refer all mounting and installation work , choose a safe and appropriate site after thorough consideration of construction, materials used, strength, and surroundings. TECHNICAL MANUAL (Ver. 1.0) HANDWRITING DEVICE: PDK-50HW3 Supported plasma displays: PDP-504CMX PDP-503CMX PDP-50MXE1 PDP-50MXE1-S PDP-503MXE This manual provides precautions and information for losses resulting from the use of parts other than those occurring during assembly, installation, mounting, or...
... this manual are subject to change without notice. Refer all mounting and installation work , choose a safe and appropriate site after thorough consideration of construction, materials used, strength, and surroundings. TECHNICAL MANUAL (Ver. 1.0) HANDWRITING DEVICE: PDK-50HW3 Supported plasma displays: PDP-504CMX PDP-503CMX PDP-50MXE1 PDP-50MXE1-S PDP-503MXE This manual provides precautions and information for losses resulting from the use of parts other than those occurring during assembly, installation, mounting, or...
Technical Manual
Page 6
... compatibility of Parts & Pin Layout 11 1.4.1 Plasma display monitor (PDP-504CMX/PDP-50MXE1/PDP-50MXE1-S) ... 11 1.4.2 Handwriting device (PDK-50HW3 11 2. Maintenance and Cleaning 40 6. Installing and Using Software 25 4.1 Installing the CBdrvU (Ver. 2.0) Driver 25 4.1.1 Operating environment 25 4.1.2 Installation procedures 25 4.1.3 Uninstall procedures 26 4.1.4 Changes from CBdrv Ver. 1.4 to Use Cable Clip 22 3.8 Sensor Operation Check 22 3.9 Final Check 24 4. Internal DIP Switch Settings 42 7. Installation Procedures 15 3.1 Unpacking 15 3.1.1 Plasma display monitor...
... compatibility of Parts & Pin Layout 11 1.4.1 Plasma display monitor (PDP-504CMX/PDP-50MXE1/PDP-50MXE1-S) ... 11 1.4.2 Handwriting device (PDK-50HW3 11 2. Maintenance and Cleaning 40 6. Installing and Using Software 25 4.1 Installing the CBdrvU (Ver. 2.0) Driver 25 4.1.1 Operating environment 25 4.1.2 Installation procedures 25 4.1.3 Uninstall procedures 26 4.1.4 Changes from CBdrv Ver. 1.4 to Use Cable Clip 22 3.8 Sensor Operation Check 22 3.9 Final Check 24 4. Internal DIP Switch Settings 42 7. Installation Procedures 15 3.1 Unpacking 15 3.1.1 Plasma display monitor...

Technical Manual
Page 7
... 2 Replacement tips 2 Allen bolt 1 Pen stand 1 Operating Instructions 1 CD-ROM (Device driver disc 1 Driver Installation Guide 1 ¶ Specifications and appearance may vary, depending on the installation method. (Refer to the PDP-504CMX. Separate handwriting device (PDK-50HW3) specifications Scan device Scanning system Infrared scanning Power indicator LED Current consumption (DC 5 V) 0.5 A max. Note 1 Allow for 400 W 400 VA of the plasma display.) 7 External dimensions (excluding pen stand) 1258 (W) x 758 (H) x 115 (D) mm Weight Plasma display (PDP-504CMX) 41...
... 2 Replacement tips 2 Allen bolt 1 Pen stand 1 Operating Instructions 1 CD-ROM (Device driver disc 1 Driver Installation Guide 1 ¶ Specifications and appearance may vary, depending on the installation method. (Refer to the PDP-504CMX. Separate handwriting device (PDK-50HW3) specifications Scan device Scanning system Infrared scanning Power indicator LED Current consumption (DC 5 V) 0.5 A max. Note 1 Allow for 400 W 400 VA of the plasma display.) 7 External dimensions (excluding pen stand) 1258 (W) x 758 (H) x 115 (D) mm Weight Plasma display (PDP-504CMX) 41...
Technical Manual
Page 11
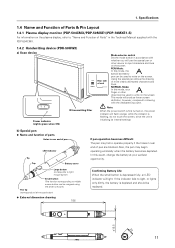
... lines on the screen. If the indicator fails to light, or lights only dimly, the battery is first turned on the screen. 1. In this mode, your earliest opportunity. Using the special pen allows the drawing of unit Mode selector switch Set the mode switch in the Technical Manual supplied with the PDP-504CMX. 1.4.2 Handwriting device (PDK-50HW3) a) Scan device PEN NORMAL Rear side of more clearly delineated characters and lines. Power indicator (Lights green...
... lines on the screen. If the indicator fails to light, or lights only dimly, the battery is first turned on the screen. 1. In this mode, your earliest opportunity. Using the special pen allows the drawing of unit Mode selector switch Set the mode switch in the Technical Manual supplied with the PDP-504CMX. 1.4.2 Handwriting device (PDK-50HW3) a) Scan device PEN NORMAL Rear side of more clearly delineated characters and lines. Power indicator (Lights green...
Technical Manual
Page 12
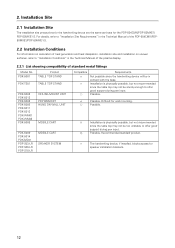
... the Technical Manual of the plasma display. 2.2.1 List showing compatibility of standard metal fittings Model No. Possible. Difficult for the PDP-504CMX/PDP-50MXE1/ PDP-50MXE1-S. Installation is physically possible, but not recommended since the table top may not be too unstable to offer good support during pen input. 2. Installation Site 2.1 Installation Site The installation site precautions for the handwriting device are the same as those for wall mounting. For...
... the Technical Manual of the plasma display. 2.2.1 List showing compatibility of standard metal fittings Model No. Possible. Difficult for the PDP-504CMX/PDP-50MXE1/ PDP-50MXE1-S. Installation is physically possible, but not recommended since the table top may not be too unstable to offer good support during pen input. 2. Installation Site 2.1 Installation Site The installation site precautions for the handwriting device are the same as those for wall mounting. For...

Technical Manual
Page 13
... handwriting device horizontally. 13 If you install a guard, however, you need to "Special Installation" in the Technical Manual of the plasma display. ¶ Calculate the distance between horizontal, upward-facing position and the 25° downward- 2. Installation Site 2.2.2 Special installations Special installation conditions for the plasma display. Refer to take their prevention in the detailed setting mode of the user's view. The following cautions are the...
... handwriting device horizontally. 13 If you install a guard, however, you need to "Special Installation" in the Technical Manual of the plasma display. ¶ Calculate the distance between horizontal, upward-facing position and the 25° downward- 2. Installation Site 2.2.2 Special installations Special installation conditions for the plasma display. Refer to take their prevention in the detailed setting mode of the user's view. The following cautions are the...
Technical Manual
Page 15
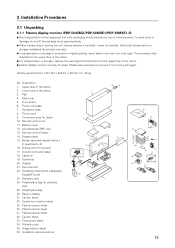
... (speed clamp x 2, bead band x 2) 16. Operating instructions (Japanese/ English/French) 23. This warning is mode off grass. Packing specifications: 1341 (W) × 846 (H) × 424 (D) mm, 55 kg No. Accessory case 8. Please take precations to prevent it vertically - Power cord case 7. Plasma caution sheet 31. Battery cover 12. Installation Procedures 3.1 Unpacking 3.1.1 Plasma display monitor (PDP-504CMX/PDP-50MXE1/PDP-50MXE1-S) ¶ Any transportation of the unopened...
... (speed clamp x 2, bead band x 2) 16. Operating instructions (Japanese/ English/French) 23. This warning is mode off grass. Packing specifications: 1341 (W) × 846 (H) × 424 (D) mm, 55 kg No. Accessory case 8. Please take precations to prevent it vertically - Power cord case 7. Plasma caution sheet 31. Battery cover 12. Installation Procedures 3.1 Unpacking 3.1.1 Plasma display monitor (PDP-504CMX/PDP-50MXE1/PDP-50MXE1-S) ¶ Any transportation of the unopened...

Technical Manual
Page 19
... INPUT 1 or INPUT 2. 2. Disable sleep, standby and all other power saving features set using the power options so that the PC supports "WXGA". ¶ Select "Display Properties" = "Effects" = "Visual effects"= "Display icons in full color" check box. 3. Note: Turn the power off before making or changing connections. 3.3 Computer Setup Example Setup procedure differs with the plasma display. Make sure that the "Maze" and "OpenGL" screen savers are not in the Operating Instructions supplied...
... INPUT 1 or INPUT 2. 2. Disable sleep, standby and all other power saving features set using the power options so that the PC supports "WXGA". ¶ Select "Display Properties" = "Effects" = "Visual effects"= "Display icons in full color" check box. 3. Note: Turn the power off before making or changing connections. 3.3 Computer Setup Example Setup procedure differs with the plasma display. Make sure that the "Maze" and "OpenGL" screen savers are not in the Operating Instructions supplied...
Technical Manual
Page 20
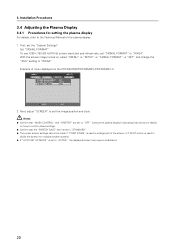
... SPLIT button is used to divide the screen into multiple smaller screens. ¶ If "AUTO SET UP MODE" is set to the Technical Manual of menu displayed on how to confirm these settings. ¶ Confirm that "MASK CONTROL" and "ORBITER" are set to set the "System Settings". Set "SIGNAL FORMAT". Installation Procedures 3.4 Adjusting the Plasma Display 3.4.1 Procedures for details on the PDP-504CMX/PDP-50MXE1/PDP-50MXE1-S MENU INPUT1 PICTURE SCREEN SETUP OPTION POWER MANAGEMENT CLAMP POSITION SIGNAL FORMAT : OFF : AUTO : XGA SET ENTER MENU EXIT 2. Next, adjust "SCREEN" to...
... SPLIT button is used to divide the screen into multiple smaller screens. ¶ If "AUTO SET UP MODE" is set to the Technical Manual of menu displayed on how to confirm these settings. ¶ Confirm that "MASK CONTROL" and "ORBITER" are set to set the "System Settings". Set "SIGNAL FORMAT". Installation Procedures 3.4 Adjusting the Plasma Display 3.4.1 Procedures for details on the PDP-504CMX/PDP-50MXE1/PDP-50MXE1-S MENU INPUT1 PICTURE SCREEN SETUP OPTION POWER MANAGEMENT CLAMP POSITION SIGNAL FORMAT : OFF : AUTO : XGA SET ENTER MENU EXIT 2. Next, adjust "SCREEN" to...

Technical Manual
Page 21
... Driver 1. 3. There are being made during this time. Installation Procedures 3.4.2 Screen burning Refer to "Screen Burning" in green and orange. When a USB cable is flashing, since automatic settings are no requirements regarding power on page 25. 2. Refer to provide 500mA current. Do not touch the screen while the indicator is connected, the accompanying screen message will appear: The power indicator will flash orange, and then flash alternately in the Technical Manual supplied...
... Driver 1. 3. There are being made during this time. Installation Procedures 3.4.2 Screen burning Refer to "Screen Burning" in green and orange. When a USB cable is flashing, since automatic settings are no requirements regarding power on page 25. 2. Refer to provide 500mA current. Do not touch the screen while the indicator is connected, the accompanying screen message will appear: The power indicator will flash orange, and then flash alternately in the Technical Manual supplied...
Technical Manual
Page 25
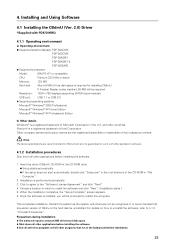
...-ROM in the background before installing the software. 1. Once the software is installed, you will be prompted to work with PDK-50HW3 4.1.1 Operating environment a) Operating environment ¶ Supported plasma displays: PDP-504CMX PDP-503CMX PDP-50MXE1 PDP-50MXE1-S PDP-503MXE ¶ Supported computers Model: IBM PC-AT or compatible CPU: Pentium 333 MHz or better Memory: 128 MB Hard disk: About 6 MB of free disk space is recommended...
...-ROM in the background before installing the software. 1. Once the software is installed, you will be prompted to work with PDK-50HW3 4.1.1 Operating environment a) Operating environment ¶ Supported plasma displays: PDP-504CMX PDP-503CMX PDP-50MXE1 PDP-50MXE1-S PDP-503MXE ¶ Supported computers Model: IBM PC-AT or compatible CPU: Pentium 333 MHz or better Memory: 128 MB Hard disk: About 6 MB of free disk space is recommended...
Technical Manual
Page 26
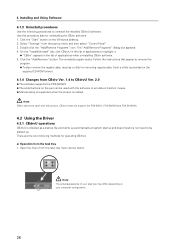
...; The software supports the PDK-50HW3. ¶ The small buttons on the pen can be used with the software to emulate a 3-button mouse. ¶ Manual setup is supported when the screen is installed as a startup file and starts up automatically at system startup and does therefore not need to uninstall the installed CBdrvU software. Such a utility is provided on the supplied CD-ROM (driver). 4.1.4 Changes from the...
...; The software supports the PDK-50HW3. ¶ The small buttons on the pen can be used with the software to emulate a 3-button mouse. ¶ Manual setup is supported when the screen is installed as a startup file and starts up automatically at system startup and does therefore not need to uninstall the installed CBdrvU software. Such a utility is provided on the supplied CD-ROM (driver). 4.1.4 Changes from the...

Technical Manual
Page 29
... Technical Manual.) ¶ Only modes with resolution. However, the set . 29 Be sure to start selected calibration mode. OK button: Press to check the "SIGNAL FORMAT" setting of the plasma display and video card may shift cursor position relative to make the settings in this screen. ¶ The set calibration is stored and is available. The following calibration methods. 1) Detail-1 (4-point calibration) 2) Detail-2 (vertical calibration) Notes: ¶ Detail-2 is no preset resolution. ¶ Adjustment of the plasma display...
... Technical Manual.) ¶ Only modes with resolution. However, the set . 29 Be sure to start selected calibration mode. OK button: Press to check the "SIGNAL FORMAT" setting of the plasma display and video card may shift cursor position relative to make the settings in this screen. ¶ The set calibration is stored and is available. The following calibration methods. 1) Detail-1 (4-point calibration) 2) Detail-2 (vertical calibration) Notes: ¶ Detail-2 is no preset resolution. ¶ Adjustment of the plasma display...

Technical Manual
Page 33
...; Driver Software Ver: Pen Button (small): Service Ver: Firmware Ver: ¶ System Buttons: L: R: M: Mouse pos: Angle: IP Address: Computer Name: Service Mode: Test chart display: Indicate the version of the CBdrvU setup program Indicate the setting of the connected PC Indicate scan device service information and DIP switch information. For details, refer to the Operating Instructions. ¶ Press the [Esc] key or use the pen to adjust plasma display settings. This mode is a service mode...
...; Driver Software Ver: Pen Button (small): Service Ver: Firmware Ver: ¶ System Buttons: L: R: M: Mouse pos: Angle: IP Address: Computer Name: Service Mode: Test chart display: Indicate the version of the CBdrvU setup program Indicate the setting of the connected PC Indicate scan device service information and DIP switch information. For details, refer to the Operating Instructions. ¶ Press the [Esc] key or use the pen to adjust plasma display settings. This mode is a service mode...
Technical Manual
Page 36
..." (Detail-1). d) Initial plasma display settings The factory default for Cyberboard. Use the "WXGA" for PDP-504CMX/PDP-50MXE1/PDP-50MXE1-S is "XGA" ("SETUP" = "SIGNAL Format" = "XGA"). Should this happen, change the resolution, for example, "3D Maze (OpenGL)". i) Portrait installation of changes in resolution. Should this hardware combination may not be calibrated from the "Select Calibration Dialog" to video card adjustment or characteristics, plasma display adjustment or discrepancies. Cursor position may shift in Welcome Login screen Pen position...
..." (Detail-1). d) Initial plasma display settings The factory default for Cyberboard. Use the "WXGA" for PDP-504CMX/PDP-50MXE1/PDP-50MXE1-S is "XGA" ("SETUP" = "SIGNAL Format" = "XGA"). Should this happen, change the resolution, for example, "3D Maze (OpenGL)". i) Portrait installation of changes in resolution. Should this hardware combination may not be calibrated from the "Select Calibration Dialog" to video card adjustment or characteristics, plasma display adjustment or discrepancies. Cursor position may shift in Welcome Login screen Pen position...
Technical Manual
Page 44
... Hz. Set the PC output to do if the screen image seems blurry and written characters do not look crisp? Then check plasma screen settings. After completing these settings, adjust "POSITION", "CLOCK" and "PHASE" under "SCREEN" in the handwriting device. Q & A Q: Is tempered glass used because the handwriting device would collide with the stand base. The buttons provide a number of functions that "SIGNAL FORMAT" is connected? The light receiving LEDs are the...
... Hz. Set the PC output to do if the screen image seems blurry and written characters do not look crisp? Then check plasma screen settings. After completing these settings, adjust "POSITION", "CLOCK" and "PHASE" under "SCREEN" in the handwriting device. Q & A Q: Is tempered glass used because the handwriting device would collide with the stand base. The buttons provide a number of functions that "SIGNAL FORMAT" is connected? The light receiving LEDs are the...

Technical Manual
Page 45
... the PDK-5008 mobile cart be set by left-clicking on an event that allows to the plasma display monitor? Use of the current output to regard the two positions as delays in start of the driver (hardware)? When more than the ...setup menu). A: Is there a same system installed in the pop-up menu (by considering this case, the last adjusted data in Excel, etc. This is because the link destination is used on the browser do when double-clicking does not work well? PDK-50HW3 supports only CBdrvU ver. 2.0. To prevent this case, when a special pen is controlled based...
... the PDK-5008 mobile cart be set by left-clicking on an event that allows to the plasma display monitor? Use of the current output to regard the two positions as delays in start of the driver (hardware)? When more than the ...setup menu). A: Is there a same system installed in the pop-up menu (by considering this case, the last adjusted data in Excel, etc. This is because the link destination is used on the browser do when double-clicking does not work well? PDK-50HW3 supports only CBdrvU ver. 2.0. To prevent this case, when a special pen is controlled based...
Technical Manual
Page 47
....) Remove any object occluding the remote signal receiver? • Point the remote control unit toward the remote signal receiver when operating • Is the selected screen size correct? The picture may look dark in the following table. This is not a malfunction. • When the video input signal's level is too bright. • Is "CLAMP POSITION" setup correct? • The unit's internal temperature has increased. (Air vents are connected...
....) Remove any object occluding the remote signal receiver? • Point the remote control unit toward the remote signal receiver when operating • Is the selected screen size correct? The picture may look dark in the following table. This is not a malfunction. • When the video input signal's level is too bright. • Is "CLAMP POSITION" setup correct? • The unit's internal temperature has increased. (Air vents are connected...

Technical Manual
Page 48
... (**) represent numerals. 48 Consult with ambient conditions. Check the input signals, connections and settings. • Turn off the main power of this unit's screen to operate only after ambient temperature exceeds 35°C (differs depending on installation conditions). Check the "Computer signal compatibility table" and change the PC output signal setting. • Turn off the main power of the plasma display. • Check whether the surrounding temperature is high...
... (**) represent numerals. 48 Consult with ambient conditions. Check the input signals, connections and settings. • Turn off the main power of this unit's screen to operate only after ambient temperature exceeds 35°C (differs depending on installation conditions). Check the "Computer signal compatibility table" and change the PC output signal setting. • Turn off the main power of the plasma display. • Check whether the surrounding temperature is high...

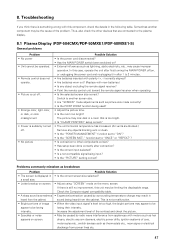
Technical Manual
Page 49
... device is loose or has been disconnected. Or resolution has been changed. • The plasma display's screen display size setting has been changed. • Driver software is not installed properly. • The plasma display's screen display position has shifted. • The plasma display's AUTO SET UP screen position adjustment has been reset. • Plasma display's "MASK CONTROL" or "ORBITER" is set to turn on. • The holes in power-saving mode. • USB cable is not connected. Troubleshooting 8.2 Handwriting Device (PDK-50HW3) Symptom No...
... device is loose or has been disconnected. Or resolution has been changed. • The plasma display's screen display size setting has been changed. • Driver software is not installed properly. • The plasma display's screen display position has shifted. • The plasma display's AUTO SET UP screen position adjustment has been reset. • Plasma display's "MASK CONTROL" or "ORBITER" is set to turn on. • The holes in power-saving mode. • USB cable is not connected. Troubleshooting 8.2 Handwriting Device (PDK-50HW3) Symptom No...


