Technical Manual
Page 1
...and surroundings. Before installation and preparatory work to qualified personnel, or consult the nearest PIONEER dealer for assistance. ÷ We accept no responsibility for losses resulting from natural .... TECHNICAL MANUAL (Ver. 1.0) HANDWRITING DEVICE: PDK-50HW3 Supported plasma displays: PDP-504CMX PDP-503CMX PDP-50MXE1 PDP-50MXE1-S PDP-503MXE This manual provides precautions and information for installation, preparation, and handling of... are not in this manual are intended to alert users to read instructions indicated by this product, or from the use of parts other than those...
...and surroundings. Before installation and preparatory work to qualified personnel, or consult the nearest PIONEER dealer for assistance. ÷ We accept no responsibility for losses resulting from natural .... TECHNICAL MANUAL (Ver. 1.0) HANDWRITING DEVICE: PDK-50HW3 Supported plasma displays: PDP-504CMX PDP-503CMX PDP-50MXE1 PDP-50MXE1-S PDP-503MXE This manual provides precautions and information for installation, preparation, and handling of... are not in this manual are intended to alert users to read instructions indicated by this product, or from the use of parts other than those...

Technical Manual
Page 7
...; Information regarding plasma displays in this Technical Manual is limited to "Installation Site Requirements" in the Technical Manual of the PDP-504CMX plasma display. External dimensions (not including plasma display and pen stand) 1258 (W) x 758 (H) x 74 (D) mm ... Replacement tips 2 Allen bolt 1 Pen stand 1 Operating Instructions 1 CD-ROM (Device driver disc 1 Driver Installation Guide 1 ¶ Specifications and appearance may vary, depending on the installation method. (Refer to the PDP-504CMX. Specifications 1.1 Specifications System (plasma display and handwriting device)...
...; Information regarding plasma displays in this Technical Manual is limited to "Installation Site Requirements" in the Technical Manual of the PDP-504CMX plasma display. External dimensions (not including plasma display and pen stand) 1258 (W) x 758 (H) x 74 (D) mm ... Replacement tips 2 Allen bolt 1 Pen stand 1 Operating Instructions 1 CD-ROM (Device driver disc 1 Driver Installation Guide 1 ¶ Specifications and appearance may vary, depending on the installation method. (Refer to the PDP-504CMX. Specifications 1.1 Specifications System (plasma display and handwriting device)...
Technical Manual
Page 8
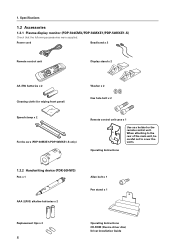
Specifications 1.2 Accessories 1.2.1 Plasma display monitor (PDP-504CMX/PDP-50MXE1/PDP-50MXE1-S) Check that the following accessories were supplied. Operating Instructions 1.2.2 Handwriting device (PDK-50HW3) Pen x 1 AAA (LR03) alkaline batteries x 2 Allen bolt x 1 Pen stand x 1 Replacement tips x 2 8 Operating Instructions CD-ROM (Device driver disc) Driver Installation Guide Power cord Bead band x 2 Remote control unit Display stand x 2 AA (R6) batteries...
Specifications 1.2 Accessories 1.2.1 Plasma display monitor (PDP-504CMX/PDP-50MXE1/PDP-50MXE1-S) Check that the following accessories were supplied. Operating Instructions 1.2.2 Handwriting device (PDK-50HW3) Pen x 1 AAA (LR03) alkaline batteries x 2 Allen bolt x 1 Pen stand x 1 Replacement tips x 2 8 Operating Instructions CD-ROM (Device driver disc) Driver Installation Guide Power cord Bead band x 2 Remote control unit Display stand x 2 AA (R6) batteries...
Technical Manual
Page 15
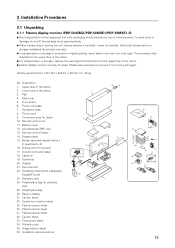
... package by its packaging should be done by two or more than four units high. Power cord 9. Display stand 15. Operating instructions (Japanese/ English/French) 23. Precautions sheet 34. Description 1. Conversion plug for warranty card 25. Bag for screen) 17. ... bag 26. Warranty card 35. Lower face of the carton 2. Washer 21. Installation Procedures 3.1 Unpacking 3.1.1 Plasma display monitor (PDP-504CMX/PDP-50MXE1/PDP-50MXE1-S) ¶ Any transportation of the unopened unit in original packing, never stack more persons. Hex hole bolt 22. Remote control...
... package by its packaging should be done by two or more than four units high. Power cord 9. Display stand 15. Operating instructions (Japanese/ English/French) 23. Precautions sheet 34. Description 1. Conversion plug for warranty card 25. Bag for screen) 17. ... bag 26. Warranty card 35. Lower face of the carton 2. Washer 21. Installation Procedures 3.1 Unpacking 3.1.1 Plasma display monitor (PDP-504CMX/PDP-50MXE1/PDP-50MXE1-S) ¶ Any transportation of the unopened unit in original packing, never stack more persons. Hex hole bolt 22. Remote control...

Technical Manual
Page 16
... top of the box. 3. Description 1 Pen 2 AAA (LR03) alkaline batteries 3 Replacement Tips 4 Allen Bolt 5 Pen Stand 6 Operating Instructions 7 CD-ROM (Device driver disc) 8 Driver Installation Guide 9 Packing Set 16 PDK-50HW3 Air Cap Sheet (150 x 100) Air Cap Bag 2 (75 x 100) Pink Pad ...
... top of the box. 3. Description 1 Pen 2 AAA (LR03) alkaline batteries 3 Replacement Tips 4 Allen Bolt 5 Pen Stand 6 Operating Instructions 7 CD-ROM (Device driver disc) 8 Driver Installation Guide 9 Packing Set 16 PDK-50HW3 Air Cap Sheet (150 x 100) Air Cap Bag 2 (75 x 100) Pink Pad ...

Technical Manual
Page 18
... of 6 mm). 3.2.2 Changing the pen battery Battery cover AAA (LR03) alkaline battery Notes: ¶ Insert battery correctly, aligning +/- polarities with governmental regulations or environmental public instruction's rules that apply in place to secure scan device in place. 2 Press in the opposite direction for an extended period (1 month or more).
... of 6 mm). 3.2.2 Changing the pen battery Battery cover AAA (LR03) alkaline battery Notes: ¶ Insert battery correctly, aligning +/- polarities with governmental regulations or environmental public instruction's rules that apply in place to secure scan device in place. 2 Press in the opposite direction for an extended period (1 month or more).

Technical Manual
Page 19
... whether the PC video cable is adjusted depending on required computer specifications. 3.3.2 Precautions regarding computer setup Be sure to "Installation and Connections" in the Operating Instructions supplied with computer type. 3. Installation Procedures 3.2.3 Connecting the plasma display to INPUT 1 or INPUT 2. 2. Below is permanently on connecting the plasma display to a computer, refer...
... whether the PC video cable is adjusted depending on required computer specifications. 3.3.2 Precautions regarding computer setup Be sure to "Installation and Connections" in the Operating Instructions supplied with computer type. 3. Installation Procedures 3.2.3 Connecting the plasma display to INPUT 1 or INPUT 2. 2. Below is permanently on connecting the plasma display to a computer, refer...
Technical Manual
Page 20
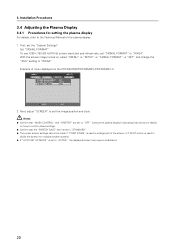
... on the PDP-504CMX/PDP-50MXE1/PDP-50MXE1-S MENU INPUT1 PICTURE SCREEN SETUP OPTION POWER MANAGEMENT CLAMP POSITION SIGNAL FORMAT : OFF : AUTO : XGA SET ENTER MENU EXIT 2. Example of the plasma display. 1. 3. To use 1280 x 768 (60 Hz/70 Hz) screen resolution and refresh rate, set to "OFF". Consult the plasma display's Operating Instructions for...
... on the PDP-504CMX/PDP-50MXE1/PDP-50MXE1-S MENU INPUT1 PICTURE SCREEN SETUP OPTION POWER MANAGEMENT CLAMP POSITION SIGNAL FORMAT : OFF : AUTO : XGA SET ENTER MENU EXIT 2. Example of the plasma display. 1. 3. To use 1280 x 768 (60 Hz/70 Hz) screen resolution and refresh rate, set to "OFF". Consult the plasma display's Operating Instructions for...

Technical Manual
Page 23
... used , however, since the screen may differ depending on your computer configuration. 2 When the pop-up menu appears, left -click on "Calibration...". 3 Follow the calibration instructions that the onscreen cursor aligns properly with a finger or other sharp objects should always be performed with the position of the physical pen tip, adjust...
... used , however, since the screen may differ depending on your computer configuration. 2 When the pop-up menu appears, left -click on "Calibration...". 3 Follow the calibration instructions that the onscreen cursor aligns properly with a finger or other sharp objects should always be performed with the position of the physical pen tip, adjust...
Technical Manual
Page 26
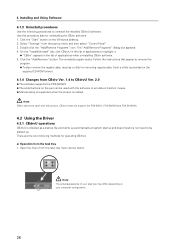
... the screen is installed as a startup file and starts up . Click the "Add/Remove" button. a) Operation from the task tray menu shown below. Follow the instructions that appear to highlight it. ¶ "CBdrv" appears in the list of your task tray may differ depending on the Windows desktop. 2. On the "Install...
... the screen is installed as a startup file and starts up . Click the "Add/Remove" button. a) Operation from the task tray menu shown below. Follow the instructions that appear to highlight it. ¶ "CBdrv" appears in the list of your task tray may differ depending on the Windows desktop. 2. On the "Install...

Technical Manual
Page 29
...When select Detail-1 or 2, changes the respective screen. Note: The availability or otherwise of screen items depends on -screen calibration instructions and accurately touch the center of the red crosses. Notes: ¶ Use the mouse to make the settings in the "PARTIAL... the plasma display and video card may shift cursor position relative to perform manual calibration of the plasma display. (Read the initial setup instructions for which the value was set calibration is stored and is not available. Cancel button: Cancels selected calibration. The following calibration methods. ...
...When select Detail-1 or 2, changes the respective screen. Note: The availability or otherwise of screen items depends on -screen calibration instructions and accurately touch the center of the red crosses. Notes: ¶ Use the mouse to make the settings in the "PARTIAL... the plasma display and video card may shift cursor position relative to perform manual calibration of the plasma display. (Read the initial setup instructions for which the value was set calibration is stored and is not available. Cancel button: Cancels selected calibration. The following calibration methods. ...

Technical Manual
Page 30
... in this screen. ¶ The set . 30 The name of the screen as shown below but disappears automatically after setup. 4. Follow the on-screen calibration instructions and touch the points in the "PARTIAL" mode, use the mouse to click the two points, the upper and lower points to verify the display...
... in this screen. ¶ The set . 30 The name of the screen as shown below but disappears automatically after setup. 4. Follow the on-screen calibration instructions and touch the points in the "PARTIAL" mode, use the mouse to click the two points, the upper and lower points to verify the display...

Technical Manual
Page 33
... coordinates recognized by Windows Indicate currently set up. ¶ Use the supplied remote control to adjust plasma display settings. For details, refer to the Operating Instructions. ¶ Press the [Esc] key or use the pen to open the screen shown below.
... coordinates recognized by Windows Indicate currently set up. ¶ Use the supplied remote control to adjust plasma display settings. For details, refer to the Operating Instructions. ¶ Press the [Esc] key or use the pen to open the screen shown below.

Technical Manual
Page 40
... or hard abrasive materials. For cleaning, we recommend readjusting the white balance every 1000 hours. Maintenance and Cleaning Periodical maintenance is recommended to the Operating Instructions supplied with water. Do not rub with the provided cloth (Wiping Cloth) or a dry soft cloth. In case of the main unit, using a vacuum cleaner...
... or hard abrasive materials. For cleaning, we recommend readjusting the white balance every 1000 hours. Maintenance and Cleaning Periodical maintenance is recommended to the Operating Instructions supplied with water. Do not rub with the provided cloth (Wiping Cloth) or a dry soft cloth. In case of the main unit, using a vacuum cleaner...
