Operating Instructions
Page 5
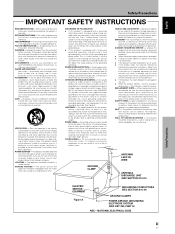
.... If you are required, be installed in a wet basement; OVERLOADING - ACCESSORIES - Slots and openings in the vicinity of any kind on an unstable cart, stand, tripod, bracket, or table. See Figure A. Refer all servicing to insert the plug fully into this product, ask the service technician to perform safety checks... cable system is connected to the product, be read before cleaning. Do not use a mounting accessory recommended by the manufacturer, or sold with a cart, stand, tripod, bracket, or table recommended by the manufacturer. This is operated.
.... If you are required, be installed in a wet basement; OVERLOADING - ACCESSORIES - Slots and openings in the vicinity of any kind on an unstable cart, stand, tripod, bracket, or table. See Figure A. Refer all servicing to insert the plug fully into this product, ask the service technician to perform safety checks... cable system is connected to the product, be read before cleaning. Do not use a mounting accessory recommended by the manufacturer, or sold with a cart, stand, tripod, bracket, or table recommended by the manufacturer. This is operated.
Operating Instructions
Page 8
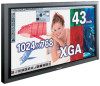
...(VGA) to the normal operating mode (MODE 1, with a high-precision (1024x768) panel, this unit was purchased.) 1 Table top stand : PDP-503CMX / PDP-433CMX display stand. 2 Wall installation unit : Wall installation bracket designed as a wall interface for securing the unit. 3 Speaker system designed specifically for ...this unit achieves the highest energy-saving of any display in its class (50inch XGA class: 380 W; 20% less than previous Pioneer products). In addition, when the Power Control function is selected, power consumption is not operable.) 2 En 4 Video card :Expansion...
...(VGA) to the normal operating mode (MODE 1, with a high-precision (1024x768) panel, this unit was purchased.) 1 Table top stand : PDP-503CMX / PDP-433CMX display stand. 2 Wall installation unit : Wall installation bracket designed as a wall interface for securing the unit. 3 Speaker system designed specifically for ...this unit achieves the highest energy-saving of any display in its class (50inch XGA class: 380 W; 20% less than previous Pioneer products). In addition, when the Power Control function is selected, power consumption is not operable.) 2 En 4 Video card :Expansion...

Operating Instructions
Page 11
When attaching to the rear of the main unit, be careful not to cover the vents. ÷ Operating Instructions ÷ Warranty Before Proceeding 5 En English Checking Supplied Accessories Check that the following accessories were supplied. 1 Power cord 2 Remote control unit 3 AA (R6) batteries (x 2) 7 Display stands (x 2) Before Proceeding 8 Washers (x 2) 9 Hex hole bolts (x 2) 0 Remote control unit holder 4 Cleaning cloth (for wiping front panel) 5 Speed clamps (x 2) 6 Bead bands (x 2) Use as a holder for the remote control unit.
When attaching to the rear of the main unit, be careful not to cover the vents. ÷ Operating Instructions ÷ Warranty Before Proceeding 5 En English Checking Supplied Accessories Check that the following accessories were supplied. 1 Power cord 2 Remote control unit 3 AA (R6) batteries (x 2) 7 Display stands (x 2) Before Proceeding 8 Washers (x 2) 9 Hex hole bolts (x 2) 0 Remote control unit holder 4 Cleaning cloth (for wiping front panel) 5 Speed clamps (x 2) 6 Bead bands (x 2) Use as a holder for the remote control unit.

Operating Instructions
Page 12
... mode (page 19). English Part Names and Functions Main Unit Main unit 3 Operation panel on the main unit 4 5 6 7 8 9 0 Part Names and Functions 1 2 Main unit 1 Display stand 2 Remote control sensor Point the remote control toward the remote sensor to operate the unit (page 8). 3 STANDBY/ON indicator This indicator is red during standby...
... mode (page 19). English Part Names and Functions Main Unit Main unit 3 Operation panel on the main unit 4 5 6 7 8 9 0 Part Names and Functions 1 2 Main unit 1 Display stand 2 Remote control sensor Point the remote control toward the remote sensor to operate the unit (page 8). 3 STANDBY/ON indicator This indicator is red during standby...
Operating Instructions
Page 16
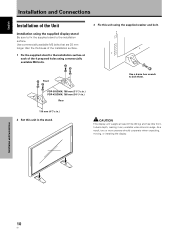
... mm (31-7/16 in.) PDP-433CMX: 768 mm (30-1/4 in.) Rear 110 mm (4-5/16 in.) 2 Set this unit using the supplied display stand Be sure to fix the supplied stand to the installation surface. CAUTION This display unit weighs at each of the Unit Installation using the supplied washer and bolt....and Connections 10 En English Installation and Connections Installation of the 4 prepared holes using commercially available M8 bolts . 3 Fix this unit in the stand. Use commercially available M8 bolts that are 25 mm longer than the thickness of the installation surface. 1 Fix the supplied...
... mm (31-7/16 in.) PDP-433CMX: 768 mm (30-1/4 in.) Rear 110 mm (4-5/16 in.) 2 Set this unit using the supplied display stand Be sure to fix the supplied stand to the installation surface. CAUTION This display unit weighs at each of the Unit Installation using the supplied washer and bolt....and Connections 10 En English Installation and Connections Installation of the 4 prepared holes using commercially available M8 bolts . 3 Fix this unit in the stand. Use commercially available M8 bolts that are 25 mm longer than the thickness of the installation surface. 1 Fix the supplied...
Operating Instructions
Page 17
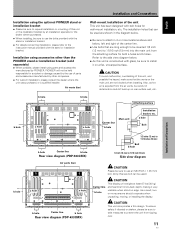
... installing. English Français Installation and Connections Installation using parts and accessories manufactured by PIONEER. As a result, two or more locations above and below, left and right of ...stand or installation bracket. ÷ For details concerning installation, please refer to prevent the unit from the attaching surface for wall-mount installation, etc. a hole Bolt Installation and Connections b hole b hole Center line b hole Rear view diagram (PDP-503CMX) Air vents (fan) a hole a hole b hole Center line b hole Rear view diagram (PDP-433CMX...
... installing. English Français Installation and Connections Installation using parts and accessories manufactured by PIONEER. As a result, two or more locations above and below, left and right of ...stand or installation bracket. ÷ For details concerning installation, please refer to prevent the unit from the attaching surface for wall-mount installation, etc. a hole Bolt Installation and Connections b hole b hole Center line b hole Rear view diagram (PDP-503CMX) Air vents (fan) a hole a hole b hole Center line b hole Rear view diagram (PDP-433CMX...
Operating Instructions
Page 40
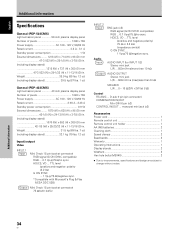
... SYNC ... 1 Vp-p/75 Ω/negative sync. D-sub 9 pin (pin connector) COMBINATION IN/OUT ... Weight 38.9 kg (85 lbs. 12 oz) (including display stand 39.5 kg (87 lbs. 1 oz) General (PDP-433CMX) Light emission panel 43 inch plasma display panel Number of pixels 1280 x 768 Power supply AC 100 - 120 V, 50/60 Hz Rated...
... SYNC ... 1 Vp-p/75 Ω/negative sync. D-sub 9 pin (pin connector) COMBINATION IN/OUT ... Weight 38.9 kg (85 lbs. 12 oz) (including display stand 39.5 kg (87 lbs. 1 oz) General (PDP-433CMX) Light emission panel 43 inch plasma display panel Number of pixels 1280 x 768 Power supply AC 100 - 120 V, 50/60 Hz Rated...