

Operating Instructions
Page 12
... sensor Point the remote control toward the remote sensor to operate the unit (page 8). 3 STANDBY/ON indicator This indicator is red during standby mode, and turns to green when the unit is in operation or standby mode (page 19). 5 INPUT button Press to select input (page 19). 6 En Note When optional...
... sensor Point the remote control toward the remote sensor to operate the unit (page 8). 3 STANDBY/ON indicator This indicator is red during standby mode, and turns to green when the unit is in operation or standby mode (page 19). 5 INPUT button Press to select input (page 19). 6 En Note When optional...
Operating Instructions
Page 21
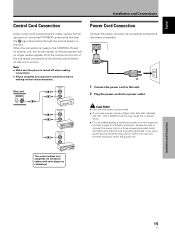
... connected component at the remote control sensor on this unit to the CONTROL IN jack on another unit, the remote sensor of connected PIONEER components that component will no resistance). If you use a power source converter plug, use a power supply voltage other than that the cord is... turned off when making control cord connections. Main unit CONTROL IN OUT CONTROL IN OUT CONTROL IN OUT CONTROL IN OUT Power Cord Connection Connect...
... connected component at the remote control sensor on this unit to the CONTROL IN jack on another unit, the remote sensor of connected PIONEER components that component will no resistance). If you use a power source converter plug, use a power supply voltage other than that the cord is... turned off when making control cord connections. Main unit CONTROL IN OUT CONTROL IN OUT CONTROL IN OUT CONTROL IN OUT Power Cord Connection Connect...

Operating Instructions
Page 23
..., then press SET. L EVEL H. Note Make this setup for WIDE VGA or WIDE XGA inputs, set to select the display mode. The STANDBY/ON indicator turns green. 3 Select INPUT1 or INPUT2. 4 Press MENU to select SET UP. ENHANCE :0 :0 : +60 : +60 : +60 :0 :0 SET UP INPUT1 OPTION RE S ET ...automatically (the SETTING item will cause the screen resolution to be displayed). 1 Switch MAIN POWER on the connection panel to the on position to turn on -screen setup is completed, press MENU to exit the menu screen. The menu screen appears. Note The PC AUTO setting supports automatic ...
..., then press SET. L EVEL H. Note Make this setup for WIDE VGA or WIDE XGA inputs, set to select the display mode. The STANDBY/ON indicator turns green. 3 Select INPUT1 or INPUT2. 4 Press MENU to select SET UP. ENHANCE :0 :0 : +60 : +60 : +60 :0 :0 SET UP INPUT1 OPTION RE S ET ...automatically (the SETTING item will cause the screen resolution to be displayed). 1 Switch MAIN POWER on the connection panel to the on position to turn on -screen setup is completed, press MENU to exit the menu screen. The menu screen appears. Note The PC AUTO setting supports automatic ...

Operating Instructions
Page 25
... a long time. If no audio connections are made to this unit, this unit. The STANDBY/ON indicator turns green. The STANDBY/ON indicator will turn the main power on position to turn the main power off . The STANDBY/ON indicator lights red. 2 Press STANDBY/ON to put this unit ...standby mode is engaged. This is a result of residual electric load impressed on the screen for a short while even after the main power is turned off . English Operations Selecting an Input Source This section explains the basic operation of this step is not necessary. 5 When viewing is finished, ...
... a long time. If no audio connections are made to this unit, this unit. The STANDBY/ON indicator turns green. The STANDBY/ON indicator will turn the main power on position to turn the main power off . The STANDBY/ON indicator lights red. 2 Press STANDBY/ON to put this unit ...standby mode is engaged. This is a result of residual electric load impressed on the screen for a short while even after the main power is turned off . English Operations Selecting an Input Source This section explains the basic operation of this step is not necessary. 5 When viewing is finished, ...
Operating Instructions
Page 27
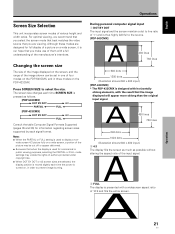
... modes of 16:9 and fills the entire screen. Press SCREEN SIZE to display a non- A 21 En Operations A 3 FULL The display is turned on, in order to prevent image burning. The screen size changes each time SCREEN SIZE is pressed as possible without altering the aspect ratio of...of authors protected under copyright law. ÷ When DOT BY DOT or 4:3 screen sizes are designed for full display of a picture on the PDP-433CMX. Although these modes are selected, the display position is moved slightly each signal format. Notes ÷ When the PARTIAL or FULL setting is ...
... modes of 16:9 and fills the entire screen. Press SCREEN SIZE to display a non- A 21 En Operations A 3 FULL The display is turned on, in order to prevent image burning. The screen size changes each time SCREEN SIZE is pressed as possible without altering the aspect ratio of...of authors protected under copyright law. ÷ When DOT BY DOT or 4:3 screen sizes are designed for full display of a picture on the PDP-433CMX. Although these modes are selected, the display position is moved slightly each signal format. Notes ÷ When the PARTIAL or FULL setting is ...
Operating Instructions
Page 30
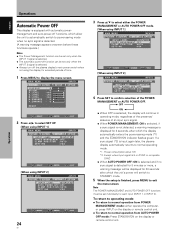
... only when the INPUT 1 signal is selected. ÷ The automatic power-off function can be set only when the INPUT 2 signal is selected. ÷ Always turn off functions, which allow the unit to automatically switch to power-saving mode when no sync signal is detected for 8 minutes or more, a warning message...
... only when the INPUT 1 signal is selected. ÷ The automatic power-off function can be set only when the INPUT 2 signal is selected. ÷ Always turn off functions, which allow the unit to automatically switch to power-saving mode when no sync signal is detected for 8 minutes or more, a warning message...

Operating Instructions
Page 37
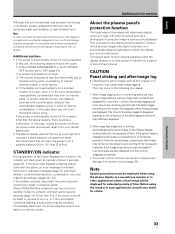
... diluted neutral cleaning detergent and after wringing the cloth thoroughly, wipe the component and then dry it with a soft cloth. Vents Illustration depicts PDP-503CMX model. Do not use a vacuum cleaner about once a month to clean the vents on the screen. About the self diagnosis mode...remote control unit. The problem may be sure to the table below . Vents WARNING THERMAL ALERT ¶ Turn off power, remove power plug from its outlet, and consult a Pioneer service center or your dealer. 31 En WARNING FAN FAILURE ¶ Cooling fan has malfunctioned. Vents Vents ...
... diluted neutral cleaning detergent and after wringing the cloth thoroughly, wipe the component and then dry it with a soft cloth. Vents Illustration depicts PDP-503CMX model. Do not use a vacuum cleaner about once a month to clean the vents on the screen. About the self diagnosis mode...remote control unit. The problem may be sure to the table below . Vents WARNING THERMAL ALERT ¶ Turn off power, remove power plug from its outlet, and consult a Pioneer service center or your dealer. 31 En WARNING FAN FAILURE ¶ Cooling fan has malfunctioned. Vents Vents ...

Operating Instructions
Page 38
.... Allow condensation to dry thoroughly before using "SCREEN" mode on the menu screen (page 27). In this case, operate the unit after first turning the MAIN POWER on/off, or unplugging the power cord and re-plugging it in accordance with new batteries). • Is a plug connected ...; INPUT is not changed. • Picture is cut off. • Strange color, light color, or dark, or color misalignment • Power is suddenly turned off. • No picture Possible Solution • Is the power cord disconnected? (page 15) • Has the MAIN POWER switch been switched on installation ...
.... Allow condensation to dry thoroughly before using "SCREEN" mode on the menu screen (page 27). In this case, operate the unit after first turning the MAIN POWER on/off, or unplugging the power cord and re-plugging it in accordance with new batteries). • Is a plug connected ...; INPUT is not changed. • Picture is cut off. • Strange color, light color, or dark, or color misalignment • Power is suddenly turned off. • No picture Possible Solution • Is the power cord disconnected? (page 15) • Has the MAIN POWER switch been switched on installation ...
Operating Instructions
Page 39
.../ON is moved suddenly from screen burning (page 29). CAUTION Panel sticking and after -image lagging. If the power is automatically turned off and change in such applications, consult your nearest sales outlet. • The plasma display panel of about three minutes. STANDBY...time. English Although this unit incorporates high precision technology in event of internal condensation; Additional cautions • If the power is automatically turned off for a long time may cause after -image lag • Displaying the same images such as a surveillance monitor or in the...
.../ON is moved suddenly from screen burning (page 29). CAUTION Panel sticking and after -image lagging. If the power is automatically turned off and change in such applications, consult your nearest sales outlet. • The plasma display panel of about three minutes. STANDBY...time. English Although this unit incorporates high precision technology in event of internal condensation; Additional cautions • If the power is automatically turned off for a long time may cause after -image lag • Displaying the same images such as a surveillance monitor or in the...