Operating Instructions
Page 1
STEREO POWER AMPLIFIER M-10X Operating Instructions
STEREO POWER AMPLIFIER M-10X Operating Instructions
Operating Instructions
Page 3
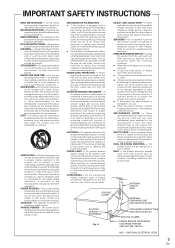
... only from heat sources such as an improper adjustment of other controls may result in the vicinity of overhead power lines or other products (including amplifiers) that they are not likely to be mounted to cords at plugs, convenience receptacles, and the point where they may expose you are covered by...
... only from heat sources such as an improper adjustment of other controls may result in the vicinity of overhead power lines or other products (including amplifiers) that they are not likely to be mounted to cords at plugs, convenience receptacles, and the point where they may expose you are covered by...

Operating Instructions
Page 5
... to be delivered as they also reduce power consumption. Further, a transformer stabilizer and stabilizer frame in the amplifier allow this unit and the VSX-39TX/other Pioneer amplifiers and work in unison with the Pioneer VSX-39TX in standby mode. 5 En If you use the supplied control cord you can also be hooked... up to other Pioneer amplifiers on and off together. 7 High-power Output: 100 W + 100 W/4 Ω (20 Hz-20 kHz, 0.2 %) 7 Energy-saving design This unit is designed to use 1 W of ...
... to be delivered as they also reduce power consumption. Further, a transformer stabilizer and stabilizer frame in the amplifier allow this unit and the VSX-39TX/other Pioneer amplifiers and work in unison with the Pioneer VSX-39TX in standby mode. 5 En If you use the supplied control cord you can also be hooked... up to other Pioneer amplifiers on and off together. 7 High-power Output: 100 W + 100 W/4 Ω (20 Hz-20 kHz, 0.2 %) 7 Energy-saving design This unit is designed to use 1 W of ...
Operating Instructions
Page 7
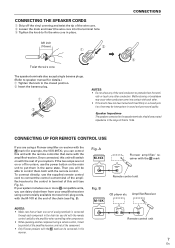
...remote control cord to connect the control out terminal of the amplifier/receiver to 16 Ω. CONNECTING UP FOR REMOTE CONTROL USE If you are not on with the M-10X at the component. • Only Pioneer products with the remote control. Then you did with the remote...closed position, there may occur when conductors come into the terminal hole. 3 Tighten the knob to protrude from your system. A M-10X CONTROL IN Pioneer amplifier/ receiver with the Î mark CONTROL OUT Remote control unit Fig. Speaker Impedance The speakers connected to the speaker terminals should ...
...remote control cord to connect the control out terminal of the amplifier/receiver to 16 Ω. CONNECTING UP FOR REMOTE CONTROL USE If you are not on with the M-10X at the component. • Only Pioneer products with the remote control. Then you did with the remote...closed position, there may occur when conductors come into the terminal hole. 3 Tighten the knob to protrude from your system. A M-10X CONTROL IN Pioneer amplifier/ receiver with the Î mark CONTROL OUT Remote control unit Fig. Speaker Impedance The speakers connected to the speaker terminals should ...
Operating Instructions
Page 8
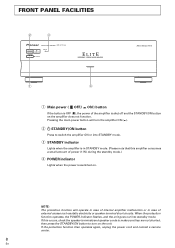
... (1 W) during the standby mode.) 4 POWER indicator Lights when the power is shut off and the STANDBY/ON button on the amplifier does not function. If this amplifier consumes a small amount of external causes such as static electricity or speaker terminal short circuits. OFF/ _ ON ) button If the... button is OFF (-), the power of internal amplifier malfunction or in STANDBY mode. (Please note that this occurs, check the speaker terminals and speaker cords to make sure they are not shorted,...
... (1 W) during the standby mode.) 4 POWER indicator Lights when the power is shut off and the STANDBY/ON button on the amplifier does not function. If this amplifier consumes a small amount of external causes such as static electricity or speaker terminal short circuits. OFF/ _ ON ) button If the... button is OFF (-), the power of internal amplifier malfunction or in STANDBY mode. (Please note that this occurs, check the speaker terminals and speaker cords to make sure they are not shorted,...

Operating Instructions
Page 9
...button to OFF. • Insert plug securely into another component. No sound. • Connecting cords are disconnected from inlet and outlet. • The amplifier's power plug has been plugged into inlet and outlet. • Turn on these channels. • Connect securely. • Connect correctly. (See page...STANDBY/ON button is set to carry out repair work. Abnormal functioning of this component, check the points below , ask your nearest PIONEER authorized service center or your dealer to STANDBY. • MAIN POWER( -OFF/_ON ) button is set incorrectly, the output settings ...
...button to OFF. • Insert plug securely into another component. No sound. • Connecting cords are disconnected from inlet and outlet. • The amplifier's power plug has been plugged into inlet and outlet. • Turn on these channels. • Connect securely. • Connect correctly. (See page...STANDBY/ON button is set to carry out repair work. Abnormal functioning of this component, check the points below , ask your nearest PIONEER authorized service center or your dealer to STANDBY. • MAIN POWER( -OFF/_ON ) button is set incorrectly, the output settings ...
Operating Instructions
Page 10
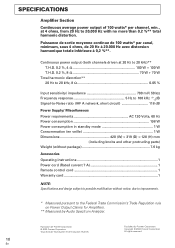
... (both channels driven at 4 ohms, from 20 Hz to the Federal Trade Commission's Trade Regulation rule on Power Output Claims for Amplifiers. ** Measured by Pioneer Corporation. Copyright © 2000 Pioneer Corporation. SPECIFICATIONS Amplifier Section Continuous average power output of 100 watts* per channel, min., at 20 Hz to 20 kHz)** T.H.D. 0.2 %, 4 100 W + 100 W T.H.D. 0.2 %, 8 70 W + 70...
... (both channels driven at 4 ohms, from 20 Hz to the Federal Trade Commission's Trade Regulation rule on Power Output Claims for Amplifiers. ** Measured by Pioneer Corporation. Copyright © 2000 Pioneer Corporation. SPECIFICATIONS Amplifier Section Continuous average power output of 100 watts* per channel, min., at 20 Hz to 20 kHz)** T.H.D. 0.2 %, 4 100 W + 100 W T.H.D. 0.2 %, 8 70 W + 70...

