Owner's Manual
Page 3
...: • When the power-supply cord or plug is located on or pinched by the operating instructions as contact with regard to proper grounding of the mast and supporting structure, grounding of antenna-discharge unit, connection to a wall or ceiling. Adjust only those controls that could result in performance - HEAT - See Figure A. OVERLOADING - NATIONAL ELECTRICAL CODE WARNING: THE APPARATUS...
...: • When the power-supply cord or plug is located on or pinched by the operating instructions as contact with regard to proper grounding of the mast and supporting structure, grounding of antenna-discharge unit, connection to a wall or ceiling. Adjust only those controls that could result in performance - HEAT - See Figure A. OVERLOADING - NATIONAL ELECTRICAL CODE WARNING: THE APPARATUS...

Owner's Manual
Page 6
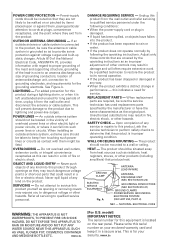
.../D2 video output 18 Connecting for multichannel surround sound 19 Connecting using the multichannel analog outputs 19 Connecting using a digital audio output 20 Connecting using i.LINK 21 About i.LINK 22 Creating an i.LINK network 22 Connecting using HDMI 24 About HDMI 24 Controlling this player from another Pioneer component 25 03 Controls and displays Front panel 26 About progressive scan video 28 Compatibility of this unit with progressive-scan TVs 28 Display 29 Remote control 30 Setting up the remote to control your TV 32 04 Getting Started Switching...
.../D2 video output 18 Connecting for multichannel surround sound 19 Connecting using the multichannel analog outputs 19 Connecting using a digital audio output 20 Connecting using i.LINK 21 About i.LINK 22 Creating an i.LINK network 22 Connecting using HDMI 24 About HDMI 24 Controlling this player from another Pioneer component 25 03 Controls and displays Front panel 26 About progressive scan video 28 Compatibility of this unit with progressive-scan TVs 28 Display 29 Remote control 30 Setting up the remote to control your TV 32 04 Getting Started Switching...
Owner's Manual
Page 7
... the player 82 Power cable caution 82 Screen sizes and disc formats 83 Widescreen TV users 83 Standard TV users 83 Resetting the player 83 About the audio output settings 84 About the HDMI output settings 85 About the i.LINK output settings 86 Setting the TV System 87 Watching NTSC on a PAL TV 87 Language code list 88 Country code list 88 Selecting languages using the language code list 89 Glossary 89 Troubleshooting 92 General 92 DVD/CD/Video CD/Super VCD player . . .93 HDMI troubleshooting 96...
... the player 82 Power cable caution 82 Screen sizes and disc formats 83 Widescreen TV users 83 Standard TV users 83 Resetting the player 83 About the audio output settings 84 About the HDMI output settings 85 About the i.LINK output settings 86 Setting the TV System 87 Watching NTSC on a PAL TV 87 Language code list 88 Country code list 88 Selecting languages using the language code list 89 Glossary 89 Troubleshooting 92 General 92 DVD/CD/Video CD/Super VCD player . . .93 HDMI troubleshooting 96...

Owner's Manual
Page 8
... easily connect to a HDMI-equipped AV receiver or audiovisual device for connection to an AV amplifier to receiver automatically changes the input give you to listen to this player.*4 Digital, DTS and multichannel DVD-Audio discs. 8 En This is achieved using the same video data converter. sampling rate (up to 192kHz) PCM multichannel digital audio from DVD-Audio and SACD discs, as well as digital audio from Dolby function to analog audio sources with a single cable and...
... easily connect to a HDMI-equipped AV receiver or audiovisual device for connection to an AV amplifier to receiver automatically changes the input give you to listen to this player.*4 Digital, DTS and multichannel DVD-Audio discs. 8 En This is achieved using the same video data converter. sampling rate (up to 192kHz) PCM multichannel digital audio from DVD-Audio and SACD discs, as well as digital audio from Dolby function to analog audio sources with a single cable and...
Owner's Manual
Page 20
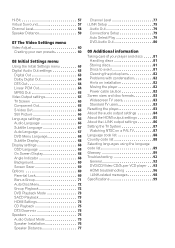
... PR AUDIO OUT (2ch) L AUDIO OUT (5.1ch) FRONT SURROUND L DIGITAL AUDIO OUT CENTER COAXIAL (AUDIO) CONTROL VIDEO OUT S-VIDEO OUT COMPONENT VIDEO OUT R R SUB WOOFER OPTICAL S400 HDMI OUT IN OUT 1 2 1 2 Y PB PR Optical connection: Use an optical cable (AUDIO) CONTROL VIDEO OUT S-VIDEO OUT COMPONENT VIDEO OUT (not supplied) to connect the OPTICAL DIGITAL OUT jack to a video input on your AV receiver. If your receiver. Coaxial connection: Use a coaxial cable (similar to the supplied video cable) to connect the COAXIAL DIGITAL OUT...
... PR AUDIO OUT (2ch) L AUDIO OUT (5.1ch) FRONT SURROUND L DIGITAL AUDIO OUT CENTER COAXIAL (AUDIO) CONTROL VIDEO OUT S-VIDEO OUT COMPONENT VIDEO OUT R R SUB WOOFER OPTICAL S400 HDMI OUT IN OUT 1 2 1 2 Y PB PR Optical connection: Use an optical cable (AUDIO) CONTROL VIDEO OUT S-VIDEO OUT COMPONENT VIDEO OUT (not supplied) to connect the OPTICAL DIGITAL OUT jack to a video input on your AV receiver. If your receiver. Coaxial connection: Use a coaxial cable (similar to the supplied video cable) to connect the COAXIAL DIGITAL OUT...

Owner's Manual
Page 21
... where the PQLS/rate control function and/or the i.LINK audio does not work properly even when connected to i.LINK Audio-compatible equipment. • Do not disconnect i.LINK cables or switch off any part of the disc that the player is on. • Copy-protected 96kHz DVD-Video discs are downsampled to 48kHz when using i.LINK If you have to a video input on your AV receiver. • The i.LINK connectors...
... where the PQLS/rate control function and/or the i.LINK audio does not work properly even when connected to i.LINK Audio-compatible equipment. • Do not disconnect i.LINK cables or switch off any part of the disc that the player is on. • Copy-protected 96kHz DVD-Video discs are downsampled to 48kHz when using i.LINK If you have to a video input on your AV receiver. • The i.LINK connectors...
Owner's Manual
Page 24
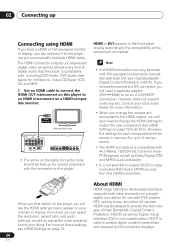
... change the component connected to the HDMI output, you can select the resolution, aspect ratio and audio settings, as well as Digital Visual Interface (DVI) in one specification. About HDMI HDMI (High Definition Multimedia Interface) supports both DVI and High Bandwidth Digital Content Protection (HDCP). HDCP is compatible with both video and audio on page 73 to do this player using a commercially available HDMI cable. HDMI was developed to provide the technologies of digital audio that the player...
... change the component connected to the HDMI output, you can select the resolution, aspect ratio and audio settings, as well as Digital Visual Interface (DVI) in one specification. About HDMI HDMI (High Definition Multimedia Interface) supports both DVI and High Bandwidth Digital Content Protection (HDCP). HDCP is compatible with both video and audio on page 73 to do this player using a commercially available HDMI cable. HDMI was developed to provide the technologies of digital audio that the player...
Owner's Manual
Page 28
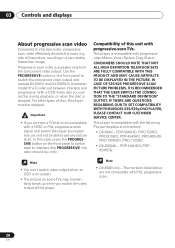
...; DV-59AVi - Progressive scan video is not compatible with a NTSC or PAL progressive scan signal and switch the player to progressive, you will not be unlit). With a DVD-Video disc you switch the video output of disc, the player must be stopped. • If you connect a TV that is available only from the component video output. 03 Controls and displays About progressive scan video Compared to interlace (the PROGRESSIVE indicator should be able to switch the component video output and (except DV-59AVi and DV-S969AVi Australian model) the D video out...
...; DV-59AVi - Progressive scan video is not compatible with a NTSC or PAL progressive scan signal and switch the player to progressive, you will not be unlit). With a DVD-Video disc you switch the video output of disc, the player must be stopped. • If you connect a TV that is available only from the component video output. 03 Controls and displays About progressive scan video Compared to interlace (the PROGRESSIVE indicator should be able to switch the component video output and (except DV-59AVi and DV-S969AVi Australian model) the D video out...
Owner's Manual
Page 34
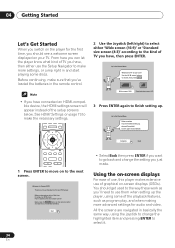
... these work as you'll need to use them when setting up . You should see a welcome screen displayed on your DVD player Put the batteries into the remote control Next, press the ENTER button on the remote control and start playing some of the playback features, such as program play, and when making more settings, or jump right in and start the Let's Get Started Menu Next Complete Back • Select Back...
... these work as you'll need to use them when setting up . You should see a welcome screen displayed on your DVD player Put the batteries into the remote control Next, press the ENTER button on the remote control and start playing some of the playback features, such as program play, and when making more settings, or jump right in and start the Let's Get Started Menu Next Complete Back • Select Back...
Owner's Manual
Page 35
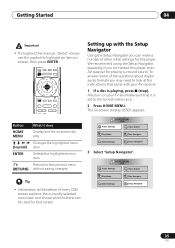
... initial settings for that screen. Also turn on your AV receiver. 1 If a disc is set to look at the bottom of every OSD screen explains the currently selected menu item and shows which buttons can make a number of the questions about digital audio formats you can be used for this player. MULTI SPEED + ENTER VIDEO RETURN ADJUST DIMMER JOG MODE V.ADJ FL JOG 7 3 8 4¢ E/ E/ 1¡ PLAY MODE SURROUND Button What it is playing, press (stop). DISPLAY AUDIO SUBTITLE ANGLE HOME MENU MENU TOP MENU -
... initial settings for that screen. Also turn on your AV receiver. 1 If a disc is set to look at the bottom of every OSD screen explains the currently selected menu item and shows which buttons can make a number of the questions about digital audio formats you can be used for this player. MULTI SPEED + ENTER VIDEO RETURN ADJUST DIMMER JOG MODE V.ADJ FL JOG 7 3 8 4¢ E/ E/ 1¡ PLAY MODE SURROUND Button What it is playing, press (stop). DISPLAY AUDIO SUBTITLE ANGLE HOME MENU MENU TOP MENU -

Owner's Manual
Page 43
...; My AV receiver is set to 2 Channel (see a picture using HDMI. This is not a malfunction. DVI sources must also be able to change the HDMI resolution. 43 En Make sure that some DVD-Audio discs only output audio through the analog outputs? Also, you 're using the HDMI interface. Make sure that you've selected this player as the HDMI input in the settings for a stereo downmix (note that DVD-Audio Out is definitely compatible with both...
...; My AV receiver is set to 2 Channel (see a picture using HDMI. This is not a malfunction. DVI sources must also be able to change the HDMI resolution. 43 En Make sure that some DVD-Audio discs only output audio through the analog outputs? Also, you 're using the HDMI interface. Make sure that you've selected this player as the HDMI input in the settings for a stereo downmix (note that DVD-Audio Out is definitely compatible with both...

Owner's Manual
Page 44
... Playing discs Chapter 5 Playing discs Introduction Most of the features described in PBC mode, or when a DVD disc menu is displayed. For DVD-Video discs select a title, or a chapter within a group. For DVD-Audio discs select a group, or a track within a title. Some DVD discs restrict the use of on -screen display. Alternatively, if a DVD-RW, CD, Video CD/ Super VCD or MP3 disc is loaded, you can use the Disc Navigator when a disc is not a malfunction. HOME MENU DVD Audio Settings Video Adjust Play Mode Disc Navigator Initial Settings Setup Navigator 2 Select...
... Playing discs Chapter 5 Playing discs Introduction Most of the features described in PBC mode, or when a DVD disc menu is displayed. For DVD-Video discs select a title, or a chapter within a group. For DVD-Audio discs select a group, or a track within a title. Some DVD discs restrict the use of on -screen display. Alternatively, if a DVD-RW, CD, Video CD/ Super VCD or MP3 disc is loaded, you can use the Disc Navigator when a disc is not a malfunction. HOME MENU DVD Audio Settings Video Adjust Play Mode Disc Navigator Initial Settings Setup Navigator 2 Select...
Owner's Manual
Page 63
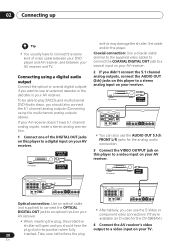
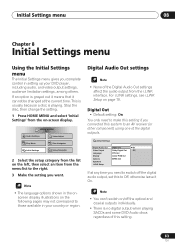
... usually because a disc is playing. HOME MENU DVD Audio Settings Video Adjust Play Mode Disc Navigator Initial Settings Setup Navigator 2 Select the setup category from the list on the left, then select an item from the on-screen display. Initial Settings Digital Audio Out Digital Out On Video Output Dolby Digital Out Off Language DTS Out Display Linear PCM Out Options MPEG Out Speakers i.LINK Setup If at the current time. Stop the disc, then change the setting. 1 Press HOME MENU and select 'Initial Settings' from the menu list to switch off the optical...
... usually because a disc is playing. HOME MENU DVD Audio Settings Video Adjust Play Mode Disc Navigator Initial Settings Setup Navigator 2 Select the setup category from the list on the left, then select an item from the on-screen display. Initial Settings Digital Audio Out Digital Out On Video Output Dolby Digital Out Off Language DTS Out Display Linear PCM Out Options MPEG Out Speakers i.LINK Setup If at the current time. Stop the disc, then change the setting. 1 Press HOME MENU and select 'Initial Settings' from the menu list to switch off the optical...

Owner's Manual
Page 65
... > PCM (4:3) format, the settings on what options are available. Pan & Scan chops the sides off widescreen material to make this player to more compatible PCM audio). Component Out • Default setting: Interlace You only need to make it to MPEG > PCM (MPEG audio is converted to an AV receiver (or other connected component) is shown with black bars on page 83. Video Output settings • You can't change the video output setting when an HDMI component is then shown using...
... > PCM (4:3) format, the settings on what options are available. Pan & Scan chops the sides off widescreen material to make this player to more compatible PCM audio). Component Out • Default setting: Interlace You only need to make it to MPEG > PCM (MPEG audio is converted to an AV receiver (or other connected component) is shown with black bars on page 83. Video Output settings • You can't change the video output setting when an HDMI component is then shown using...
Owner's Manual
Page 69
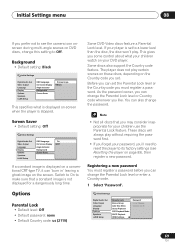
...8226; Default setting: Black Initial Settings Digital Audio Out Video Output Language Display Options Speakers i.LINK Setup OSD Language On Screen Display Angle Indicator Background Screen Saver Pioneer Logo Black This specifies what your children watch on DVD discs, change this setting to a lower level than the disc, the disc won't play. As the password owner, you can change the Parental Lock level or enter a Country code. 1 Select 'Password'. Some DVD-Video discs feature a Parental Lock level. Some discs also support the Country code feature. Switch to On to its factory...
...8226; Default setting: Black Initial Settings Digital Audio Out Video Output Language Display Options Speakers i.LINK Setup OSD Language On Screen Display Angle Indicator Background Screen Saver Pioneer Logo Black This specifies what your children watch on DVD discs, change this setting to a lower level than the disc, the disc won't play. As the password owner, you can change the Parental Lock level or enter a Country code. 1 Select 'Password'. Some DVD-Video discs feature a Parental Lock level. Some discs also support the Country code feature. Switch to On to its factory...
Owner's Manual
Page 71
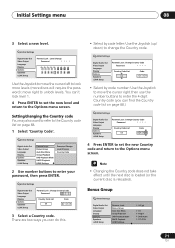
... Settings Digital Audio Out Video Output Language Display Options Speakers i.LINK Setup Parental Lock Bonus Group Auto Disc Menu Group Playback DVD Playback Mode SACD Playback HDMI Settings Password Change Level Change Country Code 2 Use number buttons to the Country code list on page 88.) Initial Settings Digital Audio Out Video Output Language Display Options Speakers i.LINK Setup Parental Lock : Change Country Code Password **** Country Code List us Code 2 1 1 9 4 Press ENTER to set the new level and return to the Options menu screen. Initial Settings Digital Audio Out Video...
... Settings Digital Audio Out Video Output Language Display Options Speakers i.LINK Setup Parental Lock Bonus Group Auto Disc Menu Group Playback DVD Playback Mode SACD Playback HDMI Settings Password Change Level Change Country Code 2 Use number buttons to the Country code list on page 88.) Initial Settings Digital Audio Out Video Output Language Display Options Speakers i.LINK Setup Parental Lock : Change Country Code Password **** Country Code List us Code 2 1 1 9 4 Press ENTER to set the new level and return to the Options menu screen. Initial Settings Digital Audio Out Video...
Owner's Manual
Page 72
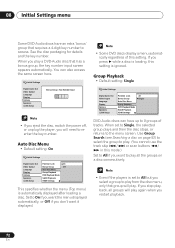
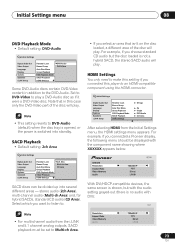
... you eject the disc, switch the power off, or unplug the player, you don't want to play all groups will play from the disc menu, only that has a bonus group, the key number input screen appears automatically. Set to 9 groups of this setting. Group Playback • Default setting: Single Initial Settings Digital Audio Out Video Output Language Display Options Speakers i.LINK Setup Parental Lock Bonus Group Auto Disc Menu Group Playback DVD Playback Mode SACD Playback HDMI Settings All Single DVD-Audio discs can also access the same screen here. Use Group Search...
... you eject the disc, switch the power off, or unplug the player, you don't want to play all groups will play from the disc menu, only that has a bonus group, the key number input screen appears automatically. Set to 9 groups of this setting. Group Playback • Default setting: Single Initial Settings Digital Audio Out Video Output Language Display Options Speakers i.LINK Setup Parental Lock Bonus Group Auto Disc Menu Group Playback DVD Playback Mode SACD Playback HDMI Settings All Single DVD-Audio discs can also access the same screen here. Use Group Search...
Owner's Manual
Page 73
... is switched into several different areas - SACD Playback • Default setting: 2ch Area Initial Settings Digital Audio Out Video Output Language Display Options Speakers i.LINK Setup Parental Lock Bonus Group Auto Disc Menu Group Playback DVD Playback Mode SACD Playback HDMI Settings 2ch Area Multi-ch Area CD Area SACD discs can be displayed with the component name showing where XXXXXX appears below: XXXXXX Resolution Aspect Ratio Video Memory Audio 720x480 P 16:9 Direct LPCM With DVI/HDCP-compatible devices, the same screen is shown, but the disc loaded is...
... is switched into several different areas - SACD Playback • Default setting: 2ch Area Initial Settings Digital Audio Out Video Output Language Display Options Speakers i.LINK Setup Parental Lock Bonus Group Auto Disc Menu Group Playback DVD Playback Mode SACD Playback HDMI Settings 2ch Area Multi-ch Area CD Area SACD discs can be displayed with the component name showing where XXXXXX appears below: XXXXXX Resolution Aspect Ratio Video Memory Audio 720x480 P 16:9 Direct LPCM With DVI/HDCP-compatible devices, the same screen is shown, but the disc loaded is...

Owner's Manual
Page 92
... player: Allow time for condensation to carry out repair work. DVD-Audio playback stops. • The disc may lie in and switch on page 82 for trouble or malfunction. Picture playback stops and the operation buttons cannot be canceled. When the power is something wrong with the label side face-up and aligned properly in the disc tray guide. • Incompatible region number: If the region number on a DVD-Video disc does not match the number on the player...
... player: Allow time for condensation to carry out repair work. DVD-Audio playback stops. • The disc may lie in and switch on page 82 for trouble or malfunction. Picture playback stops and the operation buttons cannot be canceled. When the power is something wrong with the label side face-up and aligned properly in the disc tray guide. • Incompatible region number: If the region number on a DVD-Video disc does not match the number on the player...
Owner's Manual
Page 93
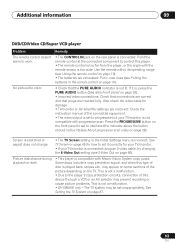
... 09 DVD/CD/Video CD/Super VCD player Problem Remedy The remote control doesn't seem to work. • The CONTROL IN jack on the rear panel is connected: Point the remote control at the connected component to control this player. • The remote control is too far from the player, or the angle with the remote sensor is too wide: Use the remote within its operating range (see Using the remote control on page 10). • The batteries...
... 09 DVD/CD/Video CD/Super VCD player Problem Remedy The remote control doesn't seem to work. • The CONTROL IN jack on the rear panel is connected: Point the remote control at the connected component to control this player. • The remote control is too far from the player, or the angle with the remote sensor is too wide: Use the remote within its operating range (see Using the remote control on page 10). • The batteries...


