
Owner's Manual
Page 6
...using i.LINK 21 About i.LINK 22 Creating an i.LINK network 22 Connecting using HDMI 24 About HDMI 24 Controlling this player from another Pioneer component 25 03 Controls and displays Front panel 26 About progressive scan video 28 Compatibility of this unit with progressive-scan TVs 28 Display 29... Remote control 30 Setting up the remote to control your TV 32 04 Getting Started Switching on 33 Let's Get Started 34 Using the on-screen displays 34...
...using i.LINK 21 About i.LINK 22 Creating an i.LINK network 22 Connecting using HDMI 24 About HDMI 24 Controlling this player from another Pioneer component 25 03 Controls and displays Front panel 26 About progressive scan video 28 Compatibility of this unit with progressive-scan TVs 28 Display 29... Remote control 30 Setting up the remote to control your TV 32 04 Getting Started Switching on 33 Let's Get Started 34 Using the on-screen displays 34...
Owner's Manual
Page 10
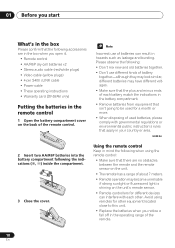
... plugs) • 4-pin S400 i.LINK cable • Power cable • These operating instructions • Warranty card (DV-59AVi only) Putting the batteries in the remote control 1 Open the battery compartment cover on the unit's remote sensor. • Remote controllers for other . Please observe the following: • Don't mix new and old batteries together. • Don...
... plugs) • 4-pin S400 i.LINK cable • Power cable • These operating instructions • Warranty card (DV-59AVi only) Putting the batteries in the remote control 1 Open the battery compartment cover on the unit's remote sensor. • Remote controllers for other . Please observe the following: • Don't mix new and old batteries together. • Don...
Owner's Manual
Page 14
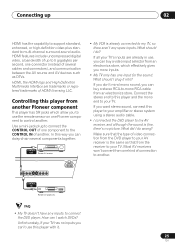
i.LINK connectors 4-pin, S400 i.LINK connectors for digital audio and video (page 24). 7 CONTROL IN / OUT For passing remote control signals to i.LINK-equipped receivers and other components, make sure that all components are lined up to your TV, AV receiver or ... both input and output (page 21). 6 HDMI OUT HDMI output providing a high quality interface for connection to other Pioneer components (page 25). 14 En 02 Connecting up Chapter 2 Connecting up Rear panel 12 3 4 DV-S969AVi AUDIO OUT (2ch) L AUDIO OUT (5.1ch) FRONT SURROUND L DIGITAL AUDIO OUT CENTER COAXIAL R R SUB ...
i.LINK connectors 4-pin, S400 i.LINK connectors for digital audio and video (page 24). 7 CONTROL IN / OUT For passing remote control signals to i.LINK-equipped receivers and other components, make sure that all components are lined up to your TV, AV receiver or ... both input and output (page 21). 6 HDMI OUT HDMI output providing a high quality interface for connection to other Pioneer components (page 25). 14 En 02 Connecting up Chapter 2 Connecting up Rear panel 12 3 4 DV-S969AVi AUDIO OUT (2ch) L AUDIO OUT (5.1ch) FRONT SURROUND L DIGITAL AUDIO OUT CENTER COAXIAL R R SUB ...
Owner's Manual
Page 25
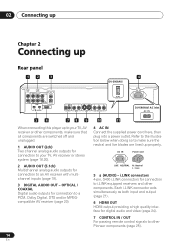
...already in use this way you can buy a video input selector from the DVD player to your TV has no picture. CONTROL OUT Pioneer AV receiver AC IN • My VCR is the same as DTVs. HDMI features include uncompressed digital video, a bandwidth of video ...connection from an electronics store, which allow you to use the remote sensor on one kind of connection to control another Pioneer component This player has SR jacks which effectively gives you can daisy-chain several cables and connectors), and communication...
...already in use this way you can buy a video input selector from the DVD player to your TV has no picture. CONTROL OUT Pioneer AV receiver AC IN • My VCR is the same as DTVs. HDMI features include uncompressed digital video, a bandwidth of video ...connection from an electronics store, which allow you to use the remote sensor on one kind of connection to control another Pioneer component This player has SR jacks which effectively gives you can daisy-chain several cables and connectors), and communication...

Owner's Manual
Page 26
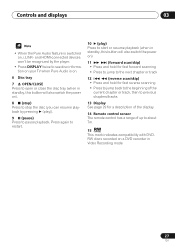
...when the Pure Audio feature is compatible with no interference from other signals (when listening to switch the player into standby using the remote control; Use this feature. 5 PURE AUDIO button/indicator When the player is recognized by another HDMl or DVI/HDCP compatible component...However, your TV must also be put into standby. 03 Controls and displays Chapter 3 Controls and displays The following illustrations show the DV-59AVi, but controls and displays for example). the STANDBY indicator above the button lights when in progressive scan mode. The indicator lights in standby...
...when the Pure Audio feature is compatible with no interference from other signals (when listening to switch the player into standby using the remote control; Use this feature. 5 PURE AUDIO button/indicator When the player is recognized by another HDMl or DVI/HDCP compatible component...However, your TV must also be put into standby. 03 Controls and displays Chapter 3 Controls and displays The following illustrations show the DV-59AVi, but controls and displays for example). the STANDBY indicator above the button lights when in progressive scan mode. The indicator lights in standby...
Owner's Manual
Page 27
... to the beginning of the current chapter or track, then to previous chapters/tracks 13 Display See page 29 for a description of the display. 14 Remote control sensor The remote control has a range of up to about 7m. 15 This mark indicates compatibility with DVDRW discs recorded on , i.LINK-
... to the beginning of the current chapter or track, then to previous chapters/tracks 13 Display See page 29 for a description of the display. 14 Remote control sensor The remote control has a range of up to about 7m. 15 This mark indicates compatibility with DVDRW discs recorded on , i.LINK-
Owner's Manual
Page 30
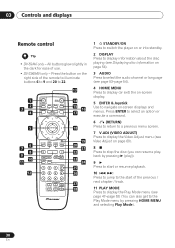
03 Controls and displays Remote control • DV-59AVi only - MULTI SPEED + 14 15 16 17 5 ENTER 18 6 7 8 9 10 11 12 VIDEO RETURN ADJUST DIMMER JOG MODE V.ADJ FL JOG 7 3 8 4¢ E/ E/ 1¡ PLAY MODE ... 53-page 54). 4 HOME MENU Press to display (or exit) the on-screen display. 5 ENTER & Joystick Use to navigate on the right side of the remote to illuminate buttons 6 to 9 and 20 to the start of use. • DV-S969AVi only - Press the button on -screen displays and menus.
03 Controls and displays Remote control • DV-59AVi only - MULTI SPEED + 14 15 16 17 5 ENTER 18 6 7 8 9 10 11 12 VIDEO RETURN ADJUST DIMMER JOG MODE V.ADJ FL JOG 7 3 8 4¢ E/ E/ 1¡ PLAY MODE ... 53-page 54). 4 HOME MENU Press to display (or exit) the on-screen display. 5 ENTER & Joystick Use to navigate on the right side of the remote to illuminate buttons 6 to 9 and 20 to the start of use. • DV-S969AVi only - Press the button on -screen displays and menus.
Owner's Manual
Page 31
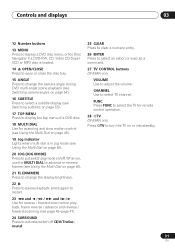
FUNC Press FUNC to select the TV for remote control operation. 28 TV DV-59AVi only Press TV to put switch jog mode on/off 2V/TruSurround. 25 CLEAR Press to clear a numeric entry. 26 ENTER Press to select an option or execute a command. 27 TV CONTROL buttons DV-59AVi only VOLUME Use to restart. 23...
FUNC Press FUNC to select the TV for remote control operation. 28 TV DV-59AVi only Press TV to put switch jog mode on/off 2V/TruSurround. 25 CLEAR Press to clear a numeric entry. 26 ENTER Press to select an option or execute a command. 27 TV CONTROL buttons DV-59AVi only VOLUME Use to restart. 23...
Owner's Manual
Page 32
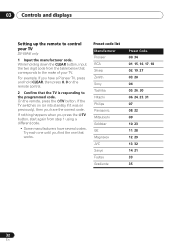
Preset code list Manufacturer Pioneer RCA Sharp Zenith Sony Toshiba Hitachi Philips Panasonic Mitsubishi Goldstar GE Magnavox JVC Sanyo ... 10, 23 11, 28 12, 29 13, 32 14, 21 33 35 32 En For example, If you have a Pioneer TV, press and hold CLEAR, then press 0, 0 on previously), then you have several codes. If nothing happens when you ... start again from the table below that corresponds to the make of your TV DV-59AVi only 1 Input the manufacturer code. 03 Controls and displays Setting up the remote to the programmed code. While holding down the CLEAR button, input the two ...
Preset code list Manufacturer Pioneer RCA Sharp Zenith Sony Toshiba Hitachi Philips Panasonic Mitsubishi Goldstar GE Magnavox JVC Sanyo ... 10, 23 11, 28 12, 29 13, 32 14, 21 33 35 32 En For example, If you have a Pioneer TV, press and hold CLEAR, then press 0, 0 on previously), then you have several codes. If nothing happens when you ... start again from the table below that corresponds to the make of your TV DV-59AVi only 1 Input the manufacturer code. 03 Controls and displays Setting up the remote to the programmed code. While holding down the CLEAR button, input the two ...

Owner's Manual
Page 33
DV-S969AVi - Make sure that the receiver is switched on and set to the correct input. • This player features a screen ...the remote control to switch the power on. STANDBY/ON STANDBY/ON HDMI PROGRESSIVE PURE AUDIO Î AUDIO/VIDEO • My DVD player switches on but there is pressed for how to switch it is set to the input you connected the DVD player to. • DV-59AVi -... Also, switch on or off (the player can be put into standby using the remote control;
DV-S969AVi - Make sure that the receiver is switched on and set to the correct input. • This player features a screen ...the remote control to switch the power on. STANDBY/ON STANDBY/ON HDMI PROGRESSIVE PURE AUDIO Î AUDIO/VIDEO • My DVD player switches on but there is pressed for how to switch it is set to the input you connected the DVD player to. • DV-59AVi -... Also, switch on or off (the player can be put into standby using the remote control;
Owner's Manual
Page 34
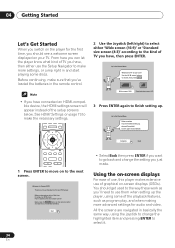
... use of TV you have , then press ENTER. See HDMI Settings on page 73 to make sure that you've loaded the batteries in the remote control. 2 Use the Joystick (left/right) to select either 'Wide screen (16:9)' or 'Standard size screen (4:3)' according to the kind of the playback features, ... for audio and video. Before using the joystick to change the setting you just made. Using the on-screen displays For ease of use, this Pioneer DVD player. From here you can let the player know what kind of graphical on-screen displays (OSDs). Before continuing, make the necessary settings. ...
... use of TV you have , then press ENTER. See HDMI Settings on page 73 to make sure that you've loaded the batteries in the remote control. 2 Use the Joystick (left/right) to select either 'Wide screen (16:9)' or 'Standard size screen (4:3)' according to the kind of the playback features, ... for audio and video. Before using the joystick to change the setting you just made. Using the on-screen displays For ease of use, this Pioneer DVD player. From here you can let the player know what kind of graphical on-screen displays (OSDs). Before continuing, make the necessary settings. ...
Owner's Manual
Page 39
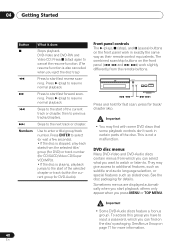
... CD/Super VCD PBC menus on . Button What it is specified. If you're playing a DVD or Video CD/Super VCD, also turn on the remote for how to a particular kind of the file structure on the complexity of DVD disc, it may appear. If you 're playing a DVD or Video...
... CD/Super VCD PBC menus on . Button What it is specified. If you're playing a DVD or Video CD/Super VCD, also turn on the remote for how to a particular kind of the file structure on the complexity of DVD disc, it may appear. If you 're playing a DVD or Video...
Owner's Manual
Page 40
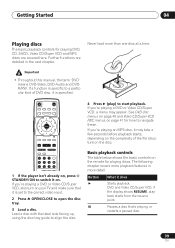
DVD-Video and DVD-RW and Video CD: Press (stop ), and (pause) buttons on the front panel ( and ) work slightly differently from the remote buttons. Press (play ) to resume normal playback. Press (play ) to resume normal playback. Skips to enter a title/group/track number. AUDIO/VIDEO &#...next track or chapter. Press ENTER to additional features, such as subtitle and audio language selection, or special features such as their remote control equivalents. The combined scan/skip buttons on the front panel work in exactly the same way as slideshows. press for more information...
DVD-Video and DVD-RW and Video CD: Press (stop ), and (pause) buttons on the front panel ( and ) work slightly differently from the remote buttons. Press (play ) to resume normal playback. Press (play ) to resume normal playback. Skips to enter a title/group/track number. AUDIO/VIDEO &#...next track or chapter. Press ENTER to additional features, such as subtitle and audio language selection, or special features such as their remote control equivalents. The combined scan/skip buttons on the front panel work in exactly the same way as slideshows. press for more information...
Owner's Manual
Page 58
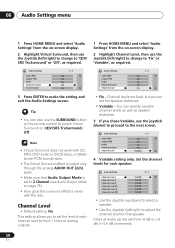
... variable channel levels as well as required. You can set the level of each speaker. Channel levels can also use the SURROUND button on the remote control to switch Virtual Surround on (2V/SRS TruSurround)/ Off. • Virtual Surround does not work with CD, MP3, DVD-Audio or SACD discs, or...
... variable channel levels as well as required. You can set the level of each speaker. Channel levels can also use the SURROUND button on the remote control to switch Virtual Surround on (2V/SRS TruSurround)/ Off. • Virtual Surround does not work with CD, MP3, DVD-Audio or SACD discs, or...
Owner's Manual
Page 82
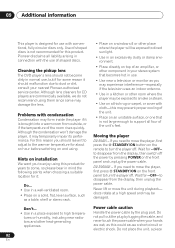
...warm room from outside, or if the temperature of the room rises quickly. Although lens cleaners for some may damage the lens. Moving the player DV-59AVi - discs rotate at a high speed and may temporarily impair its performance. Do not place the unit, a piece 82 En Although the condensation...and unplug the power cable. Wait for --OFF-- Power cable caution Handle the power cable by pressing POWER on the remote to turn the player off. Pioneer disclaims all four of shaped discs. Cleaning the pickup lens The DVD player's lens should not become dirty in a kitchen...
...warm room from outside, or if the temperature of the room rises quickly. Although lens cleaners for some may damage the lens. Moving the player DV-59AVi - discs rotate at a high speed and may temporarily impair its performance. Do not place the unit, a piece 82 En Although the condensation...and unplug the power cable. Wait for --OFF-- Power cable caution Handle the power cable by pressing POWER on the remote to turn the player off. Pioneer disclaims all four of shaped discs. Cleaning the pickup lens The DVD player's lens should not become dirty in a kitchen...
Owner's Manual
Page 93
...or the angle with the remote sensor is too wide: Use the remote within its operating range (see Using the remote control on page 10). • The batteries are exhausted: Put in new ones (see Putting the batteries in the Initial Settings menu is not a malfunction. • DV-S969AVi only - Also check ...not lit. Additional information 09 DVD/CD/Video CD/Super VCD player Problem Remedy The remote control doesn't seem to work. • The CONTROL IN jack on the rear panel is connected: Point the remote control at the connected component to control this device through a VCR or an AV ...
...or the angle with the remote sensor is too wide: Use the remote within its operating range (see Using the remote control on page 10). • The batteries are exhausted: Put in new ones (see Putting the batteries in the Initial Settings menu is not a malfunction. • DV-S969AVi only - Also check ...not lit. Additional information 09 DVD/CD/Video CD/Super VCD player Problem Remedy The remote control doesn't seem to work. • The CONTROL IN jack on the rear panel is connected: Point the remote control at the connected component to control this device through a VCR or an AV ...
Owner's Manual
Page 99
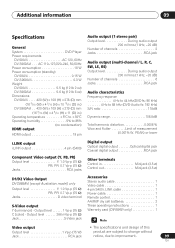
... (D) in Minijack (3.5 ø) Control out Minijack (3.5 ø) Accessories Stereo audio cable 1 Video cable 1 4-pin S400 i.LINK cable 1 Power cable 1 Remote control 1 AA/R6P dry cell batteries 2 These operating instructions 1 Warranty card (DV-59AVi only 1 Video output • The specifications and design of this Output level 1 Vp-p (75 W) product are subject to change without...
... (D) in Minijack (3.5 ø) Control out Minijack (3.5 ø) Accessories Stereo audio cable 1 Video cable 1 4-pin S400 i.LINK cable 1 Power cable 1 Remote control 1 AA/R6P dry cell batteries 2 These operating instructions 1 Warranty card (DV-59AVi only 1 Video output • The specifications and design of this Output level 1 Vp-p (75 W) product are subject to change without...


