
Owner's Manual
Page 2
... important operating and maintenance (servicing) instructions in a safe place for help. D3-4-2-1-7a_A_En 2 En Connect the equipment into an outlet on , the user is intended to alert the user to operate your model properly. REFER SERVICING TO QUALIFIED SERVICE PERSONNEL. PLEASE WRITE THIS SERIAL NUMBER ON YOUR ENCLOSED WARRANTY CARD AND KEEP IN A SECURE AREA. Please read through these operating instructions so you have finished reading the instructions, put...
... important operating and maintenance (servicing) instructions in a safe place for help. D3-4-2-1-7a_A_En 2 En Connect the equipment into an outlet on , the user is intended to alert the user to operate your model properly. REFER SERVICING TO QUALIFIED SERVICE PERSONNEL. PLEASE WRITE THIS SERIAL NUMBER ON YOUR ENCLOSED WARRANTY CARD AND KEEP IN A SECURE AREA. Please read through these operating instructions so you have finished reading the instructions, put...
Owner's Manual
Page 3
... reliable operation of the obsolete outlet. 10) Protect the power cord from the apparatus. D3-4-2-1-4_A_En En 3 Servicing is used meets the required voltage (e.g., 230 V or 120 V) written on the rear panel. less than 85 %RH (cooling vents not blocked) Do not install this product...region. To prevent a fire or shock hazard, do not remove any heat sources such as a vase or flower pot) or expose it from tip-over. 13) Unplug this unit, make sure to the inside of the polarized or grounding-type plug. To prevent fire hazard, the openings should never be used , use...
... reliable operation of the obsolete outlet. 10) Protect the power cord from the apparatus. D3-4-2-1-4_A_En En 3 Servicing is used meets the required voltage (e.g., 230 V or 120 V) written on the rear panel. less than 85 %RH (cooling vents not blocked) Do not install this product...region. To prevent a fire or shock hazard, do not remove any heat sources such as a vase or flower pot) or expose it from tip-over. 13) Unplug this unit, make sure to the inside of the polarized or grounding-type plug. To prevent fire hazard, the openings should never be used , use...
Owner's Manual
Page 6
...'s in the box 7 Loading the batteries in the remote control 7 Connections Connecting using an audio/video cable 8 Connecting using an HDMI cable 8 Part Names and Functions Remote control 10 Playback Playing discs or files 12 Example of display on main unit display window...........13 Playing files stored on USB devices 14 Recording audio CD tracks on USB devices 14 Playing in the desired order (Programmed Play)...........15 Changing the settings Audio Settings parameters 16 Video Adjust parameters 16 Initial Settings parameters 16 Playable discs and files Playable discs 18 Playable...
...'s in the box 7 Loading the batteries in the remote control 7 Connections Connecting using an audio/video cable 8 Connecting using an HDMI cable 8 Part Names and Functions Remote control 10 Playback Playing discs or files 12 Example of display on main unit display window...........13 Playing files stored on USB devices 14 Recording audio CD tracks on USB devices 14 Playing in the desired order (Programmed Play)...........15 Changing the settings Audio Settings parameters 16 Video Adjust parameters 16 Initial Settings parameters 16 Playable discs and files Playable discs 18 Playable...
Owner's Manual
Page 7
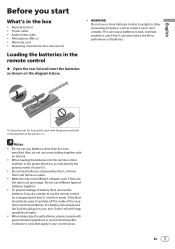
... the groove and slide in direct sunlight or other than the ones specified. Do not use different types of batteries together. To prevent leakage of battery fluid, remove the batteries if you start What's in the box Remote Control Power cable Audio/video cable AA batteries (R6) x 2 Warranty card Operating instructions (this document) Loading the batteries in the remote control Open the rear lid and insert the...
... the groove and slide in direct sunlight or other than the ones specified. Do not use different types of batteries together. To prevent leakage of battery fluid, remove the batteries if you start What's in the box Remote Control Power cable Audio/video cable AA batteries (R6) x 2 Warranty card Operating instructions (this document) Loading the batteries in the remote control Open the rear lid and insert the...
Owner's Manual
Page 8
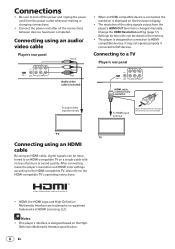
...TV TV Connecting using an HDMI cable By using an audio/ video cable Player's rear panel Yellow White Red Audio/video cable (included) When an HDMI-compatible device is connected, the resolution is displayed on a single cable with no loss of the video signals output from the power outlet whenever making or changing connections. Connect the power cord after all the connections between devices have been completed. After connecting, make the player's resolution and HDMI color settings according to DVI devices. Connections Be sure to turn off the power and unplug...
...TV TV Connecting using an HDMI cable By using an audio/ video cable Player's rear panel Yellow White Red Audio/video cable (included) When an HDMI-compatible device is connected, the resolution is displayed on a single cable with no loss of the video signals output from the power outlet whenever making or changing connections. Connect the power cord after all the connections between devices have been completed. After connecting, make the player's resolution and HDMI color settings according to DVI devices. Connections Be sure to turn off the power and unplug...
Owner's Manual
Page 9
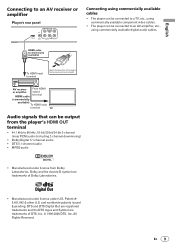
... Rights Reserved. English Connecting to an AV receiver or amplifier Player's rear panel Connecting using commercially available cables The player can be connected to a TV, etc., using commercially available component video cables. The player can be connected to an AV amplifier, etc., using commercially available digital audio cables. AV receiver or amplifier From HDMI output terminal HDMI cable (commercially available) To HDMI input terminal TV Audio signals that can be output from Dolby Laboratories. DTS and DTS Digital Out are registered...
... Rights Reserved. English Connecting to an AV receiver or amplifier Player's rear panel Connecting using commercially available cables The player can be connected to a TV, etc., using commercially available component video cables. The player can be connected to an AV amplifier, etc., using commercially available digital audio cables. AV receiver or amplifier From HDMI output terminal HDMI cable (commercially available) To HDMI input terminal TV Audio signals that can be output from Dolby Laboratories. DTS and DTS Digital Out are registered...
Owner's Manual
Page 10
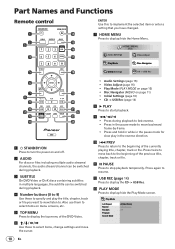
... to turn the power on and off. 2 AUDIO For discs or files including multiple audio streams/ channels, the audio stream/channel can be switched during playback. 3 SUBTITLE On DVD‑Video or DivX discs containing subtitles in multiple languages, the subtitle can be switched during playback. 4 Number buttons (0 to 9) Use these to select items, change settings and move the cursor. Audio Settings (page 16) Video Adjust (page 16) Play Mode (PLAY MODE on page 10) Disc Navigator (MENU on menu screens, etc. 5 TOP MENU Press to display...
... to turn the power on and off. 2 AUDIO For discs or files including multiple audio streams/ channels, the audio stream/channel can be switched during playback. 3 SUBTITLE On DVD‑Video or DivX discs containing subtitles in multiple languages, the subtitle can be switched during playback. 4 Number buttons (0 to 9) Use these to select items, change settings and move the cursor. Audio Settings (page 16) Video Adjust (page 16) Play Mode (PLAY MODE on page 10) Disc Navigator (MENU on menu screens, etc. 5 TOP MENU Press to display...
Owner's Manual
Page 11
... be switched during playback to skips ahead to display the menu screen or Disc Navigator. Select and play in which you input the wrong number. g DVD/USB (page 14) Press to the previous screen. i MENU Press to the beginning of the next title, chapter, track or file. When PLAY is pressed, playback resumes from the Disc Navigator. e OPEN/CLOSE Open the disc tray and load the disc. Use this for some discs or files...
... be switched during playback to skips ahead to display the menu screen or Disc Navigator. Select and play in which you input the wrong number. g DVD/USB (page 14) Press to the previous screen. i MENU Press to the beginning of the next title, chapter, track or file. When PLAY is pressed, playback resumes from the Disc Navigator. e OPEN/CLOSE Open the disc tray and load the disc. Use this for some discs or files...
Owner's Manual
Page 13
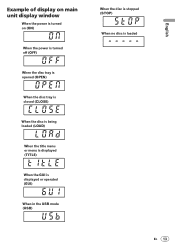
English Example of display on main unit display window When the power is turned on (ON) When the power is turned off (OFF) When the disc tray is opened (OPEN) When the disc tray is closed (CLOSE) When the disc is being loaded (LOAD) When the title menu or menu is displayed (TITLE) When the GUI is displayed or operated (GUI) When in the USB mode (USB) When the disc is stopped (STOP) When no disc is loaded En 13
English Example of display on main unit display window When the power is turned on (ON) When the power is turned off (OFF) When the disc tray is opened (OPEN) When the disc tray is closed (CLOSE) When the disc is being loaded (LOAD) When the title menu or menu is displayed (TITLE) When the GUI is displayed or operated (GUI) When in the USB mode (USB) When the disc is stopped (STOP) When no disc is loaded En 13

Owner's Manual
Page 14
... all USB devices will play files or may not supply power to stop playback. 2 Display the CD -> USB Rec screen. Press DVD/USB. The Disc Navigator appears automatically. Use to select the file, then press ENTER. Turn the power off before removing the USB device. The input will be recorded 1 Load the audio CD. If playback starts automatically, press STOP to the USB device. Recording all the tracks. 5 Select Bitrate (transfer rate). Press USB REC. Use to open the disc tray). Playing files stored...
... all USB devices will play files or may not supply power to stop playback. 2 Display the CD -> USB Rec screen. Press DVD/USB. The Disc Navigator appears automatically. Use to select the file, then press ENTER. Turn the power off before removing the USB device. The input will be recorded 1 Load the audio CD. If playback starts automatically, press STOP to the USB device. Recording all the tracks. 5 Select Bitrate (transfer rate). Press USB REC. Use to open the disc tray). Playing files stored...
Owner's Manual
Page 16
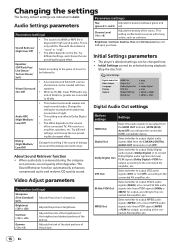
...according to the connected HDMI-compatible device. Change the setting for files with two speakers. When set to 0 upon purchase. Change this setting if the sound of the connected TV, AV receiver or amplifier, speakers, etc. Dolby Digital Out Select whether to output Dolby Digital audio signals (Dolby Digital) or to convert Dolby Digital audio signals into linear PCM signals (96kHz > 48kHz) for output, according to the connected AV amplifier, etc. Video Adjust parameters Parameters (settings) Sharpness (Fine/Standard/ Soft) Adjusts the picture's sharpness. Contrast...
...according to the connected HDMI-compatible device. Change the setting for files with two speakers. When set to 0 upon purchase. Change this setting if the sound of the connected TV, AV receiver or amplifier, speakers, etc. Dolby Digital Out Select whether to output Dolby Digital audio signals (Dolby Digital) or to convert Dolby Digital audio signals into linear PCM signals (96kHz > 48kHz) for output, according to the connected AV amplifier, etc. Video Adjust parameters Parameters (settings) Sharpness (Fine/Standard/ Soft) Adjusts the picture's sharpness. Contrast...
Owner's Manual
Page 17
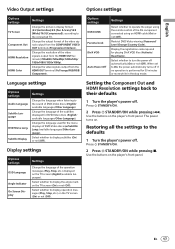
... the stop mode. Use the buttons on . Select whether to display subtitles (On) or not (Off). The power turns on the player's front panel. English Video Output settings Options settings Options settings TV Screen Component Out HDMI Resolution HDMI Color Settings Change the picture's display format (4:3 (Letter Box)/4:3 (Pan & Scan)/16:9 (Wide)/16:9 (Compressed)), according to operate the player using the remote control of the AV component connected using an HDMI cable (On) or not (Off). Options settings KURO LINK Parental Lock DivX VOD Auto Power Off Settings Select whether...
... the stop mode. Use the buttons on . Select whether to display subtitles (On) or not (Off). The power turns on the player's front panel. English Video Output settings Options settings Options settings TV Screen Component Out HDMI Resolution HDMI Color Settings Change the picture's display format (4:3 (Letter Box)/4:3 (Pan & Scan)/16:9 (Wide)/16:9 (Compressed)), according to operate the player using the remote control of the AV component connected using an HDMI cable (On) or not (Off). Options settings KURO LINK Parental Lock DivX VOD Auto Power Off Settings Select whether...
Owner's Manual
Page 18
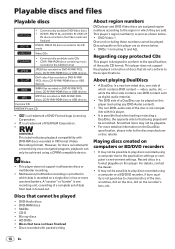
... region numbers DVD player and DVD‑Video discs are ) as digital audio material. The DVD side of discs that have not been finalized Discs recorded with a record-only-once encrypted program, playback can be played on computers or BD/DVD recorders It may not be scratched. Playable discs and files Playable discs Commercially available DVD‑Video discs DVD-R/-RW/-R DL and DVD+R/+RW/+R DL discs recorded in the Video mode and finalized DVD-R/-RW/-R DL discs recorded...
... region numbers DVD player and DVD‑Video discs are ) as digital audio material. The DVD side of discs that have not been finalized Discs recorded with a record-only-once encrypted program, playback can be played on computers or BD/DVD recorders It may not be scratched. Playable discs and files Playable discs Commercially available DVD‑Video discs DVD-R/-RW/-R DL and DVD+R/+RW/+R DL discs recorded in the Video mode and finalized DVD-R/-RW/-R DL discs recorded...
Owner's Manual
Page 19
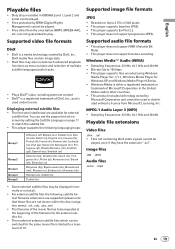
...; This player does not support lossless encoding. En 19 English Playable files Only discs recorded in the United States and/or other than the ones below are not guaranteed to a maximum of 10. Image files .jpg .jpeg Audio files .wma .mp3 Some external subtitle files may also include such advanced playback functions as menu screens and selection of multiple subtitle languages/audio tracks. Plays DivX® video, including premium...
...; This player does not support lossless encoding. En 19 English Playable files Only discs recorded in the United States and/or other than the ones below are not guaranteed to a maximum of 10. Image files .jpg .jpeg Audio files .wma .mp3 Some external subtitle files may also include such advanced playback functions as menu screens and selection of multiple subtitle languages/audio tracks. Plays DivX® video, including premium...
Owner's Manual
Page 20
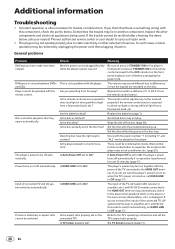
...'s operating instructions and set to On? This is not a problem with the power of the TV connected to static electricity or other components and electrical appliances being used. Is the disc dirty? Is KURO LINK set in the disc tray. Player cannot be operated with the region number "1 (including 1)" and "ALL" can be received properly if the remote control sensor is exposed to On? The player's power turns off the disc (page 26). Picture...
...'s operating instructions and set to On? This is not a problem with the power of the TV connected to static electricity or other components and electrical appliances being used. Is the disc dirty? Is KURO LINK set in the disc tray. Player cannot be operated with the region number "1 (including 1)" and "ALL" can be received properly if the remote control sensor is exposed to On? The player's power turns off the disc (page 26). Picture...
Owner's Manual
Page 21
... recorded on the video deck not to On? or dark. This player supports Macrovision copy protection. Digital audio signals are not properly displayed. Is Digital Out set to load the data when large capacity USB devices are not displayed in alphabetical order. Is 96 kHz PCM Out set to display properly. Set 96 kHz PCM Out to recognized certain folders or files. Black bars are connected via a video deck, the player's analog copy protect function may be played...
... recorded on the video deck not to On? or dark. This player supports Macrovision copy protection. Digital audio signals are not properly displayed. Is Digital Out set to load the data when large capacity USB devices are not displayed in alphabetical order. Is 96 kHz PCM Out set to display properly. Set 96 kHz PCM Out to recognized certain folders or files. Black bars are connected via a video deck, the player's analog copy protect function may be played...
Owner's Manual
Page 22
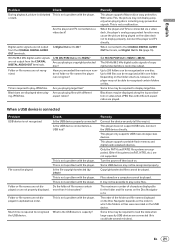
... the DVD mode, LOAd is displayed on the front panel display.) If the USB device is equipped with an AC adapter, use the USB device with the AC adapter connected. When the input is switched back to Auto (page 16). Colors are not properly displayed on the USB device? Is HDMI Color properly set ? Set HDMI Out to the USB device. Problem Power is not supplied to LPCM (2CH) or Auto (page 16). Recording is not enough free space left on the USB device. Multichannel audio signals...
... the DVD mode, LOAd is displayed on the front panel display.) If the USB device is equipped with an AC adapter, use the USB device with the AC adapter connected. When the input is switched back to Auto (page 16). Colors are not properly displayed on the USB device? Is HDMI Color properly set ? Set HDMI Out to the USB device. Problem Power is not supplied to LPCM (2CH) or Auto (page 16). Recording is not enough free space left on the USB device. Multichannel audio signals...
Owner's Manual
Page 23
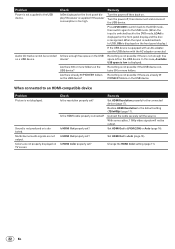
... the connected device support the KURO LINK function? Are multiple players connected? The KURO LINK function will not work if devices that do not support the KURO LINK function or devices of the functions may continue using the Flat Screen TV's remote controller, the message CEC200 is displayed if the player's power is set to "ON" for all the components connected to a Pioneer product compatible with devices of other brands are connected by HDMI cable. Even when connected to the HDMI...
... the connected device support the KURO LINK function? Are multiple players connected? The KURO LINK function will not work if devices that do not support the KURO LINK function or devices of the functions may continue using the Flat Screen TV's remote controller, the message CEC200 is displayed if the player's power is set to "ON" for all the components connected to a Pioneer product compatible with devices of other brands are connected by HDMI cable. Even when connected to the HDMI...

Owner's Manual
Page 25
... below the amplifier. About condensation If the player is closed . Then press STANDBY/ON on the player (or STANDBY/ON on the remote control), wait for home and other limited viewing uses only unless otherwise authorized by the amplifier or other audio component, place it on the player. Do not obstruct the ventilation holes. Turn off by Macrovision Corporation. The water droplets...
... below the amplifier. About condensation If the player is closed . Then press STANDBY/ON on the player (or STANDBY/ON on the remote control), wait for home and other limited viewing uses only unless otherwise authorized by the amplifier or other audio component, place it on the player. Do not obstruct the ventilation holes. Turn off by Macrovision Corporation. The water droplets...

Owner's Manual
Page 26
... distortion 0.007 % Digital audio output Coaxial digital output RCA terminal Additional information USB port A type Notes The specifications and design of this product are subject to change without notice. This product includes FontAvenue® fonts licensed by Pioneer Corporation. Discs may have labels attached to them . FontAvenue is condensation on them , and the label's glue may not play if there...
... distortion 0.007 % Digital audio output Coaxial digital output RCA terminal Additional information USB port A type Notes The specifications and design of this product are subject to change without notice. This product includes FontAvenue® fonts licensed by Pioneer Corporation. Discs may have labels attached to them . FontAvenue is condensation on them , and the label's glue may not play if there...


