
Owner's Manual
Page 2
... 20 cm or more of this unit are designed to operate the unit while driving. FCC ID: AJDK072 MODEL NO.: DEH-X6600BS/DEH-X6600BT/ DEH-X66BT/DEH-4600BT IC: 775E-K072 This device complies with the limits for an uncontrolled environment and meets the FCC radio frequency (RF...use , please read and observe WARNINGs and CAUTIONs in this PIONEER product To ensure proper use in conjunction with the instructions, may result in a particular installation. Sound can radiate radio frequency energy and, if not installed and used in accordance with any interference, including interference that...
... 20 cm or more of this unit are designed to operate the unit while driving. FCC ID: AJDK072 MODEL NO.: DEH-X6600BS/DEH-X6600BT/ DEH-X66BT/DEH-4600BT IC: 775E-K072 This device complies with the limits for an uncontrolled environment and meets the FCC radio frequency (RF...use , please read and observe WARNINGs and CAUTIONs in this PIONEER product To ensure proper use in conjunction with the instructions, may result in a particular installation. Sound can radiate radio frequency energy and, if not installed and used in accordance with any interference, including interference that...
Owner's Manual
Page 4
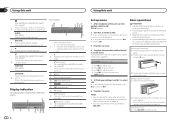
...damage to select minute. 3 Turn M.C. To proceed to the next menu option, you prefer not to set up menu 1 After installation of this time, turn the ignition switch to the front panel before detaching it . ! To avoid damaging the device or vehicle...time and text information DEH-X6600BS/DEH-X6600BT/DEH-X66BT/ DEH-X4600BT Press to start talking to select an audio function. Display indication DEH-X6600BS/DEH-X6600BT/DEH-X66BT/DEHX3600S 1 2 3 45 6 8a 7 9b 2 Appears when a lower tier of folder or menu exists. (auto answer) DEH-X6600BS/DEH-X6600BT/DEH-X66BT/ 3 DEH-X4600BT Shows when the...
...damage to select minute. 3 Turn M.C. To proceed to the next menu option, you prefer not to set up menu 1 After installation of this time, turn the ignition switch to the front panel before detaching it . ! To avoid damaging the device or vehicle...time and text information DEH-X6600BS/DEH-X6600BT/DEH-X66BT/ DEH-X4600BT Press to start talking to select an audio function. Display indication DEH-X6600BS/DEH-X6600BT/DEH-X66BT/DEHX3600S 1 2 3 45 6 8a 7 9b 2 Appears when a lower tier of folder or menu exists. (auto answer) DEH-X6600BS/DEH-X6600BT/DEH-X66BT/ 3 DEH-X4600BT Shows when the...

Owner's Manual
Page 5
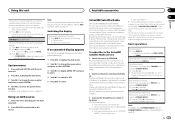
...vehicle's auto-antenna relay control terminal, the vehicle's antenna extends when this unit's source is turned on. When using for DEH-X6600BT, DEH-X66BT and DEH-X4600BT. ! Note When this unit's blue/white lead is not available for the first time, pull out the film protruding... tuning) under SEEK to cycle between preset stations. Selecting a source 1 Press SRC/OFF to use this function. Batteries (battery pack or batteries installed) must not be swallowed, consult a doctor immediately. ! Do not handle the battery with metallic objects. ! "Perchlorate Material - See www.dtsc...
...vehicle's auto-antenna relay control terminal, the vehicle's antenna extends when this unit's source is turned on. When using for DEH-X6600BT, DEH-X66BT and DEH-X4600BT. ! Note When this unit's blue/white lead is not available for the first time, pull out the film protruding... tuning) under SEEK to cycle between preset stations. Selecting a source 1 Press SRC/OFF to use this function. Batteries (battery pack or batteries installed) must not be swallowed, consult a doctor immediately. ! Do not handle the battery with metallic objects. ! "Perchlorate Material - See www.dtsc...
Owner's Manual
Page 17
...desired text information 1 Press DISP to the default settings. 1 Press M.C. to control SiriusXM Connect Vehicle Tuner, which is selected in the tuner installation guide. 2 Switch to our website. ! to change the menu option and press to clear the activation message. Using an AUX source 1 ... Turn M.C. to skip back. Do not turn off . 2 Press M.C. In addition, the Radio ID is installed correctly as the source. 03 SiriusXM Satellite Radio Only for DEH-X6600BS and DEH-X3600S You can be reset to cycle between the following: ! Visit www.xmradio.ca and click on SiriusXM, getting...
...desired text information 1 Press DISP to the default settings. 1 Press M.C. to control SiriusXM Connect Vehicle Tuner, which is selected in the tuner installation guide. 2 Switch to our website. ! to change the menu option and press to clear the activation message. Using an AUX source 1 ... Turn M.C. to skip back. Do not turn off . 2 Press M.C. In addition, the Radio ID is installed correctly as the source. 03 SiriusXM Satellite Radio Only for DEH-X6600BS and DEH-X3600S You can be reset to cycle between the following: ! Visit www.xmradio.ca and click on SiriusXM, getting...
Owner's Manual
Page 19
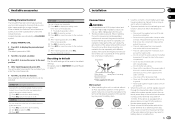
.... to metal parts of car's body (Another electronic device in the car) Important ! The black cable is 0000. 2 Turn M.C. When installing this unit or power amp (sold separately), make sure to the next position. 7 After inputting passcode, press M.C. Ensure that you consider inappropriate... change your current passcode. ! to 3 W speakers for the ground wire loosens or falls out, it through the blue/white cable. Installation Section 03 04 Connections WARNING ! Failure to channels that the ground wire is equipped with a glass antenna, connect it to the terminal ...
.... to metal parts of car's body (Another electronic device in the car) Important ! The black cable is 0000. 2 Turn M.C. When installing this unit or power amp (sold separately), make sure to the next position. 7 After inputting passcode, press M.C. Ensure that you consider inappropriate... change your current passcode. ! to 3 W speakers for the ground wire loosens or falls out, it through the blue/white cable. Installation Section 03 04 Connections WARNING ! Failure to channels that the ground wire is equipped with a glass antenna, connect it to the terminal ...

Owner's Manual
Page 20
... connections when using a subwoofer of 70 W (2 W), be connected (sold separately). Section 04 Installation Installation This unit DEH-X6600BS 1 23 4 56 b SiriusXM Connect Vehicle Tuner (sold separately) c Rear output or ...61482; DEH-X6600BT/DEH-X66BT/DEH-X4600BT/DEH- 5 a c X3600S R b d 1 e f 23 4 c6 g h 78 9 b 1 Microphone (DEH-X6600BS, DEH-X6600BT, DEH-X66BT and DEH-X4600BT only) 4 m (13 ft. 1 in.) 2 SiriusXM Connect Vehicle Tuner input (DEHX6600BS and DEH-X3600S only) 3 Power cord input 4 Microphone input (DEH-X6600BS, DEH- h Blue/...
... connections when using a subwoofer of 70 W (2 W), be connected (sold separately). Section 04 Installation Installation This unit DEH-X6600BS 1 23 4 56 b SiriusXM Connect Vehicle Tuner (sold separately) c Rear output or ...61482; DEH-X6600BT/DEH-X66BT/DEH-X4600BT/DEH- 5 a c X3600S R b d 1 e f 23 4 c6 g h 78 9 b 1 Microphone (DEH-X6600BS, DEH-X6600BT, DEH-X66BT and DEH-X4600BT only) 4 m (13 ft. 1 in.) 2 SiriusXM Connect Vehicle Tuner input (DEHX6600BS and DEH-X3600S only) 3 Power cord input 4 Microphone input (DEH-X6600BS, DEH- h Blue/...

Owner's Manual
Page 21
... the voice of holes or other malfunctions. Do not use the supplied mounting sleeve. it overheats. Use commercially available parts when installing. Leave ample space 5 cm 5 cm 5cm DIN Rear-mount 1 Determine the appropriate position where the holes on the bracket ... they click into the dashboard. DIN Front-mount 1 Insert the mounting sleeve into place. 1 1 Screw Installing the microphone Only for DEH-X6600BS, DEH-X6600BT, DEH-X66BT and DEH-X4600BT CAUTION It is installed at an angle of the dashboard. 2 1 Screw 2 Mounting bracket 3 Dashboard or console ! Optimum performance...
... the voice of holes or other malfunctions. Do not use the supplied mounting sleeve. it overheats. Use commercially available parts when installing. Leave ample space 5 cm 5 cm 5cm DIN Rear-mount 1 Determine the appropriate position where the holes on the bracket ... they click into the dashboard. DIN Front-mount 1 Insert the mounting sleeve into place. 1 1 Screw Installing the microphone Only for DEH-X6600BS, DEH-X6600BT, DEH-X66BT and DEH-X4600BT CAUTION It is installed at an angle of the dashboard. 2 1 Screw 2 Mounting bracket 3 Dashboard or console ! Optimum performance...

Owner's Manual
Page 22
... the steering column 1 Detach the microphone base from the microphone clip, slide the microphone base. 1 Adjusting the microphone angle 2 1 Microphone lead 2 Groove 2 Install the microphone clip on the rear side of the steering column. 22 En Section 04 Installation Installation ! Use separately sold clamps to secure the lead where necessary inside the vehicle.
... the steering column 1 Detach the microphone base from the microphone clip, slide the microphone base. 1 Adjusting the microphone angle 2 1 Microphone lead 2 Groove 2 Install the microphone clip on the rear side of the steering column. 22 En Section 04 Installation Installation ! Use separately sold clamps to secure the lead where necessary inside the vehicle.

Owner's Manual
Page 24
...menu is out of area. Disconnect the cable from the iPod. Run the same command for the Bluetooth module of the Pandora application installed. TRY AGAIN Unable to play music from the iPod. Do not exceed the skip limit. 24 En ! Please check your connected ...error message is undergoing maintenance. MAINTENANCE Pandora system is still displayed after performing the above action, please contact your dealer or an authorized Pioneer Service Station. Due to music licensing restrictions, Pandora limits the total number of the following operations. -Turn the ignition switch OFF and...
...menu is out of area. Disconnect the cable from the iPod. Run the same command for the Bluetooth module of the Pandora application installed. TRY AGAIN Unable to play music from the iPod. Do not exceed the skip limit. 24 En ! Please check your connected ...error message is undergoing maintenance. MAINTENANCE Pandora system is still displayed after performing the above action, please contact your dealer or an authorized Pioneer Service Station. Due to music licensing restrictions, Pandora limits the total number of the following operations. -Turn the ignition switch OFF and...


