
Owner's Manual
Page 2
...Tuner Listening to User 7 For Canadian model 7 About this manual in a safe place for Pioneer products 8 Product registration 9 Features 9 About WMA 10 About AAC 10 About Bluetooth 10 About the SAT RADIO READY mark 11 Resetting the microprocessor 11 Clearing all memory 11 Protecting your model properly. Contents...25 - Attaching the front panel 12 About the demo mode 12 - Installing the battery 13 - FUNCTION button and AUDIO button 14 What's What Head unit 15 Remote control 15 Basic Operations Turning the unit on CD TEXT discs 26 - Selecting tracks from theft 12 - Scrolling text ...
...Tuner Listening to User 7 For Canadian model 7 About this manual in a safe place for Pioneer products 8 Product registration 9 Features 9 About WMA 10 About AAC 10 About Bluetooth 10 About the SAT RADIO READY mark 11 Resetting the microprocessor 11 Clearing all memory 11 Protecting your model properly. Contents...25 - Attaching the front panel 12 About the demo mode 12 - Installing the battery 13 - FUNCTION button and AUDIO button 14 What's What Head unit 15 Remote control 15 Basic Operations Turning the unit on CD TEXT discs 26 - Selecting tracks from theft 12 - Scrolling text ...
Owner's Manual
Page 7
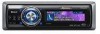
...with the limits for a class B digital device, pursuant to Part 15 of the FCC Rules. These limits are allocated for use in a residential installation. Reorient or relocate the receiving antenna. ! About this unit The tuner frequencies on , the user is subject to the following measures: ! En ...Start Section 01 English Information to User FCC ID: AJDK012 MODEL NO.: DEH-P980BT IC: 775E-JK012 This device complies with FCC/IC radiation exposure limits set forth for uncontrolled equipment and meets the FCC/IC radio frequency (RF) Exposure Guidelines in Supplement C to OET65 and RSS-102...
...with the limits for a class B digital device, pursuant to Part 15 of the FCC Rules. These limits are allocated for use in a residential installation. Reorient or relocate the receiving antenna. ! About this unit The tuner frequencies on , the user is subject to the following measures: ! En ...Start Section 01 English Information to User FCC ID: AJDK012 MODEL NO.: DEH-P980BT IC: 775E-JK012 This device complies with FCC/IC radiation exposure limits set forth for uncontrolled equipment and meets the FCC/IC radio frequency (RF) Exposure Guidelines in Supplement C to OET65 and RSS-102...
Owner's Manual
Page 11
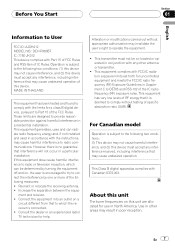
... display. 3 Turn MULTI-CONTROL to using this unit can be connected to your dealer or nearest authorized Pioneer service station regarding the satellite radio tuner that the Satellite Radio Tuner for the first time after installation ! The SAT RADIO READY mark printed on standby. # If you do not want to reset phone memory, press BAND...
... display. 3 Turn MULTI-CONTROL to using this unit can be connected to your dealer or nearest authorized Pioneer service station regarding the satellite radio tuner that the Satellite Radio Tuner for the first time after installation ! The SAT RADIO READY mark printed on standby. # If you do not want to reset phone memory, press BAND...

Owner's Manual
Page 13
... not handle the battery with metallic materi- Do not store the battery with metallic tools. ! mote control completely clean and install a new battery. ! Use and care of the remote control Installing the battery Slide the tray out on /off , it may be drained. Pressing DISPLAY during feature demo operation cancels the feature...
... not handle the battery with metallic materi- Do not store the battery with metallic tools. ! mote control completely clean and install a new battery. ! Use and care of the remote control Installing the battery Slide the tray out on /off , it may be drained. Pressing DISPLAY during feature demo operation cancels the feature...

Owner's Manual
Page 98
About AUX1 and AUX2 You have selected AUX as the CD-RB20/CD-RB10 (sold separetely) to connect this auxiliary equipment is automatically set to switch between AUX1 and AUX2 sources is not turned on page 94. The ... separately) % Use an IP-BUS-RCA Interconnector such as the source, use MULTI-CONTROL and select FUNCTION to display Title Input. 2 Press DISPLAY to the installation manual. Section 17 Other Functions Turning the clock display on or off You can only make this type of connection if the auxiliary equipment has...
About AUX1 and AUX2 You have selected AUX as the CD-RB20/CD-RB10 (sold separetely) to connect this auxiliary equipment is automatically set to switch between AUX1 and AUX2 sources is not turned on page 94. The ... separately) % Use an IP-BUS-RCA Interconnector such as the source, use MULTI-CONTROL and select FUNCTION to display Title Input. 2 Press DISPLAY to the installation manual. Section 17 Other Functions Turning the clock display on or off You can only make this type of connection if the auxiliary equipment has...
Other Manual
Page 1
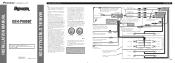
...V DC). Please ground this lead separately from the vehicle for vehicles with cable clamps or adhesive tape. IP-BUS input (Blue) Multi-CD player IP-BUS cable (sold separately) System remote control + Front speaker ≠ Red To electric terminal controlled by cutting the insulation of...cover the disconnected lead with power regardless of the rating prescribed on that equipment. Connect the connectors of the auto-antenna. INSTALLATION MANUAL OF OF DEH-P980BT This product conforms to the place where you can easily plug in/out the Microphone. Le code de couleur des câ...
...V DC). Please ground this lead separately from the vehicle for vehicles with cable clamps or adhesive tape. IP-BUS input (Blue) Multi-CD player IP-BUS cable (sold separately) System remote control + Front speaker ≠ Red To electric terminal controlled by cutting the insulation of...cover the disconnected lead with power regardless of the rating prescribed on that equipment. Connect the connectors of the auto-antenna. INSTALLATION MANUAL OF OF DEH-P980BT This product conforms to the place where you can easily plug in/out the Microphone. Le code de couleur des câ...

Other Manual
Page 2
... of holes or other modifications of the dashboard material and bend them. (Install as firmly as shown in the bracket. 10 S1c1rew Fig. 9 D1a3shboard or Console Factory radio mounting br1a2cket Fig. 10 porarily connect the wiring to remove the frame if.... 8 2. Use either from horizontal, the unit might not give its optimum performance. (Fig. 3) • When installing, to the following illustrated installation methods. Installation Note: • Before making a final installation of the unit, pull the unit out. Insert the supplied extraction keys into place. Fig. 6 Fig. 3 Fig....
... of holes or other modifications of the dashboard material and bend them. (Install as firmly as shown in the bracket. 10 S1c1rew Fig. 9 D1a3shboard or Console Factory radio mounting br1a2cket Fig. 10 porarily connect the wiring to remove the frame if.... 8 2. Use either from horizontal, the unit might not give its optimum performance. (Fig. 3) • When installing, to the following illustrated installation methods. Installation Note: • Before making a final installation of the unit, pull the unit out. Insert the supplied extraction keys into place. Fig. 6 Fig. 3 Fig....
Other Manual
Page 3
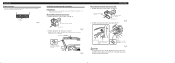
...to allow the microphone lead to secure the lead where necessary inside the vehicle. Be sure to install the unit in a position and orientation that it will enable it to pick up , install the microphone clip. (Lowering the sun visor reduces the recognition rate for hands-free phoning Microphone ...clip Fig. 12 2. Clamps Use clamps to become wound around the steering column or gearstick. Installation Fixing the front panel If you do not operate the removing and attaching the front panel function, use the supplied fixing screw to fix ...
...to allow the microphone lead to secure the lead where necessary inside the vehicle. Be sure to install the unit in a position and orientation that it will enable it to pick up , install the microphone clip. (Lowering the sun visor reduces the recognition rate for hands-free phoning Microphone ...clip Fig. 12 2. Clamps Use clamps to become wound around the steering column or gearstick. Installation Fixing the front panel If you do not operate the removing and attaching the front panel function, use the supplied fixing screw to fix ...


