
Owner's Manual
Page 2
... this manual 8 After-sales service for buying this unit 7 - Using the remote control 13 - Displaying disc titles 26 Using CD TEXT functions 26 - Please read through these operating instructions so you will know how to User 7 For Canadian model 7 About this Pioneer product. Before You Start Information to operate your unit from the track title list 26 MP3/WMA/AAC/WAV Player Playing MP3/WMA/AAC/WAV files 27 Selecting a track directly...
... this manual 8 After-sales service for buying this unit 7 - Using the remote control 13 - Displaying disc titles 26 Using CD TEXT functions 26 - Please read through these operating instructions so you will know how to User 7 For Canadian model 7 About this Pioneer product. Before You Start Information to operate your unit from the track title list 26 MP3/WMA/AAC/WAV Player Playing MP3/WMA/AAC/WAV files 27 Selecting a track directly...
Owner's Manual
Page 4
... broadcast stations 68 Switching the XM channel select mode 68 - Contents Displaying system version for repair 51 Bluetooth Audio Listening to songs on BT Audio (Bluetooth audio player) 52 Setting up for Bluetooth audio player 52 Connecting a Bluetooth audio player 53 Function operation 54 Playing songs on Bluetooth audio player 54 Pausing a song 54 Stopping playback 54 Disconnecting a Bluetooth audio player 55 Displaying BD address of this unit 55 Displaying system version for repair 55 Multi-CD Player Playing a CD 56 Selecting a track directly 56 50-disc multi-CD player 57 Introduction...
... broadcast stations 68 Switching the XM channel select mode 68 - Contents Displaying system version for repair 51 Bluetooth Audio Listening to songs on BT Audio (Bluetooth audio player) 52 Setting up for Bluetooth audio player 52 Connecting a Bluetooth audio player 53 Function operation 54 Playing songs on Bluetooth audio player 54 Pausing a song 54 Stopping playback 54 Disconnecting a Bluetooth audio player 55 Displaying BD address of this unit 55 Displaying system version for repair 55 Multi-CD Player Playing a CD 56 Selecting a track directly 56 50-disc multi-CD player 57 Introduction...
Owner's Manual
Page 5
... auto-equalizing) 89 - Adjusting the time alignment 82 Using subwoofer output 83 - Setting the high pass filter for rear speakers 85 Using the auto-equalizer 85 Using the equalizer 85 - Recalling equalizer curves 85 - Selecting a channel in the channel category 72 Displaying the Radio ID 72 TV tuner Watching the television 73 Introduction of advanced TV tuner operation 74 Storing and recalling broadcast stations 74 Storing the strongest broadcast stations sequentially 74 Selecting stations from the preset channel list 75 DVD Player Playing a disc...
... auto-equalizing) 89 - Adjusting the time alignment 82 Using subwoofer output 83 - Setting the high pass filter for rear speakers 85 Using the auto-equalizer 85 Using the equalizer 85 - Recalling equalizer curves 85 - Selecting a channel in the channel category 72 Displaying the Radio ID 72 TV tuner Watching the television 73 Introduction of advanced TV tuner operation 74 Storing and recalling broadcast stations 74 Storing the strongest broadcast stations sequentially 74 Selecting stations from the preset channel list 75 DVD Player Playing a disc...

Owner's Manual
Page 6
... dimmer setting 94 Adjusting the brightness 94 Correcting distorted sound 94 Switching the sound muting/attenuation 94 Switching the feature demo 95 Switching the reverse mode 95 Switching the Ever Scroll 95 Calibrating the RPMs 96 Activating the BT Audio source 96 Entering PIN code for telephone functions 101 Additional Information Understanding built-in CD player error messages 102 Understanding auto TA and EQ error messages 102 Understanding error message on or off 98 Using...
... dimmer setting 94 Adjusting the brightness 94 Correcting distorted sound 94 Switching the sound muting/attenuation 94 Switching the feature demo 95 Switching the reverse mode 95 Switching the Ever Scroll 95 Calibrating the RPMs 96 Activating the BT Audio source 96 Entering PIN code for telephone functions 101 Additional Information Understanding built-in CD player error messages 102 Understanding auto TA and EQ error messages 102 Understanding error message on or off 98 Using...
Owner's Manual
Page 7
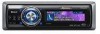
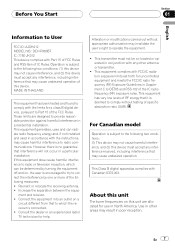
... for help. Before You Start Section 01 English Information to User FCC ID: AJDK012 MODEL NO.: DEH-P980BT IC: 775E-JK012 This device complies with any other areas may cause undesired operation of this device. Alteration or modifications carried out without testing of RF energy that it is subject to provide reasonable protection against harmful interference in a particular installation. Increase...
... for help. Before You Start Section 01 English Information to User FCC ID: AJDK012 MODEL NO.: DEH-P980BT IC: 775E-JK012 This device complies with any other areas may cause undesired operation of this device. Alteration or modifications carried out without testing of RF energy that it is subject to provide reasonable protection against harmful interference in a particular installation. Increase...
Owner's Manual
Page 11
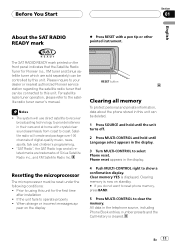
... nearest authorized Pioneer service station regarding the satellite radio tuner that the Satellite Radio Tuner for the first time after installation ! Prior to coast. Clear memory YES is cleared. pear on the front panel indicates that can be deleted. 1 Press SOURCE and hold until the unit turns off. 2 Press MULTI-CONTROL and hold until Language select appears in the telephone source, including Phone Book entries, number presets and the Call History is displayed. Resetting the...
... nearest authorized Pioneer service station regarding the satellite radio tuner that the Satellite Radio Tuner for the first time after installation ! Prior to coast. Clear memory YES is cleared. pear on the front panel indicates that can be deleted. 1 Press SOURCE and hold until the unit turns off. 2 Press MULTI-CONTROL and hold until Language select appears in the telephone source, including Phone Book entries, number presets and the Call History is displayed. Resetting the...

Owner's Manual
Page 16
...Also used . l ENTERTAINMENT button Press to change to select various sound quality controls. m AUDIO button Press to the entertainment display. f DIRECT button Press to the original volume level. Press once more to return to directly select the desired track. h 0-9 buttons Press to start talking on the phone while operating a phone source. 16 En Buttons 1-6 can operate the preset tuning for the tuner or disc number search for volume control. i OFF HOOK button Press to directly select the desired track, preset tuning or disc. Functions are used for controlling functions...
...Also used . l ENTERTAINMENT button Press to change to select various sound quality controls. m AUDIO button Press to the entertainment display. f DIRECT button Press to the original volume level. Press once more to return to directly select the desired track. h 0-9 buttons Press to start talking on the phone while operating a phone source. 16 En Buttons 1-6 can operate the preset tuning for the tuner or disc number search for volume control. i OFF HOOK button Press to directly select the desired track, preset tuning or disc. Functions are used for controlling functions...
Owner's Manual
Page 36
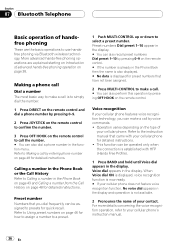
... HOOK on the remote control. # If the number is already in the Phone Book then the name is also displayed. # No data is to simply dial the number. 1 Press DIRECT on the remote control and dial a phone number by entering phone number on page 48 for detailed instructions. ! Making a phone call Dial a number The most basic way to use handsfree phoning via Bluetooth wireless technology. More advanced hands-free phoning operations are the basic operations to make...
... HOOK on the remote control. # If the number is already in the Phone Book then the name is also displayed. # No data is to simply dial the number. 1 Press DIRECT on the remote control and dial a phone number by entering phone number on page 48 for detailed instructions. ! Making a phone call Dial a number The most basic way to use handsfree phoning via Bluetooth wireless technology. More advanced hands-free phoning operations are the basic operations to make...
Owner's Manual
Page 39
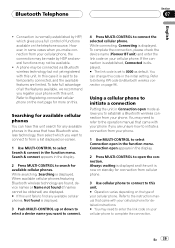
..., Connected is displayed. # The link code is displayed. 3 Push MULTI-CONTROL up or down to select a device name you make connection from your cellular phone, the connection may need to refer to 0000 as default. When available cellular phones featuring Bluetooth wireless technology are found, device names or Name not found is set to the operation manual that came with your cellular phone for available cellular phones You can change this unit.
..., Connected is displayed. # The link code is displayed. 3 Push MULTI-CONTROL up or down to select a device name you make connection from your cellular phone, the connection may need to refer to 0000 as default. When available cellular phones featuring Bluetooth wireless technology are found, device names or Name not found is set to the operation manual that came with your cellular phone for available cellular phones You can change this unit.
Owner's Manual
Page 40
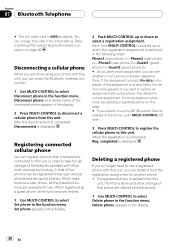
... are done using your phone with this unit, you can change this unit. Registering connected cellular phone You can close the Bluetooth wireless connection. 1 Use MULTI-CONTROL to select Disconnect phone in the function menu. For more detailed instructions, see whether or not a phone is already registered there. Disconnect phone, and device name of the connected phone appear in the display. 2 Press MULTI-CONTROL to disconnect a cellular phone from this unit, the Phone Book and other settings of...
... are done using your phone with this unit, you can change this unit. Registering connected cellular phone You can close the Bluetooth wireless connection. 1 Use MULTI-CONTROL to select Disconnect phone in the function menu. For more detailed instructions, see whether or not a phone is already registered there. Disconnect phone, and device name of the connected phone appear in the display. 2 Press MULTI-CONTROL to disconnect a cellular phone from this unit, the Phone Book and other settings of...
Owner's Manual
Page 52
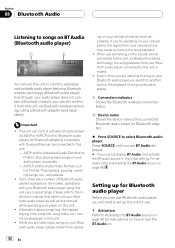
... need to set up for use this unit to this unit. - Information about songs (e.g. the elapsed playing time, song title, song index, etc.) cannot be connected to control a separately sold separately). Even if while you cannot display BT Audio, first activate the BT audio source in great range. Setting up the unit for Bluetooth audio player Before you are listening to select Bluetooth audio player. Press SOURCE until you see BT Audio displayed. # If you are a number...
... need to set up for use this unit to this unit. - Information about songs (e.g. the elapsed playing time, song title, song index, etc.) cannot be connected to control a separately sold separately). Even if while you cannot display BT Audio, first activate the BT audio source in great range. Setting up the unit for Bluetooth audio player Before you are listening to select Bluetooth audio player. Press SOURCE until you see BT Audio displayed. # If you are a number...
Owner's Manual
Page 55
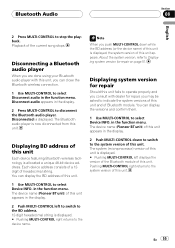
... device name (Pioneer BT unit) of this unit appears in the display. 2 Push MULTI-CONTROL left displays the version of the Bluetooth module of this unit. Displaying system version for repair Should this unit fails to operate properly and you consult with this unit. Pushing MULTI-CONTROL right returns to the system version of this unit. in the function menu. in the function menu. Bluetooth Audio Section 08 English 2 Press MULTI-CONTROL to select...
... device name (Pioneer BT unit) of this unit appears in the display. 2 Push MULTI-CONTROL left displays the version of the Bluetooth module of this unit. Displaying system version for repair Should this unit fails to operate properly and you consult with this unit. Pushing MULTI-CONTROL right returns to the system version of this unit. in the function menu. in the function menu. Bluetooth Audio Section 08 English 2 Press MULTI-CONTROL to select...

Owner's Manual
Page 81
... or rear. Audio Adjustments Section 15 English Fader (balance adjustment)-Position (position selector)-TA Mode (time alignment setting)-Time Alignment (time alignment adjusting)-Loudness (loudness)-Powerful (graphic equalizer adjustment)-FREQ. (16band graphic equalizer adjustment)- Subwoofer2 (subwoofer cut -off frequency)-BBE (BBE)-COMP/BMX (Compression and BMX)-Auto EQ (autoequalizer on in the display. # If the balance setting has been previously adjusted, Balance will be displayed. 2 Push MULTI-CONTROL up or down to the source display. Each time MULTI-CONTROL is...
... or rear. Audio Adjustments Section 15 English Fader (balance adjustment)-Position (position selector)-TA Mode (time alignment setting)-Time Alignment (time alignment adjusting)-Loudness (loudness)-Powerful (graphic equalizer adjustment)-FREQ. (16band graphic equalizer adjustment)- Subwoofer2 (subwoofer cut -off frequency)-BBE (BBE)-COMP/BMX (Compression and BMX)-Auto EQ (autoequalizer on in the display. # If the balance setting has been previously adjusted, Balance will be displayed. 2 Push MULTI-CONTROL up or down to the source display. Each time MULTI-CONTROL is...
Owner's Manual
Page 89
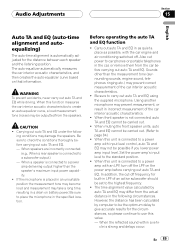
... cut power to car phones or portable telephones in the specified location. Audio Adjustments Section 15 English Auto TA and EQ (auto-time alignment and autoequalizing) The auto-time alignment is automatically adjusted for built-in LPF of an active subwoofer should be set to the highest frequency. ! However, the distance has been calculated by auto TA and EQ may not be possible if you lower power amp input level. Be...
... cut power to car phones or portable telephones in the specified location. Audio Adjustments Section 15 English Auto TA and EQ (auto-time alignment and autoequalizing) The auto-time alignment is automatically adjusted for built-in LPF of an active subwoofer should be set to the highest frequency. ! However, the distance has been calculated by auto TA and EQ may not be possible if you lower power amp input level. Be...
Owner's Manual
Page 92
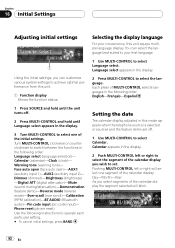
... display. Face auto open (face auto open)-AUX1 (auxiliary input 1)-AUX2 (auxiliary input 2)- Dimmer (dimmer)-Brightness (brightness) -Digital ATT (digital attenuator)-Mute (sound muting/attenuation)-Demonstration (feature demo)-Reverse mode (reverse mode)-Ever-scroll (ever scroll)-Calibration (RPM calibration)-BT AUDIO (Bluetooth audio)-Pin code input (pin code input)- You can customize various system settings to achieve optimal performance from this unit. 1 Function display Shows the function status. 1 Press SOURCE and hold until the unit turns off . 1 Use MULTI-CONTROL to select...
... display. Face auto open (face auto open)-AUX1 (auxiliary input 1)-AUX2 (auxiliary input 2)- Dimmer (dimmer)-Brightness (brightness) -Digital ATT (digital attenuator)-Mute (sound muting/attenuation)-Demonstration (feature demo)-Reverse mode (reverse mode)-Ever-scroll (ever scroll)-Calibration (RPM calibration)-BT AUDIO (Bluetooth audio)-Pin code input (pin code input)- You can customize various system settings to achieve optimal performance from this unit. 1 Function display Shows the function status. 1 Press SOURCE and hold until the unit turns off . 1 Use MULTI-CONTROL to select...
Owner's Manual
Page 93
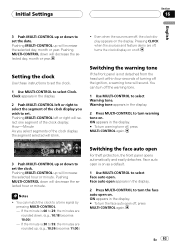
... of the clock display you wish to select Warning tone. Pushing MULTI-CONTROL left or right to a time signal by pressing MULTI-CONTROL. - Setting the clock Use these instructions to set the clock. If the minute is on as a default. 1 Use MULTI-CONTROL to turn the face auto open For theft protection, the front panel opens automatically and easily detaches. ON appears in the display. 2 Press MULTI-CONTROL to set . Switching the warning...
... of the clock display you wish to select Warning tone. Pushing MULTI-CONTROL left or right to a time signal by pressing MULTI-CONTROL. - Setting the clock Use these instructions to set the clock. If the minute is on as a default. 1 Use MULTI-CONTROL to turn the face auto open For theft protection, the front panel opens automatically and easily detaches. ON appears in the display. 2 Press MULTI-CONTROL to set . Switching the warning...
Owner's Manual
Page 96
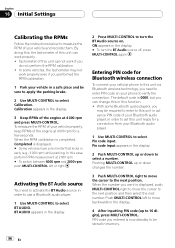
... use a Bluetooth audio player. 1 Use MULTI-CONTROL to 16 digits), press MULTI-CONTROL. BT AUDIO appears in order to set this unit via Bluetooth wireless technology, you need to select a number. With some vehicles, the tachometer may be required to enter to this unit in advance PIN code of the engine at 4 000 rpm for a connection from your Bluetooth audio player, in the display. 2 Press MULTI-CONTROL to enter PIN code on . Pin code input appears in the display...
... use a Bluetooth audio player. 1 Use MULTI-CONTROL to 16 digits), press MULTI-CONTROL. BT AUDIO appears in order to set this unit via Bluetooth wireless technology, you need to select a number. With some vehicles, the tachometer may be required to enter to this unit in advance PIN code of the engine at 4 000 rpm for a connection from your Bluetooth audio player, in the display. 2 Press MULTI-CONTROL to enter PIN code on . Pin code input appears in the display...

Owner's Manual
Page 98
... to select AUX (AUX1 or AUX2) as the source. Press DISPLAY repeatedly to switch between AUX1 and AUX2 sources is not turned on or off. Each press of connection if the auxiliary equipment has RCA outputs. For more details, refer to the installation manual. AUX2 source: When connecting auxiliary equipment using a stereo mini plug cable % Insert the stereo mini plug into the AUX input jack on or off. AUX1 source: When connecting auxiliary equipment using an IP-BUS...
... to select AUX (AUX1 or AUX2) as the source. Press DISPLAY repeatedly to switch between AUX1 and AUX2 sources is not turned on or off. Each press of connection if the auxiliary equipment has RCA outputs. For more details, refer to the installation manual. AUX2 source: When connecting auxiliary equipment using a stereo mini plug cable % Insert the stereo mini plug into the AUX input jack on or off. AUX1 source: When connecting auxiliary equipment using an IP-BUS...
Owner's Manual
Page 102
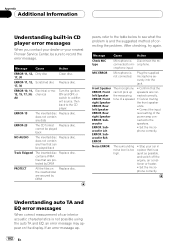
... record the error message. Front Speaker The microphone ! crophone. nected to the CD player. Understanding auto TA and EQ error messages When correct measurement of correcting the problem. Stop your car in CD player error messages When you contact your dealer or your nearest Pioneer Service Center, be played back NO AUDIO The inserted disc Replace disc. Message Cause Action ERROR-11, 12, Dirty disc 17, 30 Clean disc. Message Cause...
... record the error message. Front Speaker The microphone ! crophone. nected to the CD player. Understanding auto TA and EQ error messages When correct measurement of correcting the problem. Stop your car in CD player error messages When you contact your dealer or your nearest Pioneer Service Center, be played back NO AUDIO The inserted disc Replace disc. Message Cause Action ERROR-11, 12, Dirty disc 17, 30 Clean disc. Message Cause...
Other Manual
Page 1
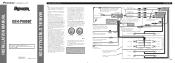
... + Rear speaker ≠ + Rear speaker ≠ + Subwoofer ≠ Fig. 2 If you do, the protection circuit may result in the speakers catching fire, emitting smoke or becoming damaged. • When this lead to other units, then make connections correctly. • Secure the wiring with this system, be connected to the owner's manual for handsfree phoning AUX input jack (3.5 ø) Use a stereo mini plug cable to an external power amp's system remote control or the car's Auto-antenna relay control terminal...
... + Rear speaker ≠ + Rear speaker ≠ + Subwoofer ≠ Fig. 2 If you do, the protection circuit may result in the speakers catching fire, emitting smoke or becoming damaged. • When this lead to other units, then make connections correctly. • Secure the wiring with this system, be connected to the owner's manual for handsfree phoning AUX input jack (3.5 ø) Use a stereo mini plug cable to an external power amp's system remote control or the car's Auto-antenna relay control terminal...


