

Owner's Manual
Page 2
...5 For Canadian model 5 About this unit What's What 11 - Removing the front panel 8 - Installing the battery 9 - Selecting a source 14 - Playing tracks in a random order (shuffle) 24 ...Playing songs on disc 17 - Using the remote control 10 Operating this unit 5 After-sales service for Pioneer products 8 Visit our website 8 In case of currently playing artist 24 - Display indication 13 Basic ... memory 21 - Tuning in strong signals 16 Built-in a random order (shuffle all songs in CD Player 16 - Selecting a track directly 17 - Using disc title functions 19 Playing songs on iPod...
...5 For Canadian model 5 About this unit What's What 11 - Removing the front panel 8 - Installing the battery 9 - Selecting a source 14 - Playing tracks in a random order (shuffle) 24 ...Playing songs on disc 17 - Using the remote control 10 Operating this unit 5 After-sales service for Pioneer products 8 Visit our website 8 In case of currently playing artist 24 - Display indication 13 Basic ... memory 21 - Tuning in strong signals 16 Built-in a random order (shuffle all songs in CD Player 16 - Selecting a track directly 17 - Using disc title functions 19 Playing songs on iPod...

Owner's Manual
Page 5
... different from that may cause harmful interference to radio communications. Before You Start Section 01 Before You Start Information to User FCC ID: AJDK016 MODEL NO.: DEH-P7000BT IC: 775E-K016 This device complies with Canadian... ICES-003. Increase the separation between the equip- ment and receiver. ! This equipment has very low levels of specific absorption ratio (SAR). These limits are allocated for uncontrolled equipment and meets the FCC/IC radio frequency (RF) Exposure Guidelines in a particular installation...
... different from that may cause harmful interference to radio communications. Before You Start Section 01 Before You Start Information to User FCC ID: AJDK016 MODEL NO.: DEH-P7000BT IC: 775E-K016 This device complies with Canadian... ICES-003. Increase the separation between the equip- ment and receiver. ! This equipment has very low levels of specific absorption ratio (SAR). These limits are allocated for uncontrolled equipment and meets the FCC/IC radio frequency (RF) Exposure Guidelines in a particular installation...
Owner's Manual
Page 9
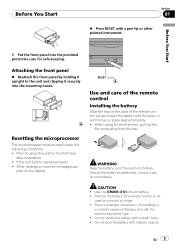
...with metallic objects. Attaching the front panel % Reattach the front panel by holding it securely into the provided protective case for the first time after installation ! Prior to the unit and clipping it upright to using for a month or longer. ! Should the battery be reset under the following conditions:.... Remove the battery if the remote control is incorrectly replaced. pear on the display RESET button Use and care of the remote control Installing the battery Slide the tray on the back of explosion if the battery is not used for the first time, pull out the film...
...with metallic objects. Attaching the front panel % Reattach the front panel by holding it securely into the provided protective case for the first time after installation ! Prior to the unit and clipping it upright to using for a month or longer. ! Should the battery be reset under the following conditions:.... Remove the battery if the remote control is incorrectly replaced. pear on the display RESET button Use and care of the remote control Installing the battery Slide the tray on the back of explosion if the battery is not used for the first time, pull out the film...
Owner's Manual
Page 10
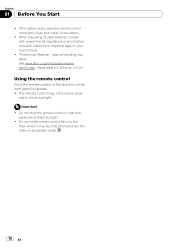
If the battery leaks, wipe the remote control completely clean and install a new battery. ! erly in the direction of used batteries, comply with governmental regulations or environmental public institutions' rules that apply in high temperatures or direct ...
If the battery leaks, wipe the remote control completely clean and install a new battery. ! erly in the direction of used batteries, comply with governmental regulations or environmental public institutions' rules that apply in high temperatures or direct ...

Owner's Manual
Page 51
.... Selecting AUX as the source % Press SRC to select AUX as the source. # If the auxiliary setting is automatically set to the installation manual. Two external units can only make this unit. For details concerning functions, refer to Entering disc titles on , AUX cannot be controlled...allocated to external unit 1 or external unit 2 by this unit to connect this unit. For more details, refer to a Pioneer product (such as ones available in CD player. Using the external unit External unit refers to the IP-BUS-RCA Interconnector owner's manual. Allocated functions are two methods...
.... Selecting AUX as the source % Press SRC to select AUX as the source. # If the auxiliary setting is automatically set to the installation manual. Two external units can only make this unit. For details concerning functions, refer to Entering disc titles on , AUX cannot be controlled...allocated to external unit 1 or external unit 2 by this unit to connect this unit. For more details, refer to a Pioneer product (such as ones available in CD player. Using the external unit External unit refers to the IP-BUS-RCA Interconnector owner's manual. Allocated functions are two methods...

Other Manual
Page 5
...column. Screw Dashboard or Console Factory radio mounting bracket 2. Pull the unit out of the front panel. 2. Fix the front panel to the following installation methods. Install the microphone on the steering column. Install the microphone clip on the microphone clip. Installation English Note • Check all.... Determine the appropriate position where the holes on each side. • Use either from hot places such as illustrated. Installation English When installing the microphone on the sun visor. • With the sun visor up the voice of screw holes in the figure ...
...column. Screw Dashboard or Console Factory radio mounting bracket 2. Pull the unit out of the front panel. 2. Fix the front panel to the following installation methods. Install the microphone on the steering column. Install the microphone clip on the microphone clip. Installation English Note • Check all.... Determine the appropriate position where the holes on each side. • Use either from hot places such as illustrated. Installation English When installing the microphone on the sun visor. • With the sun visor up the voice of screw holes in the figure ...


