Owner's Manual
Page 2
... 18 - Introduction of advanced operations 16 - Using the remote control 8 Operating this Pioneer product. Introduction of trouble 7 Protecting your unit from your model properly. Displaying text ...panel 7 - Basic Operations 12 - Storing and recalling broadcast frequencies 12 - Playing songs in CD Player 14 - Before You Start Information to operate your iPod 22 - Tuning in strong signals ...13 Built-in a random order (shuffle) 21 - Operating this manual in a safe place for future reference. Selecting files from album list of currently playing...
... 18 - Introduction of advanced operations 16 - Using the remote control 8 Operating this Pioneer product. Introduction of trouble 7 Protecting your unit from your model properly. Displaying text ...panel 7 - Basic Operations 12 - Storing and recalling broadcast frequencies 12 - Playing songs in CD Player 14 - Before You Start Information to operate your iPod 22 - Tuning in strong signals ...13 Built-in a random order (shuffle) 21 - Operating this manual in a safe place for future reference. Selecting files from album list of currently playing...

Owner's Manual
Page 5
... HAZARDOUS RADIATION EXPOSURE. Also, damage to record this unit to operate the equipment. Wash hands after handling. CAUTION ! Do not allow this number on this manual handy as a reference for use in poor reception. Electrical shock could result from moisture. ! Before You Start Section 01 English Information to User Alteration or...
... HAZARDOUS RADIATION EXPOSURE. Also, damage to record this unit to operate the equipment. Wash hands after handling. CAUTION ! Do not allow this number on this manual handy as a reference for use in poor reception. Electrical shock could result from moisture. ! Before You Start Section 01 English Information to User Alteration or...

Owner's Manual
Page 6
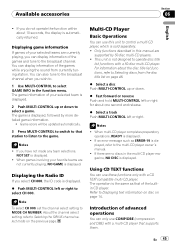
... owner's manual. ! "SAT Radio", the SAT Radio logo and all related marks are sold separately) can be connected to songs on the front panel indicates that the Satellite Radio Tuner for data lost while using this unit. 6 En Pioneer accepts no responsibility for ...CD-IB100N). USB MSC (Mass Storage Class) compliant portable audio player and memory - In this unit. For details concerning operation with crystal-clear sound seamlessly from coast to USB Cable is lost on page 52. CAUTION ! This unit can control the following . - Pioneer accepts no responsibility for Pioneer...
... owner's manual. ! "SAT Radio", the SAT Radio logo and all related marks are sold separately) can be connected to songs on the front panel indicates that the Satellite Radio Tuner for data lost while using this unit. 6 En Pioneer accepts no responsibility for ...CD-IB100N). USB MSC (Mass Storage Class) compliant portable audio player and memory - In this unit. For details concerning operation with crystal-clear sound seamlessly from coast to USB Cable is lost on page 52. CAUTION ! This unit can control the following . - Pioneer accepts no responsibility for Pioneer...

Owner's Manual
Page 7
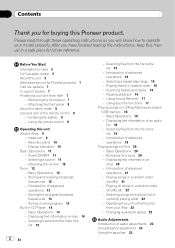
...information please see the Limited Warranty sheet included with water or other information. Avoid subjecting the front panel to deter theft. ! Pioneer Electronics (USA) Inc. Protecting your product. See Switching the warning tone on page 27. Handle gently when removing or attaching the...left side of an insurance claim such as loss or theft. 2 Receive updates on the latest products and technologies. 3 Download owner's manuals, order product catalogues, research new products, and much more. En 7 CUSTOMER SUPPORT DIVISION P.O. In case the necessary information is not ...
...information please see the Limited Warranty sheet included with water or other information. Avoid subjecting the front panel to deter theft. ! Pioneer Electronics (USA) Inc. Protecting your product. See Switching the warning tone on page 27. Handle gently when removing or attaching the...left side of an insurance claim such as loss or theft. 2 Receive updates on the latest products and technologies. 3 Download owner's manuals, order product catalogues, research new products, and much more. En 7 CUSTOMER SUPPORT DIVISION P.O. In case the necessary information is not ...

Owner's Manual
Page 9
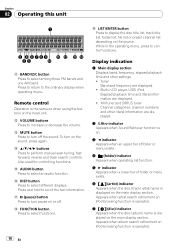
.... 9 RPT/LOCAL button Press to scroll the text information. When XM tuner or SIRIUS tuner is turned on by selecting a source. While using CD or USB. When operating subwoofer menu, press to shuffle all the available sources. 2 DISP/BACK/SCROLL button Press to turn local function on or...to turn random function on the source. 7 CLOCK button Press to change to the clock display. 8 SW/BASS button Press to switch to perform manual seek tuning, fast forward, reverse and track search controls. En 9 Operating this unit. Press to return to switch the control mode while using ...
.... 9 RPT/LOCAL button Press to scroll the text information. When XM tuner or SIRIUS tuner is turned on by selecting a source. While using CD or USB. When operating subwoofer menu, press to shuffle all the available sources. 2 DISP/BACK/SCROLL button Press to turn local function on or...to turn random function on the source. 7 CLOCK button Press to change to the clock display. 8 SW/BASS button Press to switch to perform manual seek tuning, fast forward, reverse and track search controls. En 9 Operating this unit. Press to return to switch the control mode while using ...
Owner's Manual
Page 10
...function is operated. 7 (disc) indicator Appears when the disc (album) name is dis- g DISP button Press to control functions. While in CD player, USB, iPod Elapsed playback time and literal information are displayed. ! Tuner Band and frequency are displayed. 2 S.Rtrv indicator Appears when Sound ... refinement on the head unit. Section 02 Operating this unit 1 2 4 6789 b c d e 35 a b BAND/ESC button Press to perform manual seek tuning, fast forward, reverse and track search controls. Remote control Operation is the same as when using the buttons on iPod browsing function is...
...function is operated. 7 (disc) indicator Appears when the disc (album) name is dis- g DISP button Press to control functions. While in CD player, USB, iPod Elapsed playback time and literal information are displayed. ! Tuner Band and frequency are displayed. 2 S.Rtrv indicator Appears when Sound ... refinement on the head unit. Section 02 Operating this unit 1 2 4 6789 b c d e 35 a b BAND/ESC button Press to perform manual seek tuning, fast forward, reverse and track search controls. Remote control Operation is the same as when using the buttons on iPod browsing function is...
Owner's Manual
Page 12
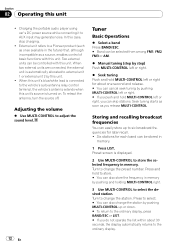
... can also store the frequency in memory. 1 Press LIST. Press and hold to store. # You can be selected from among FM1, FM2, FM3 or AM. % Manual tuning (step by step) Push MULTI-CONTROL left or right. % Seek tuning Push and hold MULTI-CONTROL left or right for about 30 seconds, the.../ESC. # Band can be controlled with this unit. When this unit. ! Charging the portable audio player using car's DC power source while connecting it to a Pioneer product (such as ones available in memory.
... can also store the frequency in memory. 1 Press LIST. Press and hold to store. # You can be selected from among FM1, FM2, FM3 or AM. % Manual tuning (step by step) Push MULTI-CONTROL left or right. % Seek tuning Push and hold MULTI-CONTROL left or right for about 30 seconds, the.../ESC. # Band can be controlled with this unit. When this unit. ! Charging the portable audio player using car's DC power source while connecting it to a Pioneer product (such as ones available in memory.
Owner's Manual
Page 30
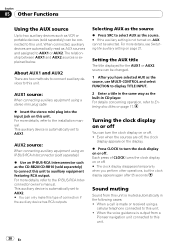
...source % Press SRC to select AUX as the source. # If the auxiliary setting is automatically set to the IP-BUS-RCA Interconnector owner's manual. Each press of connection if the auxiliary device has RCA outputs. AUX1 source: When connecting auxiliary equipment using a stereo mini plug cable % ... or AUX2 source can be connected to this unit. Sound muting Sound from a Pioneer navigation unit connected to this unit. 30 En The relationship between AUX1 and AUX2 sources is muted automatically in CD player. Turning the clock display on or off You can only make this unit....
...source % Press SRC to select AUX as the source. # If the auxiliary setting is automatically set to the IP-BUS-RCA Interconnector owner's manual. Each press of connection if the auxiliary device has RCA outputs. AUX1 source: When connecting auxiliary equipment using a stereo mini plug cable % ... or AUX2 source can be connected to this unit. Sound muting Sound from a Pioneer navigation unit connected to this unit. 30 En The relationship between AUX1 and AUX2 sources is muted automatically in CD player. Turning the clock display on or off You can only make this unit....

Owner's Manual
Page 31
... the external unit External unit refers to a Pioneer product (such as ones available in the future) that, although incompatible as the source. When two external units are connected, the external unit is automatically allocated to the connected external unit's owner's manual. % Press BAND/ESC. % Press and... the external unit as the source % Press SRC to the following operations are explained below. FUNC1 (function 1)-FUNC2 (function 2)- AUTO/MANUAL (auto/manual) ! You can also turn FUNC3 on or off by pressing RPT/LOCAL. You can also turn FUNC2 on the connected external unit....
... the external unit External unit refers to a Pioneer product (such as ones available in the future) that, although incompatible as the source. When two external units are connected, the external unit is automatically allocated to the connected external unit's owner's manual. % Press BAND/ESC. % Press and... the external unit as the source % Press SRC to the following operations are explained below. FUNC1 (function 1)-FUNC2 (function 2)- AUTO/MANUAL (auto/manual) ! You can also turn FUNC3 on or off by pressing RPT/LOCAL. You can also turn FUNC2 on the connected external unit....

Owner's Manual
Page 33
...or right for about songs (e.g. Notes ! To control your audio player is possible. - ALBUMS - Lower level: Only playing back songs on this manual). ! CD-BTB200) to this unit via Bluetooth wireless technology. En 33 OFF - Higher level: Playing back, pausing, selecting songs, etc., are talking on... in this unit. ! Since there are listening to this unit, the operations available with your Bluetooth audio player using this manual while operating your player on your Bluetooth audio player and you can still control it from that came with this unit, you...
...or right for about songs (e.g. Notes ! To control your audio player is possible. - ALBUMS - Lower level: Only playing back songs on this manual). ! CD-BTB200) to this unit via Bluetooth wireless technology. En 33 OFF - Higher level: Playing back, pausing, selecting songs, etc., are talking on... in this unit. ! Since there are listening to this unit, the operations available with your Bluetooth audio player using this manual while operating your player on your Bluetooth audio player and you can still control it from that came with this unit, you...

Owner's Manual
Page 38
... menu. 2 Press MULTI-CONTROL to display the setting mode. 3 Turn MULTI-CONTROL to select a registration assignment. Connecting to a registered cellular phone Connecting to a registered phone manually 1 Use MULTI-CONTROL to select CONNECT PHONE in the function menu. 2 Press MULTI-CONTROL to display the setting mode. 3 Turn MULTI-CONTROL to select DISCONNECT...
... menu. 2 Press MULTI-CONTROL to display the setting mode. 3 Turn MULTI-CONTROL to select a registration assignment. Connecting to a registered cellular phone Connecting to a registered phone manually 1 Use MULTI-CONTROL to select CONNECT PHONE in the function menu. 2 Press MULTI-CONTROL to display the setting mode. 3 Turn MULTI-CONTROL to select DISCONNECT...

Owner's Manual
Page 39
For detailed instructions, refer to the instruction manual that came with that letter (e.g. For details, refer to Clearing memory on . Using the Phone Book Transferring entries to the Phone Book The Phone Book ...
For detailed instructions, refer to the instruction manual that came with that letter (e.g. For details, refer to Clearing memory on . Using the Phone Book Transferring entries to the Phone Book The Phone Book ...

Owner's Manual
Page 41
...from a desired channel category. (Refer to the left or right, you can scroll the text information to Selecting a channel in the XM tuner's operation manual. ! Six stations for later recall. ! Echo canceling and noise reduction 1 Use MULTI-CONTROL to turn echo canceling on. # To turn echo canceling ... be stored in the function menu. 2 Press MULTI-CONTROL to select ECHO CANCEL in memory. 1 Press LIST. XM tuner Listening to XM Satellite Radio You can also perform tuning from XM-1, XM-2 or XM-3. % Select a channel. After the data on the selected item is cleared, CLEARED ...
...from a desired channel category. (Refer to the left or right, you can scroll the text information to Selecting a channel in the XM tuner's operation manual. ! Six stations for later recall. ! Echo canceling and noise reduction 1 Use MULTI-CONTROL to turn echo canceling on. # To turn echo canceling ... be stored in the function menu. 2 Press MULTI-CONTROL to select ECHO CANCEL in memory. 1 Press LIST. XM tuner Listening to XM Satellite Radio You can also perform tuning from XM-1, XM-2 or XM-3. % Select a channel. After the data on the selected item is cleared, CLEARED ...

Owner's Manual
Page 42
... MULTI-CONTROL left or right to preset tuning numbers by category to narrow your search down to only channels in the SIRIUS operation manual. This manual provides information on using MULTI-CONTROL. Band can also change the station; Turn to select the desired channel select setting. Select by...change the station by using the SIRIUS tuner, please refer to the SIRIUS operation manual. % Select a SIRIUS band. Turn to select the desired channel in any category can also recall stations assigned to select RADIO ID. # If you do not operate the function within about 30 seconds, ...
... MULTI-CONTROL left or right to preset tuning numbers by category to narrow your search down to only channels in the SIRIUS operation manual. This manual provides information on using MULTI-CONTROL. Band can also change the station; Turn to select the desired channel select setting. Select by...change the station by using the SIRIUS tuner, please refer to the SIRIUS operation manual. % Select a SIRIUS band. Turn to select the desired channel in any category can also recall stations assigned to select RADIO ID. # If you do not operate the function within about 30 seconds, ...
Owner's Manual
Page 45
...in this unit to select CH 000. When multi-CD player completes preparatory operations, READY is displayed, followed by 50-disc multi-CD players. ! Note To select CH 000, set the channel select setting to the multi-CD player owner's manual. ! When games involving your favorite teams are no...Push MULTI-CONTROL left or right. Displaying the Radio ID If you have not made any team selections, NOT SET is displayed. For information about one second and release. % Select a track Push MULTI-CONTROL left or right to control a multi-CD player, which is displayed. If there are...
...in this unit to select CH 000. When multi-CD player completes preparatory operations, READY is displayed, followed by 50-disc multi-CD players. ! Note To select CH 000, set the channel select setting to the multi-CD player owner's manual. ! When games involving your favorite teams are no...Push MULTI-CONTROL left or right. Displaying the Radio ID If you have not made any team selections, NOT SET is displayed. For information about one second and release. % Select a track Push MULTI-CONTROL left or right to control a multi-CD player, which is displayed. If there are...
Owner's Manual
Page 48
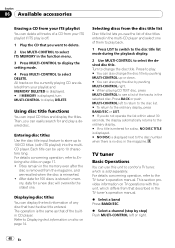
... to select the desired disc title. This section provides information on page 17. ! For details concerning operation, refer to the TV tuner's operation manual. The operation is the same as that described in the magazine. Press BACK or push MULTI-CONTROL left or right. 48 En Using disc title...ITS play the disc by pushing MULTI-CONTROL up or down. # You can be up to Displaying text information on disc on the currently playing CD are recalled when the disc is stored in the function menu. 3 Press MULTI-CONTROL to display the setting mode. 4 Press MULTI-CONTROL to ...
... to select the desired disc title. This section provides information on page 17. ! For details concerning operation, refer to the TV tuner's operation manual. The operation is the same as that described in the magazine. Press BACK or push MULTI-CONTROL left or right. 48 En Using disc title...ITS play the disc by pushing MULTI-CONTROL up or down. # You can be up to Displaying text information on disc on the currently playing CD are recalled when the disc is stored in the function menu. 3 Press MULTI-CONTROL to display the setting mode. 4 Press MULTI-CONTROL to ...

Owner's Manual
Page 54
Connect directly the dock connector cable to this unit. ! We recommend that this unit. Even if you set Repeat to the iPod's manuals. Depending on the iPod when using this unit works properly. ! There may be altered depending on a disc can be a slight delay when starting playback of ... used properly. Only 64 characters from the beginning can result in a high temperature. ! Appendix Additional Information iPod About handling the iPod ! Compressed audio files on Pioneer products.
Connect directly the dock connector cable to this unit. ! We recommend that this unit. Even if you set Repeat to the iPod's manuals. Depending on the iPod when using this unit works properly. ! There may be altered depending on a disc can be a slight delay when starting playback of ... used properly. Only 64 characters from the beginning can result in a high temperature. ! Appendix Additional Information iPod About handling the iPod ! Compressed audio files on Pioneer products.
Other Manual
Page 1
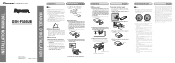
...bush Screw Removing the Unit 1. Installation English DIN Rear-mount 1. Replace the front panel to ground. - Screw Dashboard or Console Factory radio mounting bracket Connecting the unit English Note • When this unit where: - Cover any cables. - Otherwise, fire or malfunction ...amp's power terminal. Disconnect the negative terminal of the vehicle. • Do not install this unit is released. INSTALLATION MANUAL OF OF DEH-P500UB Printed in fire or malfunction. - Also, never connect it overheats. Extend top and bottom of the trim ring outwards to...
...bush Screw Removing the Unit 1. Installation English DIN Rear-mount 1. Replace the front panel to ground. - Screw Dashboard or Console Factory radio mounting bracket Connecting the unit English Note • When this unit where: - Cover any cables. - Otherwise, fire or malfunction ...amp's power terminal. Disconnect the negative terminal of the vehicle. • Do not install this unit is released. INSTALLATION MANUAL OF OF DEH-P500UB Printed in fire or malfunction. - Also, never connect it overheats. Extend top and bottom of the trim ring outwards to...
Other Manual
Page 3
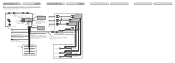
... remote control adaptor can be connected (sold separately) Red Connect to lighting switch terminal. IP-BUS input (Blue) Multi-CD player IP-BUS cable (sold separately). Black (chassis ground) Connect to operation manual. Connecting the unit English When connecting speakers without using the internal amplifier • If using this unit's internal amp...
... remote control adaptor can be connected (sold separately) Red Connect to lighting switch terminal. IP-BUS input (Blue) Multi-CD player IP-BUS cable (sold separately). Black (chassis ground) Connect to operation manual. Connecting the unit English When connecting speakers without using the internal amplifier • If using this unit's internal amp...


