
Owner's Manual
Page 3
... FCC Rules and Industry Canada licence-exempt RSS standard(s). Sound can be co-located or operated in a residential installation. Before you start Section 01 Before you start FCC ID: AJDK047 MODEL NO.: DEH-80PRS IC: 775E-K047 This device complies with Part 15 of the FCC Rules. This transmitter must accept any other...
... FCC Rules and Industry Canada licence-exempt RSS standard(s). Sound can be co-located or operated in a residential installation. Before you start Section 01 Before you start FCC ID: AJDK047 MODEL NO.: DEH-80PRS IC: 775E-K047 This device complies with Part 15 of the FCC Rules. This transmitter must accept any other...
Owner's Manual
Page 5
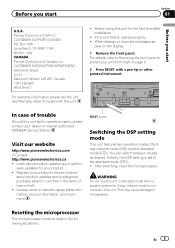
...button Switching the DSP setting mode This unit features two operation modes: the 3way network mode (NW) and the standard mode (STD). Pioneer Electronics (USA) Inc. If the unit fails to the speakers. Visit our website http://www.pioneerelectronics.com in the following situations: En... panel. Resetting the microprocessor The microprocessor must be reset in Canada http://www.pioneerelectronics.ca ! ware updates) for the first time after installation ! Initially, the DSP setting is connected to safeguard purchase details in our files in standard mode when a speaker system for 3-way...
...button Switching the DSP setting mode This unit features two operation modes: the 3way network mode (NW) and the standard mode (STD). Pioneer Electronics (USA) Inc. If the unit fails to the speakers. Visit our website http://www.pioneerelectronics.com in the following situations: En... panel. Resetting the microprocessor The microprocessor must be reset in Canada http://www.pioneerelectronics.ca ! ware updates) for the first time after installation ! Initially, the DSP setting is connected to safeguard purchase details in our files in standard mode when a speaker system for 3-way...

Owner's Manual
Page 6
... (USB, SD)". Note This unit's audio settings will be referred to the unit. For more details on how to connect the unit, refer to the installation manual. % Use a thin, flathead screwdriver to AUDIO reset (audio reset) on the bottom of this unit. ! In this manual ! Section 01 Before you start . H (High...
... (USB, SD)". Note This unit's audio settings will be referred to the unit. For more details on how to connect the unit, refer to the installation manual. % Use a thin, flathead screwdriver to AUDIO reset (audio reset) on the bottom of this unit. ! In this manual ! Section 01 Before you start . H (High...
Owner's Manual
Page 8
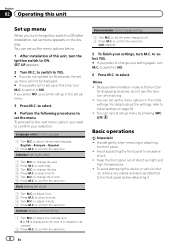
...minute. 3 Turn M.C. to confirm the selection. You can cancel set up the menu options in the set up the menu options below. 1 After installation of direct sunlight and high temperatures. ! Avoid subjecting the front panel to the front panel before detaching it. ior, remove any cables and devices ...attached to excessive shock. ! Section 02 Operating this unit Set up menu When you turn the ignition switch to ON after installation, set up at stores, do not operate for displaying at this time, turn M.C. SET UP appears. 2 Turn M.C. to switch to YES. #...
...minute. 3 Turn M.C. to confirm the selection. You can cancel set up the menu options in the set up the menu options below. 1 After installation of direct sunlight and high temperatures. ! Avoid subjecting the front panel to the front panel before detaching it. ior, remove any cables and devices ...attached to excessive shock. ! Section 02 Operating this unit Set up menu When you turn the ignition switch to ON after installation, set up at stores, do not operate for displaying at this time, turn M.C. SET UP appears. 2 Turn M.C. to switch to YES. #...
Owner's Manual
Page 9
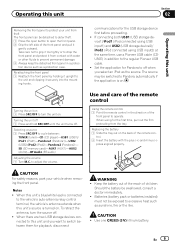
... turn the unit on the back of children. Turning the unit on 1 Press SRC/OFF to the regular Pioneer USB cable. ! Turning the unit off 1 Press and hold SRC/OFF until the unit turns off . ... on . Should the battery be exposed to operate. When using USB input2) at the same time, use a Pioneer USB cable (CDU50E) in addition to turn the source off . CAUTION For safety reasons, park your unit from the...unit's source is turned on . Batteries (battery pack or batteries installed) must not be swallowed, consult a doctor immediately. ! CAUTION ! Use one CR2025 (3 V) lithium battery.
... turn the unit on the back of children. Turning the unit on 1 Press SRC/OFF to the regular Pioneer USB cable. ! Turning the unit off 1 Press and hold SRC/OFF until the unit turns off . ... on . Should the battery be exposed to operate. When using USB input2) at the same time, use a Pioneer USB cable (CDU50E) in addition to turn the source off . CAUTION For safety reasons, park your unit from the...unit's source is turned on . Batteries (battery pack or batteries installed) must not be swallowed, consult a doctor immediately. ! CAUTION ! Use one CR2025 (3 V) lithium battery.
Owner's Manual
Page 10
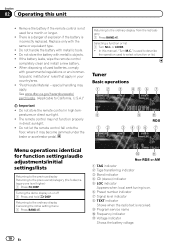
.../ . Tuner Basic operations 1 2 3 45 6 7 8 12 9 b RDS 3 45 6 7 Menu operations identical for a month or longer. ! If the battery leaks, wipe the remote control completely clean and install a new battery. ! Do not store the remote control in your country/area. ! is not used for function settings/audio adjustments/initial settings/lists Returning to...
.../ . Tuner Basic operations 1 2 3 45 6 7 8 12 9 b RDS 3 45 6 7 Menu operations identical for a month or longer. ! If the battery leaks, wipe the remote control completely clean and install a new battery. ! Do not store the remote control in your country/area. ! is not used for function settings/audio adjustments/initial settings/lists Returning to...
Owner's Manual
Page 18
...products to access the Pandora service is available at the same time. Pandora Internet radio is not available when accessing the service through the Pioneer car audio/video products, including, but not limited to, creating new stations, deleting stations, emailing current stations, buying tracks from the... are the same as those for the track currently playing and to skip to the Pandora music service by connecting your iPod which was installed the Pandora application. changes to the next track. Two iPods can play the Pandora by Pandora; Basic operations 12 2 QuickMix indicator 3...
...products to access the Pandora service is available at the same time. Pandora Internet radio is not available when accessing the service through the Pioneer car audio/video products, including, but not limited to, creating new stations, deleting stations, emailing current stations, buying tracks from the... are the same as those for the track currently playing and to skip to the Pandora music service by connecting your iPod which was installed the Pandora application. changes to the next track. Two iPods can play the Pandora by Pandora; Basic operations 12 2 QuickMix indicator 3...
Owner's Manual
Page 24
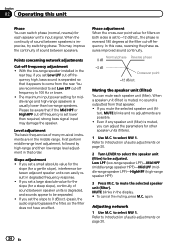
... sound is usually lower than required, strong bass signal input may improve the continuity of many musical instruments are possible. ! With the low-range speaker installed in the rear tray, if you set Low LPF cut -off frequency is set to come from that if the Mid HPF or HighHPF cut...
... sound is usually lower than required, strong bass signal input may improve the continuity of many musical instruments are possible. ! With the low-range speaker installed in the rear tray, if you set Low LPF cut -off frequency is set to come from that if the Mid HPF or HighHPF cut...

Owner's Manual
Page 37
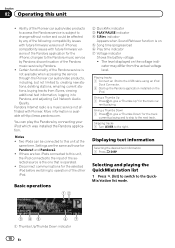
... display the main menu. 2 Turn M.C. If this unit. to AUX1 (front AUX input setting)/AUX2 (rear RCA input setting) on the application used to the installation manual. Background visual-genre-background picture 1-background picture 2-background picture 3-background picture 4-spectrum analyzer1-spectrum analyzer2-level indicator-level meter-simple display-movie screen -calendar...
... display the main menu. 2 Turn M.C. If this unit. to AUX1 (front AUX input setting)/AUX2 (rear RCA input setting) on the application used to the installation manual. Background visual-genre-background picture 1-background picture 2-background picture 3-background picture 4-spectrum analyzer1-spectrum analyzer2-level indicator-level meter-simple display-movie screen -calendar...

Owner's Manual
Page 43
... play music from the center. Please check your sage displayed in the Pandora application on or apply chemicals to the surface of the Pandora application installed. No Available Station No station found. Select a station. ERR:Front The microphone ! Front-Lch, the measuring nected correctly. Cancel muting ERR:Rear-Lch, the front...
... play music from the center. Please check your sage displayed in the Pandora application on or apply chemicals to the surface of the Pandora application installed. No Available Station No station found. Select a station. ERR:Front The microphone ! Front-Lch, the measuring nected correctly. Cancel muting ERR:Rear-Lch, the front...
Installation Manual
Page 2
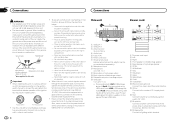
... to the power terminal of this unit in a vehicle without an ACC (accessory) position on , control signals are sent through the hole to the regular Pioneer USB cable. Never connect the blue/white cable to protect the wiring. - Power cord L 2 4 6 F/M 7 5 a R/H b 1 R 3 8 9 c d e f... input 7 Wired remote input Hard-wired remote control adaptor can be sure to the system remote control of the battery before installation. - Cover any cables. - Never wire the negative speaker cable directly to the constant 12 V supply terminal. Never band...
... to the power terminal of this unit in a vehicle without an ACC (accessory) position on , control signals are sent through the hole to the regular Pioneer USB cable. Never connect the blue/white cable to protect the wiring. - Power cord L 2 4 6 F/M 7 5 a R/H b 1 R 3 8 9 c d e f... input 7 Wired remote input Hard-wired remote control adaptor can be sure to the system remote control of the battery before installation. - Cover any cables. - Never wire the negative speaker cable directly to the constant 12 V supply terminal. Never band...
Installation Manual
Page 4
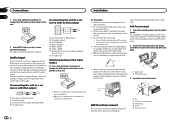
...inputting from the speaker output of a connected device ! If inputting from the RCA output of a connected device Important ! Do not install this unit. Change settings as necessary based on the bottom of this unit, make sure you can be damaged if it may interfere ...with the vehicle. 2 Secure the mounting sleeve by using a screwdriver to ensure proper heat dispersal when using either front-mount or rear-mount installation. 1 Nut 2 Firewall or metal support 3 Metal strap 4 Screw 5 Screw (M4 × 8) 4 En If connecting the unit to a car stereo with no RCA ...
...inputting from the speaker output of a connected device ! If inputting from the RCA output of a connected device Important ! Do not install this unit. Change settings as necessary based on the bottom of this unit, make sure you can be damaged if it may interfere ...with the vehicle. 2 Secure the mounting sleeve by using a screwdriver to ensure proper heat dispersal when using either front-mount or rear-mount installation. 1 Nut 2 Firewall or metal support 3 Metal strap 4 Screw 5 Screw (M4 × 8) 4 En If connecting the unit to a car stereo with no RCA ...

Installation Manual
Page 5
An unstable installation may cause skipping or other malfunctions. Use either truss (5 mm × 8 mm) or flush sur- For details, refer to protect your unit from theft. DIN ... holders. 1 Attach the holders to both sides of the dashboard. 2 Tighten two screws on each side. 1 3 2 1 Screw 2 Mounting bracket 3 Dashboard or console ! Installation Installation # Make sure that the unit is installed securely in place. Fastening the front panel If you . Press the detach button and push the front panel upward and pull it...
An unstable installation may cause skipping or other malfunctions. Use either truss (5 mm × 8 mm) or flush sur- For details, refer to protect your unit from theft. DIN ... holders. 1 Attach the holders to both sides of the dashboard. 2 Tighten two screws on each side. 1 3 2 1 Screw 2 Mounting bracket 3 Dashboard or console ! Installation Installation # Make sure that the unit is installed securely in place. Fastening the front panel If you . Press the detach button and push the front panel upward and pull it...

Installation Manual
Page 6
... using microphone clip. In this case, detach the microphone base from the microphone clip, slide the microphone base. 2 Install the microphone clip on the steering column. 1 2 3 1 Double-sided tape 2 Install the microphone clip on the sun visor. With the sun visor up the voice of the steering column. 3 Clamp Adjusting the microphone...
... using microphone clip. In this case, detach the microphone base from the microphone clip, slide the microphone base. 2 Install the microphone clip on the steering column. 1 2 3 1 Double-sided tape 2 Install the microphone clip on the sun visor. With the sun visor up the voice of the steering column. 3 Clamp Adjusting the microphone...


