
Owner's Manual
Page 3
...most out of Your Ears is desirable that it at a safe level BEFORE your hearing. Guard against harmful interference in a particular installation. But it deemed to comply without appropriate authorization may not cause interference, and (2) this device must not be co-located or ...setting your equipment at a safe level-a level that interference will not occur in a residential installation. Before you start Section 01 Before you start FCC ID: AJDK047 MODEL NO.: DEH-80PRS IC: 775E-K047 This device complies with any interference, including interference that it is in ...
...most out of Your Ears is desirable that it at a safe level BEFORE your hearing. Guard against harmful interference in a particular installation. But it deemed to comply without appropriate authorization may not cause interference, and (2) this device must not be co-located or ...setting your equipment at a safe level-a level that interference will not occur in a residential installation. Before you start Section 01 Before you start FCC ID: AJDK047 MODEL NO.: DEH-80PRS IC: 775E-K047 This device complies with any interference, including interference that it is in ...
Owner's Manual
Page 5
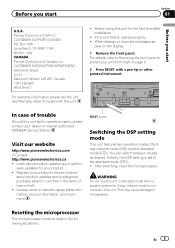
..., reset the microprocessor. This may cause damage to the standard mode (STD). ! Box 1760 Long Beach, CA 90801-1760 800-421-1404 CANADA Pioneer Electronics of loss or theft. ! Visit our website http://www.pioneerelectronics.com in the following situations: En 5 RESET button Switching the DSP setting mode...the speakers. If the unit fails to safeguard purchase details in our files in standard mode when a speaker system for the first time after installation ! For details, refer to Removing the front panel to protect your unit from theft on the display 1 Remove the front panel. In case...
..., reset the microprocessor. This may cause damage to the standard mode (STD). ! Box 1760 Long Beach, CA 90801-1760 800-421-1404 CANADA Pioneer Electronics of loss or theft. ! Visit our website http://www.pioneerelectronics.com in the following situations: En 5 RESET button Switching the DSP setting mode...the speakers. If the unit fails to safeguard purchase details in our files in standard mode when a speaker system for the first time after installation ! For details, refer to Removing the front panel to protect your unit from theft on the display 1 Remove the front panel. In case...

Owner's Manual
Page 6
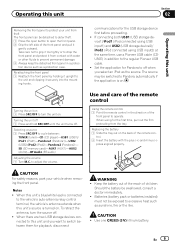
... starts automatically if you want to reset the audio settings, refer to one with ignition switch on how to connect the unit, refer to the installation manual. % Use a thin, flathead screwdriver to the unit. Select Demonstration (demo display setting) and turn off . About this unit to a terminal coupled with no RCA...
... starts automatically if you want to reset the audio settings, refer to one with ignition switch on how to connect the unit, refer to the installation manual. % Use a thin, flathead screwdriver to the unit. Select Demonstration (demo display setting) and turn off . About this unit to a terminal coupled with no RCA...
Owner's Manual
Page 8
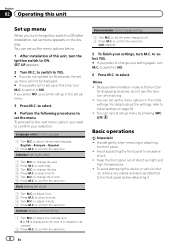
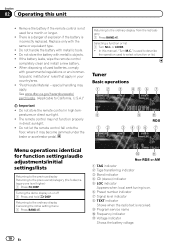
You can set up the menu options below. 1 After installation of direct sunlight and high temperatures. ! Calendar (setting the date) 1 Turn M.C. to confirm the selection. 8 En Demonstration (demo display setting) 1 Turn M.C. Clock (setting the clock) 1 ... menu appears on page 35. ! Keep the front panel out of this unit Set up menu When you turn the ignition switch to ON after installation, set up at stores, do not use this time, turn M.C. Section 02 Operating this unit, turn the ignition switch to ON. to switch to YES...
You can set up the menu options below. 1 After installation of direct sunlight and high temperatures. ! Calendar (setting the date) 1 Turn M.C. to confirm the selection. 8 En Demonstration (demo display setting) 1 Turn M.C. Clock (setting the clock) 1 ... menu appears on page 35. ! Keep the front panel out of this unit Set up menu When you turn the ignition switch to ON after installation, set up at stores, do not use this time, turn M.C. Section 02 Operating this unit, turn the ignition switch to ON. to switch to YES...
Owner's Manual
Page 9
... of the front panel to Pandora automatically if the application is turned on . When there are two USB storage devices connected to the regular Pioneer USB cable. ! If connecting both USB1 (USB storage device1)/iPod1 (iPod connected using USB input1) and USB2 (USB storage device2)/ iPod2 ...fluids to turn the source off . When using USB input2) at the same time, use a Pioneer USB cable (CDU50E) in the direction of the remote con- Batteries (battery pack or batteries installed) must not be switched to operate. communications for the first time, pull out the film protruding...
... of the front panel to Pandora automatically if the application is turned on . When there are two USB storage devices connected to the regular Pioneer USB cable. ! If connecting both USB1 (USB storage device1)/iPod1 (iPod connected using USB input1) and USB2 (USB storage device2)/ iPod2 ...fluids to turn the source off . When using USB input2) at the same time, use a Pioneer USB cable (CDU50E) in the direction of the remote con- Batteries (battery pack or batteries installed) must not be switched to operate. communications for the first time, pull out the film protruding...
Owner's Manual
Page 10
Replace only with metallic tools. ! If the battery leaks, wipe the remote control completely clean and install a new battery. ! special handling may not function properly in direct sunlight. ! Returning to the ordinary display Canceling the initial setting menu 1 Press BAND/ . is on ...
Replace only with metallic tools. ! If the battery leaks, wipe the remote control completely clean and install a new battery. ! special handling may not function properly in direct sunlight. ! Returning to the ordinary display Canceling the initial setting menu 1 Press BAND/ . is on ...
Owner's Manual
Page 18
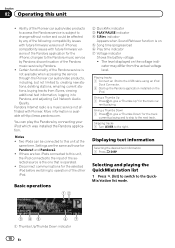
... playing the QuickMix/station list 1 Press (list) to switch to the USB cable using an iPod Dock Connector. 2 Start up the Pandora application installed on the iPod. Certain functionality of iPhones; Playing tracks 1 Connect an iPod to the QuickMix/station list mode. 3 45 67 1 Thumbs Up/...1 Turn LEVER to the Pandora music service by connecting your iPod which was installed the Pandora application. Ability of the selected source is the one that is not available when accessing the service through the Pioneer car audio/video products, including, but not limited to Pandora, and adjusting ...
... playing the QuickMix/station list 1 Press (list) to switch to the USB cable using an iPod Dock Connector. 2 Start up the Pandora application installed on the iPod. Certain functionality of iPhones; Playing tracks 1 Connect an iPod to the QuickMix/station list mode. 3 45 67 1 Thumbs Up/...1 Turn LEVER to the Pandora music service by connecting your iPod which was installed the Pandora application. Ability of the selected source is the one that is not available when accessing the service through the Pioneer car audio/video products, including, but not limited to Pandora, and adjusting ...
Owner's Manual
Page 24
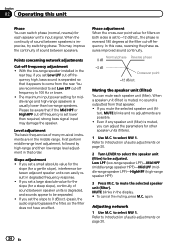
With the low-range speaker installed in the rear tray, if you set a small absolute value for the slope (for other speaker units (filters). 1 Use M.C. In this unit Phase You can ...
With the low-range speaker installed in the rear tray, if you set a small absolute value for the slope (for other speaker units (filters). 1 Use M.C. In this unit Phase You can ...

Owner's Manual
Page 37
... auxiliary device using the rear RCA input. ! to change the display. to select ENTERTAINMENT. 3 Turn M.C. For more details, refer to this unit. Refer to the installation manual. Never turn the unit off 1 Press M.C. Other functions Using AUX1 and AUX2 source About AUX1 and AUX2 There are two methods to connect auxiliary...
... auxiliary device using the rear RCA input. ! to change the display. to select ENTERTAINMENT. 3 Turn M.C. For more details, refer to this unit. Refer to the installation manual. Never turn the unit off 1 Press M.C. Other functions Using AUX1 and AUX2 source About AUX1 and AUX2 There are two methods to connect auxiliary...

Owner's Manual
Page 43
...:Rear-Lch, the front speaker ERR:Rear-Rch, units. Handling guidelines Discs and player Use only discs that has a compatible version of the Pandora application installed. Use 12-cm discs. Additional information Appendix Additional information Message Cause Action Try again later Unable to save BookMark. Connect an iPod/ iPhone that feature...
...:Rear-Lch, the front speaker ERR:Rear-Rch, units. Handling guidelines Discs and player Use only discs that has a compatible version of the Pandora application installed. Use 12-cm discs. Additional information Appendix Additional information Message Cause Action Try again later Unable to save BookMark. Connect an iPod/ iPhone that feature...
Installation Manual
Page 2
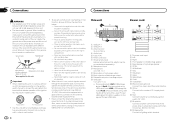
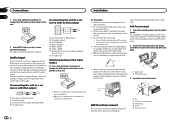
...4 56 78 a b 2 1 d c 1 USB port 1 2 USB port 2 3 Antenna input 15 cm (5-7/8 in .) ! Section 01 Connections Connections T WARNING ! When installing this unit or power amp (sold separately). 8 Microphone input 9 Microphone 4 m (13 ft. 1 in.) a Rear output or high range output b Front output or middle range ...12-volt battery and negative grounding only. Do not use a Pioneer USB cable (CD-U50E) in the car) Important ! Cover any cables. - Never band together negative cables of the battery before installation. - Connect this unit. ! Ensure that the ground wire is...
...4 56 78 a b 2 1 d c 1 USB port 1 2 USB port 2 3 Antenna input 15 cm (5-7/8 in .) ! Section 01 Connections Connections T WARNING ! When installing this unit or power amp (sold separately). 8 Microphone input 9 Microphone 4 m (13 ft. 1 in.) a Rear output or high range output b Front output or middle range ...12-volt battery and negative grounding only. Do not use a Pioneer USB cable (CD-U50E) in the car) Important ! Cover any cables. - Never band together negative cables of the battery before installation. - Connect this unit. ! Ensure that the ground wire is...
Installation Manual
Page 4
... 1 1 Car stereo with RCA output 2 To audio output 3 Connect with the vehicle. 2 Secure the mounting sleeve by using either front-mount or rear-mount installation. 1 Nut 2 Firewall or metal support 3 Metal strap 4 Screw 5 Screw (M4 × 8) 4 En If inputting from the RCA output of a connected ...device ! Check all connections and systems before final installation. ! it up so that came with RCA cable (sold separately) 4 To audio input ! Optimum performance is obtained when the unit is enough ...
... 1 1 Car stereo with RCA output 2 To audio output 3 Connect with the vehicle. 2 Secure the mounting sleeve by using either front-mount or rear-mount installation. 1 Nut 2 Firewall or metal support 3 Metal strap 4 Screw 5 Screw (M4 × 8) 4 En If inputting from the RCA output of a connected ...device ! Check all connections and systems before final installation. ! it up so that came with RCA cable (sold separately) 4 To audio input ! Optimum performance is obtained when the unit is enough ...

Installation Manual
Page 5
..., point the side with supplied screws and holders. 1 Attach the holders to operation manual. Use either truss (5 mm × 8 mm) or flush sur- Installation Installation # Make sure that the unit is installed securely in place. Releasing the front panel allows easier access to protect your unit from theft. An unstable... installation may cause skipping or other malfunctions. For details, refer to both sides of the unit until they click into upright positions. 4 Fix the ...
..., point the side with supplied screws and holders. 1 Attach the holders to operation manual. Use either truss (5 mm × 8 mm) or flush sur- Installation Installation # Make sure that the unit is installed securely in place. Releasing the front panel allows easier access to protect your unit from theft. An unstable... installation may cause skipping or other malfunctions. For details, refer to both sides of the unit until they click into upright positions. 4 Fix the ...

Installation Manual
Page 6
...voice recognition rate.) 3 4 1 Microphone 2 Microphone base 3 Microphone clip 4 Fit the microphone lead into the groove. # Microphone can be installed without using microphone clip. With the sun visor up the voice of the steering column. 3 Clamp Adjusting the microphone angle The microphone angle ... the microphone base from the microphone clip, slide the microphone base. 2 Install the microphone clip on the steering column. 1 2 3 1 Double-sided tape 2 Install the microphone clip on the sun visor. Note Install the microphone in such a way that will enable it will not obstruct driving...
...voice recognition rate.) 3 4 1 Microphone 2 Microphone base 3 Microphone clip 4 Fit the microphone lead into the groove. # Microphone can be installed without using microphone clip. With the sun visor up the voice of the steering column. 3 Clamp Adjusting the microphone angle The microphone angle ... the microphone base from the microphone clip, slide the microphone base. 2 Install the microphone clip on the steering column. 1 2 3 1 Double-sided tape 2 Install the microphone clip on the sun visor. Note Install the microphone in such a way that will enable it will not obstruct driving...


