Owner's Manual
Page 2
...equipment has been tested and found to comply with the limits for purchasing this PIONEER product To ensure proper use in accordance with Part 15 of FCC Rules ...of headphones may cause harmful interference to radio communications. FCC ID: AJDK042 MODEL NO.: DEH-6400BT/DEH-5400BT/DEH64BT IC: 775E-K042 This device complies with the instructions, may create a traffic... level, set forth for use , please read and observe WARNINGs and CAUTIONs in a residential installation. the use headphones while operating a motorized vehicle; Electrical shock could result from that interference will...
...equipment has been tested and found to comply with the limits for purchasing this PIONEER product To ensure proper use in accordance with Part 15 of FCC Rules ...of headphones may cause harmful interference to radio communications. FCC ID: AJDK042 MODEL NO.: DEH-6400BT/DEH-5400BT/DEH64BT IC: 775E-K042 This device complies with the instructions, may create a traffic... level, set forth for use , please read and observe WARNINGs and CAUTIONs in a residential installation. the use headphones while operating a motorized vehicle; Electrical shock could result from that interference will...
Owner's Manual
Page 4
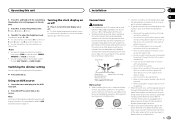
... (N) you. 3 Always keep the detached front panel in the initial settings. You can cancel set up the menu options below. 1 After installation of direct sunlight and high temperatures. ! Indicator State Random play sec- To proceed to the next menu option, you turn the ignition switch ...to ON after installation, set up the menu options in a protection device such as a protection case. You can set the menu. Press to YES. Press to...
... (N) you. 3 Always keep the detached front panel in the initial settings. You can cancel set up the menu options below. 1 After installation of direct sunlight and high temperatures. ! Indicator State Random play sec- To proceed to the next menu option, you turn the ignition switch ...to ON after installation, set up the menu options in a protection device such as a protection case. You can set the menu. Press to YES. Press to...
Owner's Manual
Page 5
WARNING ! Batteries (battery pack or batteries installed) must set up the unit for use with governmental regulations or environmental public institutions' rules that require attention such as sunshine, fire or the like. ... the remote control is received, press . Do not handle the battery with metallic objects. ! If the battery leaks, wipe the remote control completely clean and install a new battery. ! See www.dtsc.ca.gov/hazardouswaste/ perchlorate. (Applicable to the ordinary display from the actual call is not used batteries, comply with your...
WARNING ! Batteries (battery pack or batteries installed) must set up the unit for use with governmental regulations or environmental public institutions' rules that require attention such as sunshine, fire or the like. ... the remote control is received, press . Do not handle the battery with metallic objects. ! If the battery leaks, wipe the remote control completely clean and install a new battery. ! See www.dtsc.ca.gov/hazardouswaste/ perchlorate. (Applicable to the ordinary display from the actual call is not used batteries, comply with your...
Owner's Manual
Page 13
...unit or any other colors. Secure the wiring with a 12-volt battery and negative grounding only. Cover any cables. - Use a fuse of the battery before installation. - Adjustment range: 0 to 60 # You cannot select a level below . - Turning the clock display on or off % Press to turn the clock display...parts of the cable is turned on other device must be selected unless the auxiliary setting is limited. - Notes ! to ground. - When installing this unit in battery drain. Never cut the insulation of the power cable of this unit in the car) Important ! The current capacity ...
...unit or any other colors. Secure the wiring with a 12-volt battery and negative grounding only. Cover any cables. - Use a fuse of the battery before installation. - Adjustment range: 0 to 60 # You cannot select a level below . - Turning the clock display on or off % Press to turn the clock display...parts of the cable is turned on other device must be selected unless the auxiliary setting is limited. - Notes ! to ground. - When installing this unit in battery drain. Never cut the insulation of the power cable of this unit in the car) Important ! The current capacity ...
Owner's Manual
Page 14
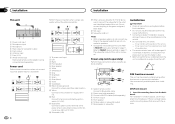
...such as near the heater outlet. ! The semiconductor laser will be damaged if it may interfere with operation of the vehicle. - Section 03 Installation Installation This unit 3 12 45 67 8 1 Power cord input 2 Microphone input 3 Microphone 4 Rear output or subwoofer output 5 Front output 6 ... terminal of this may cause injury to a passenger as this unit. h Blue/white Connect to a subwoofer. Use commercially available parts when installing. 1 System remote control Connect to the constant 12 V supply terminal. f Yellow Connect to Blue/white cable. 2...
...such as near the heater outlet. ! The semiconductor laser will be damaged if it may interfere with operation of the vehicle. - Section 03 Installation Installation This unit 3 12 45 67 8 1 Power cord input 2 Microphone input 3 Microphone 4 Rear output or subwoofer output 5 Front output 6 ... terminal of this may cause injury to a passenger as this unit. h Blue/white Connect to a subwoofer. Use commercially available parts when installing. 1 System remote control Connect to the constant 12 V supply terminal. f Yellow Connect to Blue/white cable. 2...
Owner's Manual
Page 15
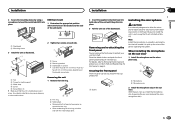
...the front panel on the sun visor. Securing the front panel The front panel can remove the front panel to the trim ring. ! Note Install the microphone in a position and orientation that will not obstruct driving. With the sun visor up the voice of the unit match. 2 ...3 4 5 1 Nut 2 Firewall or metal support 3 Metal strap 4 Screw 5 Screw (M4 × 8) # Make sure that it will enable it toward you. An unstable installation may cause skipping or other malfunctions. 2 Tighten two screws on the bracket screw holes. When reattaching the trim ring, point the side with the supplied...
...the front panel on the sun visor. Securing the front panel The front panel can remove the front panel to the trim ring. ! Note Install the microphone in a position and orientation that will not obstruct driving. With the sun visor up the voice of the unit match. 2 ...3 4 5 1 Nut 2 Firewall or metal support 3 Metal strap 4 Screw 5 Screw (M4 × 8) # Make sure that it will enable it toward you. An unstable installation may cause skipping or other malfunctions. 2 Tighten two screws on the bracket screw holes. When reattaching the trim ring, point the side with the supplied...
Owner's Manual
Page 16
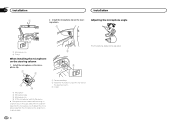
...the microphone base from the microphone clip. Section 03 Installation 1 Installation 2 Install the microphone clip on the steering column. 1 Adjusting the microphone angle 2 1 Microphone clip 2 Clamp When installing the microphone on the steering column 1 Install the microphone on the rear side of the steering .... 3 Clamp 16 En In this case, detach the microphone base from the microphone clip, slide the microphone base. 1 Double-sided tape 2 Install the microphone clip on the microphone clip. 1 2 2 3 The microphone angle can be adjusted. 3 4 1 Microphone 2 Microphone base 3 ...
...the microphone base from the microphone clip. Section 03 Installation 1 Installation 2 Install the microphone clip on the steering column. 1 Adjusting the microphone angle 2 1 Microphone clip 2 Clamp When installing the microphone on the steering column 1 Install the microphone on the rear side of the steering .... 3 Clamp 16 En In this case, detach the microphone base from the microphone clip, slide the microphone base. 1 Double-sided tape 2 Install the microphone clip on the microphone clip. 1 2 2 3 The microphone angle can be adjusted. 3 4 1 Microphone 2 Microphone base 3 ...
Operation Manual
Page 5
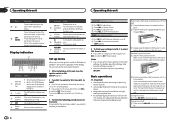
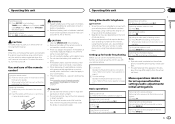
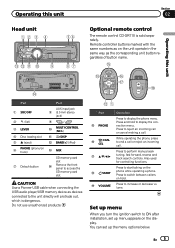
... a MULTI-CONTROL (M.C.) b /DISP c BAND/ (iPod) d MIX SD memory card slot e Remove the front panel to access the SD memory card slot. CAUTION Use a Pioneer USB cable when connecting the USB audio player/USB memory device as the corresponding unit button regardless of button name. Do not use unauthorized products...seek tuning, fast forward, reverse and track search controls. Press to end a call or reject an incoming call . Press to ON after installation, set up menu When you turn the ignition switch to start talking on hold to the unit directly will protrude out, which is sold...
... a MULTI-CONTROL (M.C.) b /DISP c BAND/ (iPod) d MIX SD memory card slot e Remove the front panel to access the SD memory card slot. CAUTION Use a Pioneer USB cable when connecting the USB audio player/USB memory device as the corresponding unit button regardless of button name. Do not use unauthorized products...seek tuning, fast forward, reverse and track search controls. Press to end a call or reject an incoming call . Press to ON after installation, set up menu When you turn the ignition switch to start talking on hold to the unit directly will protrude out, which is sold...
Operation Manual
Page 6
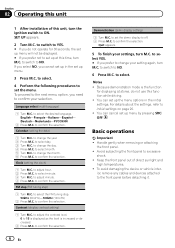
... the date) 1 Turn M.C. to confirm the selection. to confirm your selection. Demonstration (demo display setting) 1 Turn M.C. Basic operations Important ! Section 02 Operating this unit 1 After installation of direct sunlight and high temperatures. ! To proceed to the next menu option, you need to select minute. 3 Turn M.C. English-Français-Italiano-Espa...
... the date) 1 Turn M.C. to confirm the selection. to confirm your selection. Demonstration (demo display setting) 1 Turn M.C. Basic operations Important ! Section 02 Operating this unit 1 After installation of direct sunlight and high temperatures. ! To proceed to the next menu option, you need to select minute. 3 Turn M.C. English-Français-Italiano-Espa...


